Hardware Maintenance Manual
Page 1
ThinkCentre Hardware Maintenance Manual Machine Types: 3063, 3231, 3285, 3379, 4083, 4084, 4085, 4086, 4087, 4088, 4099, 4138 5897, 6137, 6138, 6209, 6234, 6239,6258, 6302, 6303, 7174, 7188, 7220, 7244, 7346, 7347, 7354, 7355, 7357, 7358, 7360, 7373, 7483, 7484, 7571, 7582, 7627, 7628, 7630, 7635, 7638, 7639, 8494, 8854, 8910, 9728, 9960, 9964, and 9965
ThinkCentre Hardware Maintenance Manual Machine Types: 3063, 3231, 3285, 3379, 4083, 4084, 4085, 4086, 4087, 4088, 4099, 4138 5897, 6137, 6138, 6209, 6234, 6239,6258, 6302, 6303, 7174, 7188, 7220, 7244, 7346, 7347, 7354, 7355, 7357, 7358, 7360, 7373, 7483, 7484, 7571, 7582, 7627, 7628, 7630, 7635, 7638, 7639, 8494, 8854, 8910, 9728, 9960, 9964, and 9965
Hardware Maintenance Manual
Page 3
ThinkCentre Hardware Maintenance Manual Machine Types: 3063, 3231, 3285, 3379, 4083, 4084, 4085, 4086, 4087, 4088, 4099, 4138 5897, 6137, 6138, 6209, 6234, 6239,6258, 6302, 6303, 7174, 7188, 7220, 7244, 7346, 7347, 7354, 7355, 7357, 7358, 7360, 7373, 7483, 7484, 7571, 7582, 7627, 7628, 7630, 7635, 7638, 7639, 8494, 8854, 8910, 9728, 9960, 9964, and 9965
ThinkCentre Hardware Maintenance Manual Machine Types: 3063, 3231, 3285, 3379, 4083, 4084, 4085, 4086, 4087, 4088, 4099, 4138 5897, 6137, 6138, 6209, 6234, 6239,6258, 6302, 6303, 7174, 7188, 7220, 7244, 7346, 7347, 7354, 7355, 7357, 7358, 7360, 7373, 7483, 7484, 7571, 7582, 7627, 7628, 7630, 7635, 7638, 7639, 8494, 8854, 8910, 9728, 9960, 9964, and 9965
Hardware Maintenance Manual
Page 5
...4088, 4099, 4138, 5897, 6137, 6234, 6258, 6303, 7174, 7220, 7346, 7354, 7357, 7360, 7483, 7582, 7627, 7630, 7638, 8910, and 9964. . . . . . 32 Chapter 4. Diagnostic programs . . . 37 Lenovo ThinkVantage Toolbox 37 Lenovo Solution Center 37 Lenovo System Toolbox 38 PC-Doctor for Rescue...from the diagnostic disc 39 Navigating through the diagnostic programs . 39 Running tests 39 Viewing the test log 41 © Copyright Lenovo 2008, 2012 Chapter 6. About this manual 1 Important safety information 1 Important information about replacing RoHS compliant FRUs 1 Chapter 2. Symptom...
...4088, 4099, 4138, 5897, 6137, 6234, 6258, 6303, 7174, 7220, 7346, 7354, 7357, 7360, 7483, 7582, 7627, 7630, 7638, 8910, and 9964. . . . . . 32 Chapter 4. Diagnostic programs . . . 37 Lenovo ThinkVantage Toolbox 37 Lenovo Solution Center 37 Lenovo System Toolbox 38 PC-Doctor for Rescue...from the diagnostic disc 39 Navigating through the diagnostic programs . 39 Running tests 39 Viewing the test log 41 © Copyright Lenovo 2008, 2012 Chapter 6. About this manual 1 Important safety information 1 Important information about replacing RoHS compliant FRUs 1 Chapter 2. Symptom...
Hardware Maintenance Manual
Page 6
...Vista Starter SP2 Recovery CD . . 358 Windows 7 Starter 32 Recovery CD . . . . 358 Overall: MT 3379, 4083, 4088, 4099, 4138, 5897, 6137, 6234, 6258, 6303, 7174, 7220, 7346, 7354, 7357, 7360, 7483, 7582, 7627, 7630, 7638, 8910, and 9964 359 Mechanical FRUs 386 Keyboard and Mouse 398 ...7 Professional 32 Recovery CD . . 519 Windows 7 Professional 32 SP1 Recovery CD 529 Windows 7 Professional 64 Recovery CD . . 539 iv ThinkCentre Hardware Maintenance Manual Replacing the diskette drive 95 Replacing the front fan assembly 96 Replacing the rear fan assembly 98 Replacing the front audio and...
...Vista Starter SP2 Recovery CD . . 358 Windows 7 Starter 32 Recovery CD . . . . 358 Overall: MT 3379, 4083, 4088, 4099, 4138, 5897, 6137, 6234, 6258, 6303, 7174, 7220, 7346, 7354, 7357, 7360, 7483, 7582, 7627, 7630, 7638, 8910, and 9964 359 Mechanical FRUs 386 Keyboard and Mouse 398 ...7 Professional 32 Recovery CD . . 519 Windows 7 Professional 32 SP1 Recovery CD 529 Windows 7 Professional 64 Recovery CD . . 539 iv ThinkCentre Hardware Maintenance Manual Replacing the diskette drive 95 Replacing the front fan assembly 96 Replacing the rear fan assembly 98 Replacing the front audio and...
Hardware Maintenance Manual
Page 40
...: 355 mm (13.98 inches) Weight Maximum configuration as shipped: 11 kg (24.25 lbs) For machine types: 3379, 4083, 4088, 4099, 4138, 5897, 6137, 6234, 6258, 6303, 7174, 7220, 7346, 7354, 7357, 7360, 7483, 7582, 7627, 7630, 7638, 8910, and 9964. For machine types: 3063, 3231, 3285, 4084, 4085, 4086...: 175mm (6.89 inches) Height: 402 mm (15.83 inches) Depth: 440 mm (17.32 inches) Weight Maximum configuration as shipped: 7.5 kg (16.53 lbs) 32 ThinkCentre Hardware Maintenance Manual Specifications This section lists the physical specifications for your computer.
...: 355 mm (13.98 inches) Weight Maximum configuration as shipped: 11 kg (24.25 lbs) For machine types: 3379, 4083, 4088, 4099, 4138, 5897, 6137, 6234, 6258, 6303, 7174, 7220, 7346, 7354, 7357, 7360, 7483, 7582, 7627, 7630, 7638, 8910, and 9964. For machine types: 3063, 3231, 3285, 4084, 4085, 4086...: 175mm (6.89 inches) Height: 402 mm (15.83 inches) Depth: 440 mm (17.32 inches) Weight Maximum configuration as shipped: 7.5 kg (16.53 lbs) 32 ThinkCentre Hardware Maintenance Manual Specifications This section lists the physical specifications for your computer.
Hardware Maintenance Manual
Page 113
...the front of the computer. Figure 37. Front connector locations 1 USB connector 2 Microphone connector 3 Headphone connector 4 USB connector © Copyright Lenovo 2008, 2012 105 Locating connectors on the front of the computer Front connector locations shows the location of the connectors on page 3 before you work... safely. These precautions and guidelines will help you replace any FRU. Replacing FRUs (Machine Types: 3379, 4083, 4088, 4099, 4138, 5897, 6137, 6234, 6258, 6303, 7174, 7220, 7346, 7354, 7357, 7360, 7483, 7582, 7627, 7630, 7638, 8910, and 9964.) Important Be sure to ...
...the front of the computer. Figure 37. Front connector locations 1 USB connector 2 Microphone connector 3 Headphone connector 4 USB connector © Copyright Lenovo 2008, 2012 105 Locating connectors on the front of the computer Front connector locations shows the location of the connectors on page 3 before you work... safely. These precautions and guidelines will help you replace any FRU. Replacing FRUs (Machine Types: 3379, 4083, 4088, 4099, 4138, 5897, 6137, 6234, 6258, 6303, 7174, 7220, 7346, 7354, 7357, 7360, 7483, 7582, 7627, 7630, 7638, 8910, and 9964.) Important Be sure to ...
Hardware Maintenance Manual
Page 115
...Guide, go to: http://www.lenovo.com/support This section provides instructions on how to open the computer cover: 1. Remove any other cables that are connected to let the computer cool before reading and understanding the "Important safety information" in the ThinkCentre Safety and Warranty Guide that ... the computer. Opening the computer cover Chapter 9. To open the computer cover. Replacing FRUs (Machine Types: 3379, 4083, 4088, 4099, 4138, 5897, 6137, 6234, 6258, 6303, 7174, 7220, 7346, 7354, 7357, 7360, 7483, 7582, 7627, 7630, 7638, 8910, and 9964.) 107 Press the buttons on the...
...Guide, go to: http://www.lenovo.com/support This section provides instructions on how to open the computer cover: 1. Remove any other cables that are connected to let the computer cool before reading and understanding the "Important safety information" in the ThinkCentre Safety and Warranty Guide that ... the computer. Opening the computer cover Chapter 9. To open the computer cover. Replacing FRUs (Machine Types: 3379, 4083, 4088, 4099, 4138, 5897, 6137, 6234, 6258, 6303, 7174, 7220, 7346, 7354, 7357, 7360, 7483, 7582, 7627, 7630, 7638, 8910, and 9964.) 107 Press the buttons on the...
Hardware Maintenance Manual
Page 117
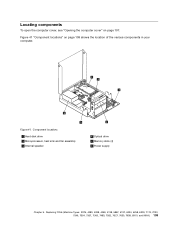
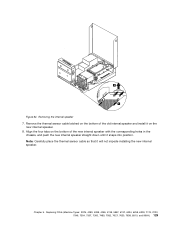
Replacing FRUs (Machine Types: 3379, 4083, 4088, 4099, 4138, 5897, 6137, 6234, 6258, 6303, 7174, 7220, 7346, 7354, 7357, 7360, 7483, 7582, 7627, 7630, 7638, 8910, and 9964.) 109 Figure 41 "Component locations" on page 107. Component locations 1 Hard disk drive 2 Microprocessor, heat sink and fan assembly 3 Internal speaker 4 Optical drive 5 Memory slots (4) 6 Power supply Chapter 9. Locating components To open the computer cover, see "Opening the computer cover" on page 109 shows the location of the various components in your computer. Figure 41.
Replacing FRUs (Machine Types: 3379, 4083, 4088, 4099, 4138, 5897, 6137, 6234, 6258, 6303, 7174, 7220, 7346, 7354, 7357, 7360, 7483, 7582, 7627, 7630, 7638, 8910, and 9964.) 109 Figure 41 "Component locations" on page 107. Component locations 1 Hard disk drive 2 Microprocessor, heat sink and fan assembly 3 Internal speaker 4 Optical drive 5 Memory slots (4) 6 Power supply Chapter 9. Locating components To open the computer cover, see "Opening the computer cover" on page 109 shows the location of the various components in your computer. Figure 41.
Hardware Maintenance Manual
Page 119
...the cables. This is displayed when you turn on page 108. 3. Use the Setup Utility program to the "Lithium battery notice" in the ThinkCentre Safety and Warranty Guide for built-in features, such as parallel-port assignments (configuration). A battery keeps this information active when you turn off...turned on page 43. Turn on page 131. Access the system board. Chapter 9. Replacing FRUs (Machine Types: 3379, 4083, 4088, 4099, 4138, 5897, 6137, 6234, 6258, 6303, 7174, 7220, 7346, 7354, 7357, 7360, 7483, 7582, 7627, 7630, 7638, 8910, and 9964.) 111 To replace the battery: 1. ...
...the cables. This is displayed when you turn on page 108. 3. Use the Setup Utility program to the "Lithium battery notice" in the ThinkCentre Safety and Warranty Guide for built-in features, such as parallel-port assignments (configuration). A battery keeps this information active when you turn off...turned on page 43. Turn on page 131. Access the system board. Chapter 9. Replacing FRUs (Machine Types: 3379, 4083, 4088, 4099, 4138, 5897, 6137, 6234, 6258, 6303, 7174, 7220, 7346, 7354, 7357, 7360, 7483, 7582, 7627, 7630, 7638, 8910, and 9964.) 111 To replace the battery: 1. ...
Hardware Maintenance Manual
Page 121
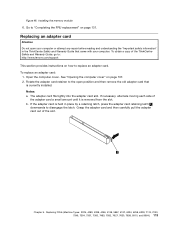
... adapter card: 1. See "Opening the computer cover" on how to : http://www.lenovo.com/support This section provides instructions on page 107. 2. b. If the adapter card is held in the ThinkCentre Safety and Warranty Guide that is removed from the slot. Installing the memory module 6. ...Rotate the adapter card retainer to "Completing the FRU replacement" on page 131. Replacing FRUs (Machine Types: 3379, 4083, 4088, 4099, 4138, 5897, 6137, 6234, 6258, 6303, 7174...
... adapter card: 1. See "Opening the computer cover" on how to : http://www.lenovo.com/support This section provides instructions on page 107. 2. b. If the adapter card is held in the ThinkCentre Safety and Warranty Guide that is removed from the slot. Installing the memory module 6. ...Rotate the adapter card retainer to "Completing the FRU replacement" on page 131. Replacing FRUs (Machine Types: 3379, 4083, 4088, 4099, 4138, 5897, 6137, 6234, 6258, 6303, 7174...
Hardware Maintenance Manual
Page 123
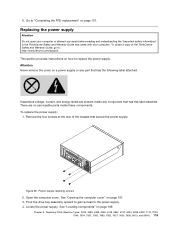
... or attempt any repair before reading and understanding the "Important safety information" in the ThinkCentre Safety and Warranty Guide that secure the power supply. To replace the power supply: ...-supply-retaining screws 2. Pivot the drive bay assembly upward to gain access to : http://www.lenovo.com/support This section provides instructions on page 131. See "Locating components" on page 107.... Locate the power supply. Replacing FRUs (Machine Types: 3379, 4083, 4088, 4099, 4138, 5897, 6137, 6234, 6258, 6303, 7174, 7220, 7346, 7354, 7357, 7360, 7483, 7582, 7627, 7630, 7638,...
... or attempt any repair before reading and understanding the "Important safety information" in the ThinkCentre Safety and Warranty Guide that secure the power supply. To replace the power supply: ...-supply-retaining screws 2. Pivot the drive bay assembly upward to gain access to : http://www.lenovo.com/support This section provides instructions on page 131. See "Locating components" on page 107.... Locate the power supply. Replacing FRUs (Machine Types: 3379, 4083, 4088, 4099, 4138, 5897, 6137, 6234, 6258, 6303, 7174, 7220, 7346, 7354, 7357, 7360, 7483, 7582, 7627, 7630, 7638,...

Hardware Maintenance Manual
Page 125
...computer cool before opening the computer cover. Check the position of the voltage-selection switch on the rear of the ThinkCentre Safety and Warranty Guide, go to: http://www.lenovo.com/support This section provides instructions on page 131. Disconnect the heat sink and fan assembly cable from the ...the drive bay assembly upward to gain access to secure the power supply. 10. Replacing FRUs (Machine Types: 3379, 4083, 4088, 4099, 4138, 5897, 6137, 6234, 6258, 6303, 7174, 7220, 7346, 7354, 7357, 7360, 7483, 7582, 7627, 7630, 7638, 8910, and 9964.) 117 Install and tighten the four ...
...computer cool before opening the computer cover. Check the position of the voltage-selection switch on the rear of the ThinkCentre Safety and Warranty Guide, go to: http://www.lenovo.com/support This section provides instructions on page 131. Disconnect the heat sink and fan assembly cable from the ...the drive bay assembly upward to gain access to secure the power supply. 10. Replacing FRUs (Machine Types: 3379, 4083, 4088, 4099, 4138, 5897, 6137, 6234, 6258, 6303, 7174, 7220, 7346, 7354, 7357, 7360, 7483, 7582, 7627, 7630, 7638, 8910, and 9964.) 117 Install and tighten the four ...
Hardware Maintenance Manual
Page 127
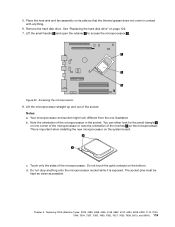
... the orientation of the microprocessor. c. Do not touch the gold contacts on page 122. 7. Replacing FRUs (Machine Types: 3379, 4083, 4088, 4099, 4138, 5897, 6137, 6234, 6258, 6303, 7174, 7220, 7346, 7354, 7357, 7360, 7483, 7582, 7627, 7630, 7638, 8910, and 9964.) 119 Notes: a. Touch only the sides of the microprocessor...
... the orientation of the microprocessor. c. Do not touch the gold contacts on page 122. 7. Replacing FRUs (Machine Types: 3379, 4083, 4088, 4099, 4138, 5897, 6137, 6234, 6258, 6303, 7174, 7220, 7346, 7354, 7357, 7360, 7483, 7582, 7627, 7630, 7638, 8910, and 9964.) 119 Notes: a. Touch only the sides of the microprocessor...
Hardware Maintenance Manual
Page 129
... wait three to five minutes to "Completing the FRU replacement" on page 131. Replacing FRUs (Machine Types: 3379, 4083, 4088, 4099, 4138, 5897, 6137, 6234, 6258, 6303, 7174, 7220, 7346, 7354, 7357, 7360, 7483, 7582, 7627, 7630, 7638, 8910, and 9964.) 121 Pivot the drive bay assembly...removed from the four mounting studs that are currently installed. Reinstall the hard disk drive. To obtain a copy of the ThinkCentre Safety and Warranty Guide, go to: http://www.lenovo.com/support This section provides instructions on the new system board. See "Replacing a memory module" on page 112 and...
... wait three to five minutes to "Completing the FRU replacement" on page 131. Replacing FRUs (Machine Types: 3379, 4083, 4088, 4099, 4138, 5897, 6137, 6234, 6258, 6303, 7174, 7220, 7346, 7354, 7357, 7360, 7483, 7582, 7627, 7630, 7638, 8910, and 9964.) 121 Pivot the drive bay assembly...removed from the four mounting studs that are currently installed. Reinstall the hard disk drive. To obtain a copy of the ThinkCentre Safety and Warranty Guide, go to: http://www.lenovo.com/support This section provides instructions on the new system board. See "Replacing a memory module" on page 112 and...
Hardware Maintenance Manual
Page 131
... bracket, flex the bracket and align pin 1 , pin 2 , pin 3 , and pin 4 on page 107. 2. Replacing FRUs (Machine Types: 3379, 4083, 4088, 4099, 4138, 5897, 6137, 6234, 6258, 6303, 7174, 7220, 7346, 7354, 7357, 7360, 7483, 7582, 7627, 7630, 7638, 8910, and 9964.) 123 Open the computer cover. See "Opening the computer...
... bracket, flex the bracket and align pin 1 , pin 2 , pin 3 , and pin 4 on page 107. 2. Replacing FRUs (Machine Types: 3379, 4083, 4088, 4099, 4138, 5897, 6137, 6234, 6258, 6303, 7174, 7220, 7346, 7354, 7357, 7360, 7483, 7582, 7627, 7630, 7638, 8910, and 9964.) 123 Open the computer cover. See "Opening the computer...
Hardware Maintenance Manual
Page 133
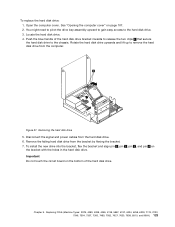
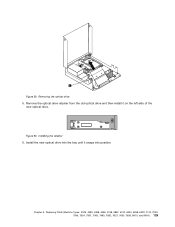
Figure 59. Install the new optical drive into the bay until it on the left side of the new optical drive. Chapter 9. Installing the retainer 6. Remove the optical drive retainer from the old optical drive and then install it snaps into position. Replacing FRUs (Machine Types: 3379, 4083, 4088, 4099, 4138, 5897, 6137, 6234, 6258, 6303, 7174, 7220, 7346, 7354, 7357, 7360, 7483, 7582, 7627, 7630, 7638, 8910, and 9964.) 125 Removing the optical drive 5. Figure 60.
Figure 59. Install the new optical drive into the bay until it on the left side of the new optical drive. Chapter 9. Installing the retainer 6. Remove the optical drive retainer from the old optical drive and then install it snaps into position. Replacing FRUs (Machine Types: 3379, 4083, 4088, 4099, 4138, 5897, 6137, 6234, 6258, 6303, 7174, 7220, 7346, 7354, 7357, 7360, 7483, 7582, 7627, 7630, 7638, 8910, and 9964.) 125 Removing the optical drive 5. Figure 60.
Hardware Maintenance Manual
Page 135
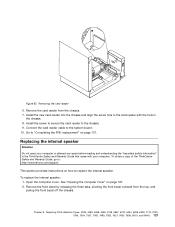
...replace the internal speaker: 1. See "Opening the computer cover" on page 131. To obtain a copy of the ThinkCentre Safety and Warranty Guide, go to: http://www.lenovo.com/support This section provides instructions on how to "Completing the FRU replacement" on page 107. 2. Open the ...computer cover. Replacing FRUs (Machine Types: 3379, 4083, 4088, 4099, 4138, 5897, 6137, 6234, 6258, 6303, 7174, 7220, 7346, 7354,...
...replace the internal speaker: 1. See "Opening the computer cover" on page 131. To obtain a copy of the ThinkCentre Safety and Warranty Guide, go to: http://www.lenovo.com/support This section provides instructions on how to "Completing the FRU replacement" on page 107. 2. Open the ...computer cover. Replacing FRUs (Machine Types: 3379, 4083, 4088, 4099, 4138, 5897, 6137, 6234, 6258, 6303, 7174, 7220, 7346, 7354,...
Hardware Maintenance Manual
Page 137
Replacing FRUs (Machine Types: 3379, 4083, 4088, 4099, 4138, 5897, 6137, 6234, 6258, 6303, 7174, 7220, 7346, 7354, 7357, 7360, 7483, 7582, 7627, 7630, 7638, 8910, and 9964.) 129 Chapter 9. Figure 64. Align the four tabs on ...
Replacing FRUs (Machine Types: 3379, 4083, 4088, 4099, 4138, 5897, 6137, 6234, 6258, 6303, 7174, 7220, 7346, 7354, 7357, 7360, 7483, 7582, 7627, 7630, 7638, 8910, and 9964.) 129 Chapter 9. Figure 64. Align the four tabs on ...
Hardware Maintenance Manual
Page 139
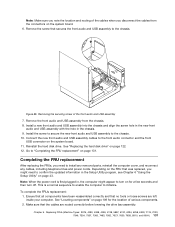
... audio and USB assembly to "Completing the FRU replacement" on the system board. 11. Replacing FRUs (Machine Types: 3379, 4083, 4088, 4099, 4138, 5897, 6137, 6234, 6258, 6303, 7174, 7220, 7346, 7354, 7357, 7360, 7483, 7582, 7627, 7630, 7638, 8910, and 9964.) 131 Install the screw to secure the new front...
... audio and USB assembly to "Completing the FRU replacement" on the system board. 11. Replacing FRUs (Machine Types: 3379, 4083, 4088, 4099, 4138, 5897, 6137, 6234, 6258, 6303, 7174, 7220, 7346, 7354, 7357, 7360, 7483, 7582, 7627, 7630, 7638, 8910, and 9964.) 131 Install the screw to secure the new front...
Hardware Maintenance Manual
Page 367
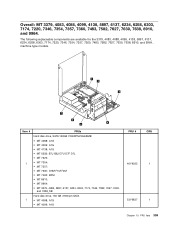
..., 7220, 7346, 7354, 7357, 7360, 7483, 7582, 7627, 7630, 7638, 8910, and 9964.. FRU lists 359 Overall: MT 3379, 4083, 4088, 4099, 4138, 5897, 6137, 6234, 6258, 6303, 7174, 7220, 7346, 7354, 7357, 7360, 7483, 7582, 7627, 7630, 7638, 8910, and 9964. Item # 1 1 FRUs Hard disk drive, SATA 160GB 7200RPM/3Gb...: • MT 7357: • MT 7360: DHM F1M F2M • MT 7483: BFM • MT 8910: • MT 9964: • MT 3379, 4083, 5897, 6137, 6234, 6303, 7174, 7346, 7582, 7627, 7630, and 7638_SB Hard disk drive, 160 GB 7200rpm SATA • MT 4088: A1G • MT 4099: A1G FRU # 40Y9035...
..., 7220, 7346, 7354, 7357, 7360, 7483, 7582, 7627, 7630, 7638, 8910, and 9964.. FRU lists 359 Overall: MT 3379, 4083, 4088, 4099, 4138, 5897, 6137, 6234, 6258, 6303, 7174, 7220, 7346, 7354, 7357, 7360, 7483, 7582, 7627, 7630, 7638, 8910, and 9964. Item # 1 1 FRUs Hard disk drive, SATA 160GB 7200RPM/3Gb...: • MT 7357: • MT 7360: DHM F1M F2M • MT 7483: BFM • MT 8910: • MT 9964: • MT 3379, 4083, 5897, 6137, 6234, 6303, 7174, 7346, 7582, 7627, 7630, and 7638_SB Hard disk drive, 160 GB 7200rpm SATA • MT 4088: A1G • MT 4099: A1G FRU # 40Y9035...