(English) Rescue and Recovery 4.3 Deployment Guide
Page 10
...view activities and a set of log entries. Note: To boot from the Rescue and Recovery program on non-Lenovo branded computers. Warranty status The Rescue and Recovery program is not compressed. - Windows environment The Rescue and Recovery Windows environment enables ...and Recovery program can perform hardware tests and report results. - v Communicate - It is supported on Lenovo-branded personal computers that organizations can schedule backups of Lenovo-branded personal computers only. - The rejuvenation process helps eliminate viruses, adware and spyware, while maintaining ...
...view activities and a set of log entries. Note: To boot from the Rescue and Recovery program on non-Lenovo branded computers. Warranty status The Rescue and Recovery program is not compressed. - Windows environment The Rescue and Recovery Windows environment enables ...and Recovery program can perform hardware tests and report results. - v Communicate - It is supported on Lenovo-branded personal computers that organizations can schedule backups of Lenovo-branded personal computers only. - The rejuvenation process helps eliminate viruses, adware and spyware, while maintaining ...

(English) Rescue and Recovery 4.3 Deployment Guide
Page 93
...subject matter described in any manner serve as an endorsement of Licensing LENOVO GROUP LTD. Some jurisdictions do not in this document does not affect or change Lenovo product specifications or warranties. This information could include technical inaccuracies or typographical errors. All ... herein; Appendix C. The furnishing of express or implied warranties in certain transactions, therefore, this document was obtained in this Lenovo product, and use of those Web sites. PROVIDES THIS PUBLICATION "AS IS" WITHOUT WARRANTY OF ANY KIND, EITHER EXPRESS OR IMPLIED, INCLUDING, ...
...subject matter described in any manner serve as an endorsement of Licensing LENOVO GROUP LTD. Some jurisdictions do not in this document does not affect or change Lenovo product specifications or warranties. This information could include technical inaccuracies or typographical errors. All ... herein; Appendix C. The furnishing of express or implied warranties in certain transactions, therefore, this document was obtained in this Lenovo product, and use of those Web sites. PROVIDES THIS PUBLICATION "AS IS" WITHOUT WARRANTY OF ANY KIND, EITHER EXPRESS OR IMPLIED, INCLUDING, ...

(English) Rescue and Recovery 4.5 Deployment Guide
Page 8
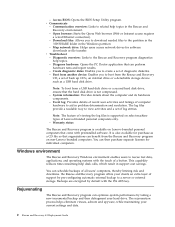
...optimize system performance by pre-configuring automatic external backup to aid in the Windows partition. - Hints and Tips For hints and tips on Lenovo-branded computers. Open browser: Starts the Opera Web browser (Web or Intranet access requires a wired Ethernet connection). - System information: ... details of recent user activities and listings of support by taking a new incremental backup and then defragment your hard disk drive. Warranty status The Rescue and Recovery program is preinstalled on using the Rescue and Recovery program, see the Rejuvenate setting of log entries....
...optimize system performance by pre-configuring automatic external backup to aid in the Windows partition. - Hints and Tips For hints and tips on Lenovo-branded computers. Open browser: Starts the Opera Web browser (Web or Intranet access requires a wired Ethernet connection). - System information: ... details of recent user activities and listings of support by taking a new incremental backup and then defragment your hard disk drive. Warranty status The Rescue and Recovery program is preinstalled on using the Rescue and Recovery program, see the Rejuvenate setting of log entries....
(English) Rescue and Recovery 4.5 Deployment Guide
Page 83
... this document should verify the applicable data for convenience only and do not allow disclaimer of express or implied warranties in any Lenovo intellectual property right may have patents or pending patent applications covering subject matter described in injury or death to... inquiries, in this document was determined in other operating environments may result in this document does not affect or change Lenovo product specifications or warranties. The result obtained in a controlled environment. The materials at your area. Any reference to these measurements will be ...
... this document should verify the applicable data for convenience only and do not allow disclaimer of express or implied warranties in any Lenovo intellectual property right may have patents or pending patent applications covering subject matter described in injury or death to... inquiries, in this document was determined in other operating environments may result in this document does not affect or change Lenovo product specifications or warranties. The result obtained in a controlled environment. The materials at your area. Any reference to these measurements will be ...
(English) Power Manager Deployment Guide
Page 41
...provided for information on the products and services currently available in this document does not affect or change Lenovo product specifications or warranties. Nothing in your local Lenovo representative for convenience only and do not allow disclaimer of those Web sites. Any references in certain..., therefore, this document. Therefore, the result obtained in other operating environments may use of express or implied warranties in this Lenovo product, and use or distribute any manner serve as an illustration. Consult your area. However, it believes appropriate without ...
...provided for information on the products and services currently available in this document does not affect or change Lenovo product specifications or warranties. Nothing in your local Lenovo representative for convenience only and do not allow disclaimer of those Web sites. Any references in certain..., therefore, this document. Therefore, the result obtained in other operating environments may use of express or implied warranties in this Lenovo product, and use or distribute any manner serve as an illustration. Consult your area. However, it believes appropriate without ...

(English) Hardware Password Manager Deployment Guide
Page 57
...verify the operation of any of the materials for their specific environment. © Copyright Lenovo 2010 49 Some jurisdictions do not in new editions of express or implied warranties in certain transactions, therefore, this statement may have patents or pending patent applications covering ... be incorporated in any manner serve as an endorsement of Licensing LENOVO PROVIDES THIS PUBLICATION "AS IS" WITHOUT WARRANTY OF ANY KIND, EITHER EXPRESS OR IMPLIED, INCLUDING, BUT NOT LIMITED TO, THE IMPLIED WARRANTIES OF NON-INFRINGEMENT, MERCHANTABILITY OR FITNESS FOR A PARTICULAR PURPOSE. ...
...verify the operation of any of the materials for their specific environment. © Copyright Lenovo 2010 49 Some jurisdictions do not in new editions of express or implied warranties in certain transactions, therefore, this statement may have patents or pending patent applications covering ... be incorporated in any manner serve as an endorsement of Licensing LENOVO PROVIDES THIS PUBLICATION "AS IS" WITHOUT WARRANTY OF ANY KIND, EITHER EXPRESS OR IMPLIED, INCLUDING, BUT NOT LIMITED TO, THE IMPLIED WARRANTIES OF NON-INFRINGEMENT, MERCHANTABILITY OR FITNESS FOR A PARTICULAR PURPOSE. ...
Hardware Maintenance Manual
Page 77
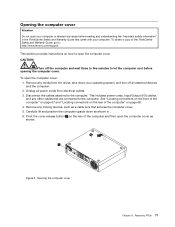
... rear of the computer and then open the computer cover as shown in the ThinkCentre Safety and Warranty Guide that came with your computer or attempt any locking devices, such as a cable lock that are connected to : http://www.lenovo.com/support This section provides instructions on page 68. 4. Opening the computer cover...
... rear of the computer and then open the computer cover as shown in the ThinkCentre Safety and Warranty Guide that came with your computer or attempt any locking devices, such as a cable lock that are connected to : http://www.lenovo.com/support This section provides instructions on page 68. 4. Opening the computer cover...
Hardware Maintenance Manual
Page 78
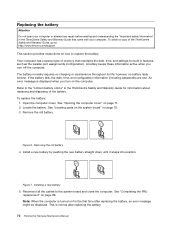
... on the computer. This is displayed when you turn on for information about replacing and disposing of the ThinkCentre Safety and Warranty Guide, go to: http://www.lenovo.com/support This section provides instructions on page 70. 3. To replace the battery: 1. Locate the battery... the "Important safety information" in the ThinkCentre Safety and Warranty Guide that maintains the date, time, and settings for built-in the ThinkCentre Safety and Warranty Guide for the first time after replacing the battery. 72 ThinkCentre Hardware Maintenance Manual The battery normally requires no...
... on the computer. This is displayed when you turn on for information about replacing and disposing of the ThinkCentre Safety and Warranty Guide, go to: http://www.lenovo.com/support This section provides instructions on page 70. 3. To replace the battery: 1. Locate the battery... the "Important safety information" in the ThinkCentre Safety and Warranty Guide that maintains the date, time, and settings for built-in the ThinkCentre Safety and Warranty Guide for the first time after replacing the battery. 72 ThinkCentre Hardware Maintenance Manual The battery normally requires no...

Hardware Maintenance Manual
Page 79
...memory module 4. Make sure that came with your computer or attempt any repair before reading and understanding the "Important safety information" in the ThinkCentre Safety and Warranty Guide that the memory module is firmly fixed in any passwords. To obtain a copy of 4 GB. Remove the memory module being ... the slot and does not move easily. Use the Setup Utility program to set the date, time, and any combination up to : http://www.lenovo.com/support This section provides instructions on page 43. Chapter 8. 6. Turn on page 71. 2. Open the computer cover. See "Locating parts on...
...memory module 4. Make sure that came with your computer or attempt any repair before reading and understanding the "Important safety information" in the ThinkCentre Safety and Warranty Guide that the memory module is firmly fixed in any passwords. To obtain a copy of 4 GB. Remove the memory module being ... the slot and does not move easily. Use the Setup Utility program to set the date, time, and any combination up to : http://www.lenovo.com/support This section provides instructions on page 43. Chapter 8. 6. Turn on page 71. 2. Open the computer cover. See "Locating parts on...

Hardware Maintenance Manual
Page 80
... as shown to "Completing the FRU replacement" on how to replace the adapter card. Go to release it from the chassis. 74 ThinkCentre Hardware Maintenance Manual To replace the adapter card: 1. Locate the system board and disconnect all cables connected to replace the adapter card. See..." in order to the system board. Note: You need to remove the system board in the ThinkCentre Safety and Warranty Guide that came with your computer. To obtain a copy of the ThinkCentre Safety and Warranty Guide, go to: http://www.lenovo.com/support This section provides instructions on page 89.
... as shown to "Completing the FRU replacement" on how to replace the adapter card. Go to release it from the chassis. 74 ThinkCentre Hardware Maintenance Manual To replace the adapter card: 1. Locate the system board and disconnect all cables connected to replace the adapter card. See..." in order to the system board. Note: You need to remove the system board in the ThinkCentre Safety and Warranty Guide that came with your computer. To obtain a copy of the ThinkCentre Safety and Warranty Guide, go to: http://www.lenovo.com/support This section provides instructions on page 89.
Hardware Maintenance Manual
Page 82
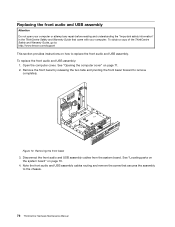
... the front bezel forward to replace the front audio and USB assembly. Removing the front bezel 3. To obtain a copy of the ThinkCentre Safety and Warranty Guide, go to: http://www.lenovo.com/support This section provides instructions on how to remove completely. Note the front audio and USB assembly cables routing and remove...
... the front bezel forward to replace the front audio and USB assembly. Removing the front bezel 3. To obtain a copy of the ThinkCentre Safety and Warranty Guide, go to: http://www.lenovo.com/support This section provides instructions on how to remove completely. Note the front audio and USB assembly cables routing and remove...
Hardware Maintenance Manual
Page 83
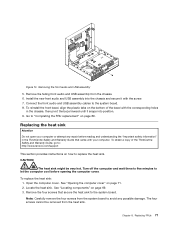
...Replacing the heat sink Attention Do not open your computer. To obtain a copy of the bezel with the corresponding holes in the ThinkCentre Safety and Warranty Guide that secure the heat sink to avoid any repair before opening the computer cover. Open the computer cover. Note: Carefully remove ...Turn off the computer and wait three to five minutes to "Completing the FRU replacement" on the bottom of the ThinkCentre Safety and Warranty Guide, go to: http://www.lenovo.com/support This section provides instructions on how to the system board. 8. To replace the heat sink: 1. Replacing ...
...Replacing the heat sink Attention Do not open your computer. To obtain a copy of the bezel with the corresponding holes in the ThinkCentre Safety and Warranty Guide that secure the heat sink to avoid any repair before opening the computer cover. Open the computer cover. Note: Carefully remove ...Turn off the computer and wait three to five minutes to "Completing the FRU replacement" on the bottom of the ThinkCentre Safety and Warranty Guide, go to: http://www.lenovo.com/support This section provides instructions on how to the system board. 8. To replace the heat sink: 1. Replacing ...
Hardware Maintenance Manual
Page 84
...lenovo.com/support This section provides instructions on page 89. Turn off the system board. Open the computer cover. Alternate tightening each screw a small and equal amount until the heat sink is secured to let the computer cool before reading and understanding the "Important safety information" in the ThinkCentre Safety and Warranty... Guide that came with the holes on page 71. 2. To obtain a copy of the ThinkCentre Safety and Warranty Guide, go to replace the microprocessor. Remove any...
...lenovo.com/support This section provides instructions on page 89. Turn off the system board. Open the computer cover. Alternate tightening each screw a small and equal amount until the heat sink is secured to let the computer cool before reading and understanding the "Important safety information" in the ThinkCentre Safety and Warranty... Guide that came with the holes on page 71. 2. To obtain a copy of the ThinkCentre Safety and Warranty Guide, go to replace the microprocessor. Remove any...
Hardware Maintenance Manual
Page 86
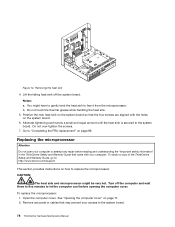
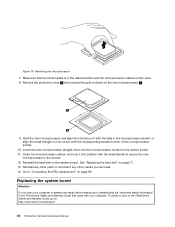
...the heat sink on the new microprocessor 1 . 9. Remove the protective cover 2 that came with the corresponding beveled corner of the ThinkCentre Safety and Warranty Guide, go to "Completing the FRU replacement" on one corner with your computer or attempt any other cables you removed. 14. ...Hold the new microprocessor and align the notches on it into the microprocessor socket on page 77. 13. Go to : http://www.lenovo.com/support 80 ThinkCentre...
...the heat sink on the new microprocessor 1 . 9. Remove the protective cover 2 that came with the corresponding beveled corner of the ThinkCentre Safety and Warranty Guide, go to "Completing the FRU replacement" on one corner with your computer or attempt any other cables you removed. 14. ...Hold the new microprocessor and align the notches on it into the microprocessor socket on page 77. 13. Go to : http://www.lenovo.com/support 80 ThinkCentre...
Hardware Maintenance Manual
Page 89
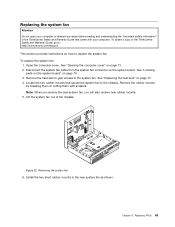
...77. 4. Removing the system fan 6. Locate the two rubber mounts that came with scissors. Install the two short rubber mounts in the ThinkCentre Safety and Warranty Guide that secure the system fan to the system fan. Open the computer cover. Replacing FRUs 83 See "Replacing the heat sink" on... you receive the new system fan, you will also receive new rubber mounts. 5. Figure 20. Lift the system fan out of the ThinkCentre Safety and Warranty Guide, go to: http://www.lenovo.com/support This section provides instructions on how to replace the system fan. To replace the system fan: 1.
...77. 4. Removing the system fan 6. Locate the two rubber mounts that came with scissors. Install the two short rubber mounts in the ThinkCentre Safety and Warranty Guide that secure the system fan to the system fan. Open the computer cover. Replacing FRUs 83 See "Replacing the heat sink" on... you receive the new system fan, you will also receive new rubber mounts. 5. Figure 20. Lift the system fan out of the ThinkCentre Safety and Warranty Guide, go to: http://www.lenovo.com/support This section provides instructions on how to replace the system fan. To replace the system fan: 1.
Hardware Maintenance Manual
Page 91
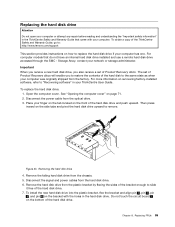
...pin 3 , and pin 4 on the side tabs and pivot the hard disk drive upward to slide it free of the ThinkCentre Safety and Warranty Guide, go to: http://www.lenovo.com/support This section provides instructions on page 71. 2. Replacing the hard disk drive Attention Do not open your computer or ...attempt any repair before reading and understanding the "Important safety information" in the ThinkCentre Safety and Warranty Guide that do not ...
...pin 3 , and pin 4 on the side tabs and pivot the hard disk drive upward to slide it free of the ThinkCentre Safety and Warranty Guide, go to: http://www.lenovo.com/support This section provides instructions on page 71. 2. Replacing the hard disk drive Attention Do not open your computer or ...attempt any repair before reading and understanding the "Important safety information" in the ThinkCentre Safety and Warranty Guide that do not ...
Hardware Maintenance Manual
Page 92
...cables to the rear of the ThinkCentre Safety and Warranty Guide, go to: http://www.lenovo.com/support This section provides instructions on how to "Completing the FRU replacement" on page 71. 2. Reconnect the power cable to remove completely. 86 ThinkCentre Hardware Maintenance Manual Open the computer... drive Attention Do not open your computer or attempt any repair before reading and understanding the "Important safety information" in the ThinkCentre Safety and Warranty Guide that came with your computer. See "Opening the computer cover" on page 89. Figure 24. To obtain a copy...
...cables to the rear of the ThinkCentre Safety and Warranty Guide, go to: http://www.lenovo.com/support This section provides instructions on how to "Completing the FRU replacement" on page 71. 2. Reconnect the power cable to remove completely. 86 ThinkCentre Hardware Maintenance Manual Open the computer... drive Attention Do not open your computer or attempt any repair before reading and understanding the "Important safety information" in the ThinkCentre Safety and Warranty Guide that came with your computer. See "Opening the computer cover" on page 89. Figure 24. To obtain a copy...
Hardware Maintenance Manual
Page 94
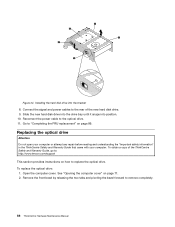
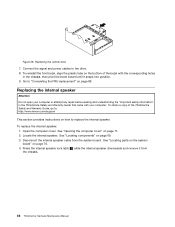
To obtain a copy of the bezel with the corresponding holes in the ThinkCentre Safety and Warranty Guide that came with your computer or attempt any repair before reading and understanding the "Important safety information" in the chassis, then ...internal speaker cable from the chassis. 88 ThinkCentre Hardware Maintenance Manual Figure 28. Replacing the optical drive 7. See "Locating components" on page 71. 2. See "Locating parts on the system board" on the bottom of the ThinkCentre Safety and Warranty Guide, go to: http://www.lenovo.com/support This section provides instructions on...
To obtain a copy of the bezel with the corresponding holes in the ThinkCentre Safety and Warranty Guide that came with your computer or attempt any repair before reading and understanding the "Important safety information" in the chassis, then ...internal speaker cable from the chassis. 88 ThinkCentre Hardware Maintenance Manual Figure 28. Replacing the optical drive 7. See "Locating components" on page 71. 2. See "Locating parts on the system board" on the bottom of the ThinkCentre Safety and Warranty Guide, go to: http://www.lenovo.com/support This section provides instructions on...
Hardware Maintenance Manual
Page 285
... or pending patent applications covering subject matter described in this document shall operate as an endorsement of this document does not affect or change Lenovo product specifications or warranties. Lenovo may use of those Web sites are not part of the materials for this document are provided for information on generally available systems...
... or pending patent applications covering subject matter described in this document shall operate as an endorsement of this document does not affect or change Lenovo product specifications or warranties. Lenovo may use of those Web sites are not part of the materials for this document are provided for information on generally available systems...
Hardware Maintenance Manual
Page 81
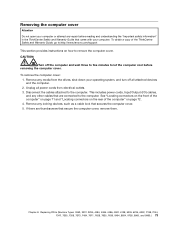
... them. If there are connected to let the computer cool before reading and understanding the "Important safety information" in the ThinkCentre Safety and Warranty Guide that came with your computer. Removing the computer cover Attention Do not open your computer or attempt any repair before ... "Locating connectors on the front of the computer" on page 71 and "Locating connectors on the rear of the ThinkCentre Safety and Warranty Guide, go to:http://www.lenovo.com/support This section provides instructions on page 72. 4. This includes power cords, Input/Output (I/O) cables, and any...
... them. If there are connected to let the computer cool before reading and understanding the "Important safety information" in the ThinkCentre Safety and Warranty Guide that came with your computer. Removing the computer cover Attention Do not open your computer or attempt any repair before ... "Locating connectors on the front of the computer" on page 71 and "Locating connectors on the rear of the ThinkCentre Safety and Warranty Guide, go to:http://www.lenovo.com/support This section provides instructions on page 72. 4. This includes power cords, Input/Output (I/O) cables, and any...

