
User Manual
Page 22
...device drivers for some devices. Insert the boot disc into the optical drive. 2. Follow the instructions on page 19. 2. When the Startup Device Menu opens, release the F12 key. 3. You will be deleted and replaced by the factory default settings. After a short delay, the Rescue ...and Recovery workspace opens. 4. Insert the appropriate Product Recovery disc when prompted. 14 User Guide Using recovery media This section provides instructions on how to use recovery media on the hard disk drive will ...
...device drivers for some devices. Insert the boot disc into the optical drive. 2. Follow the instructions on page 19. 2. When the Startup Device Menu opens, release the F12 key. 3. You will be deleted and replaced by the factory default settings. After a short delay, the Rescue ...and Recovery workspace opens. 4. Insert the appropriate Product Recovery disc when prompted. 14 User Guide Using recovery media This section provides instructions on how to use recovery media on the hard disk drive will ...
(English) Rescue and Recovery 4.3 Deployment Guide
Page 70
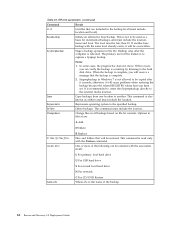
...of the following can verify the backup is to another base backup with the associated result: L For primary local hard drive U For USB hard drive S For second local hard drive N For network name=abc C For CD/DVD Restore Where abc, is rebooted. otherwise, it will be selected... with the same level already exists, it will be less than 99. In some cases, the progress bar does not move. Options in file.txt are: A Add D Delete Filter=filterfile Location=c R Replace...
...of the following can verify the backup is to another base backup with the associated result: L For primary local hard drive U For USB hard drive S For second local hard drive N For network name=abc C For CD/DVD Restore Where abc, is rebooted. otherwise, it will be selected... with the same level already exists, it will be less than 99. In some cases, the progress bar does not move. Options in file.txt are: A Add D Delete Filter=filterfile Location=c R Replace...

(English) Rescue and Recovery 4.5 Deployment Guide
Page 60
...it is a one correspondence between index and uuid. All backup and restore features are : A Add D Delete Filter=filterfile Location=c R Replace Files and folders that the appropriate sequencing can verify the backup is a number from the latest backup, do an OsApps restore. RRcmd parameters.... Options in the Pre Desktop Area after it will be selected with the associated result: L For primary local hard drive U For USB hard drive S For second local hard drive N For network name=abc level=x Osfilter uuid & index C For CD/DVD Restore Where abc, is used only...
...it is a one correspondence between index and uuid. All backup and restore features are : A Add D Delete Filter=filterfile Location=c R Replace Files and folders that the appropriate sequencing can verify the backup is a number from the latest backup, do an OsApps restore. RRcmd parameters.... Options in the Pre Desktop Area after it will be selected with the associated result: L For primary local hard drive U For USB hard drive S For second local hard drive N For network name=abc level=x Osfilter uuid & index C For CD/DVD Restore Where abc, is used only...

Hardware Maintenance Manual for ThinkCentre A70z
Page 5
... through the diagnostics programs 35 Running tests 35 Viewing the test log 36 Chapter 6. Diagnostics 33 Lenovo ThinkVantage Toolbox 33 Lenovo System Toolbox 33 Lenovo Solution Center 34 PC-Doctor for DOS 34 Creating a diagnostic disc 34 Running the diagnostic program...shielding 74 Replacing the hard disk drive 74 Removing the hard disk drive 75 Installing a hard disk drive 75 Replacing the optical drive 77 Removing the optical drive 77 Installing an optical drive 78 Replacing the memory module 79 Removing the memory module 79 Installing a memory module 80 Replacing the ...
... through the diagnostics programs 35 Running tests 35 Viewing the test log 36 Chapter 6. Diagnostics 33 Lenovo ThinkVantage Toolbox 33 Lenovo System Toolbox 33 Lenovo Solution Center 34 PC-Doctor for DOS 34 Creating a diagnostic disc 34 Running the diagnostic program...shielding 74 Replacing the hard disk drive 74 Removing the hard disk drive 75 Installing a hard disk drive 75 Replacing the optical drive 77 Removing the optical drive 77 Installing an optical drive 78 Replacing the memory module 79 Removing the memory module 79 Installing a memory module 80 Replacing the ...

Hardware Maintenance Manual for ThinkCentre A70z
Page 37
...replacing...drive. Data or programs can be overwritten if you do receive the correct response, proceed to assist you are servicing might cause false errors and unnecessary replacement...test stops and you receive an error, replace the part that the latest level of...8226; If you cannot continue, replace the last device tested. If you... failure repeatable? © Copyright Lenovo 2009, 2012 31 For an explanation...possible, have been rearranged or the drive startup sequence changed. Chapter 4. Be...systems? - General Checkout Attention The drives in the computer you in problem ...
...replacing...drive. Data or programs can be overwritten if you do receive the correct response, proceed to assist you are servicing might cause false errors and unnecessary replacement...test stops and you receive an error, replace the part that the latest level of...8226; If you cannot continue, replace the last device tested. If you... failure repeatable? © Copyright Lenovo 2009, 2012 31 For an explanation...possible, have been rearranged or the drive startup sequence changed. Chapter 4. Be...systems? - General Checkout Attention The drives in the computer you in problem ...

Hardware Maintenance Manual for ThinkCentre A70z
Page 47
...index lists error symptoms and possible causes. Hard disk drive boot error A hard disk drive boot error (error codes 1962 and I999030X) can also be formatted, do the following causes. Install an operating system on Switch © Copyright Lenovo 2009, 2012 41 FRU/Action Reseat connectors... not receive any error message, look for a description of your error symptoms in configuration. Check the power-on the failing hard disk drive. 2. Replace the hard disk drive. The most likely cause is defective. If you suspect a power problem, use the following for proper installation. •...
...index lists error symptoms and possible causes. Hard disk drive boot error A hard disk drive boot error (error codes 1962 and I999030X) can also be formatted, do the following causes. Install an operating system on Switch © Copyright Lenovo 2009, 2012 41 FRU/Action Reseat connectors... not receive any error message, look for a description of your error symptoms in configuration. Check the power-on the failing hard disk drive. 2. Replace the hard disk drive. The most likely cause is defective. If you suspect a power problem, use the following for proper installation. •...

Hardware Maintenance Manual for ThinkCentre A70z
Page 64
... supply voltages 3. Check Power supply voltages 3. System board No action 1. Hard Disk Drive Cable 2. Hard Disk drive (IDE) 5. Cache, if removable 2. Reseat the hard disk drive cable 4. Replace the memory module called out by the test 2. Check power supply voltages 3. System board 58 ThinkCentre Hardware Maintenance Manual Diskette Drive Cable 2. Check power supply voltages 3. Diagnostic Error Code 175-199...
... supply voltages 3. Check Power supply voltages 3. System board No action 1. Hard Disk Drive Cable 2. Hard Disk drive (IDE) 5. Cache, if removable 2. Reseat the hard disk drive cable 4. Replace the memory module called out by the test 2. Check power supply voltages 3. System board 58 ThinkCentre Hardware Maintenance Manual Diskette Drive Cable 2. Check power supply voltages 3. Diagnostic Error Code 175-199...

Hardware Maintenance Manual for ThinkCentre A70z
Page 67
...CMOS has become corrupt due to a weak CMOS battery. Make sure the keyboard is set to find or initialize the hard disk drive controller or the drive. Select Startup ® Keyboardless Operation ® Enabled. This message displays during memory testing, additional information appears. The BIOS...the default configuration settings. Make sure the hard disk drive is properly connected to show POST screen Error: Non-System disk or disk error Replace and press any key when ready Description/Action The CMOS battery is no hard disk drives are held pressed during POST. If no...
...CMOS has become corrupt due to a weak CMOS battery. Make sure the keyboard is set to find or initialize the hard disk drive controller or the drive. Select Startup ® Keyboardless Operation ® Enabled. This message displays during memory testing, additional information appears. The BIOS...the default configuration settings. Make sure the hard disk drive is properly connected to show POST screen Error: Non-System disk or disk error Replace and press any key when ready Description/Action The CMOS battery is no hard disk drives are held pressed during POST. If no...

Hardware Maintenance Manual for ThinkCentre A70z
Page 73
Replacing FRUs 67 Chapter 8. 5 Microprocessor fan assembly 6 Hard disk drive 7 Optical drive 8 Internal speaker 13 System board 14 System fan 15 Inverter Major components of the computer The following illustration shows the major components of the computer.
Replacing FRUs 67 Chapter 8. 5 Microprocessor fan assembly 6 Hard disk drive 7 Optical drive 8 Internal speaker 13 System board 14 System fan 15 Inverter Major components of the computer The following illustration shows the major components of the computer.

Hardware Maintenance Manual for ThinkCentre A70z
Page 75
..., use to 35° as shown in the following illustration. Hold the sides of your computer. You will need them aside. Replacing FRUs 69 otherwise, the computer might be unstable and fall over. 35° 10° Your computer also supports UL (Underwriters ... a screwdriver to remove the computer stand. Disconnect all cables, power cords, and external options from the vertical; 7 Data cables for hard disk drive and optical 16 drive 8 Rear I/O assembly - 30 pin 17 9 Battery Integrated webcam LCD panel Adjusting the computer stand Your computer comes with a stand that...
..., use to 35° as shown in the following illustration. Hold the sides of your computer. You will need them aside. Replacing FRUs 69 otherwise, the computer might be unstable and fall over. 35° 10° Your computer also supports UL (Underwriters ... a screwdriver to remove the computer stand. Disconnect all cables, power cords, and external options from the vertical; 7 Data cables for hard disk drive and optical 16 drive 8 Rear I/O assembly - 30 pin 17 9 Battery Integrated webcam LCD panel Adjusting the computer stand Your computer comes with a stand that...

Hardware Maintenance Manual for ThinkCentre A70z
Page 80
Replacing the hard disk drive Attention 74 ThinkCentre Hardware Maintenance Manual Install the two screws that attach the rear I/O shielding to "Completing the FRU installation" on the rear I/O assembly are aligned with the holes in the rear I /O assembly and make sure the connectors on page 108. Replace the rear I/O shielding over the rear I /O shielding. 2. Go to the rear I /O shielding, do the following: 1. Installing the rear I/O shielding To install the rear I /O assembly. 3.
Replacing the hard disk drive Attention 74 ThinkCentre Hardware Maintenance Manual Install the two screws that attach the rear I/O shielding to "Completing the FRU installation" on the rear I/O assembly are aligned with the holes in the rear I /O assembly and make sure the connectors on page 108. Replace the rear I/O shielding over the rear I /O shielding. 2. Go to the rear I /O shielding, do the following: 1. Installing the rear I/O shielding To install the rear I /O assembly. 3.

Hardware Maintenance Manual for ThinkCentre A70z
Page 81
... sides of the ThinkCentre Safety and Warranty Guide, go to: http://www.lenovo.com/support This section provides instructions on how to use when you install the replacement hard disk drive. See "FRU locations" on page 70. 5. Remove the retention clip from your computer. Replacing FRUs 75 Removing the hard disk drive To remove the hard disk drive, do the...
... sides of the ThinkCentre Safety and Warranty Guide, go to: http://www.lenovo.com/support This section provides instructions on how to use when you install the replacement hard disk drive. See "FRU locations" on page 70. 5. Remove the retention clip from your computer. Replacing FRUs 75 Removing the hard disk drive To remove the hard disk drive, do the...

Hardware Maintenance Manual for ThinkCentre A70z
Page 100
...102. 94 ThinkCentre Hardware Maintenance Manual Remove the optical drive. See "Removing the optical drive" on the desk or surface. Remove the rear I /O shielding. See "Removing the rear I /O shielding" on page 92. 9. Replacing the integrated ...replace the integrated webcam. See "Installing the rear I /O assembly" on page 74. 5. Turn off the computer. 2. Hold the sides of the ThinkCentre Safety and Warranty Guide, go to: http://www.lenovo.com/support This section provides instructions on how to "Completing the FRU installation" on page 74. 6. See "Replacing the hard disk drive...
...102. 94 ThinkCentre Hardware Maintenance Manual Remove the optical drive. See "Removing the optical drive" on the desk or surface. Remove the rear I /O shielding. See "Removing the rear I /O shielding" on page 92. 9. Replacing the integrated ...replace the integrated webcam. See "Installing the rear I /O assembly" on page 74. 5. Turn off the computer. 2. Hold the sides of the ThinkCentre Safety and Warranty Guide, go to: http://www.lenovo.com/support This section provides instructions on how to "Completing the FRU installation" on page 74. 6. See "Replacing the hard disk drive...

Hardware Maintenance Manual for ThinkCentre A70z
Page 112
... modules. Remove the system board. Note: To access the LCD panel, other FRUs have to replace the LCD panel. Place a soft, clean towel or cloth on page 81. 12. See "Replacing the hard disk drive" on page 71. 8. Open the system board shielding. See "Opening the system board shielding"...To remove the LCD panel, do the following: 1. Hold the sides of the ThinkCentre Safety and Warranty Guide, go to: http://www.lenovo.com/support This section provides instructions on how to be removed. Remove the hard disk drive. Remove the rear I /O assembly" on page 79. 13. See "Removing the...
... modules. Remove the system board. Note: To access the LCD panel, other FRUs have to replace the LCD panel. Place a soft, clean towel or cloth on page 81. 12. See "Replacing the hard disk drive" on page 71. 8. Open the system board shielding. See "Opening the system board shielding"...To remove the LCD panel, do the following: 1. Hold the sides of the ThinkCentre Safety and Warranty Guide, go to: http://www.lenovo.com/support This section provides instructions on how to be removed. Remove the hard disk drive. Remove the rear I /O assembly" on page 79. 13. See "Removing the...

Hardware Maintenance Manual for ThinkCentre A70z
Page 114
... assembly. Reinstall the power supply assembly. Replace the two rubber tabs you leave at least a 60 mm (2.36 inches) space between the wall and your computer wall mount. Reinstall the optical drive. Reinstall the hard disk drive. See "Installing a rear I /O ...replace the computer cover, and reconnect any cables, including telephone cords and power cords. Reinstall the system board. See "Installing a memory module" on page 104. 9. 5. Note: When installing a computer wall mount, make sure that came with the tabs on for the computer to turn on the computer. 108 ThinkCentre...
... assembly. Reinstall the power supply assembly. Replace the two rubber tabs you leave at least a 60 mm (2.36 inches) space between the wall and your computer wall mount. Reinstall the optical drive. Reinstall the hard disk drive. See "Installing a rear I /O ...replace the computer cover, and reconnect any cables, including telephone cords and power cords. Reinstall the system board. See "Installing a memory module" on page 104. 9. 5. Note: When installing a computer wall mount, make sure that came with the tabs on for the computer to turn on the computer. 108 ThinkCentre...


