Hardware Maintenance Manual
Page 14
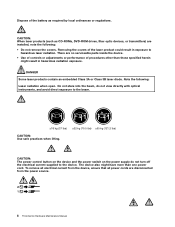
...the device. CAUTION: When laser products (such as required by local ordinances or regulations. CAUTION: The power control button on the device and the power switch on the power supply do not view directly with optical instruments, and avoid direct exposure to hazardous laser radiation. There...lbs) CAUTION: Use safe practices when lifting. To remove all electrical current from the device, ensure that all power cords are disconnected from the power source. 2 1 8 ThinkCentre Hardware Maintenance Manual DANGER Some laser products contain an embedded Class 3A or Class 3B laser diode. Dispose of ...
...the device. CAUTION: When laser products (such as required by local ordinances or regulations. CAUTION: The power control button on the device and the power switch on the power supply do not view directly with optical instruments, and avoid direct exposure to hazardous laser radiation. There...lbs) CAUTION: Use safe practices when lifting. To remove all electrical current from the device, ensure that all power cords are disconnected from the power source. 2 1 8 ThinkCentre Hardware Maintenance Manual DANGER Some laser products contain an embedded Class 3A or Class 3B laser diode. Dispose of ...
Hardware Maintenance Manual
Page 75
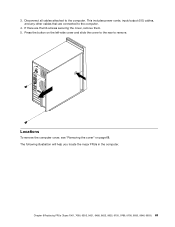
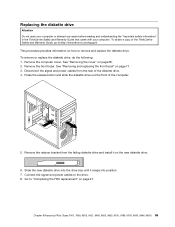
Chapter 8 Replacing FRUs (Types 7061, 7090, 9353, 9421, 9485, 9623, 9625, 9705, 9786, 9795, 9935, 9946, 9953) 69 This includes power cords, input/output (I/O) cables, and any other cables that are thumb screws securing the cover, remove them. 5. Press the button on page 68. If there are connected to the computer. 4. The following illustration will help you locate the major FRUs in the computer. Disconnect all cables attached to remove. Locations To remove the computer cover, see "Removing the cover" on the left-side cover and slide the cover to the rear to the computer. 3.
Chapter 8 Replacing FRUs (Types 7061, 7090, 9353, 9421, 9485, 9623, 9625, 9705, 9786, 9795, 9935, 9946, 9953) 69 This includes power cords, input/output (I/O) cables, and any other cables that are thumb screws securing the cover, remove them. 5. Press the button on page 68. If there are connected to the computer. 4. The following illustration will help you locate the major FRUs in the computer. Disconnect all cables attached to remove. Locations To remove the computer cover, see "Removing the cover" on the left-side cover and slide the cover to the rear to the computer. 3.
Hardware Maintenance Manual
Page 90
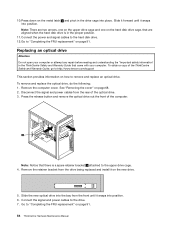
...the rear of the computer. Go to :http://www.lenovo.com/support This section provides information on page 68. 2. To obtain a copy of the ThinkCentre Safety and Warranty Guide, go to "Completing the FRU replacement" on page 91. 84 ThinkCentre Hardware Maintenance Manual Note: There are aligned when the...cage. 4. Press the release button and remove the optical drive out the front of the optical drive. 3. Press down on the new drive. 5. Connect the signal and power cables to the hard disk drive. 12. Note: Notice that there is in the ThinkCentre Safety and Warranty Guide that are...
...the rear of the computer. Go to :http://www.lenovo.com/support This section provides information on page 68. 2. To obtain a copy of the ThinkCentre Safety and Warranty Guide, go to "Completing the FRU replacement" on page 91. 84 ThinkCentre Hardware Maintenance Manual Note: There are aligned when the...cage. 4. Press the release button and remove the optical drive out the front of the optical drive. 3. Press down on the new drive. 5. Connect the signal and power cables to the hard disk drive. 12. Note: Notice that there is in the ThinkCentre Safety and Warranty Guide that are...
Hardware Maintenance Manual
Page 91
... bezel. Press the release button and slide the diskette drive out the front of the ThinkCentre Safety and Warranty Guide, go to:http://www.lenovo.com/support This procedure provides information on page 91. Remove the retainer bracket from the rear of the diskette drive. 4. Connect the signal and power cables to "Completing the...
... bezel. Press the release button and slide the diskette drive out the front of the ThinkCentre Safety and Warranty Guide, go to:http://www.lenovo.com/support This procedure provides information on page 91. Remove the retainer bracket from the rear of the diskette drive. 4. Connect the signal and power cables to "Completing the...
Hardware Maintenance Manual
Page 100
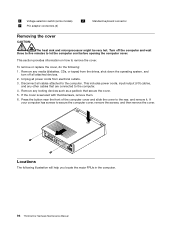
... replace the cover, do the following illustration will help you locate the major FRUs in the computer. 94 ThinkCentre Hardware Maintenance Manual Unplug all attached devices. 2. Press the button near the front of the computer cover and slide the cover to remove the cover. Locations The following :...secure the cover. 5. Disconnect all cables attached to secure the computer cover, remove the screws, and then remove the cover. This includes power cords, input/output (I/O) cables, and any locking devices such as a padlock that are connected to let the computer cool before opening the ...
... replace the cover, do the following illustration will help you locate the major FRUs in the computer. 94 ThinkCentre Hardware Maintenance Manual Unplug all attached devices. 2. Press the button near the front of the computer cover and slide the cover to remove the cover. Locations The following :...secure the cover. 5. Disconnect all cables attached to secure the computer cover, remove the screws, and then remove the cover. This includes power cords, input/output (I/O) cables, and any locking devices such as a padlock that are connected to let the computer cool before opening the ...
Hardware Maintenance Manual
Page 128
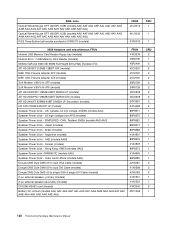
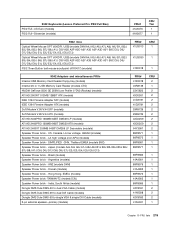
...) DVI-I(M)-VGA(F) cord (models) Battery 3V- Hong Kong, EMEA (models AAG) Speaker Power brick -TAIWAN-TC (models AAV) Speaker Power brick - 3656 mice Optical Wheel Mouse OPT (400DPI, USB) (models AAU AAF AAS ... AAL AAD AAY AAG AAM AAA AAQ AAT AAC AAB AAH AAV AAK AAR AAE AAJ) PS/2 Three Button ball mouse scrollpoint (41R0017) (models) FRU# 41U3013 CRU 1 41U3030 1 41R0018 1 3656 Adapters and miscellaneous...41R3342 45C1566 CRU 2 1 2 2 2 2 2 2 2 2 2 2 1 1 1 1 1 1 1 1 1 1 1 2 2 2 1 1 2 1 122 ThinkCentre Hardware Maintenance Manual US, Canada, LA low voltage, ASEAN (models AAU) Speaker...
...) DVI-I(M)-VGA(F) cord (models) Battery 3V- Hong Kong, EMEA (models AAG) Speaker Power brick -TAIWAN-TC (models AAV) Speaker Power brick - 3656 mice Optical Wheel Mouse OPT (400DPI, USB) (models AAU AAF AAS ... AAL AAD AAY AAG AAM AAA AAQ AAT AAC AAB AAH AAV AAK AAR AAE AAJ) PS/2 Three Button ball mouse scrollpoint (41R0017) (models) FRU# 41U3013 CRU 1 41U3030 1 41R0018 1 3656 Adapters and miscellaneous...41R3342 45C1566 CRU 2 1 2 2 2 2 2 2 2 2 2 2 1 1 1 1 1 1 1 1 1 1 1 2 2 2 1 1 2 1 122 ThinkCentre Hardware Maintenance Manual US, Canada, LA low voltage, ASEAN (models AAU) Speaker...

Hardware Maintenance Manual
Page 154
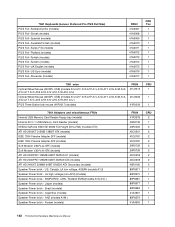
...2 2 2 2 2 2 2 2 2 1 1 1 1 1 1 1 1 148 ThinkCentre Hardware Maintenance Manual LA high voltage (non-APU) (models) Speaker Power brick - ANZ (models B1M) Speaker Power brick - US, Canada, LA low voltage, ASEAN (models A1U A2U A3U B5U B6U B7U B8U ...BBU) Speaker Power brick - 7057 Keyboards (Lenovo Preferred Pro PS/2 Full Size) PS/2 Full--Swiss F/G (models) PS/2 Full...A8P A8D A8Y B5U B5F B6U B6F B7U B7F B8U B8F BBU BBF B9G) PS/2 Three Button ball mouse scrollpoint (41R0017) (models) FRU# 41U3013 CRU 1 41U3030 1 41R0018 1 7057 ...
...2 2 2 2 2 2 2 2 2 1 1 1 1 1 1 1 1 148 ThinkCentre Hardware Maintenance Manual LA high voltage (non-APU) (models) Speaker Power brick - ANZ (models B1M) Speaker Power brick - US, Canada, LA low voltage, ASEAN (models A1U A2U A3U B5U B6U B7U B8U ...BBU) Speaker Power brick - 7057 Keyboards (Lenovo Preferred Pro PS/2 Full Size) PS/2 Full--Swiss F/G (models) PS/2 Full...A8P A8D A8Y B5U B5F B6U B6F B7U B7F B8U B8F BBU BBF B9G) PS/2 Three Button ball mouse scrollpoint (41R0017) (models) FRU# 41U3013 CRU 1 41U3030 1 41R0018 1 7057 ...
Hardware Maintenance Manual
Page 168
...CRU 2 1 2 2 2 2 2 2 2 2 2 1 1 1 1 1 1 1 1 162 ThinkCentre Hardware Maintenance Manual Japan (models) Speaker Power brick - Argentina (models) Speaker Power brick - US, Canada, LA low voltage, ASEAN (models A1U) Speaker Power brick - 7061 Keyboards (Lenovo Preferred Pro PS/2 Full Size) PS/2 Full--Serbian/Cyrillic (models) PS/2 Full--Slovak (models...models A1U A1F A1S A1P A1L A1D A1Y A1G A1M A1A A1Q A1T A1C A1B A1H A1V A1K A1R A1E A1J ) PS/2 Three Button ball mouse (41R0017) (models) FRU# 41U3013 41U3030 41R0018 CRU 1 1 1 7061 Adapters and miscellaneous FRUs Internal USB Memory Card ...
...CRU 2 1 2 2 2 2 2 2 2 2 2 1 1 1 1 1 1 1 1 162 ThinkCentre Hardware Maintenance Manual Japan (models) Speaker Power brick - Argentina (models) Speaker Power brick - US, Canada, LA low voltage, ASEAN (models A1U) Speaker Power brick - 7061 Keyboards (Lenovo Preferred Pro PS/2 Full Size) PS/2 Full--Serbian/Cyrillic (models) PS/2 Full--Slovak (models...models A1U A1F A1S A1P A1L A1D A1Y A1G A1M A1A A1Q A1T A1C A1B A1H A1V A1K A1R A1E A1J ) PS/2 Three Button ball mouse (41R0017) (models) FRU# 41U3013 41U3030 41R0018 CRU 1 1 1 7061 Adapters and miscellaneous FRUs Internal USB Memory Card ...
Hardware Maintenance Manual
Page 221
...42Y8183 41A5331 CRU 2 1 2 2 2 2 2 2 2 2 2 1 1 1 1 1 1 1 1 1 1 1 2 2 2 1 Chapter 10 FRU lists 215 US, Canada, LA low voltage, ASEAN (models) Speaker Power brick - 9342 Keyboards (Lenovo Preferred Pro PS/2 Full Size) PS/2 Full--US Euro (models) PS/2 Full--Slovenian (models) FRU# 41A5076 41A5077 CRU Tier 1 1 9342 mice Optical Wheel Mouse...D3V A2S A2P A2D A2Y A3S A3P A3D A3Y B9C D5J D6J D7J D8J D9J E1J E2J E3J E4J E5J E6J E7J) PS/2 Three Button ball mouse scrollpoint (41R0017) (models) FRU# 41U3013 41U3030 41R0018 CRU 1 1 1 9342 Adapters and miscellaneous FRUs Internal USB Memory Card ...
...42Y8183 41A5331 CRU 2 1 2 2 2 2 2 2 2 2 2 1 1 1 1 1 1 1 1 1 1 1 2 2 2 1 Chapter 10 FRU lists 215 US, Canada, LA low voltage, ASEAN (models) Speaker Power brick - 9342 Keyboards (Lenovo Preferred Pro PS/2 Full Size) PS/2 Full--US Euro (models) PS/2 Full--Slovenian (models) FRU# 41A5076 41A5077 CRU Tier 1 1 9342 mice Optical Wheel Mouse...D3V A2S A2P A2D A2Y A3S A3P A3D A3Y B9C D5J D6J D7J D8J D9J E1J E2J E3J E4J E5J E6J E7J) PS/2 Three Button ball mouse scrollpoint (41R0017) (models) FRU# 41U3013 41U3030 41R0018 CRU 1 1 1 9342 Adapters and miscellaneous FRUs Internal USB Memory Card ...
Hardware Maintenance Manual
Page 234
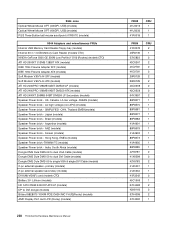
...Display Port card LP® (Rocky) (models) 228 ThinkCentre Hardware Maintenance Manual FRU# 41U3013 41U3030 41R0018 CRU 1 ...2 2 2 1 SIMPLIFIED -CHN, Thailand EMEA(models) Speaker Power brick - Korean (models) Speaker Power brick - Japan (models) Speaker Power brick - ANZ (models) Speaker Power brick - US, Canada, LA low voltage, ASEAN (models) Speaker Power brick - Argentina (models) Speaker Power brick - Lithium (models) HD 3470 256M 64bit DP ATX/... Wheel Mouse OPT (400DPI, USB) (models) PS/2 Three Button ball mouse scrollpoint (41R0017) (models) 9344 Adapters and miscellaneous...
...Display Port card LP® (Rocky) (models) 228 ThinkCentre Hardware Maintenance Manual FRU# 41U3013 41U3030 41R0018 CRU 1 ...2 2 2 1 SIMPLIFIED -CHN, Thailand EMEA(models) Speaker Power brick - Korean (models) Speaker Power brick - Japan (models) Speaker Power brick - ANZ (models) Speaker Power brick - US, Canada, LA low voltage, ASEAN (models) Speaker Power brick - Argentina (models) Speaker Power brick - Lithium (models) HD 3470 256M 64bit DP ATX/... Wheel Mouse OPT (400DPI, USB) (models) PS/2 Three Button ball mouse scrollpoint (41R0017) (models) 9344 Adapters and miscellaneous...

(English) Rescue and Recovery 4.3 Deployment Guide
Page 31
... suppressed, enter the following command: : Silent install using the power button. 8. Capturing a multiple partition machine and excluding files in a Sysprep backup To capture multiple partitions in C:\tvtrr\Program Files\Lenovo\Rescue and Recovery: To EXCLUDE a partition, add the following to...the machine boots, it will appear. 6. The status bar with a reboot : Type the following command on one line cd "\Program Files\Lenovo\Rescue and Recovery" rrcmd sysprepbackup location=l name="Sysprep Backup" If you see the following message: ** Ready to take a backup. ** 5. ...
... suppressed, enter the following command: : Silent install using the power button. 8. Capturing a multiple partition machine and excluding files in a Sysprep backup To capture multiple partitions in C:\tvtrr\Program Files\Lenovo\Rescue and Recovery: To EXCLUDE a partition, add the following to...the machine boots, it will appear. 6. The status bar with a reboot : Type the following command on one line cd "\Program Files\Lenovo\Rescue and Recovery" rrcmd sysprepbackup location=l name="Sysprep Backup" If you see the following message: ** Ready to take a backup. ** 5. ...
(English) Rescue and Recovery 4.3 Deployment Guide
Page 32
...Lenovo\Rescue and Recovery\Settings\BackupList. Capture the image for deployment. 24 Rescue and Recovery 4.3 Deployment Guide If you want to use a password, add the syntax password=pass. 6. When complete, the message Sysprep Backup is complete. Install the Rescue and Recovery program using the power button...msiexec /i "C:\TVTRR\Rescue and Recovery.msi" c. Note: The operating system will boot ** ** to include them at : http://www.lenovo.com/support/site.wss/document.do?lndocid=TVANADMIN#rnr 3. To install the setup files using the MSI without a reboot : Type the ...
...Lenovo\Rescue and Recovery\Settings\BackupList. Capture the image for deployment. 24 Rescue and Recovery 4.3 Deployment Guide If you want to use a password, add the syntax password=pass. 6. When complete, the message Sysprep Backup is complete. Install the Rescue and Recovery program using the power button...msiexec /i "C:\TVTRR\Rescue and Recovery.msi" c. Note: The operating system will boot ** ** to include them at : http://www.lenovo.com/support/site.wss/document.do?lndocid=TVANADMIN#rnr 3. To install the setup files using the MSI without a reboot : Type the ...
(English) Rescue and Recovery 4.5 Deployment Guide
Page 26
...: With reboot at the end, enter the following command: : Silent install using the MSI with System Restore in C:\tvtrr\Program Files\Lenovo\Rescue and Recovery: To EXCLUDE a partition, add the following command: : Perform the install of the Rescue and Recovery program. Perform an...ADM supplement on one line cd "\Program Files\Lenovo\Rescue and Recovery" rrcmd sysprepbackup location=l name="Sysprep Backup" If you see the following command: : Silent install using the MSIEXE file: a. To install the setup files using the power button. 8. Enter the following commands: : Start ...
...: With reboot at the end, enter the following command: : Silent install using the MSI with System Restore in C:\tvtrr\Program Files\Lenovo\Rescue and Recovery: To EXCLUDE a partition, add the following command: : Perform the install of the Rescue and Recovery program. Perform an...ADM supplement on one line cd "\Program Files\Lenovo\Rescue and Recovery" rrcmd sysprepbackup location=l name="Sysprep Backup" If you see the following command: : Silent install using the MSIEXE file: a. To install the setup files using the power button. 8. Enter the following commands: : Start ...

(English) Rescue and Recovery 4.5 Deployment Guide
Page 27
... To silently install the setup files using MSIEXE: With reboot at : HKLM\SOFTWARE\Lenovo\Rescue and Recovery\Settings\BackupList. Capture the image for Primary partitions. Configurations 21 Power off the system using the MSI without a reboot : Type the following command on .... Note: The operating system will boot ** ** to Local Hard Drive : Type the following command: : Silent install using the power button. 10. When complete, the message Sysprep Backup is complete. 3. Supported Sysprep multiple drive configurations Windows PE drive enumeration may be different...
... To silently install the setup files using MSIEXE: With reboot at : HKLM\SOFTWARE\Lenovo\Rescue and Recovery\Settings\BackupList. Capture the image for Primary partitions. Configurations 21 Power off the system using the MSI without a reboot : Type the following command on .... Note: The operating system will boot ** ** to Local Hard Drive : Type the following command: : Silent install using the power button. 10. When complete, the message Sysprep Backup is complete. 3. Supported Sysprep multiple drive configurations Windows PE drive enumeration may be different...
(Simplified Chinese) Power Manager Deployment Guide
Page 21
表 2 USB selective suspend (DC)(USB Power button (AC Power button (DC Start menu power button (AC Start menu power button (DC Windows XP Windows Windows XP Windows Windows XP Windows Windows Vista Windows Windows Vista Global Power Setting 第 3 Active Directory 和 ADM 文件 15
表 2 USB selective suspend (DC)(USB Power button (AC Power button (DC Start menu power button (AC Start menu power button (DC Windows XP Windows Windows XP Windows Windows XP Windows Windows Vista Windows Windows Vista Global Power Setting 第 3 Active Directory 和 ADM 文件 15
(Japanese) Power Manager Deployment Guide
Page 22
表 2 Search and indexing (AC AC)) Power Saver Balanced High performance Search and indexing (DC DC)) Windows XP Power Saver Balanced High performance USB selective suspend (AC) (USB AC)) Windows XP Enabled USB selective suspend (DC) (USB DC)) Windows XP Enabled Power button (AC AC)) Windows XP Windows Do nothing Sleep Hibernate Shut down Windows XP 16 Power Manager
表 2 Search and indexing (AC AC)) Power Saver Balanced High performance Search and indexing (DC DC)) Windows XP Power Saver Balanced High performance USB selective suspend (AC) (USB AC)) Windows XP Enabled USB selective suspend (DC) (USB DC)) Windows XP Enabled Power button (AC AC)) Windows XP Windows Do nothing Sleep Hibernate Shut down Windows XP 16 Power Manager
(Japanese) Power Manager Deployment Guide
Page 26
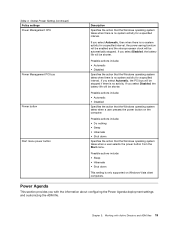
表 3 Power button 説明 Windows Start menu power button • Do nothing Sleep Hibernate Shut down Windows Sleep Hibernate Shut down Windows Vista ADM 『Power Agenda 『Power Agenda 『Power Agenda Windows XP Lenovo ThinkVantage Power Manager Windows Vista および Windows 7 Lenovo ThinkVantage Vista および Windows7 用 Desktop Power Manager 20 Power Manager
表 3 Power button 説明 Windows Start menu power button • Do nothing Sleep Hibernate Shut down Windows Sleep Hibernate Shut down Windows Vista ADM 『Power Agenda 『Power Agenda 『Power Agenda Windows XP Lenovo ThinkVantage Power Manager Windows Vista および Windows 7 Lenovo ThinkVantage Vista および Windows7 用 Desktop Power Manager 20 Power Manager
(English) Power Manager Deployment Guide
Page 22
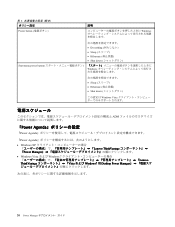
... the action that the Windows operating system takes when a user presses the power button on Windows XP client computers. Possible actions include: • Sleep • Hibernate 16 Power ManagerDeployment Guide Possible actions include: • Do nothing • Sleep &#...operating system takes when a user presses the power button on Windows XP client computers. Power Plan (Scheme) Deployments (continued) Policy settings USB selective suspend (DC) Power button (AC) Power button (DC) Start menu power button (AC) Start menu power button (DC) Description Specifies whether or not the...
... the action that the Windows operating system takes when a user presses the power button on Windows XP client computers. Possible actions include: • Sleep • Hibernate 16 Power ManagerDeployment Guide Possible actions include: • Do nothing • Sleep &#...operating system takes when a user presses the power button on Windows XP client computers. Power Plan (Scheme) Deployments (continued) Policy settings USB selective suspend (DC) Power button (AC) Power button (DC) Start menu power button (AC) Start menu power button (DC) Description Specifies whether or not the...
(English) Power Manager Deployment Guide
Page 25
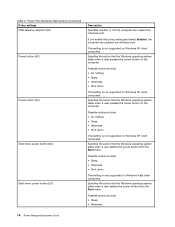
...provides you select Disabled, the battery life will be automatically stopped. Table 3. Global Power Setting (continued) Policy settings Power Management CPU Power Management PCI bus Power button Start menu power button Description Specifies the action that the Windows operating system takes when there is no ...8226; Sleep • Hibernate • Shut down Specifies the action that the Windows operating system takes when a user presses the power button on Windows Vista client computers. If you select Automatic, the PCI bus will be shorter. Chapter 3. Possible actions include: &#...
...provides you select Disabled, the battery life will be automatically stopped. Table 3. Global Power Setting (continued) Policy settings Power Management CPU Power Management PCI bus Power button Start menu power button Description Specifies the action that the Windows operating system takes when there is no ...8226; Sleep • Hibernate • Shut down Specifies the action that the Windows operating system takes when a user presses the power button on Windows Vista client computers. If you select Automatic, the PCI bus will be shorter. Chapter 3. Possible actions include: &#...
(English US/UK) User guide
Page 75
... the computer. Troubleshooting and diagnostics This chapter describes some basic troubleshooting and diagnostic programs. If your computer problems. Note: If you press the power button. For a list of the computer, make sure that comes with your computer or go to help , and service," on . v If...on and the brightness and contrast controls are stuck. © Copyright Lenovo 2008, 2009 67 Note: If your computer has a secondary power switch on the back of service and support telephone numbers, refer to the ThinkCentre Safety and Warranty Guide that it is not described here, see ...
... the computer. Troubleshooting and diagnostics This chapter describes some basic troubleshooting and diagnostic programs. If your computer problems. Note: If you press the power button. For a list of the computer, make sure that comes with your computer or go to help , and service," on . v If...on and the brightness and contrast controls are stuck. © Copyright Lenovo 2008, 2009 67 Note: If your computer has a secondary power switch on the back of service and support telephone numbers, refer to the ThinkCentre Safety and Warranty Guide that it is not described here, see ...

