Hardware Maintenance Manual
Page 1
ThinkCentre Hardware Maintenance Manual Machine Types: 3656, 3658, 7057, 7061, 7062, 7090, 7092, 9342, 9344, 9353, 9354, 9421, 9426, 9485, 9486, 9623, 9624, 9625, 9705, 9707, 9786, 9787, 9795, 9804, 9935, 9945, 9946, and 9953.
ThinkCentre Hardware Maintenance Manual Machine Types: 3656, 3658, 7057, 7061, 7062, 7090, 7092, 9342, 9344, 9353, 9354, 9421, 9426, 9485, 9486, 9623, 9624, 9625, 9705, 9707, 9786, 9787, 9795, 9804, 9935, 9945, 9946, and 9953.
Hardware Maintenance Manual
Page 3
ThinkCentre Hardware Maintenance Manual Machine Types: 3656, 3658, 7057, 7061, 7062, 7090, 7092, 9342, 9344, 9353, 9354, 9421, 9426, 9485, 9486, 9623, 9624, 9625, 9705, 9707, 9786, 9787, 9795, 9804, 9935, 9945, 9946, and 9953.
ThinkCentre Hardware Maintenance Manual Machine Types: 3656, 3658, 7057, 7061, 7062, 7090, 7092, 9342, 9344, 9353, 9354, 9421, 9426, 9485, 9486, 9623, 9624, 9625, 9705, 9707, 9786, 9787, 9795, 9804, 9935, 9945, 9946, and 9953.
Hardware Maintenance Manual
Page 5
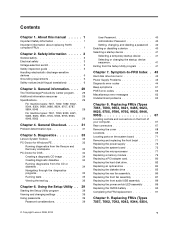
... 6. General Checkout. . . . . 31 Problem determination tips 31 Chapter 5. Replacing FRUs (Types 7061, 7090, 9353, 9421, 9485, 9623, 9625, 9705, 9786, 9795, 9935, 9946, 9953 67 Locating controls and connectors on the front of your computer 67 Rear connectors 67 Removing the cover ...Replacing the CMOS battery 90 Completing the FRU replacement 91 Chapter 9. Replacing FRUs (Types 7057, 7062, 7092, 9342, 9344, 9354, © Copyright Lenovo 2008, 2010 v Contents Chapter 1. Symptom-to-FRU Index . 43 Hard disk drive boot error 43 Power Supply Problems 43 Diagnostic error codes 44 ...
... 6. General Checkout. . . . . 31 Problem determination tips 31 Chapter 5. Replacing FRUs (Types 7061, 7090, 9353, 9421, 9485, 9623, 9625, 9705, 9786, 9795, 9935, 9946, 9953 67 Locating controls and connectors on the front of your computer 67 Rear connectors 67 Removing the cover ...Replacing the CMOS battery 90 Completing the FRU replacement 91 Chapter 9. Replacing FRUs (Types 7057, 7062, 7092, 9342, 9344, 9354, © Copyright Lenovo 2008, 2010 v Contents Chapter 1. Symptom-to-FRU Index . 43 Hard disk drive boot error 43 Power Supply Problems 43 Diagnostic error codes 44 ...
Hardware Maintenance Manual
Page 6
... Automatic configuration and power interface (ACPI) BIOS 468 Automatic Power-On features 468 Appendix A. Notices 471 Television output notice 472 Trademarks 472 vi ThinkCentre Hardware Maintenance Manual 9426, 9486, 9624, 9707, 9787, 9804, 9945 93 Rear connectors 93 Removing the cover 94 Locations 94 Locating parts ...260 Machine Type 9426 273 Machine Type 9485 286 Machine Type 9486 302 Machine Type 9623 318 Machine Type 9624 331 Machine Type 9625 344 Machine Type 9705 358 Machine Type 9707 371 Machine Type 9795 385 Machine Type 9804 398 Machine Type 9935 411 Machine Type...
... Automatic configuration and power interface (ACPI) BIOS 468 Automatic Power-On features 468 Appendix A. Notices 471 Television output notice 472 Trademarks 472 vi ThinkCentre Hardware Maintenance Manual 9426, 9486, 9624, 9707, 9787, 9804, 9945 93 Rear connectors 93 Removing the cover 94 Locations 94 Locating parts ...260 Machine Type 9426 273 Machine Type 9485 286 Machine Type 9486 302 Machine Type 9623 318 Machine Type 9624 331 Machine Type 9625 344 Machine Type 9705 358 Machine Type 9707 371 Machine Type 9795 385 Machine Type 9804 398 Machine Type 9935 411 Machine Type...
Hardware Maintenance Manual
Page 35
...19.4 lbs) For machine types: 7061, 7090, 9353, 9421, 9485, 9623, 9625, 9705, 9786, 9795, 9935, 9946, 9953 This section lists the physical specifications. © Copyright Lenovo 2008, 2010 29 The ThinkVantage Productivity Center program is available from the World Wide Web....the computer. The ThinkVantage Productivity Center program Use the ThinkVantage® Productivity Center program for your computer is preinstalled on most ThinkCentre products. You can find the following information: • CRU removal and installation instructions • Publications • Troubleshooting ...
...19.4 lbs) For machine types: 7061, 7090, 9353, 9421, 9485, 9623, 9625, 9705, 9786, 9795, 9935, 9946, 9953 This section lists the physical specifications. © Copyright Lenovo 2008, 2010 29 The ThinkVantage Productivity Center program is available from the World Wide Web....the computer. The ThinkVantage Productivity Center program Use the ThinkVantage® Productivity Center program for your computer is preinstalled on most ThinkCentre products. You can find the following information: • CRU removal and installation instructions • Publications • Troubleshooting ...

Hardware Maintenance Manual
Page 73
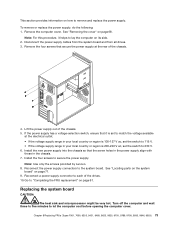
...connectors on the front of your computer The following illustration shows the locations of the connectors on the front of the computer. © Copyright Lenovo 2008, 2010 67 This chapter does not contain a remove and replace procedure for all computer models will help you replace any FRU, read ...Chapter 2 "Safety information" on page 3. Note: Not all FRUs. Replacing FRUs (Types 7061, 7090, 9353, 9421, 9485, 9623, 9625, 9705, 9786, 9795, 9935, 9946, 9953) Important Before you work safely. FRU replacements are documented. Only the major FRUs are to be done by ...
...connectors on the front of your computer The following illustration shows the locations of the connectors on the front of the computer. © Copyright Lenovo 2008, 2010 67 This chapter does not contain a remove and replace procedure for all computer models will help you replace any FRU, read ...Chapter 2 "Safety information" on page 3. Note: Not all FRUs. Replacing FRUs (Types 7061, 7090, 9353, 9421, 9485, 9623, 9625, 9705, 9786, 9795, 9935, 9946, 9953) Important Before you work safely. FRU replacements are documented. Only the major FRUs are to be done by ...
Hardware Maintenance Manual
Page 75
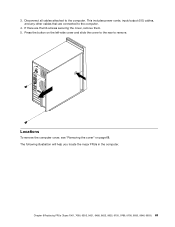
Press the button on page 68. Disconnect all cables attached to remove. Locations To remove the computer cover, see "Removing the cover" on the left-side cover and slide the cover to the rear to the computer. Chapter 8 Replacing FRUs (Types 7061, 7090, 9353, 9421, 9485, 9623, 9625, 9705, 9786, 9795, 9935, 9946, 9953) 69 3. The following illustration will help you locate the major FRUs in the computer. This includes power cords, input/output (I/O) cables, and any other cables that are thumb screws securing the cover, remove them. 5. If there are connected to the computer. 4.
Press the button on page 68. Disconnect all cables attached to remove. Locations To remove the computer cover, see "Removing the cover" on the left-side cover and slide the cover to the rear to the computer. Chapter 8 Replacing FRUs (Types 7061, 7090, 9353, 9421, 9485, 9623, 9625, 9705, 9786, 9795, 9935, 9946, 9953) 69 3. The following illustration will help you locate the major FRUs in the computer. This includes power cords, input/output (I/O) cables, and any other cables that are thumb screws securing the cover, remove them. 5. If there are connected to the computer. 4.
Hardware Maintenance Manual
Page 77
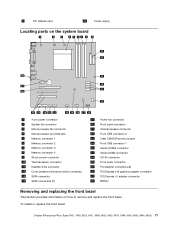
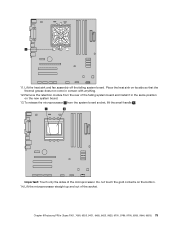
To install or replace the front bezel: Chapter 8 Replacing FRUs (Types 7061, 7090, 9353, 9421, 9485, 9623, 9625, 9705, 9786, 9795, 9935, 9946, 9953) 71 5 PCI adapter card 10 Power supply Locating parts on the system board 1 4-pin power connector 2 System fan connector 3 ...
To install or replace the front bezel: Chapter 8 Replacing FRUs (Types 7061, 7090, 9353, 9421, 9485, 9623, 9625, 9705, 9786, 9795, 9935, 9946, 9953) 71 5 PCI adapter card 10 Power supply Locating parts on the system board 1 4-pin power connector 2 System fan connector 3 ...
Hardware Maintenance Manual
Page 79
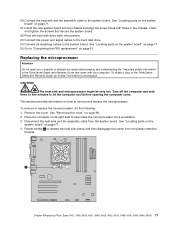
... computer on page 71. 9. Replacing the system board CAUTION: The heat sink and microprocessor might be very hot. Note: Use only the screws provided by Lenovo. 8. Turn off the computer and wait three to five minutes to the system board. Lift the power supply out of the drives. 10. Disconnect the... supply. Go to 230 V. 6. This section provides information on how to secure the power supply. Chapter 8 Replacing FRUs (Types 7061, 7090, 9353, 9421, 9485, 9623, 9625, 9705, 9786, 9795, 9935, 9946, 9953) 73 To remove or replace the power supply, do the following: 1.
... computer on page 71. 9. Replacing the system board CAUTION: The heat sink and microprocessor might be very hot. Note: Use only the screws provided by Lenovo. 8. Turn off the computer and wait three to five minutes to the system board. Lift the power supply out of the drives. 10. Disconnect the... supply. Go to 230 V. 6. This section provides information on how to secure the power supply. Chapter 8 Replacing FRUs (Types 7061, 7090, 9353, 9421, 9485, 9623, 9625, 9705, 9786, 9795, 9935, 9946, 9953) 73 To remove or replace the power supply, do the following: 1.
Hardware Maintenance Manual
Page 81
Remove the retention module from the system board socket, lift the small handle 1 . Chapter 8 Replacing FRUs (Types 7061, 7090, 9353, 9421, 9485, 9623, 9625, 9705, 9786, 9795, 9935, 9946, 9953) 75 11. To release the microprocessor 2 from the rear of the failing system board and install it in contact ...
Remove the retention module from the system board socket, lift the small handle 1 . Chapter 8 Replacing FRUs (Types 7061, 7090, 9353, 9421, 9485, 9623, 9625, 9705, 9786, 9795, 9935, 9946, 9953) 75 11. To release the microprocessor 2 from the rear of the failing system board and install it in contact ...
Hardware Maintenance Manual
Page 83
... 24. 20. See "Locating parts on the system board" on page 71. 4. Connect the power and signal cables to :http://www.lenovo.com/support CAUTION: The heat sink and microprocessor might be very hot. Disconnect the heat sink and fan assembly cable from the plastic retention ... the system board. Insert and tighten the screws that came with those in the ThinkCentre Safety and Warranty Guide that secure the system board. 22. Chapter 8 Replacing FRUs (Types 7061, 7090, 9353, 9421, 9485, 9623, 9625, 9705, 9786, 9795, 9935, 9946, 9953) 77 This section provides information on...
... 24. 20. See "Locating parts on the system board" on page 71. 4. Connect the power and signal cables to :http://www.lenovo.com/support CAUTION: The heat sink and microprocessor might be very hot. Disconnect the heat sink and fan assembly cable from the plastic retention ... the system board. Insert and tighten the screws that came with those in the ThinkCentre Safety and Warranty Guide that secure the system board. 22. Chapter 8 Replacing FRUs (Types 7061, 7090, 9353, 9421, 9485, 9623, 9625, 9705, 9786, 9795, 9935, 9946, 9953) 77 This section provides information on...

Hardware Maintenance Manual
Page 85
... board. 14. See "Removing the cover" on the plastic retention bracket. Chapter 8 Replacing FRUs (Types 7061, 7090, 9353, 9421, 9485, 9623, 9625, 9705, 9786, 9795, 9935, 9946, 9953) 79 Pivot the handle to clamp the heat sink to lay the computer on how to the system board... and Warranty Guide that came with your computer. Lower the microprocessor straight down into the system board socket of the ThinkCentre Safety and Warranty Guide, go to:http://www.lenovo.com/support This section provides information on its side. 2. Lower the small handle to "Completing the FRU replacement" ...
... board. 14. See "Removing the cover" on the plastic retention bracket. Chapter 8 Replacing FRUs (Types 7061, 7090, 9353, 9421, 9485, 9623, 9625, 9705, 9786, 9795, 9935, 9946, 9953) 79 Pivot the handle to clamp the heat sink to lay the computer on how to the system board... and Warranty Guide that came with your computer. Lower the microprocessor straight down into the system board socket of the ThinkCentre Safety and Warranty Guide, go to:http://www.lenovo.com/support This section provides information on its side. 2. Lower the small handle to "Completing the FRU replacement" ...
Hardware Maintenance Manual
Page 87
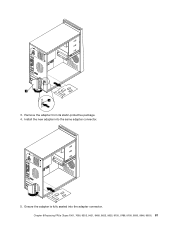
Ensure the adapter is fully seated into the same adapter connector. 5. Install the new adapter into the adapter connector. Chapter 8 Replacing FRUs (Types 7061, 7090, 9353, 9421, 9485, 9623, 9625, 9705, 9786, 9795, 9935, 9946, 9953) 81 3. Remove the adapter from its static-protective package. 4.
Ensure the adapter is fully seated into the same adapter connector. 5. Install the new adapter into the adapter connector. Chapter 8 Replacing FRUs (Types 7061, 7090, 9353, 9421, 9485, 9623, 9625, 9705, 9786, 9795, 9935, 9946, 9953) 81 3. Remove the adapter from its static-protective package. 4.

Hardware Maintenance Manual
Page 89
Align the drive cage pivot pin with the slot 1 in the upper drive cage and slide the hard disk drive into position. 9. Chapter 8 Replacing FRUs (Types 7061, 7090, 9353, 9421, 9485, 9623, 9625, 9705, 9786, 9795, 9935, 9946, 9953) 83 8. Slide the new hard disk drive into the drive cage until it snaps into the chassis.
Align the drive cage pivot pin with the slot 1 in the upper drive cage and slide the hard disk drive into position. 9. Chapter 8 Replacing FRUs (Types 7061, 7090, 9353, 9421, 9485, 9623, 9625, 9705, 9786, 9795, 9935, 9946, 9953) 83 8. Slide the new hard disk drive into the drive cage until it snaps into the chassis.
Hardware Maintenance Manual
Page 91
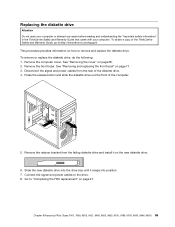
... remove and replace the diskette drive. To obtain a copy of the ThinkCentre Safety and Warranty Guide, go to the drive. 8. Chapter 8 Replacing FRUs (Types 7061, 7090, 9353, 9421, 9485, 9623, 9625, 9705, 9786, 9795, 9935, 9946, 9953) 85 Replacing the diskette...ThinkCentre Safety and Warranty Guide that came with your computer. See "Removing the cover" on page 71. 3. See "Removing and replacing the front bezel" on page 68. 2. Remove the retainer bracket from the rear of the computer. 5. Remove the computer cover. Connect the signal and power cables to :http://www.lenovo...
... remove and replace the diskette drive. To obtain a copy of the ThinkCentre Safety and Warranty Guide, go to the drive. 8. Chapter 8 Replacing FRUs (Types 7061, 7090, 9353, 9421, 9485, 9623, 9625, 9705, 9786, 9795, 9935, 9946, 9953) 85 Replacing the diskette...ThinkCentre Safety and Warranty Guide that came with your computer. See "Removing the cover" on page 71. 3. See "Removing and replacing the front bezel" on page 68. 2. Remove the retainer bracket from the rear of the computer. 5. Remove the computer cover. Connect the signal and power cables to :http://www.lenovo...
Hardware Maintenance Manual
Page 93
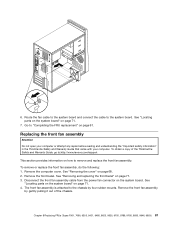
... computer cover. See "Removing and replacing the front bezel" on page 68. 2. Chapter 8 Replacing FRUs (Types 7061, 7090, 9353, 9421, 9485, 9623, 9625, 9705, 9786, 9795, 9935, 9946, 9953) 87 Replacing the front fan assembly Attention Do not open your computer or attempt any repair before reading and ... Remove the front bezel. The front fan assembly is attached to the chassis by gently pulling it out of the ThinkCentre Safety and Warranty Guide, go to:http://www.lenovo.com/support This section provides information on how to remove and replace the front fan assembly. Go to the system ...
... computer cover. See "Removing and replacing the front bezel" on page 68. 2. Chapter 8 Replacing FRUs (Types 7061, 7090, 9353, 9421, 9485, 9623, 9625, 9705, 9786, 9795, 9935, 9946, 9953) 87 Replacing the front fan assembly Attention Do not open your computer or attempt any repair before reading and ... Remove the front bezel. The front fan assembly is attached to the chassis by gently pulling it out of the ThinkCentre Safety and Warranty Guide, go to:http://www.lenovo.com/support This section provides information on how to remove and replace the front fan assembly. Go to the system ...
Hardware Maintenance Manual
Page 95
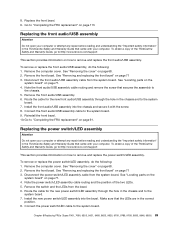
... the bezel. 6. Remove the switch and the LEDs from the system board. Chapter 8 Replacing FRUs (Types 7061, 7090, 9353, 9421, 9485, 9623, 9625, 9705, 9786, 9795, 9935, 9946, 9953) 89 Replace the front bezel. 9. Disconnect the front audio/USB assembly cable from the system board. Install...: 1. Remove the front bezel. Remove the computer cover. Reinstall the front bezel. 10. To obtain a copy of the ThinkCentre Safety and Warranty Guide, go to:http://www.lenovo.com/support This section provides information on how to the system board. 9. See "Locating parts on the system board" on...
... the bezel. 6. Remove the switch and the LEDs from the system board. Chapter 8 Replacing FRUs (Types 7061, 7090, 9353, 9421, 9485, 9623, 9625, 9705, 9786, 9795, 9935, 9946, 9953) 89 Replace the front bezel. 9. Disconnect the front audio/USB assembly cable from the system board. Install...: 1. Remove the front bezel. Remove the computer cover. Reinstall the front bezel. 10. To obtain a copy of the ThinkCentre Safety and Warranty Guide, go to:http://www.lenovo.com/support This section provides information on how to the system board. 9. See "Locating parts on the system board" on...
Hardware Maintenance Manual
Page 97
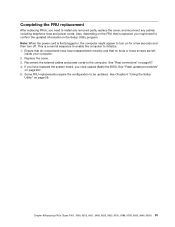
.... Reconnect the external cables and power cords to initialize. 1. See "Rear connectors" on page 467. 5. Chapter 8 Replacing FRUs (Types 7061, 7090, 9353, 9421, 9485, 9623, 9625, 9705, 9786, 9795, 9935, 9946, 9953) 91 This is a normal sequence to enable the computer to the computer. See Chapter 6 "Using the Setup Utility" on...
.... Reconnect the external cables and power cords to initialize. 1. See "Rear connectors" on page 467. 5. Chapter 8 Replacing FRUs (Types 7061, 7090, 9353, 9421, 9485, 9623, 9625, 9705, 9786, 9795, 9935, 9946, 9953) 91 This is a normal sequence to enable the computer to the computer. See Chapter 6 "Using the Setup Utility" on...
Hardware Maintenance Manual
Page 350
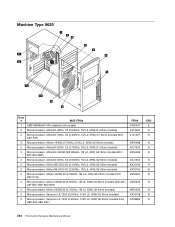
Machine Type 9625 Item # 9625 FRUs 1 AMD 89W&65W 4Pin heatsink (all models) 2 Microprocessor, Athlon64 4800+ X2 (2.50GHz, 1M L2, 65W) G1 65nm (models) 2 Microprocessor, Athlon64 5000+ X2 (2.60GHz, 1M ...) G2 65nm (models A4G A8S A8P A8D A8Y ) FRU# 41R6407 43C4093 41X1427 45R6488 45C7502 45R6486 45C7504 43C6166 43C6165 46R3624 46R3625 46R3626 43C6168 43C8986 CRU 2 N N N N N N N N N N N N N 344 ThinkCentre Hardware Maintenance Manual
Machine Type 9625 Item # 9625 FRUs 1 AMD 89W&65W 4Pin heatsink (all models) 2 Microprocessor, Athlon64 4800+ X2 (2.50GHz, 1M L2, 65W) G1 65nm (models) 2 Microprocessor, Athlon64 5000+ X2 (2.60GHz, 1M ...) G2 65nm (models A4G A8S A8P A8D A8Y ) FRU# 41R6407 43C4093 41X1427 45R6488 45C7502 45R6486 45C7504 43C6166 43C6165 46R3624 46R3625 46R3626 43C6168 43C8986 CRU 2 N N N N N N N N N N N N N 344 ThinkCentre Hardware Maintenance Manual
Hardware Maintenance Manual
Page 351
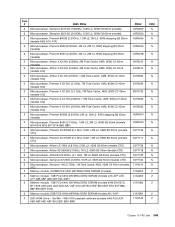
Item # 9625 FRUs 2 Microprocessor, Sempron 2100 X2 (1.80GHz, 512K L2, 65W) G2 65nm (models) 2 Microprocessor, Sempron 2200 X2 (2.00GHz, 512K L2, 65W) G2 65nm (models) 2 Microprocessor, Phenom ...
Item # 9625 FRUs 2 Microprocessor, Sempron 2100 X2 (1.80GHz, 512K L2, 65W) G2 65nm (models) 2 Microprocessor, Sempron 2200 X2 (2.00GHz, 512K L2, 65W) G2 65nm (models) 2 Microprocessor, Phenom ...