Hardware Maintenance Manual
Page 5
... 39 Numeric error codes 39 Error messages 43 Beep symptoms 44 © Copyright Lenovo 2007, 2008 No-beep symptoms 44 LCD-related symptoms 45 Intermittent problems 46 Undetermined problems 46 R61, R61e, and R61i (15.4-inch widescreen 47 Specifications 48 Status indicators 51 FRU tests 54 Fn key... 1070 Optical drive for R61e and R61i . . . . . 74 1080 Modem daughter card (MDC-1.5) . . . . 75 1090 PCI Express Mini Card for wireless LAN . . 77 1100 Backup battery 79 1110 Keyboard bezel and speakers 80 1120 Fan assembly 83 1130 CPU 86 1140 LCD assembly 87 1150 Base cover, USB sub ...
... 39 Numeric error codes 39 Error messages 43 Beep symptoms 44 © Copyright Lenovo 2007, 2008 No-beep symptoms 44 LCD-related symptoms 45 Intermittent problems 46 Undetermined problems 46 R61, R61e, and R61i (15.4-inch widescreen 47 Specifications 48 Status indicators 51 FRU tests 54 Fn key... 1070 Optical drive for R61e and R61i . . . . . 74 1080 Modem daughter card (MDC-1.5) . . . . 75 1090 PCI Express Mini Card for wireless LAN . . 77 1100 Backup battery 79 1110 Keyboard bezel and speakers 80 1120 Fan assembly 83 1130 CPU 86 1140 LCD assembly 87 1150 Base cover, USB sub ...

Hardware Maintenance Manual
Page 32
...following list: The following are not covered under the warranty by referring to excessive force, or dropped. 24 ThinkPad R61, R61e, and R61i (15.4-inch widescreen) Hardware Maintenance Manual Before checking problems with multiple labels v Damaged or bent diskette eject ...button v Fuses blown by attachment of a nonsupported device v Forgotten computer password (making the computer unusable) v Sticky keys caused by spilling a liquid onto the keyboard...
...following list: The following are not covered under the warranty by referring to excessive force, or dropped. 24 ThinkPad R61, R61e, and R61i (15.4-inch widescreen) Hardware Maintenance Manual Before checking problems with multiple labels v Damaged or bent diskette eject ...button v Fuses blown by attachment of a nonsupported device v Forgotten computer password (making the computer unusable) v Sticky keys caused by spilling a liquid onto the keyboard...

Hardware Maintenance Manual
Page 35
... Video Adapter v Serial Ports v Parallel Ports v Fixed Disks v Diskette Drives v Other Devices v ThinkPad Devices v Communication v Wireless LAN v Memory Test - Run the applicable function test. The main panel of PC-Doctor appears. 3. Quick v Keyboard v Video v Internal Speaker v Mouse v Diskette v System Load v CD-ROM/DVD Test v... Intel 11abgn Wireless Radio Notes: v In the Keyboard test in the PC-Doctor menu. A pull-down for DOS. Use the cursor keys and ESC to select. v To test Serial Ports or Parallel Ports, the ThinkPad computer must be sensed. Follow the instructions on ...
... Video Adapter v Serial Ports v Parallel Ports v Fixed Disks v Diskette Drives v Other Devices v ThinkPad Devices v Communication v Wireless LAN v Memory Test - Run the applicable function test. The main panel of PC-Doctor appears. 3. Quick v Keyboard v Video v Internal Speaker v Mouse v Diskette v System Load v CD-ROM/DVD Test v... Intel 11abgn Wireless Radio Notes: v In the Keyboard test in the PC-Doctor menu. A pull-down for DOS. Use the cursor keys and ESC to select. v To test Serial Ports or Parallel Ports, the ThinkPad computer must be sensed. Follow the instructions on ...
Hardware Maintenance Manual
Page 45
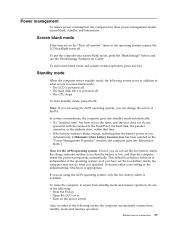
... computer has three power management modes: screen blank, standby, and hibernation. To end screen blank mode and resume normal operation, press any operation with the keyboard, the TrackPoint, the hard disk, the parallel connector, or the diskette drive within that the battery power is low. (Alternatively, if Hibernate when battery becomes...
... computer has three power management modes: screen blank, standby, and hibernation. To end screen blank mode and resume normal operation, press any operation with the keyboard, the TrackPoint, the hard disk, the parallel connector, or the diskette drive within that the battery power is low. (Alternatively, if Hibernate when battery becomes...
Hardware Maintenance Manual
Page 46
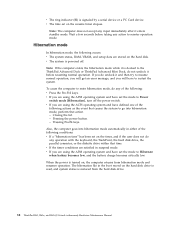
...resume normal operation, you will get an error message, and you are stored on , the computer returns from the hard disk drive. 38 ThinkPad R61, R61e, and R61i (15.4-inch widescreen) Hardware Maintenance Manual Hibernation mode In hibernation mode, the following : v Press the Fn+F12 keys. To cause the computer... Dock or ThinkPad Advanced Mini Dock, do any action to enter hibernation mode, do undock it enters standby mode. Pressing Fn+F4 keys. v The time set on the timer, and if the user does not do not undock it before taking any operation with the keyboard, the TrackPoint, the ...
...resume normal operation, you will get an error message, and you are stored on , the computer returns from the hard disk drive. 38 ThinkPad R61, R61e, and R61i (15.4-inch widescreen) Hardware Maintenance Manual Hibernation mode In hibernation mode, the following : v Press the Fn+F12 keys. To cause the computer... Dock or ThinkPad Advanced Mini Dock, do any action to enter hibernation mode, do undock it enters standby mode. Pressing Fn+F4 keys. v The time set on the timer, and if the user does not do not undock it before taking any operation with the keyboard, the TrackPoint, the ...
Hardware Maintenance Manual
Page 48
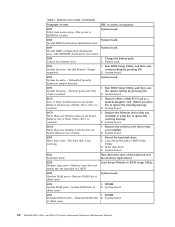
...-battery error 1. Table 1. Run BIOS Setup Utility, and then save the current setting by pressing F10. 2. System board. 021x Keyboard error. System board. 0199 System Security- Remove the Ethernet device that you installed; System board. 0188 System board. System board. 0231... System RAM error-System RAM fails at offset nnnn. 40 ThinkPad R61, R61e, and R61i (15.4-inch widescreen) Hardware Maintenance Manual Reseat the hard disk drive. 2. Embedded Security hardware tamper detected. Run interactive tests...
...-battery error 1. Table 1. Run BIOS Setup Utility, and then save the current setting by pressing F10. 2. System board. 021x Keyboard error. System board. 0199 System Security- Remove the Ethernet device that you installed; System board. 0188 System board. System board. 0231... System RAM error-System RAM fails at offset nnnn. 40 ThinkPad R61, R61e, and R61i (15.4-inch widescreen) Hardware Maintenance Manual Reseat the hard disk drive. 2. Embedded Security hardware tamper detected. Run interactive tests...
Hardware Maintenance Manual
Page 60
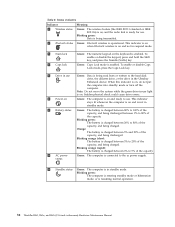
Table 8. This indicator is on when Bluetooth wireless is on the keyboard is in standby mode. To enable or disable Caps Lock mode, press the Caps Lock key. 5 Drive in use . Green: Caps Lock mode is on , .... Blinking green: The computer is entering standby mode or hibernation mode, or is being charged. Blinking green: Data is resuming normal operation. 52 ThinkPad R61, R61e, and R61i (15.4-inch widescreen) Hardware Maintenance Manual To enable or disable the keypad, press and hold the Shift key, and press the NumLk (ScrLk) key...
Table 8. This indicator is on when Bluetooth wireless is on the keyboard is in standby mode. To enable or disable Caps Lock mode, press the Caps Lock key. 5 Drive in use . Green: Caps Lock mode is on , .... Blinking green: The computer is entering standby mode or hibernation mode, or is being charged. Blinking green: Data is resuming normal operation. 52 ThinkPad R61, R61e, and R61i (15.4-inch widescreen) Hardware Maintenance Manual To enable or disable the keypad, press and hold the Shift key, and press the NumLk (ScrLk) key...

Hardware Maintenance Manual
Page 62
...can also diagnose the hard disk drive without starting up correctly. 2. PC Card slot Diagnostics --> Systemboard --> PCMCIA ExpressCard slot Keyboard 1. Remove any physical shock to Compatibility, and run Diagnostics --> Other Devices --> Conexant Audio Speaker Interactive Tests --> Internal ...the no sound is running. Table 9. If the ThinkPad Advanced Dock, the ThinkPad Advanced Mini Dock or the ThinkPad Essential Port Replicator is attached to start the diagnostic program. 54 ThinkPad R61, R61e, and R61i (15.4-inch widescreen) Hardware Maintenance Manual Interactive Tests -->...
...can also diagnose the hard disk drive without starting up correctly. 2. PC Card slot Diagnostics --> Systemboard --> PCMCIA ExpressCard slot Keyboard 1. Remove any physical shock to Compatibility, and run Diagnostics --> Other Devices --> Conexant Audio Speaker Interactive Tests --> Internal ...the no sound is running. Table 9. If the ThinkPad Advanced Dock, the ThinkPad Advanced Mini Dock or the ThinkPad Essential Port Replicator is attached to start the diagnostic program. 54 ThinkPad R61, R61e, and R61i (15.4-inch widescreen) Hardware Maintenance Manual Interactive Tests -->...

Hardware Maintenance Manual
Page 78
Removal steps of the keyboard bezel as shown in this figure. Attach the palm rest so that the two projections of the palm rest ( a ) firmly fit into place. 4. Table 14. Close the LCD cover and turn the computer over. Then fasten the four screws to secure the palm rest. 70 ThinkPad R61, R61e, and R61i (15.4-inch widescreen) Hardware Maintenance Manual a a 3. Push the front side of the palm rest until it clicks into the guide holes of palm rest (continued) 2.
Removal steps of the keyboard bezel as shown in this figure. Attach the palm rest so that the two projections of the palm rest ( a ) firmly fit into place. 4. Table 14. Close the LCD cover and turn the computer over. Then fasten the four screws to secure the palm rest. 70 ThinkPad R61, R61e, and R61i (15.4-inch widescreen) Hardware Maintenance Manual a a 3. Push the front side of the palm rest until it clicks into the guide holes of palm rest (continued) 2.
Hardware Maintenance Manual
Page 80
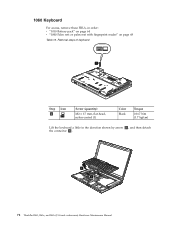
Removal steps of keyboard 1 Step 1 Icon Screw (quantity) M2 × 17 mm, flat-head, nylon-coated (1) Color Black Torque 0.167 Nm (1.7 kgfcm) Lift the keyboard a little in order: v "1010 Battery pack" on page 64 v "1040 Palm rest or palm rest with fingerprint reader" on page 68 Table 16. 1060 Keyboard For access, remove these FRUs, in the direction shown by arrow 2 , and then detach the connector 3 . 2 3 72 ThinkPad R61, R61e, and R61i (15.4-inch widescreen) Hardware Maintenance Manual
Removal steps of keyboard 1 Step 1 Icon Screw (quantity) M2 × 17 mm, flat-head, nylon-coated (1) Color Black Torque 0.167 Nm (1.7 kgfcm) Lift the keyboard a little in order: v "1010 Battery pack" on page 64 v "1040 Palm rest or palm rest with fingerprint reader" on page 68 Table 16. 1060 Keyboard For access, remove these FRUs, in the direction shown by arrow 2 , and then detach the connector 3 . 2 3 72 ThinkPad R61, R61e, and R61i (15.4-inch widescreen) Hardware Maintenance Manual

Hardware Maintenance Manual
Page 81
Table 16. a a R61, R61e, and R61i (15.4-inch widescreen) 73 Removal steps of keyboard (continued) When installing: Make sure that the keyboard edges a are under the frame as shown in this figure.
Table 16. a a R61, R61e, and R61i (15.4-inch widescreen) 73 Removal steps of keyboard (continued) When installing: Make sure that the keyboard edges a are under the frame as shown in this figure.

Hardware Maintenance Manual
Page 82
1070 Optical drive for R61e and R61i For access, remove these FRUs, in this figure. Then pull out the optical drive 3 . 74 ThinkPad R61, R61e, and R61i (15.4-inch widescreen) Hardware Maintenance Manual Removal steps of optical drive 1 Step 1 Screw (quantity) M3 × 4 mm, flat-head, nylon-coated (1) Color Black Torque 0.392 Nm (4 kgfcm) 2 3 Push the optical drive by using a screwdriver 2 as shown in order: v "1010 Battery pack" on page 64 v "1040 Palm rest or palm rest with fingerprint reader" on page 68 v "1060 Keyboard" on page 72 Table 17.
1070 Optical drive for R61e and R61i For access, remove these FRUs, in this figure. Then pull out the optical drive 3 . 74 ThinkPad R61, R61e, and R61i (15.4-inch widescreen) Hardware Maintenance Manual Removal steps of optical drive 1 Step 1 Screw (quantity) M3 × 4 mm, flat-head, nylon-coated (1) Color Black Torque 0.392 Nm (4 kgfcm) 2 3 Push the optical drive by using a screwdriver 2 as shown in order: v "1010 Battery pack" on page 64 v "1040 Palm rest or palm rest with fingerprint reader" on page 68 v "1060 Keyboard" on page 72 Table 17.

Hardware Maintenance Manual
Page 83
... 64 v "1040 Palm rest or palm rest with your fingers in the direction shown by pulling the tab with fingerprint reader" on page 68 v "1060 Keyboard" on the system board. 1 2 1 Step 1 Screw (quantity) M2 × 3 mm, flat-head, nylon-coated (2) Color Silver Torque 0.167 Nm (1.7 kgfcm) In step ...2 , remove the card by the arrow. R61, R61e, and R61i (15.4-inch widescreen) 75 Removal steps of modem daughter card (MDC-1.5) Note: Some models do not have the modem daughter card because the modem function...
... 64 v "1040 Palm rest or palm rest with your fingers in the direction shown by pulling the tab with fingerprint reader" on page 68 v "1060 Keyboard" on the system board. 1 2 1 Step 1 Screw (quantity) M2 × 3 mm, flat-head, nylon-coated (2) Color Silver Torque 0.167 Nm (1.7 kgfcm) In step ...2 , remove the card by the arrow. R61, R61e, and R61i (15.4-inch widescreen) 75 Removal steps of modem daughter card (MDC-1.5) Note: Some models do not have the modem daughter card because the modem function...

Hardware Maintenance Manual
Page 85
... In step 1 , unplug the jacks by using the removal tool antenna RF connector (P/N: 08K7159) or pick the connectors with fingerprint reader" on page 68 v "1060 Keyboard" on page 72 Table 19. Note: Some models might have three antenna cables in order: v "1010 Battery pack" on page 64 v "1040 Palm rest or... access, remove these FRUs, in step 1 . 2 2 1 Step 2 Screw (quantity) M2 × 9.5 mm, pan-head, nylon-coated (2) Color Black Torque 0.167 Nm (1.7 kgfcm) R61, R61e, and R61i (15.4-inch widescreen) 77
... In step 1 , unplug the jacks by using the removal tool antenna RF connector (P/N: 08K7159) or pick the connectors with fingerprint reader" on page 68 v "1060 Keyboard" on page 72 Table 19. Note: Some models might have three antenna cables in order: v "1010 Battery pack" on page 64 v "1040 Palm rest or... access, remove these FRUs, in step 1 . 2 2 1 Step 2 Screw (quantity) M2 × 9.5 mm, pan-head, nylon-coated (2) Color Black Torque 0.167 Nm (1.7 kgfcm) R61, R61e, and R61i (15.4-inch widescreen) 77

Hardware Maintenance Manual
Page 87
1100 Backup battery DANGER Use only the battery specified in order: v "1010 Battery pack" on page 64 v "1040 Palm rest or palm rest with fingerprint reader" on page 68 v "1060 Keyboard" on page 72 Table 20. For access, remove these FRUs in the parts list for your computer. R61, R61e, and R61i (15.4-inch widescreen) 79 Removal steps of backup battery 1 2 When installing: Make sure that the battery connector is attached firmly. Any other battery could ignite or explode.
1100 Backup battery DANGER Use only the battery specified in order: v "1010 Battery pack" on page 64 v "1040 Palm rest or palm rest with fingerprint reader" on page 68 v "1060 Keyboard" on page 72 Table 20. For access, remove these FRUs in the parts list for your computer. R61, R61e, and R61i (15.4-inch widescreen) 79 Removal steps of backup battery 1 2 When installing: Make sure that the battery connector is attached firmly. Any other battery could ignite or explode.

Hardware Maintenance Manual
Page 88
... Nm (1.7 kgfcm) 2 2 Step 2 Screw (quantity) M2 × 17 mm, pan-head, nylon-coated (2) Color Black Torque 0.167 Nm (1.7 kgfcm) 80 ThinkPad R61, R61e, and R61i (15.4-inch widescreen) Hardware Maintenance Manual 1110 Keyboard bezel and speakers For access, remove these FRUs, in order: v "1010 Battery pack" on page 64 v "1040 Palm rest or...
... Nm (1.7 kgfcm) 2 2 Step 2 Screw (quantity) M2 × 17 mm, pan-head, nylon-coated (2) Color Black Torque 0.167 Nm (1.7 kgfcm) 80 ThinkPad R61, R61e, and R61i (15.4-inch widescreen) Hardware Maintenance Manual 1110 Keyboard bezel and speakers For access, remove these FRUs, in order: v "1010 Battery pack" on page 64 v "1040 Palm rest or...

Hardware Maintenance Manual
Page 89
Then detach the speaker connector 6 . 5 5 5 5 5 6 When installing: Make sure that speaker connector is attached firmly. Step 4 Screw (quantity) M2 × 3 mm, flat-head, nylon-coated (6) Color Silver Torque 0.167 Nm (1.7 kgfcm) In step 5 , strip the securing tapes off. R61, R61e, and R61i (15.4-inch widescreen) 81 Removal steps of keyboard bezel and speakers (continued) 4 4 43 4 4 4 In step 3 , release the wireless antenna cables from the cable guide. Table 21.
Then detach the speaker connector 6 . 5 5 5 5 5 6 When installing: Make sure that speaker connector is attached firmly. Step 4 Screw (quantity) M2 × 3 mm, flat-head, nylon-coated (6) Color Silver Torque 0.167 Nm (1.7 kgfcm) In step 5 , strip the securing tapes off. R61, R61e, and R61i (15.4-inch widescreen) 81 Removal steps of keyboard bezel and speakers (continued) 4 4 43 4 4 4 In step 3 , release the wireless antenna cables from the cable guide. Table 21.

Hardware Maintenance Manual
Page 90
Then remove the keyboard bezel in the direction shown by arrow 8 . 77 8 7 7 8 When installing: Make sure that all the claws are attached firmly. 9 10 9 9 10 9 Step 9 Screw (quantity) M2 × 3 mm, flat-head, nylon-coated (4) Color Silver Torque 0.167 Nm (1.7 kgfcm) 82 ThinkPad R61, R61e, and R61i (15.4-inch widescreen) Hardware Maintenance Manual Removal steps of keyboard bezel and speakers (continued) In step 7 , detach the claws. Table 21.
Then remove the keyboard bezel in the direction shown by arrow 8 . 77 8 7 7 8 When installing: Make sure that all the claws are attached firmly. 9 10 9 9 10 9 Step 9 Screw (quantity) M2 × 3 mm, flat-head, nylon-coated (4) Color Silver Torque 0.167 Nm (1.7 kgfcm) 82 ThinkPad R61, R61e, and R61i (15.4-inch widescreen) Hardware Maintenance Manual Removal steps of keyboard bezel and speakers (continued) In step 7 , detach the claws. Table 21.

Hardware Maintenance Manual
Page 91
1120 Fan assembly For access, remove these FRUs, in order: v "1010 Battery pack" on page 64 v "1040 Palm rest or palm rest with fingerprint reader" on page 68 v "1060 Keyboard" on page 72 v "1110 Keyboard bezel and speakers" on page 80 Table 22. Removal steps of fan assembly 2 3 2 1 3 1 Step 1 Screw (quantity) M2 × 3 mm, flat-head, nylon-coated (2) Color Silver 2 M2 × 9.5 mm, pan-head, nylon-coated (2) Black Torque 0.167 Nm (1.7 kgfcm) 0.167 Nm (1.7 kgfcm) R61, R61e, and R61i (15.4-inch widescreen) 83
1120 Fan assembly For access, remove these FRUs, in order: v "1010 Battery pack" on page 64 v "1040 Palm rest or palm rest with fingerprint reader" on page 68 v "1060 Keyboard" on page 72 v "1110 Keyboard bezel and speakers" on page 80 Table 22. Removal steps of fan assembly 2 3 2 1 3 1 Step 1 Screw (quantity) M2 × 3 mm, flat-head, nylon-coated (2) Color Silver 2 M2 × 9.5 mm, pan-head, nylon-coated (2) Black Torque 0.167 Nm (1.7 kgfcm) 0.167 Nm (1.7 kgfcm) R61, R61e, and R61i (15.4-inch widescreen) 83
Hardware Maintenance Manual
Page 94
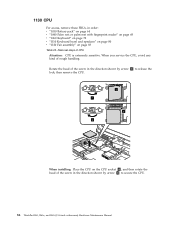
...2 1 a b 3 When installing: Place the CPU on page 83 Table 23. 1130 CPU For access, remove these FRUs, in order: v "1010 Battery pack" on page 64 v "1040 Palm rest or palm rest with fingerprint reader" on page 68 v "1060 Keyboard" on page 72 v "1110 Keyboard bezel and speakers" on page 80 v "1120 Fan... lock; Removal steps of rough handling. Rotate the head of the screw in the direction shown by arrow 1 to secure the CPU. 86 ThinkPad R61, R61e, and R61i (15.4-inch widescreen) Hardware Maintenance Manual When you service the CPU, avoid any kind of CPU Attention: CPU is extremely sensitive.
...2 1 a b 3 When installing: Place the CPU on page 83 Table 23. 1130 CPU For access, remove these FRUs, in order: v "1010 Battery pack" on page 64 v "1040 Palm rest or palm rest with fingerprint reader" on page 68 v "1060 Keyboard" on page 72 v "1110 Keyboard bezel and speakers" on page 80 v "1120 Fan... lock; Removal steps of rough handling. Rotate the head of the screw in the direction shown by arrow 1 to secure the CPU. 86 ThinkPad R61, R61e, and R61i (15.4-inch widescreen) Hardware Maintenance Manual When you service the CPU, avoid any kind of CPU Attention: CPU is extremely sensitive.


