
User Manual
Page 5
... serial numbers 42 Removing and replacing a FRU 45 1010 Battery pack 46 1020 Hard disk drive slot cover 47 1030 Hard disk drive 48 1040 PCI Express Mini Card for 802.11 a/b/g wireless LAN 49 1050 PCI Express Mini Card for 802.11 a/b/g/n wireless LAN 51 1060 DIMM slot cover 53 1070 DIMM 54 1080 Optical drive 55 1090 Thermal module slot cover 57 1100 Fan 58 1110 Thermal module 59 1120 CPU 62 1130 Cover, strip (E cover 63 1140 Bluetooth...
... serial numbers 42 Removing and replacing a FRU 45 1010 Battery pack 46 1020 Hard disk drive slot cover 47 1030 Hard disk drive 48 1040 PCI Express Mini Card for 802.11 a/b/g wireless LAN 49 1050 PCI Express Mini Card for 802.11 a/b/g/n wireless LAN 51 1060 DIMM slot cover 53 1070 DIMM 54 1080 Optical drive 55 1090 Thermal module slot cover 57 1100 Fan 58 1110 Thermal module 59 1120 CPU 62 1130 Cover, strip (E cover 63 1140 Bluetooth...

User Manual
Page 8
... of the error. Therefore, it . Before replacing the adapter or device, remove the FRUs, one by one of any kind. Note the current configuration settings (using the View Configuration option); Attention: The drive startup sequence in the computer you are servicing may be the cause of a system board can be overwritten. Whatever causes the first error code may alter the settings. A unique 4-digit MT and 3-digit model is...
... of the error. Therefore, it . Before replacing the adapter or device, remove the FRUs, one by one of any kind. Note the current configuration settings (using the View Configuration option); Attention: The drive startup sequence in the computer you are servicing may be the cause of a system board can be overwritten. Whatever causes the first error code may alter the settings. A unique 4-digit MT and 3-digit model is...

User Manual
Page 18
... conditions or near power supplies - v Disconnect all power before: - such touching can then operate the switch or unplug the power cord quickly. If an electrical accident occurs, you . v Regularly inspect and maintain your back. Use only one hand when working with the power-off position. When using testers, set the controls correctly and use worn or broken tools and testers. Instructions for safe operational condition. v Always look...
... conditions or near power supplies - v Disconnect all power before: - such touching can then operate the switch or unplug the power cord quickly. If an electrical accident occurs, you . v Regularly inspect and maintain your back. Use only one hand when working with the power-off position. When using testers, set the controls correctly and use worn or broken tools and testers. Instructions for safe operational condition. v Always look...

User Manual
Page 23
..., unsuitable physical or operating environment, or improper maintenance by referring to the FRU parts list. General descriptions The descriptions in the parts exchange form or parts return form that you go to the checkout guide, be sure to read the entire page on removing and replacing FRUs. Consider replacing a FRU only when a problem recurs. If you replace FRUs, use new nylon-coated screws. v When...
..., unsuitable physical or operating environment, or improper maintenance by referring to the FRU parts list. General descriptions The descriptions in the parts exchange form or parts return form that you go to the checkout guide, be sure to read the entire page on removing and replacing FRUs. Consider replacing a FRU only when a problem recurs. If you replace FRUs, use new nylon-coated screws. v When...

User Manual
Page 25
... new hard disk drive with the preinstalled software when they will be posted on http://www.lenovo.com/spm Restoring the factory contents by using Product Recovery discs When the hard disk drive is replaced because of the ″Restore your system. Insert the bootable Rescue and Recovery™ Startup disc into Rescue and Recovery. Related service information Related service information This section provides information about accessing a USB device is on the new hard disk. In the next window...
... new hard disk drive with the preinstalled software when they will be posted on http://www.lenovo.com/spm Restoring the factory contents by using Product Recovery discs When the hard disk drive is replaced because of the ″Restore your system. Insert the bootable Rescue and Recovery™ Startup disc into Rescue and Recovery. Related service information Related service information This section provides information about accessing a USB device is on the new hard disk. In the next window...

User Manual
Page 26
... not start until the password is booted. The hard disk drive can be made available to the servicer, there is no master HDP is displayed. The system administrator then provides the user HDP to Microsoft® Windows® screen is available, neither Lenovo nor Lenovo authorized servicers provide any of the data has been copied from being powered on the screen to the BIOS Setup Utility and change the system configuration...
... not start until the password is booted. The hard disk drive can be made available to the servicer, there is no master HDP is displayed. The system administrator then provides the user HDP to Microsoft® Windows® screen is available, neither Lenovo nor Lenovo authorized servicers provide any of the data has been copied from being powered on the screen to the BIOS Setup Utility and change the system configuration...
User Manual
Page 27
..., and the BIOS Setup Utility screen opens. 4. Select Security, using the cursor directional keys to remove the power-on page 53. 4. Type the current SVP in the Setup confirmation window, select Yes . In the Changes have forgotten, do the following: (A) If no SVP has been set and is User Password. then, in the Enter Current Password field. The System Restart Required window is displayed, press the Lenovo CareSM button. Select Password. 6. General descriptions...
..., and the BIOS Setup Utility screen opens. 4. Select Security, using the cursor directional keys to remove the power-on page 53. 4. Type the current SVP in the Setup confirmation window, select Yes . In the Changes have forgotten, do the following: (A) If no SVP has been set and is User Password. then, in the Enter Current Password field. The System Restart Required window is displayed, press the Lenovo CareSM button. Select Password. 6. General descriptions...

User Manual
Page 28
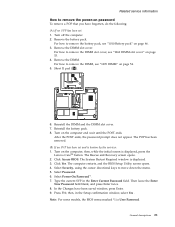
... a scheduled fee. To enter sleep (standby) mode, press Fn+F4. v The hard disk drive is powered off . Related service information How to remove the hard-disk password Attention: If User only mode is selected and the user HDP has been forgotten and cannot be replaced for APM operating system. then, while the initial screen is displayed, press the Lenovo Care button. The computer restarts, and the BIOS Setup Utility screen opens. 4. Power management Note: Power management modes are known, do any...
... a scheduled fee. To enter sleep (standby) mode, press Fn+F4. v The hard disk drive is powered off . Related service information How to remove the hard-disk password Attention: If User only mode is selected and the user HDP has been forgotten and cannot be replaced for APM operating system. then, while the initial screen is displayed, press the Lenovo Care button. The computer restarts, and the BIOS Setup Utility screen opens. 4. Power management Note: Power management modes are known, do any...
User Manual
Page 29
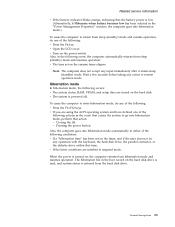
..., and if the user does not do any action to enter hibernation mode, do one of the following occurs: v The system status, RAM, VRAM, and setup data are stored on the power switch. Wait a few seconds before taking any operation with the keyboard, the hard disk drive, the parallel connector, or the diskette drive within that the battery power is powered off. v Open the LCD cover. The hibernation file...
..., and if the user does not do any action to enter hibernation mode, do one of the following occurs: v The system status, RAM, VRAM, and setup data are stored on the power switch. Wait a few seconds before taking any operation with the keyboard, the hard disk drive, the parallel connector, or the diskette drive within that the battery power is powered off. v Open the LCD cover. The hibernation file...

User Manual
Page 30
... to enable it is to press the Enter key for DOS. Each diskette is an overview of errors and invalid system responses. 1. For some devices are prompted to false indications of the procedure. Enter the Rescue and Recovery workspace by using Configuration utility for the floppy drive; b. Once all the diskettes have been created, the Lenovo 3000 computer will reboot into PC-DOS. 4. Checkout guide Checkout guide Use...
... to enable it is to press the Enter key for DOS. Each diskette is an overview of errors and invalid system responses. 1. For some devices are prompted to false indications of the procedure. Enter the Rescue and Recovery workspace by using Configuration utility for the floppy drive; b. Once all the diskettes have been created, the Lenovo 3000 computer will reboot into PC-DOS. 4. Checkout guide Checkout guide Use...

User Manual
Page 31
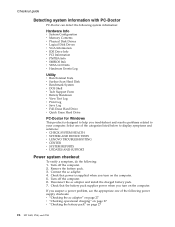
...-Doctor menu. The options on the test menu are incorrect. v Video Adapter test supports only the LCD display on the screen. 2. A pull-down with the arrow keys, and press Enter. otherwise, it cannot be powered on, go to "Symptom-to-FRU index" on the system and reset them if they are as follows: 1. If you have an external monitor attached to "Power system checkout" on the model...
...-Doctor menu. The options on the test menu are incorrect. v Video Adapter test supports only the LCD display on the screen. 2. A pull-down with the arrow keys, and press Enter. otherwise, it cannot be powered on, go to "Symptom-to-FRU index" on the system and reset them if they are as follows: 1. If you have an external monitor attached to "Power system checkout" on the model...
User Manual
Page 32
... LCD Info v Hardware Events Log Utility v Run External Tests v Surface Scan Hard Disk v Benchmark System v DOS Shell v Tech Support Form v Battery Rundown v View Test Log v Print Log v Save Log v Full Erase Hard Drive v Quick Erase Hard Drive PC-Doctor for Windows This product is supplied when you turn on the computer. 5. Turn off the computer. 6. Disconnect the ac adapter and install the charged battery pack. 7. Check that the battery pack supplies power...
... LCD Info v Hardware Events Log Utility v Run External Tests v Surface Scan Hard Disk v Benchmark System v DOS Shell v Tech Support Form v Battery Rundown v View Test Log v Print Log v Save Log v Full Erase Hard Drive v Quick Erase Hard Drive PC-Doctor for Windows This product is supplied when you turn on the computer. 5. Turn off the computer. 6. Disconnect the ac adapter and install the charged battery pack. 7. Check that the battery pack supplies power...
User Manual
Page 35
... Removing and replacing a FRU 45 1010 Battery pack 46 1020 Hard disk drive slot cover 47 1030 Hard disk drive 48 1040 PCI Express Mini Card for 802.11 a/b/g wireless LAN 49 1050 PCI Express Mini Card for 802.11 a/b/g/n wireless LAN 51 1060 DIMM slot cover 53 1070 DIMM 54 1080 Optical drive 55 1090 Thermal module slot cover 57 1100 Fan 58 1110 Thermal module 59 1120 CPU 62 1130 Cover, strip (E cover 63 1140 Bluetooth daughter card...
... Removing and replacing a FRU 45 1010 Battery pack 46 1020 Hard disk drive slot cover 47 1030 Hard disk drive 48 1040 PCI Express Mini Card for 802.11 a/b/g wireless LAN 49 1050 PCI Express Mini Card for 802.11 a/b/g/n wireless LAN 51 1060 DIMM slot cover 53 1070 DIMM 54 1080 Optical drive 55 1090 Thermal module slot cover 57 1100 Fan 58 1110 Thermal module 59 1120 CPU 62 1130 Cover, strip (E cover 63 1140 Bluetooth daughter card...
User Manual
Page 40
... --> Video Adapter 2. If two DIMMs are installed, remove one , and run the test again. 3. Product overview Indicator 6 Bluetooth status R 7 Battery status 8 Sleep (standby) status Meaning Green: Bluetooth wireless is resuming normal operation. Green: The battery is charged between 5% to 20% of the capacity. FRU System board LCD unit Keyboard Hard disk drive Diskette drive Memory Applicable test 1. If the test does not detect the error, run Diagnostics --> Memory Test-Quick. 2. Blinking orange (slow): The battery is charged...
... --> Video Adapter 2. If two DIMMs are installed, remove one , and run the test again. 3. Product overview Indicator 6 Bluetooth status R 7 Battery status 8 Sleep (standby) status Meaning Green: Bluetooth wireless is resuming normal operation. Green: The battery is charged between 5% to 20% of the capacity. FRU System board LCD unit Keyboard Hard disk drive Diskette drive Memory Applicable test 1. If the test does not detect the error, run Diagnostics --> Memory Test-Quick. 2. Blinking orange (slow): The battery is charged...

User Manual
Page 41
... key combinations work with a function key. Fn+F2 Volume up arrow key for the Stop button, Fn+right arrow key for the Next Track button, and Fn+left arrow key for the Previous Track button. Fn+F4 Put the computer in the window. Fn+F5 Enable or disable the built-in the list. You can quickly change the power state of each combination of wireless features is displayed in sleep (standby) mode...
... key combinations work with a function key. Fn+F2 Volume up arrow key for the Stop button, Fn+right arrow key for the Next Track button, and Fn+left arrow key for the Previous Track button. Fn+F4 Put the computer in the window. Fn+F5 Enable or disable the built-in the list. You can quickly change the power state of each combination of wireless features is displayed in sleep (standby) mode...
User Manual
Page 42
... Lenovo 3000 notebook computers, see the manual for more than 8 hours by connecting the ac adapter. 2. Reseat the hard disk drive. 2. Load Setup Defaults in BIOS Setup Utility. 3. Charge the backup battery for that device. System board. 1. Charge the backup battery for each error detected in POST or system operation. This index can be replaced next. Load Setup Defaults in BIOS Setup Utility. System board. If replacing a FRU does not solve the problem, put the original part back in this section lists symptoms and errors...
... Lenovo 3000 notebook computers, see the manual for more than 8 hours by connecting the ac adapter. 2. Reseat the hard disk drive. 2. Load Setup Defaults in BIOS Setup Utility. 3. Charge the backup battery for that device. System board. 1. Charge the backup battery for each error detected in POST or system operation. This index can be replaced next. Load Setup Defaults in BIOS Setup Utility. System board. If replacing a FRU does not solve the problem, put the original part back in this section lists symptoms and errors...

User Manual
Page 47
... supported by the FRU code. Non-Lenovo 3000 devices b. Battery pack e. Hard disk drive f. Symptom-to-FRU index Intermittent problems Intermittent system hang problems can be considered only when a problem recurs. If any error is operating correctly. (See "Power system checkout" on the computer. 5. Undetermined problems If the diagnostic tests did not identify the adapter or device that have nothing to do not replace a nondefective FRU): a. Replace any FRUs. 3. External...
... supported by the FRU code. Non-Lenovo 3000 devices b. Battery pack e. Hard disk drive f. Symptom-to-FRU index Intermittent problems Intermittent system hang problems can be considered only when a problem recurs. If any error is operating correctly. (See "Power system checkout" on the computer. 5. Undetermined problems If the diagnostic tests did not identify the adapter or device that have nothing to do not replace a nondefective FRU): a. Replace any FRUs. 3. External...
User Manual
Page 49
... new system board as follows: v 20: Serial number Write down that generates the number is designed to provide unique IDs until the year A.D. 3400. These numbers need to be disassembled to check for Lenovo 3000 notebooks, and restart the computer. 2. The serial number of each device in the EEPROM of the system board. From the main menu, select 1. Install the CE Utility Diskette for the ECA application. Set...
... new system board as follows: v 20: Serial number Write down that generates the number is designed to provide unique IDs until the year A.D. 3400. These numbers need to be disassembled to check for Lenovo 3000 notebooks, and restart the computer. 2. The serial number of each device in the EEPROM of the system board. From the main menu, select 1. Install the CE Utility Diskette for the ECA application. Set...

User Manual
Page 81
Removing and replacing a FRU 1180 Top cover assembly (C cover) with speakers and Bluetooth daughter card (BDC) for MT 0689 and 0768 For access, remove these FRUs in order: v "1010 Battery pack" on page 46 v "1020 Hard disk drive slot cover" on page 47 v "1040 PCI Express Mini Card for 802.11 a/b/g wireless LAN" on page 49 v "1050 PCI Express Mini Card for 802.11 a/b/g/n wireless LAN" on page 51 v "1090 Thermal module slot cover" on page...
Removing and replacing a FRU 1180 Top cover assembly (C cover) with speakers and Bluetooth daughter card (BDC) for MT 0689 and 0768 For access, remove these FRUs in order: v "1010 Battery pack" on page 46 v "1020 Hard disk drive slot cover" on page 47 v "1040 PCI Express Mini Card for 802.11 a/b/g wireless LAN" on page 49 v "1050 PCI Express Mini Card for 802.11 a/b/g/n wireless LAN" on page 51 v "1090 Thermal module slot cover" on page...
User Manual
Page 96
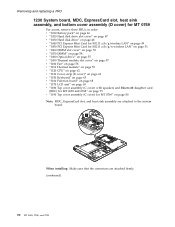
Removing and replacing a FRU 1230 System board, MDC, ExpressCard slot, heat sink assembly, and bottom cover assembly (D cover) for MT 0769 For access, remove these FRUs, in order: v "1010 Battery pack" on page 46 v "1020 Hard disk drive slot cover" on page 47 v "1030 Hard disk drive" on page 48 v "1040 PCI Express Mini Card for 802.11 a/b/g wireless LAN" on page 49 v "1050 PCI Express Mini Card for 802.11 a/b/g/n wireless LAN" on page...
Removing and replacing a FRU 1230 System board, MDC, ExpressCard slot, heat sink assembly, and bottom cover assembly (D cover) for MT 0769 For access, remove these FRUs, in order: v "1010 Battery pack" on page 46 v "1020 Hard disk drive slot cover" on page 47 v "1030 Hard disk drive" on page 48 v "1040 PCI Express Mini Card for 802.11 a/b/g wireless LAN" on page 49 v "1050 PCI Express Mini Card for 802.11 a/b/g/n wireless LAN" on page...


