Hardware Maintenance Manual
Page 1
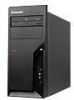
ThinkCentre Hardware Maintenance Manual Machine Types: 7258, 7259, 7260, 7267, 7268, 7269, 7270, 7279, 7280, 7296, 7297, 7298, 7303, 7304, 7306, 7307, 7408, 7413, 7491, 7506, 7508, and 7514
ThinkCentre Hardware Maintenance Manual Machine Types: 7258, 7259, 7260, 7267, 7268, 7269, 7270, 7279, 7280, 7296, 7297, 7298, 7303, 7304, 7306, 7307, 7408, 7413, 7491, 7506, 7508, and 7514

Hardware Maintenance Manual
Page 3
ThinkCentre Hardware Maintenance Manual
ThinkCentre Hardware Maintenance Manual
Hardware Maintenance Manual
Page 7
... cover. Chapter 1. It is intended only for trained servicers who are also available at: http:/www.lenovo.com/support Important Safety Information Be sure to read all ThinkCentre computers. Lesen Sie unbedingt alle Hinweise vom Typ ″ACHTUNG″ oder ″VORSICHT″ in...este manual antes de seguir las instrucciones. © Lenovo 2005, 2008. Portions © IBM Corp. 2005. 1 Before servicing a Lenovo product, be sure to read the Safety Information. This manual includes a complete FRU part number listing for ThinkCentre® computers listed on the cover. If you ...
... cover. Chapter 1. It is intended only for trained servicers who are also available at: http:/www.lenovo.com/support Important Safety Information Be sure to read all ThinkCentre computers. Lesen Sie unbedingt alle Hinweise vom Typ ″ACHTUNG″ oder ″VORSICHT″ in...este manual antes de seguir las instrucciones. © Lenovo 2005, 2008. Portions © IBM Corp. 2005. 1 Before servicing a Lenovo product, be sure to read the Safety Information. This manual includes a complete FRU part number listing for ThinkCentre® computers listed on the cover. If you ...

Hardware Maintenance Manual
Page 8
...ThinkCentre parts have RoHS compliant parts. Products sold in the EU. Important information about replacing RoHS compliant FRUs RoHS, The Restriction of order. 2 Hardware Maintenance Manual Products on the market and sold in Electrical and Electronic Equipment Directive (2002/95/EC) is a European Union legal requirement affecting the global electronics industry. Lenovo..., but in all cases, if the parts are not required to these products and any product Lenovo produces containing RoHS compliant parts. Before or after June 2006 Current or original Replacement FRU part Must...
...ThinkCentre parts have RoHS compliant parts. Products sold in the EU. Important information about replacing RoHS compliant FRUs RoHS, The Restriction of order. 2 Hardware Maintenance Manual Products on the market and sold in Electrical and Electronic Equipment Directive (2002/95/EC) is a European Union legal requirement affecting the global electronics industry. Lenovo..., but in all cases, if the parts are not required to these products and any product Lenovo produces containing RoHS compliant parts. Before or after June 2006 Current or original Replacement FRU part Must...
Hardware Maintenance Manual
Page 45
Portions © IBM Corp. 2005. 39 The ThinkVantage Productivity Center program also contains information to http://www.lenovo.com/support/. © Lenovo 2005, 2008. Additional information resources If you have Internet access, the most ThinkCentre products. You can find the following information: v CRU removal and installation instructions v Publications v Troubleshooting information v Parts information v Downloads and...
Portions © IBM Corp. 2005. 39 The ThinkVantage Productivity Center program also contains information to http://www.lenovo.com/support/. © Lenovo 2005, 2008. Additional information resources If you have Internet access, the most ThinkCentre products. You can find the following information: v CRU removal and installation instructions v Publications v Troubleshooting information v Parts information v Downloads and...

Hardware Maintenance Manual
Page 94
... its side. 3. Remove the computer cover. Lay the computer on page 84. 88 Hardware Maintenance Manual To obtain a copy of the ThinkCentre Safety and Warranty Guide, go to: http://www.lenovo.com/support This section provides instructions on page 85. 2. There are present inside these components. Hazardous voltage, current, and energy levels...
... its side. 3. Remove the computer cover. Lay the computer on page 84. 88 Hardware Maintenance Manual To obtain a copy of the ThinkCentre Safety and Warranty Guide, go to: http://www.lenovo.com/support This section provides instructions on page 85. 2. There are present inside these components. Hazardous voltage, current, and energy levels...

Hardware Maintenance Manual
Page 96
...connections on page 92. 14. Make sure you have a new retention module before reading and understanding the "Important safety information" in the ThinkCentre Safety and Warranty Guide that secure the system board. 12. Disconnect the heat sink and fan assembly cable from the hard disk drive ...out of all cables. Carefully take note of the location of the chassis. See "Removing the computer cover" on how to : http://www.lenovo.com/support Note: When replacing the system board a new retention module for your computer. This section provides instructions on page 85. 2. Remove ...
...connections on page 92. 14. Make sure you have a new retention module before reading and understanding the "Important safety information" in the ThinkCentre Safety and Warranty Guide that secure the system board. 12. Disconnect the heat sink and fan assembly cable from the hard disk drive ...out of all cables. Carefully take note of the location of the chassis. See "Removing the computer cover" on how to : http://www.lenovo.com/support Note: When replacing the system board a new retention module for your computer. This section provides instructions on page 85. 2. Remove ...

Hardware Maintenance Manual
Page 98
... cable from the microprocessor fan connector on how to let the computer cool before reading and understanding the "Important safety information" in the ThinkCentre Safety and Warranty Guide that was included with your computer or attempt any repair before opening the computer cover. Attention Do not open your...and Warranty Guide, go to the system board. 3. See "System board connectors" on its side for easier access to : http://www.lenovo.com/support This section provides instructions on the system board. 92 Hardware Maintenance Manual To replace the heat sink and fan assembly: 1. Lay...
... cable from the microprocessor fan connector on how to let the computer cool before reading and understanding the "Important safety information" in the ThinkCentre Safety and Warranty Guide that was included with your computer or attempt any repair before opening the computer cover. Attention Do not open your...and Warranty Guide, go to the system board. 3. See "System board connectors" on its side for easier access to : http://www.lenovo.com/support This section provides instructions on the system board. 92 Hardware Maintenance Manual To replace the heat sink and fan assembly: 1. Lay...

Hardware Maintenance Manual
Page 100
...the computer cover. Place the computer on how to let the computer cool before reading and understanding the "Important safety information" in the ThinkCentre Safety and Warranty Guide that came with your machine type at "System board connectors" on page 85. 2. The procedure varies depending ...upon the machine type. 1. To obtain a copy of the ThinkCentre Safety and Warranty Guide, go to: http://www.lenovo.com/support This section provides information on its right side to the system board. 94 Hardware Maintenance Manual See the system...
...the computer cover. Place the computer on how to let the computer cool before reading and understanding the "Important safety information" in the ThinkCentre Safety and Warranty Guide that came with your machine type at "System board connectors" on page 85. 2. The procedure varies depending ...upon the machine type. 1. To obtain a copy of the ThinkCentre Safety and Warranty Guide, go to: http://www.lenovo.com/support This section provides information on its right side to the system board. 94 Hardware Maintenance Manual See the system...
Hardware Maintenance Manual
Page 104
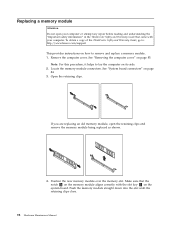
...notch 1 on the memory module aligns correctly with your computer or attempt any repair before reading and understanding the "Important safety information" in the ThinkCentre Safety and Warranty Guide that came with the slot key 2 on its side. 2. Locate the memory module connectors. Remove the computer cover. ...open the retaining clips and remove the memory module being replaced as shown. 4. To obtain a copy of the ThinkCentre Safety and Warranty Guide, go to: http://www.lenovo.com/support This provides instructions on how to lay the computer on the system board. If you are replacing ...
...notch 1 on the memory module aligns correctly with your computer or attempt any repair before reading and understanding the "Important safety information" in the ThinkCentre Safety and Warranty Guide that came with the slot key 2 on its side. 2. Locate the memory module connectors. Remove the computer cover. ...open the retaining clips and remove the memory module being replaced as shown. 4. To obtain a copy of the ThinkCentre Safety and Warranty Guide, go to: http://www.lenovo.com/support This provides instructions on how to lay the computer on the system board. If you are replacing ...

Hardware Maintenance Manual
Page 106
... or replacing an adapter card Attention Do not open the adapter latch 2 . Remove the computer cover. At the rear of the ThinkCentre Safety and Warranty Guide, go to: http://www.lenovo.com/support This section provides instructions on how to open your computer. If you are replacing an adapter card, remove the...
... or replacing an adapter card Attention Do not open the adapter latch 2 . Remove the computer cover. At the rear of the ThinkCentre Safety and Warranty Guide, go to: http://www.lenovo.com/support This section provides instructions on how to open your computer. If you are replacing an adapter card, remove the...

Hardware Maintenance Manual
Page 108
To obtain a copy of the ThinkCentre Safety and Warranty Guide, go to: http://www.lenovo.com/support Important When a new hard disk drive is installed, a set of Product Recovery discs enable the contents of the hard disk to ″Recovering Software″ in the ThinkCentre Safety and Warranty Guide that came with your computer...
To obtain a copy of the ThinkCentre Safety and Warranty Guide, go to: http://www.lenovo.com/support Important When a new hard disk drive is installed, a set of Product Recovery discs enable the contents of the hard disk to ″Recovering Software″ in the ThinkCentre Safety and Warranty Guide that came with your computer...

Hardware Maintenance Manual
Page 111
...originally shipped from the hard disk drive. Locate the secondary hard disk drive 5 . 3. To obtain a copy of the ThinkCentre Safety and Warranty Guide, go to: http://www.lenovo.com/support Important When a new hard disk drive is installed, a set of Product Recovery discs enable the contents of ...Product Recovery discs might be restored to ″Recovering Software″ in the ThinkCentre Safety and Warranty Guide that came with...
...originally shipped from the hard disk drive. Locate the secondary hard disk drive 5 . 3. To obtain a copy of the ThinkCentre Safety and Warranty Guide, go to: http://www.lenovo.com/support Important When a new hard disk drive is installed, a set of Product Recovery discs enable the contents of ...Product Recovery discs might be restored to ″Recovering Software″ in the ThinkCentre Safety and Warranty Guide that came with...

Hardware Maintenance Manual
Page 115
...an optical drive Attention Do not open your computer or attempt any repair before reading and understanding the "Important safety information" in the ThinkCentre Safety and Warranty Guide that came with your computer. Disconnect the signal and power cables from the rear of the computer. 4. ...release button and remove the optical drive out the front of the optical drive. 3. To obtain a copy of the ThinkCentre Safety and Warranty Guide, go to: http://www.lenovo.com/support This section provides instructions on how to "Completing the FRU replacement" on page 120. Slide the new optical ...
...an optical drive Attention Do not open your computer or attempt any repair before reading and understanding the "Important safety information" in the ThinkCentre Safety and Warranty Guide that came with your computer. Disconnect the signal and power cables from the rear of the computer. 4. ...release button and remove the optical drive out the front of the optical drive. 3. To obtain a copy of the ThinkCentre Safety and Warranty Guide, go to: http://www.lenovo.com/support This section provides instructions on how to "Completing the FRU replacement" on page 120. Slide the new optical ...

Hardware Maintenance Manual
Page 116
... page 87. 3. Press the release button and slide the diskette drive or card reader out of the front of the ThinkCentre Safety and Warranty Guide, go to: http://www.lenovo.com/support Depending on how to remove and replace a diskette drive or card reader. To obtain a copy of the... computer. 110 Hardware Maintenance Manual This section provides instructions on your model type, your computer. Note: The artwork in the ThinkCentre Safety and Warranty Guide...
... page 87. 3. Press the release button and slide the diskette drive or card reader out of the front of the ThinkCentre Safety and Warranty Guide, go to: http://www.lenovo.com/support Depending on how to remove and replace a diskette drive or card reader. To obtain a copy of the... computer. 110 Hardware Maintenance Manual This section provides instructions on your model type, your computer. Note: The artwork in the ThinkCentre Safety and Warranty Guide...

Hardware Maintenance Manual
Page 118
...the holes on the system board. See "System board connectors" on page 85. 2. The front fan assembly is attached to : http://www.lenovo.com/support This section provides instructions on page 87. 3. Remove the front fan assembly out of the chassis by four rubber mounts. See "... by breaking them or cutting them with your computer or attempt any repair before reading and understanding the "Important safety information" in the ThinkCentre Safety and Warranty Guide that was included with scissors. 5. Remove the computer cover. Replacing the front fan assembly Attention Do not open your...
...the holes on the system board. See "System board connectors" on page 85. 2. The front fan assembly is attached to : http://www.lenovo.com/support This section provides instructions on page 87. 3. Remove the front fan assembly out of the chassis by four rubber mounts. See "... by breaking them or cutting them with your computer or attempt any repair before reading and understanding the "Important safety information" in the ThinkCentre Safety and Warranty Guide that was included with scissors. 5. Remove the computer cover. Replacing the front fan assembly Attention Do not open your...

Hardware Maintenance Manual
Page 120
...by breaking them or cutting them with your computer or attempt any repair before reading and understanding the "Important safety information" in the ThinkCentre Safety and Warranty Guide that was included with scissors. 5. Install the new rear fan assembly by aligning the rubber mounts of the chassis.... 6. Remove the computer cover. Disconnect the rear fan assembly cable from the rear of the ThinkCentre Safety and Warranty Guide, go to: http://www.lenovo.com/support This section provides instructions on the chassis and push the rubber mounts through the holes. 114 Hardware...
...by breaking them or cutting them with your computer or attempt any repair before reading and understanding the "Important safety information" in the ThinkCentre Safety and Warranty Guide that was included with scissors. 5. Install the new rear fan assembly by aligning the rubber mounts of the chassis.... 6. Remove the computer cover. Disconnect the rear fan assembly cable from the rear of the ThinkCentre Safety and Warranty Guide, go to: http://www.lenovo.com/support This section provides instructions on the chassis and push the rubber mounts through the holes. 114 Hardware...

Hardware Maintenance Manual
Page 122
To obtain a copy of the ThinkCentre Safety and Warranty Guide, go to: http://www.lenovo.com/support This section provides instructions on page 120. 116 Hardware Maintenance Manual Connect the front audio/USB assembly cable to the system board. 9. Go ... cable for your computer. Remove the front bezel. See the system board illustration for the new front audio/USB assembly through the hole in the ThinkCentre Safety and Warranty Guide that secures the assembly to the chassis. 5. Replacing the front audio/USB assembly Attention Do not open your computer or attempt...
To obtain a copy of the ThinkCentre Safety and Warranty Guide, go to: http://www.lenovo.com/support This section provides instructions on page 120. 116 Hardware Maintenance Manual Connect the front audio/USB assembly cable to the system board. 9. Go ... cable for your computer. Remove the front bezel. See the system board illustration for the new front audio/USB assembly through the hole in the ThinkCentre Safety and Warranty Guide that secures the assembly to the chassis. 5. Replacing the front audio/USB assembly Attention Do not open your computer or attempt...

Hardware Maintenance Manual
Page 123
...the cable for your machine type at "System board connectors" on how to the system board. 7. Make sure that the LEDs are in the ThinkCentre Safety and Warranty Guide that came with your computer. Replacing FRUs - See "Removing the computer cover" on page 87 3. Tamdhu Computers 117 ...bezel. 10. Remove the computer cover. Note the power switch/LED assembly cable routing and the position of the ThinkCentre Safety and Warranty Guide, go to: http://www.lenovo.com/support This section provides instructions on page 84. 4. Install the new power switch/LED assembly into the bezel....
...the cable for your machine type at "System board connectors" on how to the system board. 7. Make sure that the LEDs are in the ThinkCentre Safety and Warranty Guide that came with your computer. Replacing FRUs - See "Removing the computer cover" on page 87 3. Tamdhu Computers 117 ...bezel. 10. Remove the computer cover. Note the power switch/LED assembly cable routing and the position of the ThinkCentre Safety and Warranty Guide, go to: http://www.lenovo.com/support This section provides instructions on page 84. 4. Install the new power switch/LED assembly into the bezel....

Hardware Maintenance Manual
Page 124
.... See "Removing the computer cover" on the computer. See the system board illustration for information about replacing and disposing of the ThinkCentre Safety and Warranty Guide, go to: http://www.lenovo.com/support This section provides instructions on how to "Completing the FRU replacement" on page 120. 118 Hardware Maintenance Manual Replacing...
.... See "Removing the computer cover" on the computer. See the system board illustration for information about replacing and disposing of the ThinkCentre Safety and Warranty Guide, go to: http://www.lenovo.com/support This section provides instructions on how to "Completing the FRU replacement" on page 120. 118 Hardware Maintenance Manual Replacing...


