
(English) User Guide - Lenovo K450e
Page 8
... models only) HDMI connector (selected models only) On-board VGA connector USB 3.0 connector (selected models only) USB 2.0 connector Ethernet connector Audio connectors PCI Express X 16 graphics adapter slot (some models are equipped with a graphics card) PCI Express X 1 adapter slots (some models are equipped with a WIFI...
... models only) HDMI connector (selected models only) On-board VGA connector USB 3.0 connector (selected models only) USB 2.0 connector Ethernet connector Audio connectors PCI Express X 16 graphics adapter slot (some models are equipped with a graphics card) PCI Express X 1 adapter slots (some models are equipped with a WIFI...

(English) User Guide - Lenovo K450e
Page 27
Check to see if the signal cable to the monitor is loose; Check to the connector on the computer graphics card; Right-click the desktop anywhere except over an icon, then select Screen resolution from the pop-up menu to : • Change the desktop background •... pop-up menu. 2. Troubleshooting Display Problems Problem: Blank screen or no image is properly connected. • If an error message appears on the computer graphics card. if not, shut down the exact message. if so, plug the power cord securely into the monitor. 3. if not, press the Power button. 2.
Check to see if the signal cable to the monitor is loose; Check to the connector on the computer graphics card; Right-click the desktop anywhere except over an icon, then select Screen resolution from the pop-up menu to : • Change the desktop background •... pop-up menu. 2. Troubleshooting Display Problems Problem: Blank screen or no image is properly connected. • If an error message appears on the computer graphics card. if not, shut down the exact message. if so, plug the power cord securely into the monitor. 3. if not, press the Power button. 2.

(English) User Guide - Lenovo K450e
Page 34
Hardware Replacement Guide This chapter contains the following topics: Identifying internal components Identifying parts on the system board Removing the computer cover Removing the front bezel Replacing a memory module Replacing a hard disk drive Replacing an optical drive Replacing a graphics card Replacing the keyboard and mouse User Guide 29
Hardware Replacement Guide This chapter contains the following topics: Identifying internal components Identifying parts on the system board Removing the computer cover Removing the front bezel Replacing a memory module Replacing a hard disk drive Replacing an optical drive Replacing a graphics card Replacing the keyboard and mouse User Guide 29

(English) User Guide - Lenovo K450e
Page 35
... guide contains instructions for replacing the following parts: • Memory modules • Hard disk drive • Optical disk drive • Graphics card • Keyboard and mouse Safety information for replacing CRUs Do not open your computer. It is intended to be used by customers who ... guide does not include procedures for the replacement of the Safety and Warranty Guide can also be obtained online from the Lenovo® Support Web site at: http://support.lenovo.com. 30 User Guide An electronic copy of all parts. Overview This guide is expected that was included with your ...
... guide contains instructions for replacing the following parts: • Memory modules • Hard disk drive • Optical disk drive • Graphics card • Keyboard and mouse Safety information for replacing CRUs Do not open your computer. It is intended to be used by customers who ... guide does not include procedures for the replacement of the Safety and Warranty Guide can also be obtained online from the Lenovo® Support Web site at: http://support.lenovo.com. 30 User Guide An electronic copy of all parts. Overview This guide is expected that was included with your ...

(English) User Guide - Lenovo K450e
Page 38
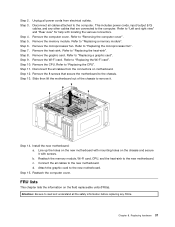
Locations Identifying internal components The following illustration shows the components inside your computer. 2 1 3 4 6 5 Optical disk drive Graphics card System fan Hard disk drive System board Power supply User Guide 33
Locations Identifying internal components The following illustration shows the components inside your computer. 2 1 3 4 6 5 Optical disk drive Graphics card System fan Hard disk drive System board Power supply User Guide 33

(English) User Guide - Lenovo K450e
Page 46
Remove the screw that secures the graphics card fixing bracket and lift the bracket up. Refer to lay the computer on a flat, stable surface. Replacing a graphics card Note: For this procedure, it helps to "Removing the computer cover". 2. To replace a graphics card: 1. User Guide 41 Remove the computer cover.
Remove the screw that secures the graphics card fixing bracket and lift the bracket up. Refer to lay the computer on a flat, stable surface. Replacing a graphics card Note: For this procedure, it helps to "Removing the computer cover". 2. To replace a graphics card: 1. User Guide 41 Remove the computer cover.

(English) User Guide - Lenovo K450e
Page 47
Remove the screw that secures the graphics latch to the chassis. 3 2 1 5. Remove the graphics card by lifting it . 4. 3. Remove the screw that secures the graphics card to the chassis and open it straight out of the connector. 42 User Guide
Remove the screw that secures the graphics latch to the chassis. 3 2 1 5. Remove the graphics card by lifting it . 4. 3. Remove the screw that secures the graphics card to the chassis and open it straight out of the connector. 42 User Guide

(English) User Guide - Lenovo K450e
Page 48
...Your keyboard will be replaced using the same method. 6. Refer to chassis with the screw. 8. Turn the graphics card latch to a USB connector at either front or the rear of the chassis". 4. Remove any media (disks, CDs, or memory... cards) from the drives, shut down the computer, and turn off all power cords from the computer and connect the... it to "Front view of the chassis" and "Rear view of the computer. Reattach the graphics card fixing bracket and computer cover. User Guide 43
...Your keyboard will be replaced using the same method. 6. Refer to chassis with the screw. 8. Turn the graphics card latch to a USB connector at either front or the rear of the chassis". 4. Remove any media (disks, CDs, or memory... cards) from the drives, shut down the computer, and turn off all power cords from the computer and connect the... it to "Front view of the chassis" and "Rear view of the computer. Reattach the graphics card fixing bracket and computer cover. User Guide 43
Lenovo K4 Series Hardware Maintenance Manual
Page 3
... the front bezel 25 Replacing a memory module 26 Replacing a hard disk drive 27 Replacing an optical drive 28 Replacing a graphics card 29 Replacing the Power supply 30 Replacing the microprocessor fan 31 Replacing the heat-sink 32 Replacing the CPU 33 Replacing the Wi-...POST error codes 20 Undetermined problems 20 Chapter 7. General Checkout . . . . . 11 Chapter 5. Using the Setup Utility. . . 13 Starting the Lenovo BIOS Setup Utility program . 13 Viewing and changing settings 13 Using passwords 13 Enabling or disabling a device 15 Selecting a startup device 16 Exiting the...
... the front bezel 25 Replacing a memory module 26 Replacing a hard disk drive 27 Replacing an optical drive 28 Replacing a graphics card 29 Replacing the Power supply 30 Replacing the microprocessor fan 31 Replacing the heat-sink 32 Replacing the CPU 33 Replacing the Wi-...POST error codes 20 Undetermined problems 20 Chapter 7. General Checkout . . . . . 11 Chapter 5. Using the Setup Utility. . . 13 Starting the Lenovo BIOS Setup Utility program . 13 Viewing and changing settings 13 Using passwords 13 Enabling or disabling a device 15 Selecting a startup device 16 Exiting the...
Lenovo K4 Series Hardware Maintenance Manual
Page 25
The following illustration shows the components inside your computer. 2 1 3 4 6 5 1 Optical disk drive 2 Hard disk drive 3 Graphics card 4 System board 5 Microprocessor fan and heatsink 6 Power supply Identifying parts on the system board. © Copyright Lenovo 2014 21 Chapter 7. Locations This section provides illustrations to help locate the various connectors, controls and components of devices that...
The following illustration shows the components inside your computer. 2 1 3 4 6 5 1 Optical disk drive 2 Hard disk drive 3 Graphics card 4 System board 5 Microprocessor fan and heatsink 6 Power supply Identifying parts on the system board. © Copyright Lenovo 2014 21 Chapter 7. Locations This section provides illustrations to help locate the various connectors, controls and components of devices that...

Lenovo K4 Series Hardware Maintenance Manual
Page 33
Remove the screw that secures the graphics card to "Removing the computer cover". Remove the computer cover. Step 3. Refer to the chassis. 3 Chapter 8. Replacing a graphics card Note: For this procedure, it helps to the chassis and open it. 1 2 Step 4. Remove the screw that secures the graphics card fixing bracket and lift the bracket up. Remove the screw that secures the graphics latch to lay the computer flat. Replacing hardware 29 Step 2. To replace a graphics card: Step 1.
Remove the screw that secures the graphics card to "Removing the computer cover". Remove the computer cover. Step 3. Refer to the chassis. 3 Chapter 8. Replacing a graphics card Note: For this procedure, it helps to the chassis and open it. 1 2 Step 4. Remove the screw that secures the graphics card fixing bracket and lift the bracket up. Remove the screw that secures the graphics latch to lay the computer flat. Replacing hardware 29 Step 2. To replace a graphics card: Step 1.

Lenovo K4 Series Hardware Maintenance Manual
Page 34
Step 6. Remove the graphics card by lifting it with the screw. Install the new adapter into the same adapter connector and secure it to chassis with the screw. Replacing the Power supply Note: For this procedure, it helps to the closed position and secure it straight out of the connector. Step 8. Turn the graphics card latch to lay the computer flat. Reattach the graphics card fixing bracket and computer cover. 3 2 1 Step 5. To replace the Power supply: 30 Lenovo K4 SeriesHardware Maintenance Manual Step 7.
Step 6. Remove the graphics card by lifting it with the screw. Install the new adapter into the same adapter connector and secure it to chassis with the screw. Replacing the Power supply Note: For this procedure, it helps to the closed position and secure it straight out of the connector. Step 8. Turn the graphics card latch to lay the computer flat. Reattach the graphics card fixing bracket and computer cover. 3 2 1 Step 5. To replace the Power supply: 30 Lenovo K4 SeriesHardware Maintenance Manual Step 7.
Lenovo K4 Series Hardware Maintenance Manual
Page 41
... various connectors. Step 11. Step 13. Slide then lift the motherboard out of the chassis to "Replacing the Wi-Fi card". Attach the graphic card to "Replacing a memory module". Replacing hardware 37 This includes power cords, input/output (I/O) cables, and any FRUs. Remove the... Step 7. Refer to the new motherboard. Reattach the memory module, Wi-Fi card, CPU, and the heat-sink to "Replacing the CPU". Remove the Wi-Fi card. Disconnect the all cables attached to "Replacing a graphic card". Step 12. Line up the holes on the new motherboard with mounting holes ...
... various connectors. Step 11. Step 13. Slide then lift the motherboard out of the chassis to "Replacing the Wi-Fi card". Attach the graphic card to "Replacing a memory module". Replacing hardware 37 This includes power cords, input/output (I/O) cables, and any FRUs. Remove the... Step 7. Refer to the new motherboard. Reattach the memory module, Wi-Fi card, CPU, and the heat-sink to "Replacing the CPU". Remove the Wi-Fi card. Disconnect the all cables attached to "Replacing a graphic card". Step 12. Line up the holes on the new motherboard with mounting holes ...

Lenovo K4 Series Hardware Maintenance Manual
Page 43
... Black BD Recorder-LH(BE) PLDS DH-12B2SH HH Black BD Recorder-LH HLDS BH40N Blu-ray Recorder-LH(BE) Graphic Card MSI@Geforce GTX 750@2G/A/2D/mHDMI Graphic Card 1100649 2 1100966 2 1100807 2 1100908 2 1100909 2 1100612 2 1100611 2 1100217 2 1100647 2 1100669 2 1100648 2 16200247 2 16200178 2 16200512 2 16200182 2 16200513 2 16200292 2 16200293 2 16200184 2 16200514 2 16200294...
... Black BD Recorder-LH(BE) PLDS DH-12B2SH HH Black BD Recorder-LH HLDS BH40N Blu-ray Recorder-LH(BE) Graphic Card MSI@Geforce GTX 750@2G/A/2D/mHDMI Graphic Card 1100649 2 1100966 2 1100807 2 1100908 2 1100909 2 1100612 2 1100611 2 1100217 2 1100647 2 1100669 2 1100648 2 16200247 2 16200178 2 16200512 2 16200182 2 16200513 2 16200292 2 16200293 2 16200184 2 16200514 2 16200294...


