
Lenovo IdeaCentre B3/B5 Series User Guide
Page 4
... 3 1.3 Rear view of the computer 4 1.4 TV button instructions (selected models only 5 1.5 Computer stand 6 1.6 Connecting your computer 7 1.7 Important information about using the computer 8 1.8 Wired keyboard (selected models only 10 Chapter 2 Touch screen user instruction 11 2.1 Touch Screen Calibration 12 2.2 User Gesture Instructions for the Touch screen 12 2.3 Attentions when using the Touch Screen 20 Chapter 3 Using the Onekey TV (selected models only)..... 23 3.1 Guide to the remote control (selected models only 25 3.2 Onekey TV Instructions (ASTC model...
... 3 1.3 Rear view of the computer 4 1.4 TV button instructions (selected models only 5 1.5 Computer stand 6 1.6 Connecting your computer 7 1.7 Important information about using the computer 8 1.8 Wired keyboard (selected models only 10 Chapter 2 Touch screen user instruction 11 2.1 Touch Screen Calibration 12 2.2 User Gesture Instructions for the Touch screen 12 2.3 Attentions when using the Touch Screen 20 Chapter 3 Using the Onekey TV (selected models only)..... 23 3.1 Guide to the remote control (selected models only 25 3.2 Onekey TV Instructions (ASTC model...
Lenovo IdeaCentre B3/B5 Series User Guide
Page 7
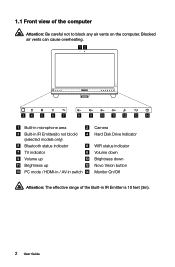
1.1 Front view of the Built-in IR Emitter is 10 feet (3m). 2 User Guide Blocked air vents can cause overheating. 12 34 5 6 7 8 9 10 11 12 13 14 Built-in microphone area Built-in IR Emitter(do not block) (selected models only) Bluetooth status indicator TV indicator Volume up Brightness up PC mode / HDMI-in / AV-in switch Camera Hard Disk Drive Indicator WIFI status indicator Volume down Brightness down Novo Vision button Monitor On/Off Attention: The effective range of the computer Attention: Be careful not to block any air vents on the computer.
1.1 Front view of the Built-in IR Emitter is 10 feet (3m). 2 User Guide Blocked air vents can cause overheating. 12 34 5 6 7 8 9 10 11 12 13 14 Built-in microphone area Built-in IR Emitter(do not block) (selected models only) Bluetooth status indicator TV indicator Volume up Brightness up PC mode / HDMI-in / AV-in switch Camera Hard Disk Drive Indicator WIFI status indicator Volume down Brightness down Novo Vision button Monitor On/Off Attention: The effective range of the computer Attention: Be careful not to block any air vents on the computer.
Lenovo IdeaCentre B3/B5 Series User Guide
Page 12
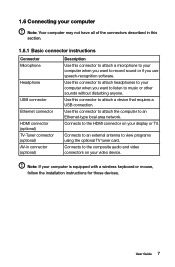
... mouse, follow the installation instructions for those devices. Connects to the HDMI connector on your video device. Use this connector to an Ethernet-type local area network. Connects to the composite audio and video connectors on your display or TV. Use this connector to attach the computer to attach a device that requires a USB connection. User Guide 7 Use this connector to attach headphones to your computer when you use speech-recognition software. Connects to an external antenna to view programs using the optional TV tuner card. 1.6 Connecting...
... mouse, follow the installation instructions for those devices. Connects to the HDMI connector on your video device. Use this connector to an Ethernet-type local area network. Connects to the composite audio and video connectors on your display or TV. Use this connector to attach the computer to attach a device that requires a USB connection. User Guide 7 Use this connector to attach headphones to your computer when you use speech-recognition software. Connects to an external antenna to view programs using the optional TV tuner card. 1.6 Connecting...
Lenovo IdeaCentre B3/B5 Series User Guide
Page 17
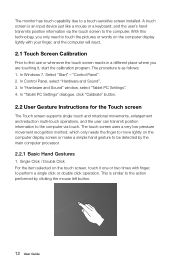
... "Hardware and Sound". 3. The touch screen uses a very low pressure movement recognition method, which only needs the finger to move lightly on the computer display lightly with finger, to perform a single click or double click operation. The monitor has touch capability due to the action performed by the main computer processor. 2.2.1 Basic Hand Gestures 1. In "Tablet PC Settings" dialogue, click "Calibrate" button. 2.2 User Gesture Instructions...
... "Hardware and Sound". 3. The touch screen uses a very low pressure movement recognition method, which only needs the finger to move lightly on the computer display lightly with finger, to perform a single click or double click operation. The monitor has touch capability due to the action performed by the main computer processor. 2.2.1 Basic Hand Gestures 1. In "Tablet PC Settings" dialogue, click "Calibrate" button. 2.2 User Gesture Instructions...
Lenovo IdeaCentre B3/B5 Series User Guide
Page 31
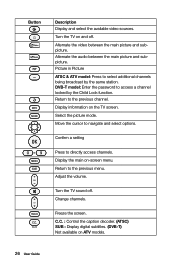
... TV sound off . Button Description Display and select the available video sources. DVB-T model: Enter the password to select additional channels being broadcast by the Child Lock function. Select the picture mode. C.C. : Control the caption decoder. (ATSC) SUB : Display digital subtitles. (DVB-T) Not available on -screen menu. Display the main on ATV models. 26 User Guide Change channels. Display information on and off . Return to navigate and select options...
... TV sound off . Button Description Display and select the available video sources. DVB-T model: Enter the password to select additional channels being broadcast by the Child Lock function. Select the picture mode. C.C. : Control the caption decoder. (ATSC) SUB : Display digital subtitles. (DVB-T) Not available on -screen menu. Display the main on ATV models. 26 User Guide Change channels. Display information on and off . Return to navigate and select options...
Lenovo IdeaCentre B3/B5 Series User Guide
Page 40
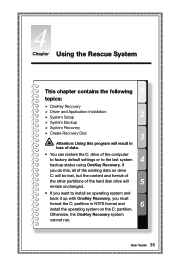
... Recovery Ø Create Recovery Disc 3 Attention: Using this , all of the existing data on drive C: will be lost, but the content and format of the other partitions of the computer 4 to factory default settings or to install an operating system and back it up with OneKey Recovery, you must format the C: partition in loss of data. • You can restore the C: drive of the hard disk drive will...
... Recovery Ø Create Recovery Disc 3 Attention: Using this , all of the existing data on drive C: will be lost, but the content and format of the other partitions of the computer 4 to factory default settings or to install an operating system and back it up with OneKey Recovery, you must format the C: partition in loss of data. • You can restore the C: drive of the hard disk drive will...
Lenovo IdeaCentre B3/B5 Series User Guide
Page 41
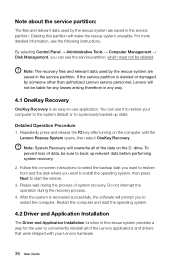
... restore your Lenovo hardware. 36 User Guide To prevent loss of system recovery. Detailed Operation Procedure 1. Note about the service partition: The files and relevant data used by the rescue system are saved in the service partition. If the service partition is recovered successfully, the software will make the rescue system unusable. Restart the computer and start the restore. 3. Repeatedly press and release the F2 key after turning on the C: drive...
... restore your Lenovo hardware. 36 User Guide To prevent loss of system recovery. Detailed Operation Procedure 1. Note about the service partition: The files and relevant data used by the rescue system are saved in the service partition. If the service partition is recovered successfully, the software will make the rescue system unusable. Restart the computer and start the restore. 3. Repeatedly press and release the F2 key after turning on the C: drive...
Lenovo IdeaCentre B3/B5 Series User Guide
Page 42
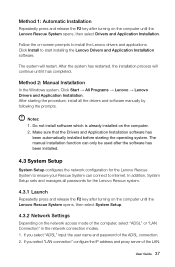
... turning on the computer until the Lenovo Rescue System opens, then select System Setup. 4.3.2 Network Settings Depending on the network access mode of the computer, select "ADSL" or "LAN Connection" in the network connection modes. 1. Follow the on the computer. 2. The manual installation function can connect to install the Lenovo drivers and applications. Method 2: Manual Installation In the Windows system, Click Start → All Programs → Lenovo → Lenovo Drivers and Application Installation. Make sure that the Drivers and Application Installation software...
... turning on the computer until the Lenovo Rescue System opens, then select System Setup. 4.3.2 Network Settings Depending on the network access mode of the computer, select "ADSL" or "LAN Connection" in the network connection modes. 1. Follow the on the computer. 2. The manual installation function can connect to install the Lenovo drivers and applications. Method 2: Manual Installation In the Windows system, Click Start → All Programs → Lenovo → Lenovo Drivers and Application Installation. Make sure that the Drivers and Application Installation software...

Lenovo IdeaCentre B3/B5 Series User Guide
Page 43
...-screen prompts to a system backup point or the initial state (factory default settings). 4.6 Create Recovery Disc Create a bootable recovery disc from this image file. In the Windows system, click Start → All Programs → Lenovo → Lenovo Rescue System. The default password is blank. 4.3.3 Password Management Password Management allows you to set a password, access the system directly and use it accordingly. 4.4 System Backup This backs up your system partition to back up your system partition...
...-screen prompts to a system backup point or the initial state (factory default settings). 4.6 Create Recovery Disc Create a bootable recovery disc from this image file. In the Windows system, click Start → All Programs → Lenovo → Lenovo Rescue System. The default password is blank. 4.3.3 Password Management Password Management allows you to set a password, access the system directly and use it accordingly. 4.4 System Backup This backs up your system partition to back up your system partition...
Lenovo IdeaCentre B3/B5 Series User Guide
Page 45
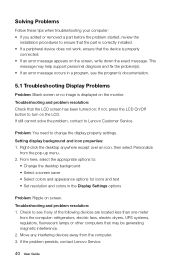
... added or removed a part before the problem started, review the installation procedures to ensure that the part is correctly installed. • If a peripheral device does not work, ensure that the device is displayed on the LCD. Troubleshooting and problem resolution: Check that may help support personnel diagnose and fix the problem(s). • If an error message occurs in the Display Settings options Problem: Ripple on screen. Problem: You need to : • Change the desktop background • Select a screen...
... added or removed a part before the problem started, review the installation procedures to ensure that the part is correctly installed. • If a peripheral device does not work, ensure that the device is displayed on the LCD. Troubleshooting and problem resolution: Check that may help support personnel diagnose and fix the problem(s). • If an error message occurs in the Display Settings options Problem: Ripple on screen. Problem: You need to : • Change the desktop background • Select a screen...

Lenovo IdeaCentre B3/B5 Series User Guide
Page 46
... a running program normally. Troubleshooting and problem resolution: • Check the headphone cable connection - Open the Task Manager window by powering the system off or through other drastic means. Problem resolution: During installation never abort the install process by pressing Ctrl, Alt and Delete at the same time. 2. User Guide 41 Adjust the volume, bass, or treble controls to the computer's side-panel headphone connector. Troubleshooting and problem resolution: 1. Problem: No sound...
... a running program normally. Troubleshooting and problem resolution: • Check the headphone cable connection - Open the Task Manager window by powering the system off or through other drastic means. Problem resolution: During installation never abort the install process by pressing Ctrl, Alt and Delete at the same time. 2. User Guide 41 Adjust the volume, bass, or treble controls to the computer's side-panel headphone connector. Troubleshooting and problem resolution: 1. Problem: No sound...
Lenovo IdeaCentre B3/B5 Series User Guide
Page 47
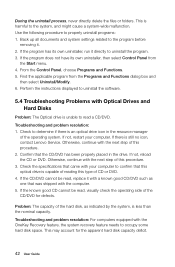
... that this optical drive is capable of reading this type of the hard disk, as one that the CD/DVD has been properly placed in the resource manager of the CD/DVD for the apparent hard disk capacity deficit. 42 User Guide Troubleshooting and problem resolution: 1. If the CD/DVD cannot be read , replace it with your computer. Use the following procedure to the program before removing it...
... that this optical drive is capable of reading this type of the hard disk, as one that the CD/DVD has been properly placed in the resource manager of the CD/DVD for the apparent hard disk capacity deficit. 42 User Guide Troubleshooting and problem resolution: 1. If the CD/DVD cannot be read , replace it with your computer. Use the following procedure to the program before removing it...

Lenovo IdeaCentre B3/B5 Series User Guide
Page 50
Chapter Hardware Replacement Guide 1 This chapter contains the following topics: 2 Ø Removing the computer cover Ø Installing a wall mount bracket adapter Ø Installing a B-CAS card Ø Replacing a memory module 3 Ø Replacing the optical drive Ø Replacing the hard disk drive Ø Replacing the keyboard and mouse 4 Ø Replacing the power cord 5 6 User Guide 45
Chapter Hardware Replacement Guide 1 This chapter contains the following topics: 2 Ø Removing the computer cover Ø Installing a wall mount bracket adapter Ø Installing a B-CAS card Ø Replacing a memory module 3 Ø Replacing the optical drive Ø Replacing the hard disk drive Ø Replacing the keyboard and mouse 4 Ø Replacing the power cord 5 6 User Guide 45
Lenovo IdeaCentre B3/B5 Series User Guide
Page 51
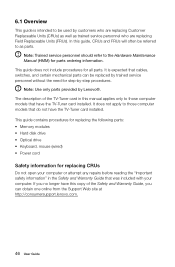
... replacing the following parts: • Memory modules • Hard disk drive • Optical drive • Keyboard, mouse (wired) • Power cord Safety information for step-by-step procedures. If you no longer have this copy of the TV-Tuner card in the Safety and Warranty Guide that have the TV-Tuner card installed. It is intended to those computer models that do not have the TV-Tuner card installed...
... replacing the following parts: • Memory modules • Hard disk drive • Optical drive • Keyboard, mouse (wired) • Power cord Safety information for step-by-step procedures. If you no longer have this copy of the TV-Tuner card in the Safety and Warranty Guide that have the TV-Tuner card installed. It is intended to those computer models that do not have the TV-Tuner card installed...
Lenovo IdeaCentre B3/B5 Series User Guide
Page 54
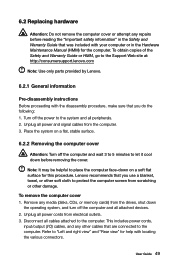
... 6.2 Replacing hardware Attention: Do not remove the computer cover or attempt any repairs before removing the cover. To obtain copies of the Safety and Warranty Guide or HMM, go to "Left and right view" and "Rear view" for the computer. Unplug all peripherals. 2. Refer to the Support Web site at: http://consumersupport.lenovo.com Note: Use only parts provided by Lenovo. 6.2.1 General information Pre-disassembly instructions...
... 6.2 Replacing hardware Attention: Do not remove the computer cover or attempt any repairs before removing the cover. To obtain copies of the Safety and Warranty Guide or HMM, go to "Left and right view" and "Rear view" for the computer. Unplug all peripherals. 2. Refer to the Support Web site at: http://consumersupport.lenovo.com Note: Use only parts provided by Lenovo. 6.2.1 General information Pre-disassembly instructions...
Lenovo IdeaCentre B3/B5 Series User Guide
Page 58
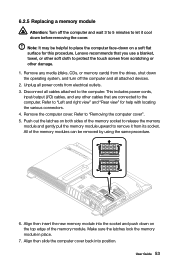
.... 1. Disconnect all power cords from the drives, shut down before removing the cover. Make sure the latches lock the memory module in place. 7. Lenovo recommends that are connected to the computer. Unplug all cables attached to the computer. Refer to "Left and right view" and "Rear view" for this procedure. 6.2.5 Replacing a memory module Attention: Turn off the computer and all attached devices. 2. Push out...
.... 1. Disconnect all power cords from the drives, shut down before removing the cover. Make sure the latches lock the memory module in place. 7. Lenovo recommends that are connected to the computer. Unplug all cables attached to the computer. Refer to "Left and right view" and "Rear view" for this procedure. 6.2.5 Replacing a memory module Attention: Turn off the computer and all attached devices. 2. Push out...
Lenovo IdeaCentre B3/B5 Series User Guide
Page 59
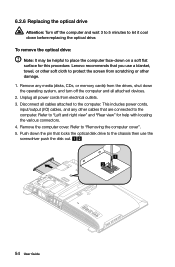
... (I/O) cables, and any media (disks, CDs, or memory cards) from electrical outlets. 3. Push down the pin that locks the optical disk drive to the computer. Unplug all power cords from the drives, shut down the operating system, and turn off the computer and wait 3 to 5 minutes to let it cool down on a soft flat surface for help with locating the various connectors. 4. Disconnect all cables attached...
... (I/O) cables, and any media (disks, CDs, or memory cards) from electrical outlets. 3. Push down the pin that locks the optical disk drive to the computer. Unplug all power cords from the drives, shut down the operating system, and turn off the computer and wait 3 to 5 minutes to let it cool down on a soft flat surface for help with locating the various connectors. 4. Disconnect all cables attached...
Lenovo IdeaCentre B3/B5 Series User Guide
Page 63
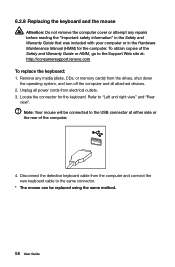
... and right view" and "Rear view". Unplug all power cords from the drives, shut down the operating system, and turn off the computer and all attached devices. 2. 6.2.8 Replacing the keyboard and the mouse Attention: Do not remove the computer cover or attempt any media (disks, CDs, or memory cards) from electrical outlets. 3. Note: Your mouse will be replaced using the same method. 58 User Guide Remove any repairs before reading the "Important...
... and right view" and "Rear view". Unplug all power cords from the drives, shut down the operating system, and turn off the computer and all attached devices. 2. 6.2.8 Replacing the keyboard and the mouse Attention: Do not remove the computer cover or attempt any media (disks, CDs, or memory cards) from electrical outlets. 3. Note: Your mouse will be replaced using the same method. 58 User Guide Remove any repairs before reading the "Important...
Lenovo IdeaCentre B3/B5 Series User Guide
Page 65
... Thank you install and use Lenovo's products appropriately. Carefully read all documents shipped with your computer, and the content of the computer that you use the product for using Lenovo products. This manual could include technical inaccuracies or typographical errors. For the configuration of the manuals included with your computer, or operate the product inappropriately. The software interface and function and hardware configuration described in...
... Thank you install and use Lenovo's products appropriately. Carefully read all documents shipped with your computer, and the content of the computer that you use the product for using Lenovo products. This manual could include technical inaccuracies or typographical errors. For the configuration of the manuals included with your computer, or operate the product inappropriately. The software interface and function and hardware configuration described in...

Lenovo IdeaCentre B3/B5 Series User Guide
Page 67
... power settings: - To help in this endeavor, Lenovo has preset the following power-management features to take effect when your computer has been inactive for a specified duration: ENERGY STAR power-management features, by operating system Microsoft Windows XP • Turn off monitor: After 15 minutes • Turn off hard disk drives: Never • System standby: After 20 minutes • System hibernates: Never Microsoft Windows Vista and Windows 7 Power plan...
... power settings: - To help in this endeavor, Lenovo has preset the following power-management features to take effect when your computer has been inactive for a specified duration: ENERGY STAR power-management features, by operating system Microsoft Windows XP • Turn off monitor: After 15 minutes • Turn off hard disk drives: Never • System standby: After 20 minutes • System hibernates: Never Microsoft Windows Vista and Windows 7 Power plan...


