Lenovo H520g Hardware Maintenance Manual
Page 41
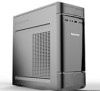
... of data. • Verify that the disc you need technical assistance, see "Lenovo Solution Center" on page 51 for "A CD or DVD does not work " on page 37 • "Unable to use a startable (bootable) recovery medium, such as the Product Recovery CD, to start your CD or DVD drive. Refer to start your...
... of data. • Verify that the disc you need technical assistance, see "Lenovo Solution Center" on page 51 for "A CD or DVD does not work " on page 37 • "Unable to use a startable (bootable) recovery medium, such as the Product Recovery CD, to start your CD or DVD drive. Refer to start your...

Lenovo H520g Hardware Maintenance Manual
Page 59
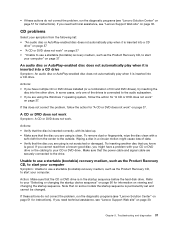
... to the SATA connectors (such as hard disk drives or the optical drive) are disabled and cannot be accessed. Move the Clear CMOS /Recovery jumper back to select a temporary startup device. Enabling or disabling a device This section provides information on for approximately five seconds. 7. Start the...5. Remove the computer cover. 3. Move the jumper from the drives and turn off all cables that are bootable. Locate the Clear CMOS /Recovery jumper on page 57. To enable or disable a device, do one of up from electrical outlets and disconnect all attached devices and the ...
... to the SATA connectors (such as hard disk drives or the optical drive) are disabled and cannot be accessed. Move the Clear CMOS /Recovery jumper back to select a temporary startup device. Enabling or disabling a device This section provides information on for approximately five seconds. 7. Start the...5. Remove the computer cover. 3. Move the jumper from the drives and turn off all cables that are bootable. Locate the Clear CMOS /Recovery jumper on page 57. To enable or disable a device, do one of up from electrical outlets and disconnect all attached devices and the ...
Lenovo H520g Hardware Maintenance Manual
Page 64
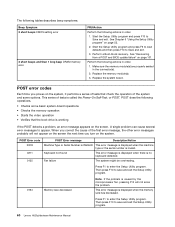
Start the Setup Utility program and press F9 to load defaults and then press F10 to save and exit the Setup Utility program. 60 Lenovo H520gHardware Maintenance Manual Replace the memory module(s). 3. POST does the following operations. • Checks some basic system-board operations • Checks... displayed when there is invalid. Start the Setup Utility program and press F10 to enter the Setup Utility program. Perform a Boot-block recovery. Replace the system board. When you correct the cause of the first error message, the other error messages probably will not solve the...
Start the Setup Utility program and press F9 to load defaults and then press F10 to save and exit the Setup Utility program. 60 Lenovo H520gHardware Maintenance Manual Replace the memory module(s). 3. POST does the following operations. • Checks some basic system-board operations • Checks... displayed when there is invalid. Start the Setup Utility program and press F10 to enter the Setup Utility program. Perform a Boot-block recovery. Replace the system board. When you correct the cause of the first error message, the other error messages probably will not solve the...
Lenovo H520g Hardware Maintenance Manual
Page 72
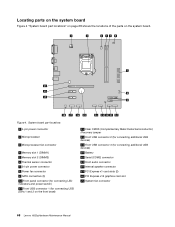
... Figure 4 "System board part locations" on page 68 shows the locations of the parts on the front bezel) 12 Clear CMOS (Complementary Metal Oxide Semiconductor) /Recovery jumper 13 Front USB connector 2 (for connecting additional USB devices) 14 Front USB connector 3 (for connecting additional USB devices) 15 Battery 16 Serial (COM2) connector... Front audio connector 18 Internal speaker connector 19 PCI Express x1 card slots (2) 20 PCI Express x16 graphics card slot 21 System fan connector 68 Lenovo H520gHardware Maintenance Manual
... Figure 4 "System board part locations" on page 68 shows the locations of the parts on the front bezel) 12 Clear CMOS (Complementary Metal Oxide Semiconductor) /Recovery jumper 13 Front USB connector 2 (for connecting additional USB devices) 14 Front USB connector 3 (for connecting additional USB devices) 15 Battery 16 Serial (COM2) connector... Front audio connector 18 Internal speaker connector 19 PCI Express x1 card slots (2) 20 PCI Express x16 graphics card slot 21 System fan connector 68 Lenovo H520gHardware Maintenance Manual
Lenovo H520g Hardware Maintenance Manual
Page 105
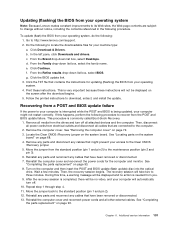
... replacement" on page 72. 3. Click Continue. g. Recovering from the standard position (pin 1 and pin 2) to the Clear CMOS /Recovery jumper. 5. Then, the recovery session begins. Chapter 11. c. Follow the printed instructions to http://www.lenovo.com/support. 2. See "Removing the computer cover" on page 93. 8. During this happens, perform the following : 1. Additional service...
... replacement" on page 72. 3. Click Continue. g. Recovering from the standard position (pin 1 and pin 2) to the Clear CMOS /Recovery jumper. 5. Then, the recovery session begins. Chapter 11. c. Follow the printed instructions to http://www.lenovo.com/support. 2. See "Removing the computer cover" on page 93. 8. During this happens, perform the following : 1. Additional service...

Lenovo H520g Hardware Maintenance Manual
Page 108
... the United States, other rights owners. patents and other intellectual property rights owned by Macrovision Corporation and other countries, or both : Lenovo The Lenovo logo Rescue and Recovery ThinkVantage Microsoft and Windows are trademarks of the Microsoft group of certain U.S. Intel is intended for home and other limited viewing uses only unless otherwise...
... the United States, other rights owners. patents and other intellectual property rights owned by Macrovision Corporation and other countries, or both : Lenovo The Lenovo logo Rescue and Recovery ThinkVantage Microsoft and Windows are trademarks of the Microsoft group of certain U.S. Intel is intended for home and other limited viewing uses only unless otherwise...
Lenovo H520g Hardware Maintenance Manual
Page 109
Index A Administrator, password 54 B basic troubleshooting 33 battery, replacing 77 BIOS settings, changing 57 Boot-block Recovery 101 C changing password 54 startup device sequence 56 CMOS, clearing 55 components, internal 66 computer cover removing 72 computer cover, ...replacing 90 heat sink and fan assembly, replacing 82 I Identifying FRUs 66 installing operating system 57 installing options memory module 78 PCI card 74 L Lenovo Solution Center 51 locating components 66 looking up part numbers 1, 65 M memory module installing, replacing 78 system board 78 microprocessor replacing 85 O optical...
Index A Administrator, password 54 B basic troubleshooting 33 battery, replacing 77 BIOS settings, changing 57 Boot-block Recovery 101 C changing password 54 startup device sequence 56 CMOS, clearing 55 components, internal 66 computer cover removing 72 computer cover, ...replacing 90 heat sink and fan assembly, replacing 82 I Identifying FRUs 66 installing operating system 57 installing options memory module 78 PCI card 74 L Lenovo Solution Center 51 locating components 66 looking up part numbers 1, 65 M memory module installing, replacing 78 system board 78 microprocessor replacing 85 O optical...
Lenovo H520g Hardware Maintenance Manual
Page 110
Power-On, Password 54 R rear connectors 66 recovering from a POST and BIOS update failure 101 recovery Boot-block Recovery 101 removing computer cover 72 replacing battery 77 hard disk drive 90 heat sink and fan assembly 82 microprocessor 85 S security enabling or disabling 55 ... device 55 the BIOS, updating (flashing) 100-101 troubleshooting, basic 33 troubleshooting, diagnostics 33 U updating (flashing) the BIOS 100 updating (flashing) the BIOS 101 106 Lenovo H520gHardware Maintenance Manual using passwords 53 Setup Utility 53 V viewing and changing settings 53
Power-On, Password 54 R rear connectors 66 recovering from a POST and BIOS update failure 101 recovery Boot-block Recovery 101 removing computer cover 72 replacing battery 77 hard disk drive 90 heat sink and fan assembly 82 microprocessor 85 S security enabling or disabling 55 ... device 55 the BIOS, updating (flashing) 100-101 troubleshooting, basic 33 troubleshooting, diagnostics 33 U updating (flashing) the BIOS 100 updating (flashing) the BIOS 101 106 Lenovo H520gHardware Maintenance Manual using passwords 53 Setup Utility 53 V viewing and changing settings 53


