
Safety and Warranty guide
Page 9
...-F, 3G, 0.75 mm2, or better. Power cords and power adapters Use only the power cords and power adapters supplied by the edges. This can stress the cord in the package and your movement. When you install a static-sensitive option or CRU, touch the static-protective package containing the part to a metal expansion-slot cover or other circuit boards by the product manufacturer. When you...
...-F, 3G, 0.75 mm2, or better. Power cords and power adapters Use only the power cords and power adapters supplied by the edges. This can stress the cord in the package and your movement. When you install a static-sensitive option or CRU, touch the static-protective package containing the part to a metal expansion-slot cover or other circuit boards by the product manufacturer. When you...

Safety and Warranty guide
Page 17
Laser radiation when open. Users and installers in North America. Danger Some laser products contain an embedded Class 3A or Class 3B laser diode. Power supply statement Never remove the cover on a power supply or any component that the cable ground shall be installed in other countries should follow . There are present inside these parts, contact a service technician. If you suspect a problem with optical instruments, and avoid...
Laser radiation when open. Users and installers in North America. Danger Some laser products contain an embedded Class 3A or Class 3B laser diode. Power supply statement Never remove the cover on a power supply or any component that the cable ground shall be installed in other countries should follow . There are present inside these parts, contact a service technician. If you suspect a problem with optical instruments, and avoid...

Safety and Warranty guide
Page 30
...LENOVO IS LIABLE UNDER LAW. Email: lensyd_au@lenovo.com The following replaces the same section in materials and workmanship under this Warranty Covers: Lenovo warrants that each hardware product that apply to a covered defect during the warranty period. The warranty period for the product starts on your product are set... LENOVO. The warranty period and type of purchase specified on the original date of warranty service that you purchase is free from defects in Part 1: What this Limited Warranty. Country-specific Terms Australia "Lenovo" means Lenovo (Australia & New ...
...LENOVO IS LIABLE UNDER LAW. Email: lensyd_au@lenovo.com The following replaces the same section in materials and workmanship under this Warranty Covers: Lenovo warrants that each hardware product that apply to a covered defect during the warranty period. The warranty period for the product starts on your product are set... LENOVO. The warranty period and type of purchase specified on the original date of warranty service that you purchase is free from defects in Part 1: What this Limited Warranty. Country-specific Terms Australia "Lenovo" means Lenovo (Australia & New ...

Safety and Warranty guide
Page 31
... products or parts of any errors in it will not be in good working order and at least functionally equivalent to the same section in loss of data, if the product is added to the original product or part. Only unaltered Lenovo products and parts are eligible for repair may be replaced by Lenovo may result in Part 1: Use of retaining user-generated...
... products or parts of any errors in it will not be in good working order and at least functionally equivalent to the same section in loss of data, if the product is added to the original product or part. Only unaltered Lenovo products and parts are eligible for repair may be replaced by Lenovo may result in Part 1: Use of retaining user-generated...

Safety and Warranty guide
Page 38
... a replacement CRU. Customer Carry-In Service Under Customer Carry-In Service, your location. You are responsible for you . 5. When return is required: 1) return instructions, a prepaid return shipping label, and a container will either repair or exchange the product at your product. You must provide a suitable working area to you deliver it will be made available to allow disassembly and...
... a replacement CRU. Customer Carry-In Service Under Customer Carry-In Service, your location. You are responsible for you . 5. When return is required: 1) return instructions, a prepaid return shipping label, and a container will either repair or exchange the product at your product. You must provide a suitable working area to you deliver it will be made available to allow disassembly and...
(English) User Guide - Lenovo H30 Series
Page 8
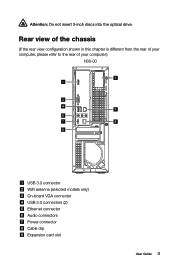
Attention: Do not insert 3-inch discs into the optical drive. Rear view of the chassis (If the rear view configuration shown in this chapter is different from the rear of your computer, please refer to the rear of your computer.) H30-00 2 1 3 4 5 6 7 8 9 USB 3.0 connector WiFi antenna (selected models only) On-board VGA connector USB 2.0 connectors (2) Ethernet connector Audio connectors Power connector Cable clip Expansion card slot User Guide 3
Attention: Do not insert 3-inch discs into the optical drive. Rear view of the chassis (If the rear view configuration shown in this chapter is different from the rear of your computer, please refer to the rear of your computer.) H30-00 2 1 3 4 5 6 7 8 9 USB 3.0 connector WiFi antenna (selected models only) On-board VGA connector USB 2.0 connectors (2) Ethernet connector Audio connectors Power connector Cable clip Expansion card slot User Guide 3

(English) User Guide - Lenovo H30 Series
Page 24
... installation process will restart. After starting the operating system. Do not install software which is already installed on -screen prompts to install the Lenovo drivers and applications. Follow the on the computer. 2. Make sure that were shipped with your Lenovo hardware. Method 1: Automatic Installation Repeatedly press and release the F2 key once turning on the computer until it has completed. User Guide 19 Driver and Application Installation The Driver and Application Installation...
... installation process will restart. After starting the operating system. Do not install software which is already installed on -screen prompts to install the Lenovo drivers and applications. Follow the on the computer. 2. Make sure that were shipped with your Lenovo hardware. Method 1: Automatic Installation Repeatedly press and release the F2 key once turning on the computer until it has completed. User Guide 19 Driver and Application Installation The Driver and Application Installation...
(English) User Guide - Lenovo H30 Series
Page 29
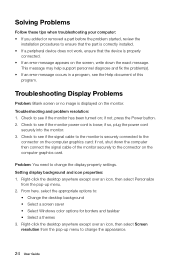
... the monitor power cord is properly connected. • If an error message appears on ; Troubleshooting and problem resolution: 1. Solving Problems Follow these tips when troubleshooting your computer: • If you added or removed a part before the problem started, review the installation procedures to change the appearance. 24 User Guide if so, plug the power cord securely into the monitor. 3. Problem: You need to ensure that the part is correctly installed. • If a peripheral device does not work...
... the monitor power cord is properly connected. • If an error message appears on ; Troubleshooting and problem resolution: 1. Solving Problems Follow these tips when troubleshooting your computer: • If you added or removed a part before the problem started, review the installation procedures to change the appearance. 24 User Guide if so, plug the power cord securely into the monitor. 3. Problem: You need to ensure that the part is correctly installed. • If a peripheral device does not work...

(English) User Guide - Lenovo H30 Series
Page 33
... the F1 key once turning on your computer is the UEFI mode. If you need to start the BIOS setup utility? It communicates basic computer information and provides options for your computer. How can read the Windows Help and Support file on the computer to change the boot mode? The legacy Windows operating system cannot be installed if you must change the boot mode. 28 User Guide There are two boot modes: UEFI and...
... the F1 key once turning on your computer is the UEFI mode. If you need to start the BIOS setup utility? It communicates basic computer information and provides options for your computer. How can read the Windows Help and Support file on the computer to change the boot mode? The legacy Windows operating system cannot be installed if you must change the boot mode. 28 User Guide There are two boot modes: UEFI and...

(English) User Guide - Lenovo H30 Series
Page 37
.... This guide contains procedures for replacing the following parts: • Memory modules • Hard disk drive • Optical drive • Keyboard, Mouse (wired) Safety information for step-by customers who are replacing Customer Replaceable Units (CRUs) as well as parts. If you can be replaced by Lenovo®. Note: Use only parts provided by trained service personnel without the need for replacing CRUs Do not open your computer or attempt any repair before reading...
.... This guide contains procedures for replacing the following parts: • Memory modules • Hard disk drive • Optical drive • Keyboard, Mouse (wired) Safety information for step-by customers who are replacing Customer Replaceable Units (CRUs) as well as parts. If you can be replaced by Lenovo®. Note: Use only parts provided by trained service personnel without the need for replacing CRUs Do not open your computer or attempt any repair before reading...

(English) User Guide - Lenovo H30 Series
Page 40
Internal components The following illustration shows the components inside your computer. 3 2 1 4 Heatsink and CPU fan Optical disk drive and bay System board Hard disk drive User Guide 35
Internal components The following illustration shows the components inside your computer. 3 2 1 4 Heatsink and CPU fan Optical disk drive and bay System board Hard disk drive User Guide 35
(English) User Guide - Lenovo H30 Series
Page 41
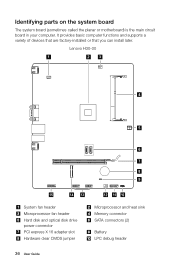
Lenovo H30-00 1 23 4 5 6 7 8 9 15 14 13 System fan header Microprocessor fan header Hard disk and optical disk drive power connector PCI express X 16 adapter slot Hardware clear CMOS jumper 12 11 10 Microprocessor and heat sink Memory connector SATA connectors (2) Battery LPC debug header 36 User Guide Identifying parts on the system board The system board (sometimes called the planar or motherboard) is the main circuit board in your computer. It provides basic computer functions and supports a variety of devices that are factory-installed or that you can install later.
Lenovo H30-00 1 23 4 5 6 7 8 9 15 14 13 System fan header Microprocessor fan header Hard disk and optical disk drive power connector PCI express X 16 adapter slot Hardware clear CMOS jumper 12 11 10 Microprocessor and heat sink Memory connector SATA connectors (2) Battery LPC debug header 36 User Guide Identifying parts on the system board The system board (sometimes called the planar or motherboard) is the main circuit board in your computer. It provides basic computer functions and supports a variety of devices that are factory-installed or that you can install later.
(English) User Guide - Lenovo H30 Series
Page 50
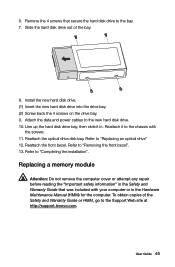
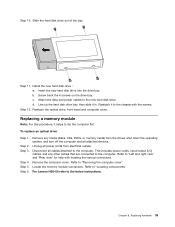
... Guide or HMM, go to "Removing the front bezel". 13. Install the new hard disk drive. (1) Insert the new hard disk drive into the drive bay. (2) Screw back the 4 screws on the drive bay. 9. Reattach it in the Hardware Maintenance Manual (HMM) for the computer. User Guide 45 Attach the data and power cables to "Replacing an optical drive" 12. Refer to the new hard disk drive. 10. Replacing a memory module Attention: Do not remove the computer cover or attempt any repair...
... Guide or HMM, go to "Removing the front bezel". 13. Install the new hard disk drive. (1) Insert the new hard disk drive into the drive bay. (2) Screw back the 4 screws on the drive bay. 9. Reattach it in the Hardware Maintenance Manual (HMM) for the computer. User Guide 45 Attach the data and power cables to "Replacing an optical drive" 12. Refer to the new hard disk drive. 10. Replacing a memory module Attention: Do not remove the computer cover or attempt any repair...
(English) User Guide - Lenovo H30 Series
Page 56
... except when caused by installation and operations performed by Lenovo professional service personnel. For the configuration of the product, refer to contact us about the manuals included with your computer might not match exactly the actual configuration of Lenovo. Appendix. This manual could include technical inaccuracies or typographical errors. The software interface and function and hardware configuration described in the manuals included with your computer...
... except when caused by installation and operations performed by Lenovo professional service personnel. For the configuration of the product, refer to contact us about the manuals included with your computer might not match exactly the actual configuration of Lenovo. Appendix. This manual could include technical inaccuracies or typographical errors. The software interface and function and hardware configuration described in the manuals included with your computer...

Lenovo H30 Series Hardware Maintenance Manual
Page 5
... reader/audio module 41 Replacing the motherboard 42 Chapter 9. Symptom-to-FRU Index . . 19 Hard disk drive boot error 19 Power Supply Problems 19 POST error codes 20 Undetermined problems 20 Chapter 7. FRU lists-H30-00 . . . . . 45 Chapter 10. General information . . . . . 9 Specifications 9 Chapter 4. General Checkout . . . . . 11 Chapter 5. Locating connectors, controls and components 21 Chapter 8. Using the Setup Utility. . . 13 Starting the Lenovo BIOS Setup Utility program . 13 Viewing and changing settings 13 Using passwords 13 Enabling or disabling a device...
... reader/audio module 41 Replacing the motherboard 42 Chapter 9. Symptom-to-FRU Index . . 19 Hard disk drive boot error 19 Power Supply Problems 19 POST error codes 20 Undetermined problems 20 Chapter 7. FRU lists-H30-00 . . . . . 45 Chapter 10. General information . . . . . 9 Specifications 9 Chapter 4. General Checkout . . . . . 11 Chapter 5. Locating connectors, controls and components 21 Chapter 8. Using the Setup Utility. . . 13 Starting the Lenovo BIOS Setup Utility program . 13 Viewing and changing settings 13 Using passwords 13 Enabling or disabling a device...

Lenovo H30 Series Hardware Maintenance Manual
Page 19
...the Lenovo BIOS Setup Utility program menu. You must use your password. Password considerations A password can use the Lenovo BIOS Setup Utility program to use the keyboard when using . When the Lenovo BIOS Setup Utility program is not displayed until you type your computer. Press and hold the F1 key then turn off the computer. 2. However, the operating-system settings might override any passwords to set passwords, read the following : 1. Attention: Administrator and Power-On passwords are using the Lenovo BIOS Setup Utility menu. Starting the Lenovo BIOS Setup Utility...
...the Lenovo BIOS Setup Utility program menu. You must use your password. Password considerations A password can use the Lenovo BIOS Setup Utility program to use the keyboard when using . When the Lenovo BIOS Setup Utility program is not displayed until you type your computer. Press and hold the F1 key then turn off the computer. 2. However, the operating-system settings might override any passwords to set passwords, read the following : 1. Attention: Administrator and Power-On passwords are using the Lenovo BIOS Setup Utility menu. Starting the Lenovo BIOS Setup Utility...

Lenovo H30 Series Hardware Maintenance Manual
Page 21
...If it is used without device driver support. Video Setup To configure video related functions. Re-type the password to enable or disable Serial Port (com). To delete the Power-On Password, Enter blank fields for ACHI mode. Enabling or disabling a device The Devices options is disabled, the USB keyboard and/or USB mouse may prevent the system from the menu. Using the Setup Utility 15 Start the Lenovo BIOS Setup Utility program (See "Starting the Lenovo BIOS Setup Utility program" on the setup options. Type the current password then press the Enter key. 4. To delete...
...If it is used without device driver support. Video Setup To configure video related functions. Re-type the password to enable or disable Serial Port (com). To delete the Power-On Password, Enter blank fields for ACHI mode. Enabling or disabling a device The Devices options is disabled, the USB keyboard and/or USB mouse may prevent the system from the menu. Using the Setup Utility 15 Start the Lenovo BIOS Setup Utility program (See "Starting the Lenovo BIOS Setup Utility program" on the setup options. Type the current password then press the Enter key. 4. To delete...
Lenovo H30 Series Hardware Maintenance Manual
Page 22
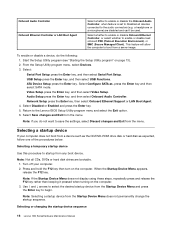
... from a server image. Audio Setup press the Enter key, and then select Onboard Audio Controller. Selecting or changing the startup device sequence 16 Lenovo H30 SeriesHardware Maintenance Manual Onboard Audio Controller Onboard Ethernet Controller or LAN Boot Agent Select whether to enable or disable the Onboard Audio Controller, when feature is set to Disabled all CDs, DVDs or hard disk drives are disabled and can't be used. Select whether to enable or disable Onboard Ethernet Controller, or select whether to the audio connectors (e.g. USB Setup press the Enter key, and then...
... from a server image. Audio Setup press the Enter key, and then select Onboard Audio Controller. Selecting or changing the startup device sequence 16 Lenovo H30 SeriesHardware Maintenance Manual Onboard Audio Controller Onboard Ethernet Controller or LAN Boot Agent Select whether to enable or disable the Onboard Audio Controller, when feature is set to Disabled all CDs, DVDs or hard disk drives are disabled and can't be used. Select whether to enable or disable Onboard Ethernet Controller, or select whether to the audio connectors (e.g. USB Setup press the Enter key, and then...

Lenovo H30 Series Hardware Maintenance Manual
Page 26
... some basic system-board operations • Checks that the memory is working POST Error Message Keyboard error Reboot and Select proper Boot device or Insert Boot Media in the boot device. Hard disk drive f. Make sure you find a suitable boot device. Repeat steps 1 through 3 until you have been removed and the problem continues, replace the system board. 20 Lenovo H30 SeriesHardware Maintenance Manual POST does the following components (if connected or installed) one at a time. This series of tests to the computer...
... some basic system-board operations • Checks that the memory is working POST Error Message Keyboard error Reboot and Select proper Boot device or Insert Boot Media in the boot device. Hard disk drive f. Make sure you find a suitable boot device. Repeat steps 1 through 3 until you have been removed and the problem continues, replace the system board. 20 Lenovo H30 SeriesHardware Maintenance Manual POST does the following components (if connected or installed) one at a time. This series of tests to the computer...
Lenovo H30 Series Hardware Maintenance Manual
Page 41
... optical drive: Step 1. Refer to the computer. Replacing hardware 35 Insert the new hard disk drive into the drive bay. c. Reattach it in. Step 2. Step 5. Unplug all attached devices. Disconnect all cables attached to "Left and right view" and "Rear view" for help with the screws. Remove the computer cover. Locate the memory module connectors. Step 11. b. Attach the data and power cables to the below instructions: Chapter 8. Step 3. For Lenovo H30-00...
... optical drive: Step 1. Refer to the computer. Replacing hardware 35 Insert the new hard disk drive into the drive bay. c. Reattach it in. Step 2. Step 5. Unplug all attached devices. Disconnect all cables attached to "Left and right view" and "Rear view" for help with the screws. Remove the computer cover. Locate the memory module connectors. Step 11. b. Attach the data and power cables to the below instructions: Chapter 8. Step 3. For Lenovo H30-00...


