Lenovo G470/G475/G570/G575 User Guide V1.0
Page 2
... disclosure is subject to most models. Some features may not be slightly different. LIMITED AND RESTRICTED RIGHTS NOTICE: If products, data, computer software, or services are using other Windows operating system, some operations may differ from the actual product. First Edition (December 2010) © Copyright Lenovo 2010. If you are using other operating systems, some operations may be available on your...
... disclosure is subject to most models. Some features may not be slightly different. LIMITED AND RESTRICTED RIGHTS NOTICE: If products, data, computer software, or services are using other Windows operating system, some operations may differ from the actual product. First Edition (December 2010) © Copyright Lenovo 2010. If you are using other operating systems, some operations may be available on your...
Lenovo G470/G475/G570/G575 User Guide V1.0
Page 3
... First use 10 Using AC adapter and battery ...12 Using the touchpad 14 Using the keyboard 15 Connecting external devices.......18 Special keys and buttons 20 System status indicators 21 Securing your computer 1 Top view 1 Left-side view 4 Right-side view 5 Front view 6 Bottom view 7 Chapter 2. Getting to the Internet 25 Wired connection 25 Wireless connection 27 Chapter 4. CRU instructions 31 Replacing the battery 31 Replacing the hard disk drive ....33 Replacing memory 37 Removing the optical drive ........40...
... First use 10 Using AC adapter and battery ...12 Using the touchpad 14 Using the keyboard 15 Connecting external devices.......18 Special keys and buttons 20 System status indicators 21 Securing your computer 1 Top view 1 Left-side view 4 Right-side view 5 Front view 6 Bottom view 7 Chapter 2. Getting to the Internet 25 Wired connection 25 Wireless connection 27 Chapter 4. CRU instructions 31 Replacing the battery 31 Replacing the hard disk drive ....33 Replacing memory 37 Removing the optical drive ........40...
Lenovo G470/G475/G570/G575 User Guide V1.0
Page 8
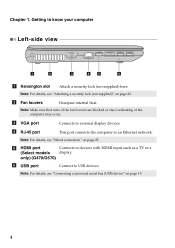
... Ethernet network. d RJ-45 port This port connects the computer to know your computer Left-side view 1 2 3 4 5 6 a Kensington slot Attach a security lock (not supplied) here. Note: Make sure that none of the fan louvers are blocked or else overheating of the computer may occur. e HDMI port Connects to external display devices. b Fan louvers Dissipate internal heat. c VGA port Connects to devices with HDMI input such as a TV or a (Select models display. Chapter...
... Ethernet network. d RJ-45 port This port connects the computer to know your computer Left-side view 1 2 3 4 5 6 a Kensington slot Attach a security lock (not supplied) here. Note: Make sure that none of the fan louvers are blocked or else overheating of the computer may occur. e HDMI port Connects to external display devices. b Fan louvers Dissipate internal heat. c VGA port Connects to devices with HDMI input such as a TV or a (Select models display. Chapter...
Lenovo G470/G475/G570/G575 User Guide V1.0
Page 9
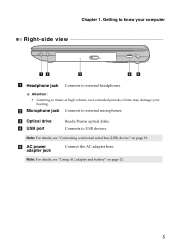
Note: For details, see "Connecting a universal serial bus (USB) device" on page 12. 5 Note: For details, see "Using AC adapter and battery" on page 19. c Optical drive d USB port Reads/Burns optical disks. Getting to know your hearing. Connects to external headphones. Attention: • Listening to external microphones. e AC power adapter jack Connect the AC adapter here. b Microphone jack Connects to music at high volume over extended periods of time may damage your computer Right-side view 12 3 45 a Headphone jack Connects to USB devices. Chapter 1.
Note: For details, see "Connecting a universal serial bus (USB) device" on page 12. 5 Note: For details, see "Using AC adapter and battery" on page 19. c Optical drive d USB port Reads/Burns optical disks. Getting to know your hearing. Connects to external headphones. Attention: • Listening to external microphones. e AC power adapter jack Connect the AC adapter here. b Microphone jack Connects to music at high volume over extended periods of time may damage your computer Right-side view 12 3 45 a Headphone jack Connects to USB devices. Chapter 1.

Lenovo G470/G475/G570/G575 User Guide V1.0
Page 14
... the power button to turn on AC power. The battery is automatically charged while the computer is running on the computer. „ Configuring the operating system You may include the procedures below. • Accepting the end user license agreement • Configuring the Internet connection • Registering the operating system • Creating a user account 10 Chapter 2. To charge the battery and begin using your computer, insert the battery pack and connect...
... the power button to turn on AC power. The battery is automatically charged while the computer is running on the computer. „ Configuring the operating system You may include the procedures below. • Accepting the end user license agreement • Configuring the Internet connection • Registering the operating system • Creating a user account 10 Chapter 2. To charge the battery and begin using your computer, insert the battery pack and connect...
Lenovo G470/G475/G570/G575 User Guide V1.0
Page 15
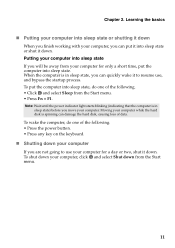
Note: Wait until the power indicator light starts blinking (indicating that the computer is spinning can put it into sleep state, do one of the following . • Press the power button. • Press any key on the keyboard. „ Shutting down from the Start menu. • Press Fn + F1. To shut down ...resume use your computer. When the computer is in sleep state) before you can quickly wake it to use , and bypass the startup process. Moving your computer while the hard disk is in sleep state, you move your computer for only a short time, put the computer into sleep ...
Note: Wait until the power indicator light starts blinking (indicating that the computer is spinning can put it into sleep state, do one of the following . • Press the power button. • Press any key on the keyboard. „ Shutting down from the Start menu. • Press Fn + F1. To shut down ...resume use your computer. When the computer is in sleep state) before you can quickly wake it to use , and bypass the startup process. Moving your computer while the hard disk is in sleep state, you move your computer for only a short time, put the computer into sleep ...

Lenovo G470/G475/G570/G575 User Guide V1.0
Page 16
... computer user has different habits and needs, it drops from entering the inside of your computer: for example, how often you access the hard disk drive and how bright you make the computer display. „ Charging the battery When you find that the battery power is low, you need to charge the battery in any of the following situations: • When you purchase a new battery • If the battery status indicator starts blinking...
... computer user has different habits and needs, it drops from entering the inside of your computer: for example, how often you access the hard disk drive and how bright you make the computer display. „ Charging the battery When you find that the battery power is low, you need to charge the battery in any of the following situations: • When you purchase a new battery • If the battery status indicator starts blinking...
Lenovo G470/G475/G570/G575 User Guide V1.0
Page 17
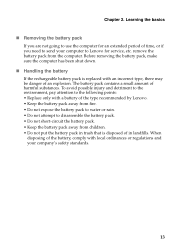
... battery, comply with a battery of the type recommended by Lenovo. • Keep the battery pack away from fire. • Do not expose the battery pack to water or rain. • Do not attempt to disassemble the battery pack. • Do not short-circuit the battery pack. • Keep the battery pack away from the computer. Learning the basics „ Removing the battery...
... battery, comply with a battery of the type recommended by Lenovo. • Keep the battery pack away from fire. • Do not expose the battery pack to water or rain. • Do not attempt to disassemble the battery pack. • Do not short-circuit the battery pack. • Keep the battery pack away from the computer. Learning the basics „ Removing the battery...
Lenovo G470/G475/G570/G575 User Guide V1.0
Page 19
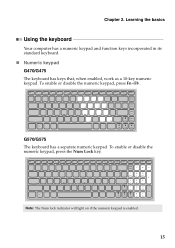
Chapter 2. To enable or disable the numeric keypad, press Fn+F8 . To enable or disable the numeric keypad, press the Num Lock key. Note: The Num lock indicator will light on if the numeric keypad is enabled. 15 G570/G575 The keyboard has a separate numeric keypad. Learning the basics Using the keyboard Your computer has a numeric keypad and function keys incorporated in its standard keyboard. „ Numeric keypad G470/G475 The keyboard has keys that, when enabled, work as a 10-key numeric keypad.
Chapter 2. To enable or disable the numeric keypad, press Fn+F8 . To enable or disable the numeric keypad, press the Num Lock key. Note: The Num lock indicator will light on if the numeric keypad is enabled. 15 G570/G575 The keyboard has a separate numeric keypad. Learning the basics Using the keyboard Your computer has a numeric keypad and function keys incorporated in its standard keyboard. „ Numeric keypad G470/G475 The keyboard has keys that, when enabled, work as a 10-key numeric keypad.
Lenovo G470/G475/G570/G575 User Guide V1.0
Page 21
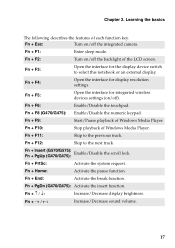
... integrated wireless devices settings (on /off the backlight of Windows Media Player. Fn + F6: Enable/Disable the touchpad. Fn + Esc: Turn on /off). Fn + F3: Open the interface for the display device switch to select this notebook or an external display. Fn + F9: Start/Pause playback of the LCD screen. Fn + Home: Activate the pause function. Fn Increase/Decrease sound volume. 17 Fn + Insert (G570/G575): Fn + PgUp (G470/G475): Enable/Disable the scroll lock. Fn + PgDn (G470/G475): Activate...
... integrated wireless devices settings (on /off the backlight of Windows Media Player. Fn + F6: Enable/Disable the touchpad. Fn + Esc: Turn on /off). Fn + F3: Open the interface for the display device switch to select this notebook or an external display. Fn + F9: Start/Pause playback of the LCD screen. Fn + Home: Activate the pause function. Fn Increase/Decrease sound volume. 17 Fn + Insert (G570/G575): Fn + PgUp (G470/G475): Enable/Disable the scroll lock. Fn + PgDn (G470/G475): Activate...
Lenovo G470/G475/G570/G575 User Guide V1.0
Page 22
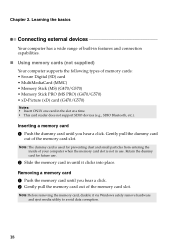
...; Insert ONLY one card in the slot at a time. • This card reader does not support SDIO devices (e.g., SDIO Bluetooth, etc.). Chapter 2. Note: The dummy card is not in use . 2 Slide the memory card in features and connection capabilities. „ Using memory cards (not supplied) Your computer supports the following types of the memory card slot. Note: Before removing the memory card, disable it clicks into place. Inserting a memory card 1 Push the dummy card until you hear...
...; Insert ONLY one card in the slot at a time. • This card reader does not support SDIO devices (e.g., SDIO Bluetooth, etc.). Chapter 2. Note: The dummy card is not in use . 2 Slide the memory card in features and connection capabilities. „ Using memory cards (not supplied) Your computer supports the following types of the memory card slot. Note: Before removing the memory card, disable it clicks into place. Inserting a memory card 1 Push the dummy card until you hear...
Lenovo G470/G475/G570/G575 User Guide V1.0
Page 23
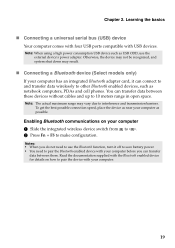
...; Connecting a Bluetooth device (Select models only) If your computer has an integrated Bluetooth adapter card, it off to save battery power. • You need to use the external device's power adapter. Enabling Bluetooth communications on how to pair the device with your computer 1 Slide the integrated wireless device switch from to . 2 Press Fn + F5 to interference and transmission barriers. Learning the basics „ Connecting a universal serial bus (USB) device Your computer comes with four USB ports compatible...
...; Connecting a Bluetooth device (Select models only) If your computer has an integrated Bluetooth adapter card, it off to save battery power. • You need to use the external device's power adapter. Enabling Bluetooth communications on how to pair the device with your computer 1 Slide the integrated wireless device switch from to . 2 Press Fn + F5 to interference and transmission barriers. Learning the basics „ Connecting a universal serial bus (USB) device Your computer comes with four USB ports compatible...
Lenovo G470/G475/G570/G575 User Guide V1.0
Page 26
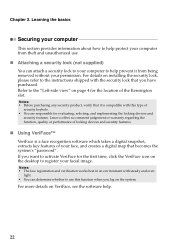
Refer to the instructions shipped with the security lock that you have purchased. For details on installing the security lock, please refer to the "Left-side view" on page 4 for the location of security keyhole. • You are responsible for the first time, ... being removed without your facial image. Lenovo offers no comment judgement or warranty regarding the function, quality or performance of locking devices and security features. „ Using VeriFace™ VeriFace is a face recognition software which takes a digital snapshot, extracts key features of your face, and creates a...
Refer to the instructions shipped with the security lock that you have purchased. For details on installing the security lock, please refer to the "Left-side view" on page 4 for the location of security keyhole. • You are responsible for the first time, ... being removed without your facial image. Lenovo offers no comment judgement or warranty regarding the function, quality or performance of locking devices and security features. „ Using VeriFace™ VeriFace is a face recognition software which takes a digital snapshot, extracts key features of your face, and creates a...
Lenovo G470/G475/G570/G575 User Guide V1.0
Page 28
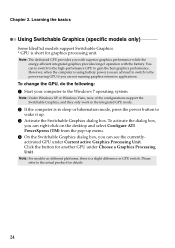
Note: Under Windows XP or Windows Vista, none of the configurations support the Switchable Graphics, and they only work in the integrated GPU mode. 2 If the computer is a slight difference in sleep or hibernation mode, press the power button to the power-saving GPU if you are not running graphics-intensive applications. Click the button for another GPU under Current active Graphics Processing Unit. To...
Note: Under Windows XP or Windows Vista, none of the configurations support the Switchable Graphics, and they only work in the integrated GPU mode. 2 If the computer is a slight difference in sleep or hibernation mode, press the power button to the power-saving GPU if you are not running graphics-intensive applications. Click the button for another GPU under Current active Graphics Processing Unit. To...
Lenovo G470/G475/G570/G575 User Guide V1.0
Page 33
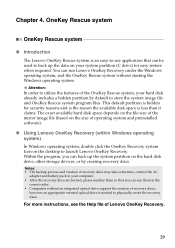
... needed to launch Lenovo OneKey Recovery. For more instructions, see the Help file of operating system and preinstalled software). „ Using Lenovo OneKey Recovery (within Windows operating system) In Windows operating system, double click the OneKey Recovery system Icon on the desktop to physically create the recovery discs. This default partition is hidden for easy restore when required. however an appropriate external optical drive is less than it claims. The exact available hard disk...
... needed to launch Lenovo OneKey Recovery. For more instructions, see the Help file of operating system and preinstalled software). „ Using Lenovo OneKey Recovery (within Windows operating system) In Windows operating system, double click the OneKey Recovery system Icon on the desktop to physically create the recovery discs. This default partition is hidden for easy restore when required. however an appropriate external optical drive is less than it claims. The exact available hard disk...
Lenovo G470/G475/G570/G575 User Guide V1.0
Page 35
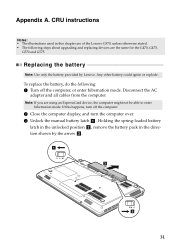
... computer, or enter hibernation mode. Replacing the battery Note: Use only the battery provided by the arrow c . 1 3 2 31 Disconnect the AC adapter and all cables from the computer. Note: If you are the same for the G470, G475, G570 and G575. Holding the spring-loaded battery latch in the unlocked position b , remove the battery pack in this happens, turn the computer over. 3 Unlock the manual battery latch...
... computer, or enter hibernation mode. Replacing the battery Note: Use only the battery provided by the arrow c . 1 3 2 31 Disconnect the AC adapter and all cables from the computer. Note: If you are the same for the G470, G475, G570 and G575. Holding the spring-loaded battery latch in the unlocked position b , remove the battery pack in this happens, turn the computer over. 3 Unlock the manual battery latch...
Lenovo G470/G475/G570/G575 User Guide V1.0
Page 37
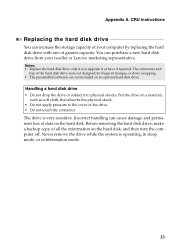
... data on the hard disk, and then turn the computer off. The connectors and bay of all the information on the hard disk. Never remove the drive while the system is very sensitive. The drive is operating, in sleep mode, or in hibernation mode. 33 Before removing the hard disk drive, make a backup copy of the hard disk drive were not designed for frequent changes, or drive swapping. • The preinstalled softwares are not...
... data on the hard disk, and then turn the computer off. The connectors and bay of all the information on the hard disk. Never remove the drive while the system is very sensitive. The drive is operating, in sleep mode, or in hibernation mode. 33 Before removing the hard disk drive, make a backup copy of the hard disk drive were not designed for frequent changes, or drive swapping. • The preinstalled softwares are not...
Lenovo G470/G475/G570/G575 User Guide V1.0
Page 38
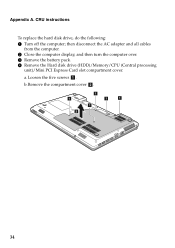
a.Loosen the five screws a . b.Remove the compartment cover b. 1 1 1 1 1 2 34 Appendix A. CRU instructions To replace the hard disk drive, do the following: 1 Turn off the computer; then disconnect the AC adapter and all cables from the computer. 2 Close the computer display, and then turn the computer over. 3 Remove the battery pack. 4 Remove the Hard disk drive (HDD)/Memory/CPU (Central processing unit)/Mini PCI Express Card slot compartment cover.
a.Loosen the five screws a . b.Remove the compartment cover b. 1 1 1 1 1 2 34 Appendix A. CRU instructions To replace the hard disk drive, do the following: 1 Turn off the computer; then disconnect the AC adapter and all cables from the computer. 2 Close the computer display, and then turn the computer over. 3 Remove the battery pack. 4 Remove the Hard disk drive (HDD)/Memory/CPU (Central processing unit)/Mini PCI Express Card slot compartment cover.
Lenovo G470/G475/G570/G575 User Guide V1.0
Page 41
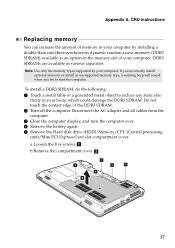
... adapter and all cables from the computer. 3 Close the computer display, and turn the computer over. 4 Remove the battery again. 5 Remove the Hard disk drive (HDD)/Memory/CPU (Central processing unit)/Mini PCI Express Card slot compartment cover. Note: Use only the memory types supported by installing a double-data-rate three synchronous dynamic random access memory (DDR3 SDRAM)-available as an option-in your computer by your computer. To install a DDR3 SDRAM, do the following: 1 Touch...
... adapter and all cables from the computer. 3 Close the computer display, and turn the computer over. 4 Remove the battery again. 5 Remove the Hard disk drive (HDD)/Memory/CPU (Central processing unit)/Mini PCI Express Card slot compartment cover. Note: Use only the memory types supported by installing a double-data-rate three synchronous dynamic random access memory (DDR3 SDRAM)-available as an option-in your computer by your computer. To install a DDR3 SDRAM, do the following: 1 Touch...
Lenovo G470/G475/G570/G575 User Guide V1.0
Page 45
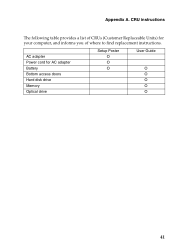
CRU instructions The following table provides a list of where to find replacement instructions. AC adapter Power cord for your computer, and informs you of CRUs (Customer Replaceable Units) for AC adapter Battery Bottom access doors Hard disk drive Memory Optical drive Setup Poster O O O User Guide O O O O O 41 Appendix A.
CRU instructions The following table provides a list of where to find replacement instructions. AC adapter Power cord for your computer, and informs you of CRUs (Customer Replaceable Units) for AC adapter Battery Bottom access doors Hard disk drive Memory Optical drive Setup Poster O O O User Guide O O O O O 41 Appendix A.


