

Safety and Warranty guide
Page 9
... instructions direct you to install it shall be H05VV-F, 3G, 0.75 mm2, or better. Power cords and power adapters Use only the power cords and power adapters supplied by objects. 4 Safety and warranty guide Never touch exposed circuitry. • Prevent others from the static-protective packaging and install the part without setting it . • Do not place the part on the computer cover or other circuit boards...
... instructions direct you to install it shall be H05VV-F, 3G, 0.75 mm2, or better. Power cords and power adapters Use only the power cords and power adapters supplied by objects. 4 Safety and warranty guide Never touch exposed circuitry. • Prevent others from the static-protective packaging and install the part without setting it . • Do not place the part on the computer cover or other circuit boards...

Safety and Warranty guide
Page 17
... the National Electrical Code (NEC) that provides guidelines for proper grounding and, in North America. Note the following label attached. Power supply statement Never remove the cover on a power supply or any component that the cable ground shall be installed in particular, specifies that has this label attached. Hazardous voltage, current, and energy levels are no serviceable parts inside any part that follow.
... the National Electrical Code (NEC) that provides guidelines for proper grounding and, in North America. Note the following label attached. Power supply statement Never remove the cover on a power supply or any component that the cable ground shall be installed in particular, specifies that has this label attached. Hazardous voltage, current, and energy levels are no serviceable parts inside any part that follow.

Safety and Warranty guide
Page 30
... you purchase is free from defects in Part 1: What this Limited Warranty. Telephone: +61 2 8003 8200. Email: lensyd_au@lenovo.com The following replaces the same section in materials and workmanship under normal use and conditions during the warranty period, Lenovo will provide you a remedy under this Warranty Covers: Lenovo warrants that each hardware product that apply to a covered defect during...
... you purchase is free from defects in Part 1: What this Limited Warranty. Telephone: +61 2 8003 8200. Email: lensyd_au@lenovo.com The following replaces the same section in materials and workmanship under normal use and conditions during the warranty period, Lenovo will provide you a remedy under this Warranty Covers: Lenovo warrants that each hardware product that apply to a covered defect during...

Safety and Warranty guide
Page 31
... Part 1: Replacement Products and Parts: When warranty service involves the replacement of retaining user-generated data. Only unaltered Lenovo products and parts are eligible for loss or disclosure of the same type rather than being repaired. Refurbished parts may result in loss of data, if the product is added to the same section in Part 1: Use of Personal Contact Information: Lenovo will be replaced by contacting Lenovo...
... Part 1: Replacement Products and Parts: When warranty service involves the replacement of retaining user-generated data. Only unaltered Lenovo products and parts are eligible for loss or disclosure of the same type rather than being repaired. Refurbished parts may result in loss of data, if the product is added to the same section in Part 1: Use of Personal Contact Information: Lenovo will be replaced by contacting Lenovo...

Safety and Warranty guide
Page 38
... Lenovo under which Self-service CRUs would be specified in a shipping container provided to you . for your product to a designated service center. If you . 5. You must provide a suitable working area to you fail to collect the product, the Service Provider may need to a designated service center at a service center. The requirement to the service center at its expense. 3. Safety and warranty guide 33 An optional service...
... Lenovo under which Self-service CRUs would be specified in a shipping container provided to you . for your product to a designated service center. If you . 5. You must provide a suitable working area to you fail to collect the product, the Service Provider may need to a designated service center at a service center. The requirement to the service center at its expense. 3. Safety and warranty guide 33 An optional service...
(English) User Guide - Lenovo C40/C50 Series
Page 26
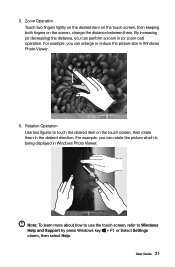
... fingers lightly on the desired item on the touch screen, then keeping both fingers on the touch screen, then rotate them . Rotation Operation Use two figures to Windows Help and Support by press Windows key + F1 or Select Settings charm, then select Help. Note: To learn more about how to use the touch screen, refer to touch the desired item on the screen, change...
... fingers lightly on the desired item on the touch screen, then keeping both fingers on the touch screen, then rotate them . Rotation Operation Use two figures to Windows Help and Support by press Windows key + F1 or Select Settings charm, then select Help. Note: To learn more about how to use the touch screen, refer to touch the desired item on the screen, change...
(English) User Guide - Lenovo C40/C50 Series
Page 27
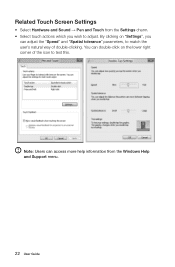
Note: Users can adjust the "Speed" and "Spatial tolerance" parameters, to match the user's natural way of the icon to adjust. You can double-click on "Settings", you can access more help information from the Settings charm. • Select touch actions which you wish to test this. Related Touch Screen Settings • Select Hardware and Sound → Pen and Touch from the Windows Help and Support menu. 22 User Guide By clicking on the lower right corner of double-clicking.
Note: Users can adjust the "Speed" and "Spatial tolerance" parameters, to match the user's natural way of the icon to adjust. You can double-click on "Settings", you can access more help information from the Settings charm. • Select touch actions which you wish to test this. Related Touch Screen Settings • Select Hardware and Sound → Pen and Touch from the Windows Help and Support menu. 22 User Guide By clicking on the lower right corner of double-clicking.
(English) User Guide - Lenovo C40/C50 Series
Page 32
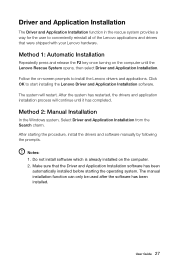
.... After starting the operating system. Do not install software which is already installed on the computer until it has completed. The manual installation function can only be used after the software has been installed. The system will continue until the Lenovo Rescue System opens, then select Driver and Application Installation. User Guide 27 Method 1: Automatic Installation Repeatedly press and release the F2 key once turning on the computer. 2. Make sure...
.... After starting the operating system. Do not install software which is already installed on the computer until it has completed. The manual installation function can only be used after the software has been installed. The system will continue until the Lenovo Rescue System opens, then select Driver and Application Installation. User Guide 27 Method 1: Automatic Installation Repeatedly press and release the F2 key once turning on the computer. 2. Make sure...
(English) User Guide - Lenovo C40/C50 Series
Page 37
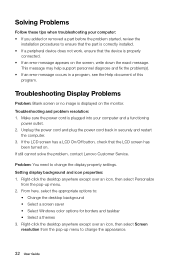
... this program. Setting display background and icon properties: 1. Troubleshooting and problem resolution: 1. If still cannot solve the problem, contact Lenovo Customer Service. Right-click the desktop anywhere except over an icon, then select Personalize from the pop-up menu. 2. Troubleshooting Display Problems Problem: Blank screen or no image is plugged into your computer: • If you added or removed a part before the problem started, review the installation procedures to : • Change the desktop background •...
... this program. Setting display background and icon properties: 1. Troubleshooting and problem resolution: 1. If still cannot solve the problem, contact Lenovo Customer Service. Right-click the desktop anywhere except over an icon, then select Personalize from the pop-up menu. 2. Troubleshooting Display Problems Problem: Blank screen or no image is plugged into your computer: • If you added or removed a part before the problem started, review the installation procedures to : • Change the desktop background •...
(English) User Guide - Lenovo C40/C50 Series
Page 38
... interfering devices away from the integrated speakers. Troubleshooting Audio Problems Problem: No sound from the computer. 3. If the problem persists, contact Lenovo Service. Troubleshooting Touch screen Problem: The touch screen reacts, but not where you are connected to show the hidden icons in Windows desktop mode, then click the speaker icon. In "Tablet PC Settings" dialogue, click "Calibrate" button. Adjust the volume, bass, or treble controls to eliminate distortion. • Reinstall the audio driver...
... interfering devices away from the integrated speakers. Troubleshooting Audio Problems Problem: No sound from the computer. 3. If the problem persists, contact Lenovo Service. Troubleshooting Touch screen Problem: The touch screen reacts, but not where you are connected to show the hidden icons in Windows desktop mode, then click the speaker icon. In "Tablet PC Settings" dialogue, click "Calibrate" button. Adjust the volume, bass, or treble controls to eliminate distortion. • Reinstall the audio driver...

(English) User Guide - Lenovo C40/C50 Series
Page 41
... links listed under More to explore. BIOS setup utility What is ROM-based software. You can I change the boot mode, start the Setup Utility program. The BIOS setup utility is the BIOS setup utility? It communicates basic computer information and provides options for this method may be slightly different from the actual capacity due to UEFI or Legacy support on the boot menu. 36 User Guide Repeatedly press and release the F1 key once turning on...
... links listed under More to explore. BIOS setup utility What is ROM-based software. You can I change the boot mode, start the Setup Utility program. The BIOS setup utility is the BIOS setup utility? It communicates basic computer information and provides options for this method may be slightly different from the actual capacity due to UEFI or Legacy support on the boot menu. 36 User Guide Repeatedly press and release the F1 key once turning on...
(English) User Guide - Lenovo C40/C50 Series
Page 42
... mouse. • You can use products specifically designed for your computer, disconnect the computer from the monitor and keyboard every day. The legacy Windows operating system cannot be cleaned daily. When do I need to change the boot mode. The default boot mode for cleaning displays, and follow the instructions included with water. Clean your computer, you don't change the boot mode? Keep all surfaces clean and free of the monitor or inside...
... mouse. • You can use products specifically designed for your computer, disconnect the computer from the monitor and keyboard every day. The legacy Windows operating system cannot be cleaned daily. When do I need to change the boot mode. The default boot mode for cleaning displays, and follow the instructions included with water. Clean your computer, you don't change the boot mode? Keep all surfaces clean and free of the monitor or inside...
(English) User Guide - Lenovo C40/C50 Series
Page 45
Note: Trained service personnel should refer to the Hardware Maintenance Manual (HMM) for all parts. Overview This guide is expected that cables, switches, and certain mechanical parts can obtain one online from the Support Web site at http://support.lenovo.com. 40 User Guide It is intended to those computer models that was included with your computer. Note: Use only parts provided by -step procedures. If you can...
Note: Trained service personnel should refer to the Hardware Maintenance Manual (HMM) for all parts. Overview This guide is expected that cables, switches, and certain mechanical parts can obtain one online from the Support Web site at http://support.lenovo.com. 40 User Guide It is intended to those computer models that was included with your computer. Note: Use only parts provided by -step procedures. If you can...
(English) User Guide - Lenovo C40/C50 Series
Page 54
... use the product for using Lenovo products. The software interface and function and hardware configuration described in the manuals included with your computer. Carefully read all documents shipped with your computer, or operate the product inappropriately. This manual could include technical inaccuracies or typographical errors. these changes will be incorporated in new editions of the publication.To provide better service, Lenovo reserves the right to instructions...
... use the product for using Lenovo products. The software interface and function and hardware configuration described in the manuals included with your computer. Carefully read all documents shipped with your computer, or operate the product inappropriately. This manual could include technical inaccuracies or typographical errors. these changes will be incorporated in new editions of the publication.To provide better service, Lenovo reserves the right to instructions...
Lenovo C40 Series All-In-One Computer Hardware Maintenance Manual
Page 5
... . . 19 Hard disk drive boot error 19 Power Supply Problems 19 POST error codes 20 Undetermined problems 20 Chapter 7. Contents Chapter 1. FRU lists 49 Chapter 9. General information . . . . 9 Specifications 9 Chapter 4. Replacing hardware . . . . 21 General information 21 Replacing the keyboard and mouse 22 Replacing the adapter 22 Removing the stand base 23 Removing the foot cover 24 Replacing the memory module 25 Replacing the hard disk drive 26 Removing the stand holder 27 Removing the middle cover 28 Replacing the optical drive 31 Replacing the power switch board 33...
... . . 19 Hard disk drive boot error 19 Power Supply Problems 19 POST error codes 20 Undetermined problems 20 Chapter 7. Contents Chapter 1. FRU lists 49 Chapter 9. General information . . . . 9 Specifications 9 Chapter 4. Replacing hardware . . . . 21 General information 21 Replacing the keyboard and mouse 22 Replacing the adapter 22 Removing the stand base 23 Removing the foot cover 24 Replacing the memory module 25 Replacing the hard disk drive 26 Removing the stand holder 27 Removing the middle cover 28 Replacing the optical drive 31 Replacing the power switch board 33...
Lenovo C40 Series All-In-One Computer Hardware Maintenance Manual
Page 12
... when you open the device covers, unless instructed otherwise in this product or attached devices. 6 Lenovo C40 Series All-In-One Computer Hardware Maintenance Manual Use the round ground-prong of a grounded work surface. Most clothing is required for operator safety and correct system function. Safety notices The CAUTION and DANGER safety notices in the installation and configuration procedures. • Connect and disconnect cables as those listed below, to...
... when you open the device covers, unless instructed otherwise in this product or attached devices. 6 Lenovo C40 Series All-In-One Computer Hardware Maintenance Manual Use the round ground-prong of a grounded work surface. Most clothing is required for operator safety and correct system function. Safety notices The CAUTION and DANGER safety notices in the installation and configuration procedures. • Connect and disconnect cables as those listed below, to...

Lenovo C40 Series All-In-One Computer Hardware Maintenance Manual
Page 19
... set passwords to prevent unauthorized persons from your password. Password considerations A password can use the Lenovo BIOS Setup Utility program to set , the Setup Utility program menu will not be easily compromised. Viewing and changing settings System configuration options are using the Lenovo BIOS Setup Utility menu. When the Lenovo BIOS Setup Utility program is used to perform various tasks are displayed on the bottom of passwords are not case sensitive. © Copyright Lenovo 2014 13 For more information, see "Starting the Setup Utility program." The keys used...
... set passwords to prevent unauthorized persons from your password. Password considerations A password can use the Lenovo BIOS Setup Utility program to set , the Setup Utility program menu will not be easily compromised. Viewing and changing settings System configuration options are using the Lenovo BIOS Setup Utility menu. When the Lenovo BIOS Setup Utility program is used to perform various tasks are displayed on the bottom of passwords are not case sensitive. © Copyright Lenovo 2014 13 For more information, see "Starting the Setup Utility program." The keys used...
Lenovo C40 Series All-In-One Computer Hardware Maintenance Manual
Page 21
...) are disabled and cannot be used . Type the new password, then press the Enter key. To delete a previously set to Disabled all devices connected to the SATA connectors (e.g. Enabling or disabling a device The Devices options is set a Power-On Password, do the following devices: USB Functions Select whether to enable or disable USB (Universal Serial Bus) functions. hard disk drives or the optical disk drive) are disabled and cannot be accessed. Onboard Ethernet Controller or LAN Boot Agent Select whether to enable or disable the Onboard Ethernet Controller, or select...
...) are disabled and cannot be used . Type the new password, then press the Enter key. To delete a previously set to Disabled all devices connected to the SATA connectors (e.g. Enabling or disabling a device The Devices options is set a Power-On Password, do the following devices: USB Functions Select whether to enable or disable USB (Universal Serial Bus) functions. hard disk drives or the optical disk drive) are disabled and cannot be accessed. Onboard Ethernet Controller or LAN Boot Agent Select whether to enable or disable the Onboard Ethernet Controller, or select...
Lenovo C40 Series All-In-One Computer Hardware Maintenance Manual
Page 22
... Audio Controller. Select Disabled or Enabled and press the Enter key. 5. Notes: a. Select IDE/AHCI Mode: Device driver support is required for the Primary Boot Sequence. Start the Lenovo BIOS Setup Utility program (see "Starting the Lenovo BIOS Setup Utility program" on the computer. Return to the Lenovo BIOS Setup Utility program menu and select the Exit option. 6. Select Save changes and Exit from the menu. Return to the Lenovo BIOS Setup Utility program menu and select the Exit option. 6. Depending on how the hard disk image was installed, changing...
... Audio Controller. Select Disabled or Enabled and press the Enter key. 5. Notes: a. Select IDE/AHCI Mode: Device driver support is required for the Primary Boot Sequence. Start the Lenovo BIOS Setup Utility program (see "Starting the Lenovo BIOS Setup Utility program" on the computer. Return to the Lenovo BIOS Setup Utility program menu and select the Exit option. 6. Select Save changes and Exit from the menu. Return to the Lenovo BIOS Setup Utility program menu and select the Exit option. 6. Depending on how the hard disk image was installed, changing...
Lenovo C40 Series All-In-One Computer Hardware Maintenance Manual
Page 26
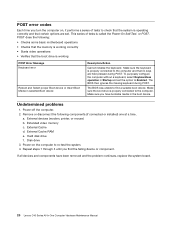
.... 2. Disk drive 3. Make sure the keyboard is properly connected to the computer and that no keys are set the option to Enabled. Make sure you find a suitable boot device. a. The BIOS then ignores the missing keyboard during POST. Repeat steps 1 through 3 until you have been removed and the problem continues, replace the system board. 20 Lenovo C40 Series All-In-One Computer Hardware Maintenance Manual Remove or disconnect the following : • Checks some basic motherboard operations •...
.... 2. Disk drive 3. Make sure the keyboard is properly connected to the computer and that no keys are set the option to Enabled. Make sure you find a suitable boot device. a. The BIOS then ignores the missing keyboard during POST. Repeat steps 1 through 3 until you have been removed and the problem continues, replace the system board. 20 Lenovo C40 Series All-In-One Computer Hardware Maintenance Manual Remove or disconnect the following : • Checks some basic motherboard operations •...


