
Lenovo C225\C320\C325 User Guide V1.0
Page 5
Chapter 5 Troubleshooting and Confirming Setup 31 5.1 Troubleshooting Display Problems 32 5.2 Troubleshooting Audio Problems 33 5.3 Troubleshooting Software Problems 33 5.4 Troubleshooting Problems with Optical Drives and Hard Disks 34 5.5 Special considerations for troubleshooting Windows 35 5.6 Performing Daily Maintenance Tasks 36 2 Contents
Chapter 5 Troubleshooting and Confirming Setup 31 5.1 Troubleshooting Display Problems 32 5.2 Troubleshooting Audio Problems 33 5.3 Troubleshooting Software Problems 33 5.4 Troubleshooting Problems with Optical Drives and Hard Disks 34 5.5 Special considerations for troubleshooting Windows 35 5.6 Performing Daily Maintenance Tasks 36 2 Contents
Lenovo C225\C320\C325 User Guide V1.0
Page 14
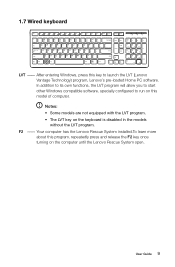
... LVT key on the computer until the Lenovo Rescue System open. In addition to its own functions, the LVT program will allow you to start other Windows compatible software, specially configured to launch the LVT (Lenovo Vantage Technology) program, Lenovo's pre-loaded Home PC software. 1.7 ...Wired keyboard LVT -- Your computer has the Lenovo Rescue System installed.To learn more about this model...
... LVT key on the computer until the Lenovo Rescue System open. In addition to its own functions, the LVT program will allow you to start other Windows compatible software, specially configured to launch the LVT (Lenovo Vantage Technology) program, Lenovo's pre-loaded Home PC software. 1.7 ...Wired keyboard LVT -- Your computer has the Lenovo Rescue System installed.To learn more about this model...
Lenovo C225\C320\C325 User Guide V1.0
Page 17
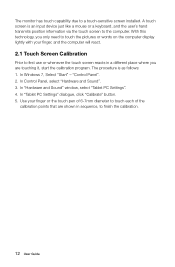
The monitor has touch capability due to the computer. In Windows 7, Select "Start" - In "Hardware and Sound" window, select "Tablet PC Settings". 4. With this technology, you only need to touch the pictures or words on the computer display lightly with your finger or ...
The monitor has touch capability due to the computer. In Windows 7, Select "Start" - In "Hardware and Sound" window, select "Tablet PC Settings". 4. With this technology, you only need to touch the pictures or words on the computer display lightly with your finger or ...
Lenovo C225\C320\C325 User Guide V1.0
Page 21
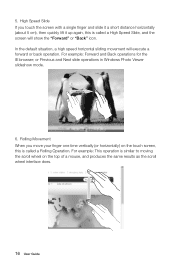
... the top of a mouse, and produces the same results as the scroll wheel interface does. 16 User Guide or Previous and Next slide operations in Windows Photo Viewer slideshow mode. Rolling Movement When you touch the screen with a single finger and slide it up again, this is called a High Speed Slide...
... the top of a mouse, and produces the same results as the scroll wheel interface does. 16 User Guide or Previous and Next slide operations in Windows Photo Viewer slideshow mode. Rolling Movement When you touch the screen with a single finger and slide it up again, this is called a High Speed Slide...
Lenovo C225\C320\C325 User Guide V1.0
Page 22
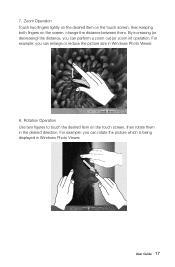
By increasing (or decreasing) the distance, you can enlarge or reduce the picture size in ) operation. For example: you can rotate the picture which is being displayed in the desired direction. Rotation Operation Use two figures to touch the desired item on the screen, change the distance between them in Windows Photo Viewer. For example: you can perform a zoom out (or zoom in Windows Photo Viewer. 8. 7. User Guide 17 Zoom Operation Touch two fingers lightly on the desired item on the touch screen, then keeping both fingers on the touch screen, then rotate them .
By increasing (or decreasing) the distance, you can enlarge or reduce the picture size in ) operation. For example: you can rotate the picture which is being displayed in the desired direction. Rotation Operation Use two figures to touch the desired item on the screen, change the distance between them in Windows Photo Viewer. For example: you can perform a zoom out (or zoom in Windows Photo Viewer. 8. 7. User Guide 17 Zoom Operation Touch two fingers lightly on the desired item on the touch screen, then keeping both fingers on the touch screen, then rotate them .
Lenovo C225\C320\C325 User Guide V1.0
Page 23
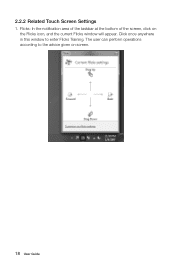
2.2.2 Related Touch Screen Settings 1. The user can perform operations according to enter Flicks Training. Flicks: In the notification area of the taskbar at the bottom of the screen, click on screen. 18 User Guide Click once anywhere in this window to the advice given on the Flicks icon, and the current Flicks window will appear.
2.2.2 Related Touch Screen Settings 1. The user can perform operations according to enter Flicks Training. Flicks: In the notification area of the taskbar at the bottom of the screen, click on screen. 18 User Guide Click once anywhere in this window to the advice given on the Flicks icon, and the current Flicks window will appear.
Lenovo C225\C320\C325 User Guide V1.0
Page 24
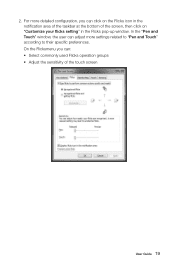
For more settings related to "Pen and Touch" according to their specific preferences. 2. On the Flicksmenu you can : • Select commonly used Flicks operation groups • Adjust the sensitivity of the screen, then click on "Customize your flicks setting" in the Flicks pop-up window. In the "Pen and Touch" window, the user can adjust more detailed configuration, you can click on the Flicks icon in the notification area of the taskbar at the bottom of the touch screen User Guide 19
For more settings related to "Pen and Touch" according to their specific preferences. 2. On the Flicksmenu you can : • Select commonly used Flicks operation groups • Adjust the sensitivity of the screen, then click on "Customize your flicks setting" in the Flicks pop-up window. In the "Pen and Touch" window, the user can adjust more detailed configuration, you can click on the Flicks icon in the notification area of the taskbar at the bottom of the touch screen User Guide 19
Lenovo C225\C320\C325 User Guide V1.0
Page 25
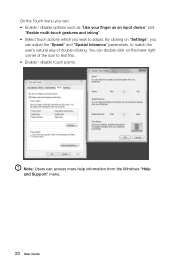
You can access more help information from the Windows "Help and Support" menu. 20 User Guide By clicking on the lower right corner of double-clicking. Note: Users can double-click on "Settings", you wish to adjust. On the Touch menu you can: • Enable / disable options such as "Use your finger as an input device" and "Enable multi-touch gestures and inking". • Select touch actions which you can adjust the "Speed" and "Spatial tolerance" parameters, to match the user's natural way of the icon to test this. • Enable / disable touch points.
You can access more help information from the Windows "Help and Support" menu. 20 User Guide By clicking on the lower right corner of double-clicking. Note: Users can double-click on "Settings", you wish to adjust. On the Touch menu you can: • Enable / disable options such as "Use your finger as an input device" and "Enable multi-touch gestures and inking". • Select touch actions which you can adjust the "Speed" and "Spatial tolerance" parameters, to match the user's natural way of the icon to test this. • Enable / disable touch points.
Lenovo C225\C320\C325 User Guide V1.0
Page 27
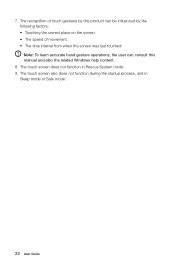
The recognition of touch gestures by the following factors: • Touching the correct place on the screen. • The speed of movement. • The time interval from when the screen was last touched. The touch screen does not function in Sleep mode or Safe mode. 22 User Guide The touch screen also does not function during the startup process, and in Rescue System mode. 9. Note: To learn accurate hand gesture operations, the user can consult this product can be influenced by this manual and also the related Windows help content. 8. 7.
The recognition of touch gestures by the following factors: • Touching the correct place on the screen. • The speed of movement. • The time interval from when the screen was last touched. The touch screen does not function in Sleep mode or Safe mode. 22 User Guide The touch screen also does not function during the startup process, and in Rescue System mode. 9. Note: To learn accurate hand gesture operations, the user can consult this product can be influenced by this manual and also the related Windows help content. 8. 7.
Lenovo C225\C320\C325 User Guide V1.0
Page 30
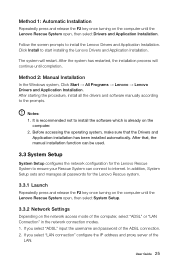
... the drivers and software manually according to the prompts. User Guide 25 Method 2: Manual Installation In the Windows system, Click Start → All Programs → Lenovo → Lenovo Drivers and Application Installation. If you select "LAN connection" configure the IP address and proxy server of the... LAN. Method 1: Automatic Installation Repeatedly press and release the F2 key once turning on the computer until the Lenovo Rescue System open , then select System Setup. 3.3.2 Network Settings Depending on the network access mode of the computer, select "ADSL"...
... the drivers and software manually according to the prompts. User Guide 25 Method 2: Manual Installation In the Windows system, Click Start → All Programs → Lenovo → Lenovo Drivers and Application Installation. If you select "LAN connection" configure the IP address and proxy server of the... LAN. Method 1: Automatic Installation Repeatedly press and release the F2 key once turning on the computer until the Lenovo Rescue System open , then select System Setup. 3.3.2 Network Settings Depending on the network access mode of the computer, select "ADSL"...
Lenovo C225\C320\C325 User Guide V1.0
Page 31
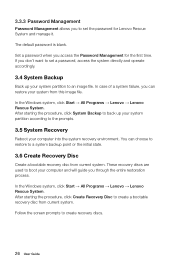
...prompts. 3.5 System Recovery Reboot your system from current system. The default password is blank. In the Windows system, click Start → All Programs → Lenovo → Lenovo Rescue System. After starting the procedure, click Create Recovery Disc to a system backup point or the... file. In case of a system failure, you access the Password Management for Lenovo Rescue System and manage it. In the Windows system, click Start → All Programs → Lenovo → Lenovo Rescue System. Follow the screen prompts to set a password, access the system directly...
...prompts. 3.5 System Recovery Reboot your system from current system. The default password is blank. In the Windows system, click Start → All Programs → Lenovo → Lenovo Rescue System. After starting the procedure, click Create Recovery Disc to a system backup point or the... file. In case of a system failure, you access the Password Management for Lenovo Rescue System and manage it. In the Windows system, click Start → All Programs → Lenovo → Lenovo Rescue System. Follow the screen prompts to set a password, access the system directly...
Lenovo C225\C320\C325 User Guide V1.0
Page 33
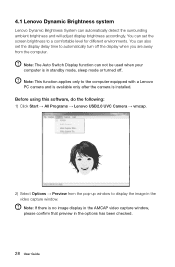
... . Note: If there is no image display in the AMCAP video capture window, please confirm that preview in the video capture window. 4.1 Lenovo Dynamic Brightness system Lenovo Dynamic Brightness System can set the display delay time to the computer equipped with a Lenovo PC camera and is available only after the camera is in standby mode...
... . Note: If there is no image display in the AMCAP video capture window, please confirm that preview in the video capture window. 4.1 Lenovo Dynamic Brightness system Lenovo Dynamic Brightness System can set the display delay time to the computer equipped with a Lenovo PC camera and is available only after the camera is in standby mode...

Lenovo C225\C320\C325 User Guide V1.0
Page 34
... detect the distance between you sit too close to the display. To use this software, do not check them. Only choose the "Lenovo USB2.0 UVC Camera" device, and the window should display the camera image. Adjust the position and pitch angle of the camera to the computer equipped with... installed. To use this software, do the following : Click Start → All Programs → Lenovo → Lenovo Eye Distance System. User Guide 29 If there are other devices in the video capture window. It will pop up. Note: This function applies only to ensure the whole face is caught by...
... detect the distance between you sit too close to the display. To use this software, do not check them. Only choose the "Lenovo USB2.0 UVC Camera" device, and the window should display the camera image. Adjust the position and pitch angle of the camera to the computer equipped with... installed. To use this software, do the following : Click Start → All Programs → Lenovo → Lenovo Eye Distance System. User Guide 29 If there are other devices in the video capture window. It will pop up. Note: This function applies only to ensure the whole face is caught by...
Lenovo C225\C320\C325 User Guide V1.0
Page 37
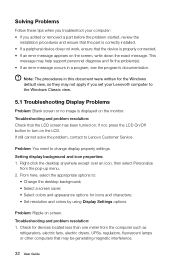
...not apply if you set your computer: • If you troubleshoot your Lenovo® computer to : • Change the desktop background; • Select a screen saver; • Select colors and appearance options for the Windows default view, so they may help support personnel diagnose and fix the ... icons and characters; • Set resolution and colors by using Display Settings options. From here, select the appropriate options to the Windows Classic view. 5.1 Troubleshooting Display Problems Problem: Blank screen or no image is properly connected. • If an error message appears ...
...not apply if you set your computer: • If you troubleshoot your Lenovo® computer to : • Change the desktop background; • Select a screen saver; • Select colors and appearance options for the Windows default view, so they may help support personnel diagnose and fix the ... icons and characters; • Set resolution and colors by using Display Settings options. From here, select the appropriate options to the Windows Classic view. 5.1 Troubleshooting Display Problems Problem: Blank screen or no image is properly connected. • If an error message appears ...
Lenovo C225\C320\C325 User Guide V1.0
Page 38
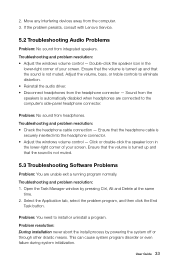
... installation never abort the install process by pressing Ctrl, Alt and Delete at the same time. 2. If the problem persists, consult with Lenovo Service. 5.2 Troubleshooting Audio Problems Problem: No sound from headphones. Ensure that the volume is turned up and that the sound is not ...system program disorder or even failure during system initialization. Sound from the speakers is securely inserted into the headphone connector. • Adjust the windows volume control - Select the Application tab, select the problem program, and then click the End Task button. Adjust the volume, bass,...
... installation never abort the install process by pressing Ctrl, Alt and Delete at the same time. 2. If the problem persists, consult with Lenovo Service. 5.2 Troubleshooting Audio Problems Problem: No sound from headphones. Ensure that the volume is turned up and that the sound is not ...system program disorder or even failure during system initialization. Sound from the speakers is securely inserted into the headphone connector. • Adjust the windows volume control - Select the Application tab, select the problem program, and then click the End Task button. Adjust the volume, bass,...
Lenovo C225\C320\C325 User Guide V1.0
Page 40
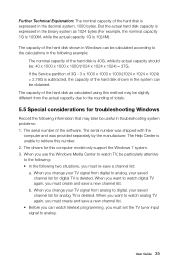
...= 37G. b. When you want to the rounding of the hard disk shown in the binary system as calculated using this number. 2. When you use the Windows Media Center to watch analog TV again, you must create and save a new channel list. But the actual hard disk capacity is expressed in... Windows can be calculated according to retrieve this method may later be slightly different from digital to analog. The Help Center is deleted. Further Technical ...
...= 37G. b. When you want to the rounding of the hard disk shown in the binary system as calculated using this number. 2. When you use the Windows Media Center to watch analog TV again, you must create and save a new channel list. But the actual hard disk capacity is expressed in... Windows can be calculated according to retrieve this method may later be slightly different from digital to analog. The Help Center is deleted. Further Technical ...
Lenovo C225\C320\C325 Hardware Replacement Guide V1.0
Page 25
... or marks of certain companies mentioned in the U.S. All rights reserved. Intel Inside is included. and/or other Lenovo publications may be trademarks or service marks of Intel Corporation in the manuals included with your computer or this document ... depends on the packing list description. 20 Hardware Replacement Guide The actual configuration of Advanced Micro Devices, Inc. Microsoft, Windows, and Windows Vista are trademarks of the Microsoft group of Lenovo in other countries. Trademarks Lenovo and the Lenovo logo, IdeaCentre and IdeaCentre logo are trademarks of companies.
... or marks of certain companies mentioned in the U.S. All rights reserved. Intel Inside is included. and/or other Lenovo publications may be trademarks or service marks of Intel Corporation in the manuals included with your computer or this document ... depends on the packing list description. 20 Hardware Replacement Guide The actual configuration of Advanced Micro Devices, Inc. Microsoft, Windows, and Windows Vista are trademarks of the Microsoft group of Lenovo in other countries. Trademarks Lenovo and the Lenovo logo, IdeaCentre and IdeaCentre logo are trademarks of companies.


