
Safety and Warranty guide
Page 13
...to rise to an optimal operating temperature of the computer including heat sink inlet fins, power supply vents, and fans. then remove any perforations in extreme conditions. If possible, avoid operating your desktop computer for dust accumulation at least once every three months....The optimal environment in which to maintain optimum computer performance, always follow these appliances can damage the monitor and data on the hard disk drive. 8 Safety and warranty guide Before inspecting your computer because the strong magnetic fields generated by these basic precautions with humidity ...
...to rise to an optimal operating temperature of the computer including heat sink inlet fins, power supply vents, and fans. then remove any perforations in extreme conditions. If possible, avoid operating your desktop computer for dust accumulation at least once every three months....The optimal environment in which to maintain optimum computer performance, always follow these appliances can damage the monitor and data on the hard disk drive. 8 Safety and warranty guide Before inspecting your computer because the strong magnetic fields generated by these basic precautions with humidity ...
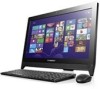
Lenovo C260 All-In-One PC Hardware Maintenance Manual
Page 5
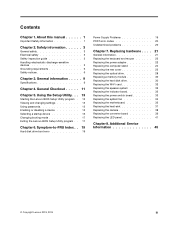
... program . 13 Viewing and changing settings 13 Using passwords 13 Enabling or disabling a device 15 Selecting a startup device 16 Changing booting mode 17 Exiting the Lenovo BIOS Setup Utility program . . 17 Chapter 6. General information . . . . . 9 Specifications 9 Chapter 4. About this manual 1 Important Safety Information 1 Chapter 2. ...22 Replacing the power adapter 22 Replacing the computer stand 24 Removing the rear cover 25 Replacing the optical drive 28 Replacing a memory module 30 Replacing the hard disk drive 30 Replacing the Wi-Fi card 32 Replacing the speaker ...
... program . 13 Viewing and changing settings 13 Using passwords 13 Enabling or disabling a device 15 Selecting a startup device 16 Changing booting mode 17 Exiting the Lenovo BIOS Setup Utility program . . 17 Chapter 6. General information . . . . . 9 Specifications 9 Chapter 4. About this manual 1 Important Safety Information 1 Chapter 2. ...22 Replacing the power adapter 22 Replacing the computer stand 24 Removing the rear cover 25 Replacing the optical drive 28 Replacing a memory module 30 Replacing the hard disk drive 30 Replacing the Wi-Fi card 32 Replacing the speaker ...
Lenovo C260 All-In-One PC Hardware Maintenance Manual
Page 26
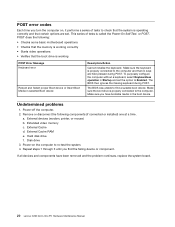
..., select Keyboardless operation in the boot device. a. Make sure the boot drive is working correctly • Starts video operations • Verifies that the boot drive is properly connected to the computer. Hard disk drive f. Extended video memory c. POST error codes Each time you turn the ...certain options are held pressed during POST. Disk drive 3. The BIOS then ignores the missing keyboard during POST. Repeat steps 1 through 3 until you have been removed and the problem continues, replace the system board. 20 Lenovo C260 All-In-One PC Hardware Maintenance Manual This ...
..., select Keyboardless operation in the boot device. a. Make sure the boot drive is working correctly • Starts video operations • Verifies that the boot drive is properly connected to the computer. Hard disk drive f. Extended video memory c. POST error codes Each time you turn the ...certain options are held pressed during POST. Disk drive 3. The BIOS then ignores the missing keyboard during POST. Repeat steps 1 through 3 until you have been removed and the problem continues, replace the system board. 20 Lenovo C260 All-In-One PC Hardware Maintenance Manual This ...
Lenovo C260 All-In-One PC Hardware Maintenance Manual
Page 36
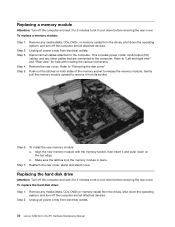
.... Remove any media (disks, CDs, DVDs or memory cards) from electrical outlets. Step 4. Align the new memory module with locating the various connectors. Unplug all cables attached to let it from electrical outlets. 30 Lenovo C260 All-In-One PC Hardware Maintenance Manual Step 6. Step 2. To replace a memory module: Step 1. Replacing the hard disk drive...
.... Remove any media (disks, CDs, DVDs or memory cards) from electrical outlets. Step 4. Align the new memory module with locating the various connectors. Unplug all cables attached to let it from electrical outlets. 30 Lenovo C260 All-In-One PC Hardware Maintenance Manual Step 6. Step 2. To replace a memory module: Step 1. Replacing the hard disk drive...
Lenovo C260 All-In-One PC Hardware Maintenance Manual
Page 37
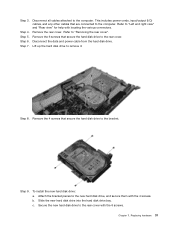
.... This includes power cords, input/output (I/O) cables, and any other cables that secure the hard disk drive to the rear cover. Lift up the hard disk drive to the computer. Step 9. Chapter 7. Refer to "Removing the rear cover". c. Replacing hardware 31 Step 6. Remove the rear cover. Refer to "Left and right view" and "Rear view" for...
.... This includes power cords, input/output (I/O) cables, and any other cables that secure the hard disk drive to the rear cover. Lift up the hard disk drive to the computer. Step 9. Chapter 7. Refer to "Removing the rear cover". c. Replacing hardware 31 Step 6. Remove the rear cover. Refer to "Left and right view" and "Rear view" for...

Lenovo C260 All-In-One PC Hardware Maintenance Manual
Page 38
...Lenovo C260 All-In-One PC Hardware Maintenance Manual d. Step 3. Insert the new Wi-Fi card into the card port and secure it from the drives, shut down before removing... the rear cover. b. Connect the data and power cables to the new Wi-Fi card. Step 2. Remove... cool down before removing the rear cover. Step 9. Step 10. Remove the rear cover... computer and all cables attached to "Removing the rear cover". Replacing the speaker ...off the computer and wait 3 to 5 minutes to remove it with locating the various connectors. Step 6. Step ...
...Lenovo C260 All-In-One PC Hardware Maintenance Manual d. Step 3. Insert the new Wi-Fi card into the card port and secure it from the drives, shut down before removing... the rear cover. b. Connect the data and power cables to the new Wi-Fi card. Step 2. Remove... cool down before removing the rear cover. Step 9. Step 10. Remove the rear cover... computer and all cables attached to "Removing the rear cover". Replacing the speaker ...off the computer and wait 3 to 5 minutes to remove it with locating the various connectors. Step 6. Step ...


