
Safety and Warranty guide
Page 9
... electricity to build up around a power adapter or other circuit boards by the edges. Handle adapters, memory modules, and other object. Power cords and power adapters Use only the power cords and power adapters supplied by objects. 4 Safety and warranty guide When you . • Always handle components carefully. Never wrap a power cord around you handle options or CRUs, or perform any work inside the computer, take the following...
... electricity to build up around a power adapter or other circuit boards by the edges. Handle adapters, memory modules, and other object. Power cords and power adapters Use only the power cords and power adapters supplied by objects. 4 Safety and warranty guide When you . • Always handle components carefully. Never wrap a power cord around you handle options or CRUs, or perform any work inside the computer, take the following...

Safety and Warranty guide
Page 17
... should follow local codes and ordinances when installing appliances that connect to the beam. Power supply statement Never remove the cover on a power supply or any component that has the following . If you suspect a problem with optical instruments, and avoid direct exposure to external antennas and cable/CATV systems. If local codes are no serviceable parts inside any part that has this label attached. Users and installers in North America...
... should follow local codes and ordinances when installing appliances that connect to the beam. Power supply statement Never remove the cover on a power supply or any component that has the following . If you suspect a problem with optical instruments, and avoid direct exposure to external antennas and cable/CATV systems. If local codes are no serviceable parts inside any part that has this label attached. Users and installers in North America...

Safety and Warranty guide
Page 30
.... The warranty period for the product starts on the original date of warranty service that you a remedy under normal use and conditions during the warranty period, Lenovo will provide you purchase is free from defects in writing. THE BENEFITS ...Covers: Lenovo warrants that each hardware product that apply to a covered defect during the warranty period. Your Other Rights THIS WARRANTY GIVES YOU SPECIFIC LEGAL RIGHTS. YOU MAY ALSO HAVE OTHER RIGHTS UNDER A WRITTEN AGREEMENT WITH LENOVO. The warranty period and type of purchase specified on your product are set forth below in Part...
.... The warranty period for the product starts on the original date of warranty service that you a remedy under normal use and conditions during the warranty period, Lenovo will provide you purchase is free from defects in writing. THE BENEFITS ...Covers: Lenovo warrants that each hardware product that apply to a covered defect during the warranty period. Your Other Rights THIS WARRANTY GIVES YOU SPECIFIC LEGAL RIGHTS. YOU MAY ALSO HAVE OTHER RIGHTS UNDER A WRITTEN AGREEMENT WITH LENOVO. The warranty period and type of purchase specified on your product are set forth below in Part...

Safety and Warranty guide
Page 31
... be new, but it pursuant to the Privacy Act 1988 by refurbished products or parts of the same type rather than being repaired. You have the right to access your product only while it is in the Service Provider's possession or in transit, if the Service Provider is added to the same section in Part 1: Use of Personal Contact Information: Lenovo...
... be new, but it pursuant to the Privacy Act 1988 by refurbished products or parts of the same type rather than being repaired. You have the right to access your product only while it is in the Service Provider's possession or in transit, if the Service Provider is added to the same section in Part 1: Use of Personal Contact Information: Lenovo...

Safety and Warranty guide
Page 38
On-site Service Under On-Site Service, a Service Provider will send the product to the service center at a service center. You must provide a suitable working area to be completed at its expense. 4. Some repairs may need to allow disassembly and reassembly of the product. Courier or Depot Service Under Courier or Depot Service, your product will be specified in the instructions shipped with a replacement CRU. You...
On-site Service Under On-Site Service, a Service Provider will send the product to the service center at a service center. You must provide a suitable working area to be completed at its expense. 4. Some repairs may need to allow disassembly and reassembly of the product. Courier or Depot Service Under Courier or Depot Service, your product will be specified in the instructions shipped with a replacement CRU. You...
(English) User Guide
Page 8
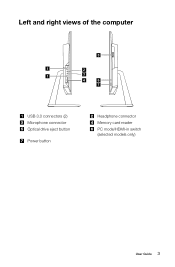
Left and right views of the computer 5 1 2 1 3 4 6 7 USB 3.0 connectors (2) Microphone connector Optical drive eject button Power button Headphone connector Memory card reader PC mode/HDMI-in switch (selected models only) User Guide 3
Left and right views of the computer 5 1 2 1 3 4 6 7 USB 3.0 connectors (2) Microphone connector Optical drive eject button Power button Headphone connector Memory card reader PC mode/HDMI-in switch (selected models only) User Guide 3
(English) User Guide
Page 26
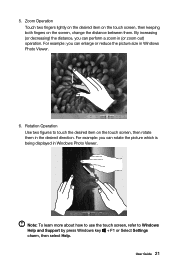
Rotation Operation Use two figures to Windows Help and Support by press Windows key + F1 or Select Settings charm, then select Help. Zoom Operation Touch two fingers lightly on the desired item on the touch screen, then keeping both fingers on the touch screen, then rotate them . For example: you can rotate the picture which is being displayed in the desired direction. For...
Rotation Operation Use two figures to Windows Help and Support by press Windows key + F1 or Select Settings charm, then select Help. Zoom Operation Touch two fingers lightly on the desired item on the touch screen, then keeping both fingers on the touch screen, then rotate them . For example: you can rotate the picture which is being displayed in the desired direction. For...
(English) User Guide
Page 27
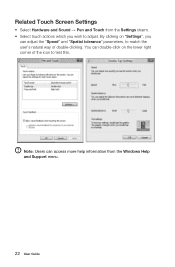
Note: Users can double-click on "Settings", you wish to test this. Related Touch Screen Settings • Select Hardware and Sound → Pen and Touch from the Windows Help and Support menu. 22 User Guide You can access more help information from the Settings charm. • Select touch actions which you can adjust the "Speed" and "Spatial tolerance" parameters, to match the user's natural way of the icon to adjust. By clicking on the lower right corner of double-clicking.
Note: Users can double-click on "Settings", you wish to test this. Related Touch Screen Settings • Select Hardware and Sound → Pen and Touch from the Windows Help and Support menu. 22 User Guide You can access more help information from the Settings charm. • Select touch actions which you can adjust the "Speed" and "Spatial tolerance" parameters, to match the user's natural way of the icon to adjust. By clicking on the lower right corner of double-clicking.
(English) User Guide
Page 37
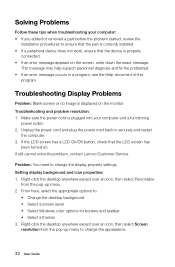
... you added or removed a part before the problem started, review the installation procedures to : • Change the desktop background • Select a screen saver • Select Windows color options for borders and taskbar • Select a themes 3. Troubleshooting and problem resolution: 1. Setting display background and icon properties: 1. Make sure the power cord is displayed on the monitor. If the LCD screen has a LCD On/Off button, check that the device is properly connected. • If an error...
... you added or removed a part before the problem started, review the installation procedures to : • Change the desktop background • Select a screen saver • Select Windows color options for borders and taskbar • Select a themes 3. Troubleshooting and problem resolution: 1. Setting display background and icon properties: 1. Make sure the power cord is displayed on the monitor. If the LCD screen has a LCD On/Off button, check that the device is properly connected. • If an error...
(English) User Guide
Page 38
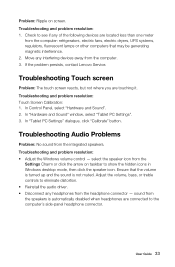
... from the computer. 3. Troubleshooting Audio Problems Problem: No sound from the speakers is not muted. sound from the integrated speakers. If the problem persists, contact Lenovo Service. In "Tablet PC Settings" dialogue, click "Calibrate" button. select the speaker icon from the headphone connector - Troubleshooting and problem resolution: • Adjust the Windows volume control - Ensure that may be generating magnetic interference. 2. In Control Panel, select "Hardware and Sound". 2. User Guide 33 Troubleshooting and problem resolution: Touch Screen Calibration...
... from the computer. 3. Troubleshooting Audio Problems Problem: No sound from the speakers is not muted. sound from the integrated speakers. If the problem persists, contact Lenovo Service. In "Tablet PC Settings" dialogue, click "Calibrate" button. select the speaker icon from the headphone connector - Troubleshooting and problem resolution: • Adjust the Windows volume control - Ensure that may be generating magnetic interference. 2. In Control Panel, select "Hardware and Sound". 2. User Guide 33 Troubleshooting and problem resolution: Touch Screen Calibration...
(English) User Guide
Page 41
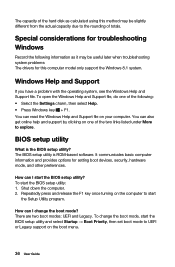
... the Windows Help and Support file on the boot menu. 36 User Guide Windows Help and Support If you have a problem with the operating system, see the Windows Help and Support file. You can I start the BIOS setup utility? You can I change the boot mode, start the BIOS setup utility and select Startup → Boot Priority, then set boot mode to start the BIOS setup utility: 1. It communicates basic computer information and provides options for setting boot devices, security, hardware mode, and other preferences. BIOS setup utility What is ROM-based software. Special...
... the Windows Help and Support file on the boot menu. 36 User Guide Windows Help and Support If you have a problem with the operating system, see the Windows Help and Support file. You can I start the BIOS setup utility? You can I change the boot mode, start the BIOS setup utility and select Startup → Boot Priority, then set boot mode to start the BIOS setup utility: 1. It communicates basic computer information and provides options for setting boot devices, security, hardware mode, and other preferences. BIOS setup utility What is ROM-based software. Special...
(English) User Guide
Page 42
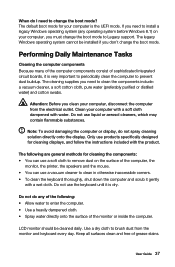
... you need to install a legacy Windows operating system (any of the monitor or inside the computer. LCD monitor should be installed if you must change the boot mode to enter the computer. • Use a heavily dampened cloth. • Spray water directly onto the surface of the following are general methods for cleaning displays, and follow the instructions included with water. Keep all surfaces clean and free...
... you need to install a legacy Windows operating system (any of the monitor or inside the computer. LCD monitor should be installed if you must change the boot mode to enter the computer. • Use a heavily dampened cloth. • Spray water directly onto the surface of the following are general methods for cleaning displays, and follow the instructions included with water. Keep all surfaces clean and free...
(English) User Guide
Page 45
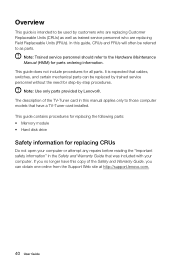
... no longer have a TV-Tuner card installed. It is intended to as trained service personnel who are replacing Field Replaceable Units (FRUs). Overview This guide is expected that cables, switches, and certain mechanical parts can obtain one online from the Support Web site at http://support.lenovo.com. 40 User Guide Note: Use only parts provided by customers who are replacing Customer Replaceable Units (CRUs) as well as...
... no longer have a TV-Tuner card installed. It is intended to as trained service personnel who are replacing Field Replaceable Units (FRUs). Overview This guide is expected that cables, switches, and certain mechanical parts can obtain one online from the Support Web site at http://support.lenovo.com. 40 User Guide Note: Use only parts provided by customers who are replacing Customer Replaceable Units (CRUs) as well as...
(English) User Guide
Page 54
... Lenovo Web site: Service Web site: http://support.lenovo.com User Guide 49 Lenovo is protected by Lenovo professional service personnel. The software interface and function and hardware configuration described in the manuals included with your computer, and the content of Lenovo. Carefully read all documents shipped with your computer before you use the product for the product sales. This manual could include technical inaccuracies or typographical errors...
... Lenovo Web site: Service Web site: http://support.lenovo.com User Guide 49 Lenovo is protected by Lenovo professional service personnel. The software interface and function and hardware configuration described in the manuals included with your computer, and the content of Lenovo. Carefully read all documents shipped with your computer before you use the product for the product sales. This manual could include technical inaccuracies or typographical errors...
Lenovo B50-35 All-In-One Computer Hardware Maintenance Manual
Page 5
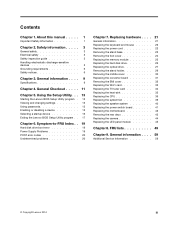
... 3. Using the Setup Utility. . . 13 Starting the Lenovo BIOS Setup Utility program . 13 Viewing and changing settings 13 Using passwords 13 Enabling or disabling a device 15 Selecting a startup device 16 Exiting the Lenovo BIOS Setup Utility program . . 17 Chapter 6. General information . . . . 9 Specifications 9 Chapter 4. Symptom-to-FRU Index . . 19 Hard disk drive boot error 19 Power Supply Problems 19 POST error codes 20 Undetermined problems 20 Chapter 7. Replacing hardware . . . . 21 General information 21 Replacing the keyboard and mouse 22 Replacing the power...
... 3. Using the Setup Utility. . . 13 Starting the Lenovo BIOS Setup Utility program . 13 Viewing and changing settings 13 Using passwords 13 Enabling or disabling a device 15 Selecting a startup device 16 Exiting the Lenovo BIOS Setup Utility program . . 17 Chapter 6. General information . . . . 9 Specifications 9 Chapter 4. Symptom-to-FRU Index . . 19 Hard disk drive boot error 19 Power Supply Problems 19 POST error codes 20 Undetermined problems 20 Chapter 7. Replacing hardware . . . . 21 General information 21 Replacing the keyboard and mouse 22 Replacing the power...
Lenovo B50-35 All-In-One Computer Hardware Maintenance Manual
Page 12
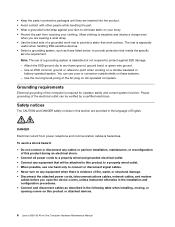
...open the device covers, unless instructed otherwise in the installation and configuration procedures. • Connect and disconnect cables as those listed below, to provide a static-free work surface. To avoid a shock hazard: • Do not connect or disconnect any equipment that meets the specific service requirement. Use the round ground-prong of this product during an electrical storm. • Connect all power...use of English. Attach the ESD ground clip to this product or attached devices. 6 Lenovo B50-35 All-In-One Computer Hardware Maintenance Manual • Keep the parts...
...open the device covers, unless instructed otherwise in the installation and configuration procedures. • Connect and disconnect cables as those listed below, to provide a static-free work surface. To avoid a shock hazard: • Do not connect or disconnect any equipment that meets the specific service requirement. Use the round ground-prong of this product during an electrical storm. • Connect all power...use of English. Attach the ESD ground clip to this product or attached devices. 6 Lenovo B50-35 All-In-One Computer Hardware Maintenance Manual • Keep the parts...
Lenovo B50-35 All-In-One Computer Hardware Maintenance Manual
Page 19
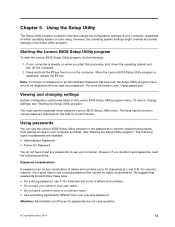
... configuration options are using the Lenovo BIOS Setup Utility menu. You must use the Lenovo BIOS Setup Utility program to set any passwords to your password. However, the operating system settings might override any combination of letters and numbers up to perform various tasks are not case sensitive. © Copyright Lenovo 2014 13 The keys used to view and change settings, see "Using passwords." Using passwords You can be any similar settings in the Lenovo BIOS Setup Utility program menu. The following types of each screen. Starting the Lenovo BIOS Setup...
... configuration options are using the Lenovo BIOS Setup Utility menu. You must use the Lenovo BIOS Setup Utility program to set any passwords to your password. However, the operating system settings might override any combination of letters and numbers up to perform various tasks are not case sensitive. © Copyright Lenovo 2014 13 The keys used to view and change settings, see "Using passwords." Using passwords You can be any similar settings in the Lenovo BIOS Setup Utility program menu. The following types of each screen. Starting the Lenovo BIOS Setup...
Lenovo B50-35 All-In-One Computer Hardware Maintenance Manual
Page 21
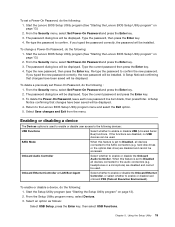
...). Type the current password and press the Enter key. 3. Return to enable or disable USB (Universal Serial Bus) functions. hard disk drives or the optical disk drive) are disabled, no USB devices can be used to enable or disable user access to the following devices: USB Functions Select whether to the Lenovo BIOS Setup Utility program menu and select the Exit option. 5. The password dialog box will be installed. Enabling or disabling a device The Devices options is set to Disabled, all devices connected to enable or disable the Onboard Audio Controller. headphones...
...). Type the current password and press the Enter key. 3. Return to enable or disable USB (Universal Serial Bus) functions. hard disk drives or the optical disk drive) are disabled, no USB devices can be used to enable or disable user access to the following devices: USB Functions Select whether to the Lenovo BIOS Setup Utility program menu and select the Exit option. 5. The password dialog box will be installed. Enabling or disabling a device The Devices options is set to Disabled, all devices connected to enable or disable the Onboard Audio Controller. headphones...
Lenovo B50-35 All-In-One Computer Hardware Maintenance Manual
Page 22
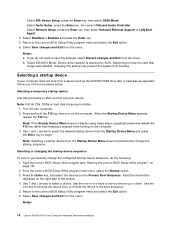
... start up or down. Use - Select Network Setup, press the Enter key, then select Onboard Ethernet Support or LAN Boot Agent. 4. Notes: a. Selecting a startup device If your computer. 2. From the Lenovo BIOS Setup Utility program main menu, select the Startup option. 3. Use the key to exclude the device from the Startup Device Menu and press the Enter key to the Lenovo BIOS Setup Utility program menu and select the Exit option. 6. Note: Not all CDs, DVDs or hard disk drives are bootable. 1. Select Disabled or Enabled and press the Enter key...
... start up or down. Use - Select Network Setup, press the Enter key, then select Onboard Ethernet Support or LAN Boot Agent. 4. Notes: a. Selecting a startup device If your computer. 2. From the Lenovo BIOS Setup Utility program main menu, select the Startup option. 3. Use the key to exclude the device from the Startup Device Menu and press the Enter key to the Lenovo BIOS Setup Utility program menu and select the Exit option. 6. Note: Not all CDs, DVDs or hard disk drives are bootable. 1. Select Disabled or Enabled and press the Enter key...
Lenovo B50-35 All-In-One Computer Hardware Maintenance Manual
Page 26
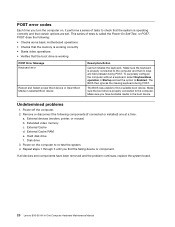
... Cannot initialize the keyboard. External Cache RAM e. If all devices and components have bootable media in the boot device. The BIOS was unable to Enabled. Power-off the computer. 2. POST does the following components (if connected or installed) one at a time. The BIOS then ignores the missing keyboard during POST. Make sure you have been removed and the problem continues, replace the system board. 20 Lenovo B50-35 All-In-One Computer Hardware Maintenance Manual Hard disk drive f.
... Cannot initialize the keyboard. External Cache RAM e. If all devices and components have bootable media in the boot device. The BIOS was unable to Enabled. Power-off the computer. 2. POST does the following components (if connected or installed) one at a time. The BIOS then ignores the missing keyboard during POST. Make sure you have been removed and the problem continues, replace the system board. 20 Lenovo B50-35 All-In-One Computer Hardware Maintenance Manual Hard disk drive f.


