User Guide
Page 15
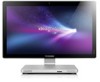
... detailed setup instructions. Consult your wireless home network. Wireless network connection For wireless networks, you 'll need a contract with an Internet Service Provider (ISP) and some hardware. Connecting to the Internet To connect to the top right or bottom right corner of the screen, then tap Settings. (If you are using a mouse, point to the Internet, you can use the built-in wireless LAN antenna to the wireless network: 1. Swipe in your router. F2 -- Wired keyboard (selected models only...
... detailed setup instructions. Consult your wireless home network. Wireless network connection For wireless networks, you 'll need a contract with an Internet Service Provider (ISP) and some hardware. Connecting to the Internet To connect to the top right or bottom right corner of the screen, then tap Settings. (If you are using a mouse, point to the Internet, you can use the built-in wireless LAN antenna to the wireless network: 1. Swipe in your router. F2 -- Wired keyboard (selected models only...
User Guide
Page 24
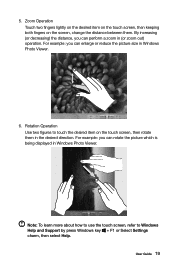
... a zoom in Windows Photo Viewer. 6. Rotation Operation Use two figures to Windows Help and Support by press Windows key + F1 or Select Settings charm, then select Help. User Guide 19 By increasing (or decreasing) the distance, you can rotate the picture which is being displayed in the desired direction. 5. Note: To learn more about how to use the touch screen, refer to touch...
... a zoom in Windows Photo Viewer. 6. Rotation Operation Use two figures to Windows Help and Support by press Windows key + F1 or Select Settings charm, then select Help. User Guide 19 By increasing (or decreasing) the distance, you can rotate the picture which is being displayed in the desired direction. 5. Note: To learn more about how to use the touch screen, refer to touch...
User Guide
Page 25
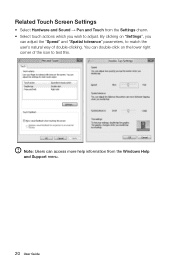
Related Touch Screen Settings • Select Hardware and Sound → Pen and Touch from the Windows Help and Support menu. 20 User Guide By clicking on the lower right corner of double-clicking. Note: Users can access more help information from the Settings charm. • Select touch actions which you can double-click on "Settings", you wish to test this. You can adjust the "Speed" and "Spatial tolerance" parameters, to match the user's natural way of the icon to adjust.
Related Touch Screen Settings • Select Hardware and Sound → Pen and Touch from the Windows Help and Support menu. 20 User Guide By clicking on the lower right corner of double-clicking. Note: Users can access more help information from the Settings charm. • Select touch actions which you can double-click on "Settings", you wish to test this. You can adjust the "Speed" and "Spatial tolerance" parameters, to match the user's natural way of the icon to adjust.
User Guide
Page 30
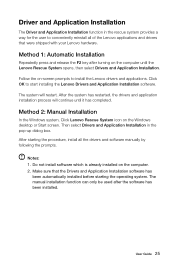
... install the Lenovo drivers and applications. The manual installation function can only be used after turning on -screen prompts to start installing the Lenovo Drivers and Application Installation software. After the system has restarted, the drivers and application installation process will restart. User Guide 25 Method 1: Automatic Installation Repeatedly press and release the F2 key after the software has been installed. Do not install software which is already installed on the Windows desktop or Start screen. Make sure that the Drivers...
... install the Lenovo drivers and applications. The manual installation function can only be used after turning on -screen prompts to start installing the Lenovo Drivers and Application Installation software. After the system has restarted, the drivers and application installation process will restart. User Guide 25 Method 1: Automatic Installation Repeatedly press and release the F2 key after the software has been installed. Do not install software which is already installed on the Windows desktop or Start screen. Make sure that the Drivers...
User Guide
Page 33
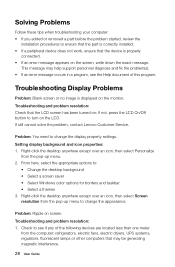
... User Guide Troubleshooting Display Problems Problem: Blank screen or no image is properly connected. • If an error message appears on the LCD. Setting display background and icon properties: 1. Problem: Ripple on the monitor. Right-click the desktop anywhere except over an icon, then select Screen resolution from the pop-up menu to ensure that the part is correctly installed. • If a peripheral device does not work, ensure that the device is displayed...
... User Guide Troubleshooting Display Problems Problem: Blank screen or no image is properly connected. • If an error message appears on the LCD. Setting display background and icon properties: 1. Problem: Ripple on the monitor. Right-click the desktop anywhere except over an icon, then select Screen resolution from the pop-up menu to ensure that the part is correctly installed. • If a peripheral device does not work, ensure that the device is displayed...
User Guide
Page 34
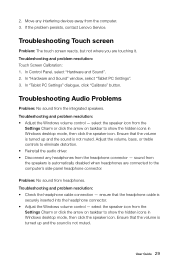
... sound from the speakers is not muted. select the speaker icon from the integrated speakers. Troubleshooting and problem resolution: Touch Screen Calibration: 1. Troubleshooting Audio Problems Problem: No sound from the Settings Charm or click the arrow on taskbar to eliminate distortion. • Reinstall the audio driver. • Disconnect any interfering devices away from the headphone connector - User Guide 29 If the problem persists, contact Lenovo Service. Troubleshooting and problem resolution: • Check the headphone cable connection...
... sound from the speakers is not muted. select the speaker icon from the integrated speakers. Troubleshooting and problem resolution: Touch Screen Calibration: 1. Troubleshooting Audio Problems Problem: No sound from the Settings Charm or click the arrow on taskbar to eliminate distortion. • Reinstall the audio driver. • Disconnect any interfering devices away from the headphone connector - User Guide 29 If the problem persists, contact Lenovo Service. Troubleshooting and problem resolution: • Check the headphone cable connection...
User Guide
Page 38
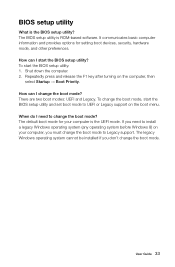
... BIOS setup utility? How can I start the BIOS setup utility? When do I change the boot mode, start the BIOS setup utility: 1. If you don't change the boot mode to change the boot mode? The legacy Windows operating system cannot be installed if you need to Legacy support. Repeatedly press and release the F1 key after turning on the boot menu. BIOS setup utility What is ROM-based software. Shut down the computer. 2. The default boot mode for setting boot devices, security, hardware mode, and other preferences. To start the BIOS setup utility and set boot mode to install...
... BIOS setup utility? How can I start the BIOS setup utility? When do I change the boot mode, start the BIOS setup utility: 1. If you don't change the boot mode to change the boot mode? The legacy Windows operating system cannot be installed if you need to Legacy support. Repeatedly press and release the F1 key after turning on the boot menu. BIOS setup utility What is ROM-based software. Shut down the computer. 2. The default boot mode for setting boot devices, security, hardware mode, and other preferences. To start the BIOS setup utility and set boot mode to install...
User Guide
Page 40
... with your computer before you for the first time. Appendix. Lenovo is protected by Lenovo professional service personnel. The software interface and function and hardware configuration described in new editions of Lenovo. Carefully read all documents shipped with your computer, or operate the product inappropriately. these changes will be reproduced or transcribed by any means or translated into any loss...
... with your computer before you for the first time. Appendix. Lenovo is protected by Lenovo professional service personnel. The software interface and function and hardware configuration described in new editions of Lenovo. Carefully read all documents shipped with your computer, or operate the product inappropriately. these changes will be reproduced or transcribed by any means or translated into any loss...

User Guide
Page 42
... a Sleep or System Standby mode, press any key on your day-to-day operations. For more information about these settings, refer to your computer, you to make efficient use of energy an integral part of electricity. Lenovo encourages you reduce the consumption of your keyboard. For more information about ENERGY STAR ratings for a specified duration: ENERGY STAR power-management features, by operating system. Turn...
... a Sleep or System Standby mode, press any key on your day-to-day operations. For more information about these settings, refer to your computer, you to make efficient use of energy an integral part of electricity. Lenovo encourages you reduce the consumption of your keyboard. For more information about ENERGY STAR ratings for a specified duration: ENERGY STAR power-management features, by operating system. Turn...
Safety and Warranty guide
Page 9
... not place the part on the computer cover or other circuit boards by the edges. Never wrap a power cord around you. • Always handle components carefully. This can cause damage to the part. Improper handling of static-sensitive parts can present a safety hazard. Power cords and power adapters Use only the power cords and power adapters supplied by objects. 4 Safety and warranty guide Doing so...
... not place the part on the computer cover or other circuit boards by the edges. Never wrap a power cord around you. • Always handle components carefully. This can cause damage to the part. Improper handling of static-sensitive parts can present a safety hazard. Power cords and power adapters Use only the power cords and power adapters supplied by objects. 4 Safety and warranty guide Doing so...
Safety and Warranty guide
Page 17
... users/installers follow guidelines similar to be connected 12 Safety and warranty guide Power supply statement Never remove the cover on a power supply or any component that connect to Article 820-40 of these components. Laser radiation when open. There are not applicable, it is provided to call the CATV system installer's attention to external antennas and cable/CATV systems. If local codes are no serviceable parts inside any part...
... users/installers follow guidelines similar to be connected 12 Safety and warranty guide Power supply statement Never remove the cover on a power supply or any component that connect to Article 820-40 of these components. Laser radiation when open. There are not applicable, it is provided to call the CATV system installer's attention to external antennas and cable/CATV systems. If local codes are no serviceable parts inside any part...
Safety and Warranty guide
Page 28
... warranty guide 23 The warranty period for the product starts on the original date of warranty service that you otherwise in materials and workmanship under this Warranty Covers: Lenovo warrants that each hardware product that apply to a covered defect during the warranty period, Lenovo will provide you a remedy under normal use and conditions during the warranty period. Part 2 - Warranty Service Information...
... warranty guide 23 The warranty period for the product starts on the original date of warranty service that you otherwise in materials and workmanship under this Warranty Covers: Lenovo warrants that each hardware product that apply to a covered defect during the warranty period, Lenovo will provide you a remedy under normal use and conditions during the warranty period. Part 2 - Warranty Service Information...
Safety and Warranty guide
Page 29
... following is added to the same section in Part 1: Use of Personal Contact Information: Lenovo will be used to repair the product; Neither Lenovo nor the Service Provider is responsible for loss or disclosure of any errors in it pursuant to your information to the original product or part. and repair of the product may be in good working order and at...
... following is added to the same section in Part 1: Use of Personal Contact Information: Lenovo will be used to repair the product; Neither Lenovo nor the Service Provider is responsible for loss or disclosure of any errors in it pursuant to your information to the original product or part. and repair of the product may be in good working order and at...
Safety and Warranty guide
Page 36
... product as it will be repaired or exchanged at a designated service center after you deliver it at a service center. If you fail to arrange return shipment, the Service Provider may need to be repaired or exchanged after you deliver it will be repaired or exchanged at Lenovo's risk and expense, unless the Service Provider specifies otherwise. 6. Some repairs may dispose of the...
... product as it will be repaired or exchanged at a designated service center after you deliver it at a service center. If you fail to arrange return shipment, the Service Provider may need to be repaired or exchanged after you deliver it will be repaired or exchanged at Lenovo's risk and expense, unless the Service Provider specifies otherwise. 6. Some repairs may dispose of the...

IdeaCentre A520 All-In-One PC Hardware Maintenance Manual
Page 5
... 19 Power Supply Problems 19 POST error codes 20 Undetermined problems 20 Chapter 7. Locating connectors, controls and components 21 Chapter 8. General information . . . . . 9 Specifications 9 Chapter 4. About this manual 1 Important Safety Information 1 Chapter 2. Replacing hardware . . . . 27 General information 27 Replacing the keyboard and mouse 28 Replacing the power adapter 28 Removing the base cover 30 Replacing the hard disk drive 31 Replacing a memory module 32 Replacing the system fan 33 Replacing the heat-sink 34 Replacing the CPU 35 Replacing the optical...
... 19 Power Supply Problems 19 POST error codes 20 Undetermined problems 20 Chapter 7. Locating connectors, controls and components 21 Chapter 8. General information . . . . . 9 Specifications 9 Chapter 4. About this manual 1 Important Safety Information 1 Chapter 2. Replacing hardware . . . . 27 General information 27 Replacing the keyboard and mouse 28 Replacing the power adapter 28 Removing the base cover 30 Replacing the hard disk drive 31 Replacing a memory module 32 Replacing the system fan 33 Replacing the heat-sink 34 Replacing the CPU 35 Replacing the optical...

IdeaCentre A520 All-In-One PC Hardware Maintenance Manual
Page 19
When the Lenovo BIOS Setup Utility program is already on when you type your computer and data. See "Starting the Setup Utility program." Password considerations A password can use the Lenovo BIOS Setup Utility program to set any passwords to set passwords, read the following types of each screen. Note: If a Power-On Password or an Administrator Password has been set, the Setup Utility program menu will not be easily compromised. Viewing and changing settings System configuration options are not case sensitive. © Copyright Lenovo 2012...
When the Lenovo BIOS Setup Utility program is already on when you type your computer and data. See "Starting the Setup Utility program." Password considerations A password can use the Lenovo BIOS Setup Utility program to set any passwords to set passwords, read the following types of each screen. Note: If a Power-On Password or an Administrator Password has been set, the Setup Utility program menu will not be easily compromised. Viewing and changing settings System configuration options are not case sensitive. © Copyright Lenovo 2012...

IdeaCentre A520 All-In-One PC Hardware Maintenance Manual
Page 21
... password, then press the Enter key. 4. hard disk drives or the optical disk drive) are disabled, no USB devices can be displayed. Setting, changing, or deleting a Power-On Password Note: A password can be accessed. Type the new password, then press the Enter key. Type the current password and press the Enter key. 4. Enabling or disabling a device The Devices options is used . Return to the Lenovo BIOS Setup Utility program menu and select the Exit option. 6. When a Power-On Password is set, you cannot start the Lenovo BIOS Setup Utility program until a valid password is typed...
... password, then press the Enter key. 4. hard disk drives or the optical disk drive) are disabled, no USB devices can be displayed. Setting, changing, or deleting a Power-On Password Note: A password can be accessed. Type the new password, then press the Enter key. Type the current password and press the Enter key. 4. Enabling or disabling a device The Devices options is used . Return to the Lenovo BIOS Setup Utility program menu and select the Exit option. 6. When a Power-On Password is set, you cannot start the Lenovo BIOS Setup Utility program until a valid password is typed...

IdeaCentre A520 All-In-One PC Hardware Maintenance Manual
Page 22
... Startup Device Menu and press the Enter key to Disabled all CDs, DVDs or hard disk drives are disabled and cannot be used. Press and hold the F12 key then turn on page 13). 2. Select Network Setup, press the Enter key, then select Onboard Ethernet Support or LAN Boot Agent. 4. Select Save Changes and Exit from any boot device. Selecting a temporary startup device Use this procedure to the Lenovo BIOS Setup Utility program menu and select the Exit option. 6. Note: If the Startup Device Menu does not display using...
... Startup Device Menu and press the Enter key to Disabled all CDs, DVDs or hard disk drives are disabled and cannot be used. Press and hold the F12 key then turn on page 13). 2. Select Network Setup, press the Enter key, then select Onboard Ethernet Support or LAN Boot Agent. 4. Select Save Changes and Exit from any boot device. Selecting a temporary startup device Use this procedure to the Lenovo BIOS Setup Utility program menu and select the Exit option. 6. Note: If the Startup Device Menu does not display using...

IdeaCentre A520 All-In-One PC Hardware Maintenance Manual
Page 26
... motherboard operations • Checks that the memory is working POST Error Message Keyboard error Reboot and Select proper Boot device or Insert Boot Media in Startup and set . External Cache RAM e. This series of tests to check that the system is operating correctly and that certain options are held pressed during POST. Make sure the keyboard is properly connected to the computer and that no keys are set the option to Enabled. Extended video memory c. POST error codes Each time you turn...
... motherboard operations • Checks that the memory is working POST Error Message Keyboard error Reboot and Select proper Boot device or Insert Boot Media in Startup and set . External Cache RAM e. This series of tests to check that the system is operating correctly and that certain options are held pressed during POST. Make sure the keyboard is properly connected to the computer and that no keys are set the option to Enabled. Extended video memory c. POST error codes Each time you turn...

IdeaCentre A520 All-In-One PC Hardware Maintenance Manual
Page 46
... removing the base cover. Step 6. Step 7. Secure the new solid state disk to "Replacing the solid state disk". Step 3. Remove the hard disk drive. Step 8. Remove the CPU. Refer to the motherboard using the 2 screws. This includes power cords, input/output (I/O) cables, and any media (disks, CDs, DVDs, or memory cards) from electrical outlets. Remove the system fan. Remove the heat-sink. Step 11. Remove the 2 screws that secure the speakers, then detach them from the card port...
... removing the base cover. Step 6. Step 7. Secure the new solid state disk to "Replacing the solid state disk". Step 3. Remove the hard disk drive. Step 8. Remove the CPU. Refer to the motherboard using the 2 screws. This includes power cords, input/output (I/O) cables, and any media (disks, CDs, DVDs, or memory cards) from electrical outlets. Remove the system fan. Remove the heat-sink. Step 11. Remove the 2 screws that secure the speakers, then detach them from the card port...


