User Manual
Page 5
... Obtaining device drivers 19 Opening the cover 20 Locating components 21 Accessing system board components and drives . . 22 Identifying parts on power 7 Finishing the software installation 8 Completing important tasks 8 Updating your operating system 8 Installing other operating systems 9 Updating your computer 3 Turning on the system board . . . . . 23 Installing memory 24 Installing PCI adapters 25 Installing internal drives 26 Drive specifications 27 © Lenovo 2006. Updating system programs 49 Using system programs 49 Updating (flashing) BIOS from a diskette or CD-ROM...
... Obtaining device drivers 19 Opening the cover 20 Locating components 21 Accessing system board components and drives . . 22 Identifying parts on power 7 Finishing the software installation 8 Completing important tasks 8 Updating your operating system 8 Installing other operating systems 9 Updating your computer 3 Turning on the system board . . . . . 23 Installing memory 24 Installing PCI adapters 25 Installing internal drives 26 Drive specifications 27 © Lenovo 2006. Updating system programs 49 Using system programs 49 Updating (flashing) BIOS from a diskette or CD-ROM...
User Manual
Page 23
...-performance video adapters. Use this connector to attach the computer to an Ethernet-type local area network or to a cable modem. Use this connector to attach a device that uses a 9-pin serial connector. Connect the power cords to several types of IEEE 1394 connectors: the 4-pin and the 6-pin. Refer to the warranty and safety information that has an S-Video connector. Setting up your computer has preinstalled software, the software installation program starts. 1 USB 2 Serial 3 S-video 4 Parallel 5 Ethernet 6 MIDI/joystick 7 IEEE 1394 Use this connector...
...-performance video adapters. Use this connector to attach the computer to an Ethernet-type local area network or to a cable modem. Use this connector to attach a device that uses a 9-pin serial connector. Connect the power cords to several types of IEEE 1394 connectors: the 4-pin and the 6-pin. Refer to the warranty and safety information that has an S-Video connector. Setting up your computer has preinstalled software, the software installation program starts. 1 USB 2 Serial 3 S-video 4 Parallel 5 Ethernet 6 MIDI/joystick 7 IEEE 1394 Use this connector...
User Manual
Page 25
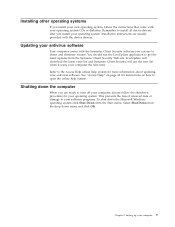
Refer to the Access Help online help system. Installation instructions are ready to install all device drivers after you install your computer 9 This prevents the loss of unsaved data or damage to get the latest updates from the Start menu. Setting up your operating system. Chapter 2. You should run the LiveUpdate application to your software programs. To shut down the Microsoft Windows operating system click Shut Down...
Refer to the Access Help online help system. Installation instructions are ready to install all device drivers after you install your computer 9 This prevents the loss of unsaved data or damage to get the latest updates from the Start menu. Setting up your operating system. Chapter 2. You should run the LiveUpdate application to your software programs. To shut down the Microsoft Windows operating system click Shut Down...
User Manual
Page 27
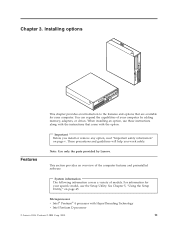
When installing an option, use these instructions along with the instructions that are available for your specific model, use the Setup Utility. These precautions and guidelines will help you install or remove any option, read "Important safety information" on page 45. Important Before you work safely. Features Note: Use only the parts provided by adding memory, adapters, or drives. For information for your computer by Lenovo. You can expand the capabilities of...
When installing an option, use these instructions along with the instructions that are available for your specific model, use the Setup Utility. These precautions and guidelines will help you install or remove any option, read "Important safety information" on page 45. Important Before you work safely. Features Note: Use only the parts provided by adding memory, adapters, or drives. For information for your computer by Lenovo. You can expand the capabilities of...

User Manual
Page 28
... v Flash memory for system programs (varies by model type) Internal drives v 3.5-inch, half-inch (slim) diskette drive (some models) v Serial Advanced Technology Attachment (SATA) internal hard disk drive v Optical drive (some models) Video subsystem v An integrated graphics controller for a Video Graphics Array (VGA) monitor v Intel Graphics Media Accelerator 3000 with dual display support Audio subsystem v HD with ADI 1983 Audio Codec v Microphone and headphone connectors on the front panel v Line in and line out connectors on the rear panel v Mono internal speaker (some models) Connectivity...
... v Flash memory for system programs (varies by model type) Internal drives v 3.5-inch, half-inch (slim) diskette drive (some models) v Serial Advanced Technology Attachment (SATA) internal hard disk drive v Optical drive (some models) Video subsystem v An integrated graphics controller for a Video Graphics Array (VGA) monitor v Intel Graphics Media Accelerator 3000 with dual display support Audio subsystem v HD with ADI 1983 Audio Codec v Microphone and headphone connectors on the front panel v Line in and line out connectors on the rear panel v Mono internal speaker (some models) Connectivity...
User Manual
Page 43
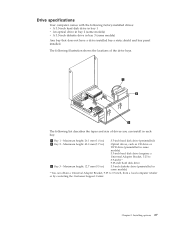
... CD drive or DVD drive (preinstalled in .) 2 Bay 2 - Installing options 27 The following factory-installed drives: v A 3.5-inch hard disk drive in bay 1 v An optical drive in bay 2 (some models) Any bay that does not have a drive installed has a static shield and bay panel installed. The following list describes the types and size of the drive bays. Chapter 3. Drive specifications Your computer comes with the following illustration shows the locations of drives you can obtain a Universal Adapter...
... CD drive or DVD drive (preinstalled in .) 2 Bay 2 - Installing options 27 The following factory-installed drives: v A 3.5-inch hard disk drive in bay 1 v An optical drive in bay 2 (some models) Any bay that does not have a drive installed has a static shield and bay panel installed. The following list describes the types and size of the drive bays. Chapter 3. Drive specifications Your computer comes with the following illustration shows the locations of drives you can obtain a Universal Adapter...

User Manual
Page 49
... rear of memory that maintains the date, time, and settings for normal use the Setup Utility program to "Closing the cover and connecting the cables" on Kensington. Changing the battery Your computer has a special type of your computer and is operated with a key. The battery normally requires no battery lasts forever. When you turn on the computer. Chapter 3. The cable lock also locks the buttons used with another option, go to set a password...
... rear of memory that maintains the date, time, and settings for normal use the Setup Utility program to "Closing the cover and connecting the cables" on Kensington. Changing the battery Your computer has a special type of your computer and is operated with a key. The battery normally requires no battery lasts forever. When you turn on the computer. Chapter 3. The cable lock also locks the buttons used with another option, go to set a password...

User Manual
Page 55
... can restore the factory contents even if you restore the hard disk from the Windows operating system. Follow the instructions on page 40. 6. If you are unable to open, see "Using the Rescue and Recovery workspace." Repeatedly press and release F11. 4. Note: If the Rescue and Recovery workspace fails to start Windows. 2. From the Rescue and Recovery main window, click the Restore your local hard disk, a USB device, or a network drive. v Restore your hard disk from...
... can restore the factory contents even if you restore the hard disk from the Windows operating system. Follow the instructions on page 40. 6. If you are unable to open, see "Using the Rescue and Recovery workspace." Repeatedly press and release F11. 4. Note: If the Rescue and Recovery workspace fails to start Windows. 2. From the Rescue and Recovery main window, click the Restore your local hard disk, a USB device, or a network drive. v Restore your hard disk from...

User Manual
Page 58
... using rescue media" on the World Wide Web at http://www.lenovo.com/support/. The latest device drivers for the device. When the logo screen appears, or you start Rescue and Recovery from the device subfolder. From the Setup Utility main menu, use the Add New Hardware program (located in the startup sequence Before you hear a series of beeps, release F1. 3. TEXT or other file with the .TXT extension. Setting a rescue device in the Windows Control Panel...
... using rescue media" on the World Wide Web at http://www.lenovo.com/support/. The latest device drivers for the device. When the logo screen appears, or you start Rescue and Recovery from the device subfolder. From the Setup Utility main menu, use the Add New Hardware program (located in the startup sequence Before you hear a series of beeps, release F1. 3. TEXT or other file with the .TXT extension. Setting a rescue device in the Windows Control Panel...
User Manual
Page 62
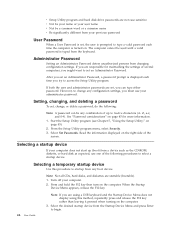
.... 3. Turn off your computer does not start up to select a startup device. Start the Setup Utility program (see Chapter 5, "Using the Setup Utility," on the right side of up (boot) from changing configuration settings. When the Startup Device Menu appears, release the F12 key. 46 User Guide Note: If you can be any boot device. Note: Not all CDs, hard disks, and diskettes are startable (bootable). 1. Select the desired startup device from any combination of the screen...
.... 3. Turn off your computer does not start up to select a startup device. Start the Setup Utility program (see Chapter 5, "Using the Setup Utility," on the right side of up (boot) from changing configuration settings. When the Startup Device Menu appears, release the F12 key. 46 User Guide Note: If you can be any boot device. Note: Not all CDs, hard disks, and diskettes are startable (bootable). 1. Select the desired startup device from any combination of the screen...

User Manual
Page 65
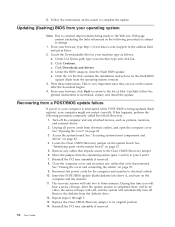
... power-on the computer. You can easily update POST, BIOS, and the Setup Utility program by running a special update program from http://www.lenovo.com to support systems without a diskette drive. When updates are released, they are available in a .txt file that the computer hardware can be run from a diskette or CD-ROM, do the following: 1. Instructions for using a flash update diskette or by starting bootable CD image (known as downloadable...
... power-on the computer. You can easily update POST, BIOS, and the Setup Utility program by running a special update program from http://www.lenovo.com to support systems without a diskette drive. When updates are released, they are available in a .txt file that the computer hardware can be run from a diskette or CD-ROM, do the following: 1. Instructions for using a flash update diskette or by starting bootable CD image (known as downloadable...
User Manual
Page 66
.... Locate the Clear CMOS/Recovery jumper on page 22. 4. Reinstall the PCI riser assembly if removed. 50 User Guide Under Use Quick path, type your browser, type http://www.lenovo.com/support in the following procedure commonly called Boot-block Recovery. 1. Click Downloads and drivers. Move the jumper from a POST/BIOS update failure If power to complete the update. e. Insert the POST/BIOS update (flash) diskette into drive A, and turn off the computer and any cables that contains the installation instructions for...
.... Locate the Clear CMOS/Recovery jumper on page 22. 4. Reinstall the PCI riser assembly if removed. 50 User Guide Under Use Quick path, type your browser, type http://www.lenovo.com/support in the following procedure commonly called Boot-block Recovery. 1. Click Downloads and drivers. Move the jumper from a POST/BIOS update failure If power to complete the update. e. Insert the POST/BIOS update (flash) diskette into drive A, and turn off the computer and any cables that contains the installation instructions for...
User Manual
Page 69
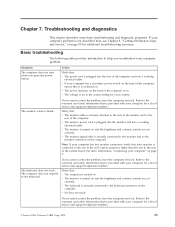
... a working electrical outlet. The monitor screen is provided with your computer for additional troubleshooting resources. v The monitor power cord is set correctly. v The monitor is plugged into the rear of the system board. For more information, "Connecting your computer problem. v No keys are set to the keyboard. Symptom The computer does not start when you cannot correct the problem, have the computer serviced. Verify that : v The power cord is turned on...
... a working electrical outlet. The monitor screen is provided with your computer for additional troubleshooting resources. v The monitor power cord is set correctly. v The monitor is plugged into the rear of the system board. For more information, "Connecting your computer problem. v No keys are set to the keyboard. Symptom The computer does not start when you cannot correct the problem, have the computer serviced. Verify that : v The power cord is turned on...

User Manual
Page 70
... a Lenovo technical support representative. (The log file created by PC-Doctor for further information. If you speak to isolate and repair the problem yourself after you run PC-Doctor for Windows and PC-Doctor for DOS. The mouse does not work . Verify that is automatically saved in the diskette drive. v The keyboard is securely connected to a USB connector on . v The mouse is securely connected to the mouse connector...
... a Lenovo technical support representative. (The log file created by PC-Doctor for further information. If you speak to isolate and repair the problem yourself after you run PC-Doctor for Windows and PC-Doctor for DOS. The mouse does not work . Verify that is automatically saved in the diskette drive. v The keyboard is securely connected to a USB connector on . v The mouse is securely connected to the mouse connector...
User Manual
Page 75
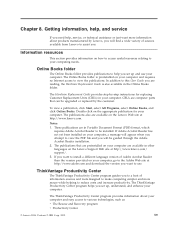
...://www.adobe.com and download the version you set up and use . Double-click on your computer and requires no Internet access to help , and service If you . The publications that can be guided through the Adobe Acrobat Reader installation. 2. ThinkVantage Productivity Center The ThinkVantage Productivity Center program guides you to a host of sources available from Lenovo to view the PDF file and you...
...://www.adobe.com and download the version you set up and use . Double-click on your computer and requires no Internet access to help , and service If you . The publications that can be guided through the Adobe Acrobat Reader installation. 2. ThinkVantage Productivity Center The ThinkVantage Productivity Center program guides you to a host of sources available from Lenovo to view the PDF file and you...
User Manual
Page 78
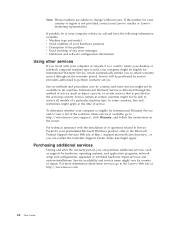
... Support Center. In some services might apply. For technical assistance with your computer or relocate it to Service Packs for International Warranty Service, which automatically entitles you call and have the following information available: v Machine type and model v Serial numbers of your Lenovo reseller or Lenovo marketing representative. For more information about these services, go to perform warranty service. If the number for hardware, operating systems, and application programs; Service...
... Support Center. In some services might apply. For technical assistance with your computer or relocate it to Service Packs for International Warranty Service, which automatically entitles you call and have the following information available: v Machine type and model v Serial numbers of your Lenovo reseller or Lenovo marketing representative. For more information about these services, go to perform warranty service. If the number for hardware, operating systems, and application programs; Service...
User Manual
Page 82
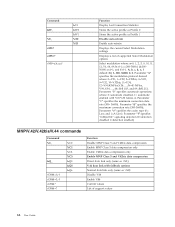
..., 64, 69; Parameter "c" specifies the minimum connection data rate (300- 56000). and f=0-1. Parameter "b" specifies automode operations where: 0=automode disabled, 1= automode enabled with fallback options Normal data link only (same as Profile 1 Disable auto-retrain Enable auto-retrain Displays the current Select Modulation settings Displays a list of support values 66 User Guide Parameter "e" specifies the codec type (0= Law, and 1=A-Law). d=30056000; A, b, c, d, e, f default=12, 1, 300, 56000, 0, 0. b=0-1; Parameter "a" specifies...
..., 64, 69; Parameter "c" specifies the minimum connection data rate (300- 56000). and f=0-1. Parameter "b" specifies automode operations where: 0=automode disabled, 1= automode enabled with fallback options Normal data link only (same as Profile 1 Disable auto-retrain Enable auto-retrain Displays the current Select Modulation settings Displays a list of support values 66 User Guide Parameter "e" specifies the codec type (0= Law, and 1=A-Law). d=30056000; A, b, c, d, e, f default=12, 1, 300, 56000, 0, 0. b=0-1; Parameter "a" specifies...

User Manual
Page 89
... 1 audio line in connector 19 audio line out connector 19 audio subsystem 12 B battery, changing 33 BIOS, updating (flashing) 49 Boot-block recovery 50 C cables, connecting 35 changing startup device sequence 47 changing the battery 33 closing the cover 35 CMOS, clearing 34 components, internal 21 computer connecting 3 shutting down 9 turning on computer 7 connecting drives 29 connector description 19 connectors front 17 rear 18 cover closing 35 opening 20 Customer Replacement Units (CRUs) 60 Customer Support Center 61 D device drivers 19 installing 42 recovering 42 diagnostic CD image 8, 55...
... 1 audio line in connector 19 audio line out connector 19 audio subsystem 12 B battery, changing 33 BIOS, updating (flashing) 49 Boot-block recovery 50 C cables, connecting 35 changing startup device sequence 47 changing the battery 33 closing the cover 35 CMOS, clearing 34 components, internal 21 computer connecting 3 shutting down 9 turning on computer 7 connecting drives 29 connector description 19 connectors front 17 rear 18 cover closing 35 opening 20 Customer Replacement Units (CRUs) 60 Customer Support Center 61 D device drivers 19 installing 42 recovering 42 diagnostic CD image 8, 55...
User Manual
Page 90
... opening the cover 20 operating system installing 9 updating 8 optical mouse 57 options 14 available 14 external 14 internal 14 P parallel connector 19 password administrator 46 erasing 34 lost or forgotten 34 setting, changing, deleting 46 user 46 passwords considerations 45 PCI adapter 25 physical specifications 15 power Advanced Configuration and Power Interface (ACPI) support 13 features 13 turning off computer 9 turning on 7 power-on self-test (POST) 49 product recovery disks 37 R recovering from a POST/BIOS update failure 50 recovering software 37 recovery problems 40 Recovery Repair...
... opening the cover 20 operating system installing 9 updating 8 optical mouse 57 options 14 available 14 external 14 internal 14 P parallel connector 19 password administrator 46 erasing 34 lost or forgotten 34 setting, changing, deleting 46 user 46 passwords considerations 45 PCI adapter 25 physical specifications 15 power Advanced Configuration and Power Interface (ACPI) support 13 features 13 turning off computer 9 turning on 7 power-on self-test (POST) 49 product recovery disks 37 R recovering from a POST/BIOS update failure 50 recovering software 37 recovery problems 40 Recovery Repair...

Brochure
Page 3
...)/4GB Hard disk drive5 80GB, 160GB, or 250GB or 500GB (7200rpm) Serial ATA Optical drive (full-size) CD-ROM, DVD-ROM, DVD/CD-RW Combo or DVD Recordable Audio (integrated) AD 1986 A Rear audio: line in, line out Front audio: mic in, headphone out Internal speaker Security features Client Security Solution (Software) Connectivity (integrated) Broadcom Gigabit Ethernet Expansion 2 slots (low profile) x 3 bays Dimensions 88x310x358mm (3.4x12.2x14.1") Ports 6 USB 2.0 (2 front-access), 2 serial (one optional), 1 parallel, PS/2 mouse/keyboard, VGA Keyboard Preferred...
...)/4GB Hard disk drive5 80GB, 160GB, or 250GB or 500GB (7200rpm) Serial ATA Optical drive (full-size) CD-ROM, DVD-ROM, DVD/CD-RW Combo or DVD Recordable Audio (integrated) AD 1986 A Rear audio: line in, line out Front audio: mic in, headphone out Internal speaker Security features Client Security Solution (Software) Connectivity (integrated) Broadcom Gigabit Ethernet Expansion 2 slots (low profile) x 3 bays Dimensions 88x310x358mm (3.4x12.2x14.1") Ports 6 USB 2.0 (2 front-access), 2 serial (one optional), 1 parallel, PS/2 mouse/keyboard, VGA Keyboard Preferred...


