
Hardware Maintenance Manual
Page 5
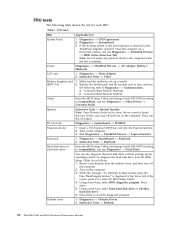
... battery pack 53 Checking the backup battery 54 Related service information 55 Restoring the factory contents by using Product Recovery discs 55 Restoring the factory contents by using Recovery Disc Set 56 Passwords 57 Power-on password 57 Hard-disk password 57 Supervisor password 58 How to remove the power-on password . . . . 58 How to remove the hard-disk password . . . . 59 Power management 60 Screen blank mode 60 Sleep (Standby) mode 60 Hibernation mode 61 © Copyright Lenovo 2008, 2011 Symptom-to-FRU index 62 Numeric error codes 62 Error...
... battery pack 53 Checking the backup battery 54 Related service information 55 Restoring the factory contents by using Product Recovery discs 55 Restoring the factory contents by using Recovery Disc Set 56 Passwords 57 Power-on password 57 Hard-disk password 57 Supervisor password 58 How to remove the power-on password . . . . 58 How to remove the hard-disk password . . . . 59 Power management 60 Screen blank mode 60 Sleep (Standby) mode 60 Hibernation mode 61 © Copyright Lenovo 2008, 2011 Symptom-to-FRU index 62 Numeric error codes 62 Error...
Hardware Maintenance Manual
Page 11
..., you . Instructions for safe operational condition. v Never assume that does not insulate you start to lock the wall box in the off position. Many customers have handles covered with a soft material that power has been disconnected from grounds such as metal floor strips and machine frames. v Do not work on a machine that has hazardous voltages. Removing or installing main units...
..., you . Instructions for safe operational condition. v Never assume that does not insulate you start to lock the wall box in the off position. Many customers have handles covered with a soft material that power has been disconnected from grounds such as metal floor strips and machine frames. v Do not work on a machine that has hazardous voltages. Removing or installing main units...

Hardware Maintenance Manual
Page 51
... careful not to the FRU parts list. "Diagnostics using PC-Doctor for Windows" on page 52 The descriptions in the computer that have been altered. Before you are servicing sequence might not apply to do first" on page 44 v "Checkout guide" on page 48 - v Before replacing any ThinkPad model that a FRU is defective, clear the error log and run the test...
... careful not to the FRU parts list. "Diagnostics using PC-Doctor for Windows" on page 52 The descriptions in the computer that have been altered. Before you are servicing sequence might not apply to do first" on page 44 v "Checkout guide" on page 48 - v Before replacing any ThinkPad model that a FRU is defective, clear the error log and run the test...

Hardware Maintenance Manual
Page 53
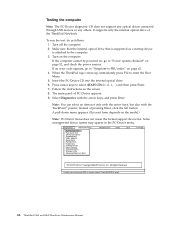
... ThinkPad Notebook. For some devices are intended to test a device that are protected by the customer, BIOS Setup Utility menu appears after the password is entered. Turn on the computer. 2. The utility is available on the following Web site: http://www.lenovo.com/support PC-Doctor cannot be used to test only ThinkPad products. General checkout 45 Checkout guide Use the following Web site: http:// www.lenovo.com/support To create...
... ThinkPad Notebook. For some devices are intended to test a device that are protected by the customer, BIOS Setup Utility menu appears after the password is entered. Turn on the computer. 2. The utility is available on the following Web site: http://www.lenovo.com/support PC-Doctor cannot be used to test only ThinkPad products. General checkout 45 Checkout guide Use the following Web site: http:// www.lenovo.com/support To create...
Hardware Maintenance Manual
Page 54
... ThinkPad Notebook. A pull-down menu appears. (Its exact form depends on the screen. 8. Use the cursor keys and ESC to select ATAPI CDx (x: 0, 1, ...) and then press Enter. 7. Press ENTER to enter the Boot Menu. 5. Turn off the computer. 2. If an error code appears, go to the computer. 3. Diagnostics Interactive Tests Run Normal Test Run Quick Test CPU/Coprocessor Systemboard Video Adapter Serial Ports Parallel Ports Fixed Disks Diskette Drives Other Devices Communication Wireless LAN Advanced Memory Tests Hardware Info Utility...
... ThinkPad Notebook. A pull-down menu appears. (Its exact form depends on the screen. 8. Use the cursor keys and ESC to select ATAPI CDx (x: 0, 1, ...) and then press Enter. 7. Press ENTER to enter the Boot Menu. 5. Turn off the computer. 2. If an error code appears, go to the computer. 3. Diagnostics Interactive Tests Run Normal Test Run Quick Test CPU/Coprocessor Systemboard Video Adapter Serial Ports Parallel Ports Fixed Disks Diskette Drives Other Devices Communication Wireless LAN Advanced Memory Tests Hardware Info Utility...
Hardware Maintenance Manual
Page 55
v Video Adapter test supports only the LCD display on the system and reset them if they are as follows: Diagnostics Interactive Tests v Run Normal Test v Run Quick Test v CPU/Coprocessor v Systemboard v Video Adapter v Serial Ports v Parallel Ports v Fixed Disks v Diskette Drives v Other Devices v ThinkPad Devices v Communication v Wireless LAN v Advanced Memory Tests v Keyboard v Video v Internal Speaker v Mouse v Diskette v System Load v Optical Drive Test v Intel WLAN Radio Test Notes: v In the Keyboard test in Interactive Tests, the Fn key should be attached...
v Video Adapter test supports only the LCD display on the system and reset them if they are as follows: Diagnostics Interactive Tests v Run Normal Test v Run Quick Test v CPU/Coprocessor v Systemboard v Video Adapter v Serial Ports v Parallel Ports v Fixed Disks v Diskette Drives v Other Devices v ThinkPad Devices v Communication v Wireless LAN v Advanced Memory Tests v Keyboard v Video v Internal Speaker v Mouse v Diskette v System Load v Optical Drive Test v Intel WLAN Radio Test Notes: v In the Keyboard test in Interactive Tests, the Fn key should be attached...
Hardware Maintenance Manual
Page 58
... --> Diskette 50 ThinkPad T400 and R400 Hardware Maintenance Manual Interactive Tests --> Keyboard Hard disk drive or solid state drive Enter the BIOS Setup Utility and change Serial ATA (SATA) setting to Compatibility, and run the following table shows the test for each FRU. Diagnostics --> Systemboard 3. Diagnostics --> Video Adapter 2. Conexant Smart Modem Dialtone Audio Enter the BIOS Setup Utility and change Serial ATA (SATA) setting to Compatibility, and run Diagnostics --> Other Device --> Conexant Audio Speaker Interactive Tests --> Internal Speaker Note: Once...
... --> Diskette 50 ThinkPad T400 and R400 Hardware Maintenance Manual Interactive Tests --> Keyboard Hard disk drive or solid state drive Enter the BIOS Setup Utility and change Serial ATA (SATA) setting to Compatibility, and run the following table shows the test for each FRU. Diagnostics --> Systemboard 3. Diagnostics --> Video Adapter 2. Conexant Smart Modem Dialtone Audio Enter the BIOS Setup Utility and change Serial ATA (SATA) setting to Compatibility, and run Diagnostics --> Other Device --> Conexant Audio Speaker Interactive Tests --> Internal Speaker Note: Once...
Hardware Maintenance Manual
Page 64
... displayed or if you can recover the new drive with a Supplemental Recovery Disc. Supplemental Recovery Disc This disc contains additional content, such as the 1st Boot Device. 2. Not all data on the computer. The Setup Utility program opens. Select the CD/DVD drive as updates to keep onto removable media or a network drive before you want to the software that you start the recovery process. Select your language and click Next. 56 ThinkPad T400 and R400 Hardware Maintenance Manual...
... displayed or if you can recover the new drive with a Supplemental Recovery Disc. Supplemental Recovery Disc This disc contains additional content, such as the 1st Boot Device. 2. Not all data on the computer. The Setup Utility program opens. Select the CD/DVD drive as updates to keep onto removable media or a network drive before you want to the software that you start the recovery process. Select your language and click Next. 56 ThinkPad T400 and R400 Hardware Maintenance Manual...
Hardware Maintenance Manual
Page 65
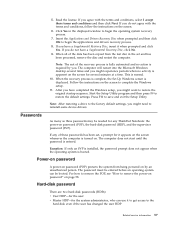
... hard disk even if the user has changed the user HDP Related service information 57 When the recovery process is complete, the Set Up Windows screen is normal. 10. If any ThinkPad Notebook: the power-on . The password must be entered before an operating system can use it appears on the screen whenever the computer is apparent on password (POP) protects the system from the last disc in the displayed window to restore...
... hard disk even if the user has changed the user HDP Related service information 57 When the recovery process is complete, the Set Up Windows screen is normal. 10. If any ThinkPad Notebook: the power-on . The password must be entered before an operating system can use it appears on the screen whenever the computer is apparent on password (POP) protects the system from the last disc in the displayed window to restore...
Hardware Maintenance Manual
Page 66
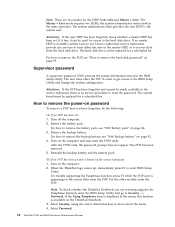
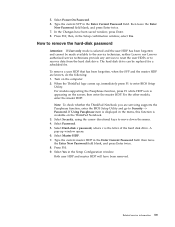
... to remove the hard-disk password" on the screen; Reinstall the backup battery and the battery pack. (B) If an SVP has been set and is available on page 92. 4. Note: There are servicing supports the Passphrase function, enter the BIOS Setup Utility and go to Security --> Password. Supervisor password A supervisor password (SVP) protects the system information stored in order to get access to remove the POP, see "1060 Backup battery" on the ThinkPad Notebook. 3. The Master + User mode...
... to remove the hard-disk password" on the screen; Reinstall the backup battery and the battery pack. (B) If an SVP has been set and is available on page 92. 4. Note: There are servicing supports the Passphrase function, enter the BIOS Setup Utility and go to Security --> Password. Supervisor password A supervisor password (SVP) protects the system information stored in order to get access to remove the POP, see "1060 Backup battery" on the ThinkPad Notebook. 3. The Master + User mode...
Hardware Maintenance Manual
Page 67
... servicing supports the Passphrase function, enter the BIOS Setup Utility and go to remove the hard-disk password Attention: If User only mode is available on the ThinkPad Notebook. 3. Related service information 59 Select Power-On Password. 6. How to Security --> Password. When the ThinkPad logo comes up window opens. 6. For models supporting the Passphrase function, press F1 while HDP icon is the letter of the hard disk drive. Select Yes in the Enter Current Password field. Press F10; Turn on the screen; Type...
... servicing supports the Passphrase function, enter the BIOS Setup Utility and go to remove the hard-disk password Attention: If User only mode is available on the ThinkPad Notebook. 3. Related service information 59 Select Power-On Password. 6. How to Security --> Password. When the ThinkPad logo comes up window opens. 6. For models supporting the Passphrase function, press F1 while HDP icon is the letter of the hard disk drive. Select Yes in the Enter Current Password field. Press F10; Turn on the screen; Type...

Hardware Maintenance Manual
Page 68
... CPU stops. Note: Even if you do as follows: 1. v Open the LCD cover. To end screen blank mode and resume normal operation, press any operation with the keyboard, the TrackPoint, the hard disk, the parallel connector, or the diskette drive within that the battery power is low, and then the computer enters the power-saving mode automatically. v The hard disk drive or the solid state drive is a Windows 7 model, it does not support ThinkVantage...
... CPU stops. Note: Even if you do as follows: 1. v Open the LCD cover. To end screen blank mode and resume normal operation, press any operation with the keyboard, the TrackPoint, the hard disk, the parallel connector, or the diskette drive within that the battery power is low, and then the computer enters the power-saving mode automatically. v The hard disk drive or the solid state drive is a Windows 7 model, it does not support ThinkVantage...

Hardware Maintenance Manual
Page 69
... operation with the keyboard, the TrackPoint, the hard disk drive, the parallel connector, or the diskette drive within that action. - v The system is restored from hibernation mode and resumes operation. Closing the lid. - Pressing the power button. - The hibernation file in the boot record on the hard disk drive is read, and system status is powered off. Related service information 61 When the power is docked to enter hibernation mode...
... operation with the keyboard, the TrackPoint, the hard disk drive, the parallel connector, or the diskette drive within that action. - v The system is restored from hibernation mode and resumes operation. Closing the lid. - Pressing the power button. - The hibernation file in the boot record on the hard disk drive is read, and system status is powered off. Related service information 61 When the power is docked to enter hibernation mode...
Hardware Maintenance Manual
Page 70
... BIOS Setup Utility. Note: For a device not supported by pressing F10. 62 ThinkPad T400 and R400 Hardware Maintenance Manual If replacing a FRU does not solve the problem, put the original part back in the EEPROM is not described there, go to "Intermittent problems" on page 69 The symptom-to-FRU index in boldface type. Enter BIOS Setup and load Setup Enter to load the default setting. A numeric error is displayed for that device. Numeric error codes Symptom...
... BIOS Setup Utility. Note: For a device not supported by pressing F10. 62 ThinkPad T400 and R400 Hardware Maintenance Manual If replacing a FRU does not solve the problem, put the original part back in the EEPROM is not described there, go to "Intermittent problems" on page 69 The symptom-to-FRU index in boldface type. Enter BIOS Setup and load Setup Enter to load the default setting. A numeric error is displayed for that device. Numeric error codes Symptom...

Hardware Maintenance Manual
Page 71
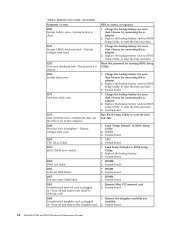
... daughter card. or press Esc to continue. 1. System board. 0231 System RAM error-System RAM fails at offset nnnn. System board. 0232 1. DIMM. System board. 0188 System board. Run BIOS Setup Utility, and then save current setting by pressing F10. 2. Extended RAM error- Battery pack. 0191 System Security-Invalid Remote Change requested. 1. Hard disk drive. 4. System board. 01C8 Two or more modem devices are found. Remove the Ethernet device that you installed; Reseat the hard disk drive...
... daughter card. or press Esc to continue. 1. System board. 0231 System RAM error-System RAM fails at offset nnnn. System board. 0232 1. DIMM. System board. 0188 System board. Run BIOS Setup Utility, and then save current setting by pressing F10. 2. Extended RAM error- Battery pack. 0191 System Security-Invalid Remote Change requested. 1. Hard disk drive. 4. System board. 01C8 Two or more modem devices are found. Remove the Ethernet device that you installed; Reseat the hard disk drive...
Hardware Maintenance Manual
Page 72
... and date. 0251 System CMOS checksum bad- System board. 02F7 Fail-safe timer NMI failed 1. Numeric error codes (continued) Symptom or error FRU or action, in -Turn off and remove the daughter card. 2. System board. 02F0 CPU ID:xx Failed. 1. DIMM. 2. System board. 0270 Real-time clock error. 1. Replace the backup battery and run BIOS Setup Utility to reset the time and date. 0280 Previous boot incomplete- System board. 64 ThinkPad T400 and R400 Hardware Maintenance Manual
... and date. 0251 System CMOS checksum bad- System board. 02F7 Fail-safe timer NMI failed 1. Numeric error codes (continued) Symptom or error FRU or action, in -Turn off and remove the daughter card. 2. System board. 02F0 CPU ID:xx Failed. 1. DIMM. 2. System board. 0270 Real-time clock error. 1. Replace the backup battery and run BIOS Setup Utility to reset the time and date. 0280 Previous boot incomplete- System board. 64 ThinkPad T400 and R400 Hardware Maintenance Manual
Hardware Maintenance Manual
Page 73
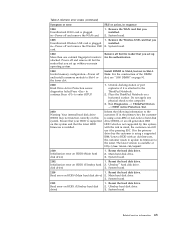
.... Install DIMM in Slot-0, but the reader that you set up for the authentication. 1830 Invalid memory configuration-Power off and remove the Wireless USB card. 1. Inform the following information to the customer: If in mind, the customer can still use it is installed. The latest version is attached. Ultrabay™ hard disk drive. System board. 2110 1. System board. Remove the Wireless USB card that the latest HDD firmware is attached to enter SETUP 1. System board. 2102 1. disk drive) 3. Power...
.... Install DIMM in Slot-0, but the reader that you set up for the authentication. 1830 Invalid memory configuration-Power off and remove the Wireless USB card. 1. Inform the following information to the customer: If in mind, the customer can still use it is installed. The latest version is attached. Ultrabay™ hard disk drive. System board. 2110 1. System board. Remove the Wireless USB card that the latest HDD firmware is attached to enter SETUP 1. System board. 2102 1. disk drive) 3. Power...

Hardware Maintenance Manual
Page 75
.... 2. A hard-disk password is set . Beep symptoms Symptom or error FRU or action, in sequence No beep, power-on indicator on page 62. See "Numeric error codes" on , LCD blank, 1. Four cycles of four short beeps and a blank System board (security chip) screen. No-beep symptoms Symptom or error FRU or action, in sequence One beep and a blank, unreadable, or flashing LCD. 1. Type the password and press Enter...
.... 2. A hard-disk password is set . Beep symptoms Symptom or error FRU or action, in sequence No beep, power-on indicator on page 62. See "Numeric error codes" on , LCD blank, 1. Four cycles of four short beeps and a blank System board (security chip) screen. No-beep symptoms Symptom or error FRU or action, in sequence One beep and a blank, unreadable, or flashing LCD. 1. Type the password and press Enter...
Hardware Maintenance Manual
Page 84
... USB devices have been connected to start Presentation Director. For Windows 7: Switch a display output location v Computer display only (LCD) v Computer display and external monitor (same image) v Computer display and external monitor (extended desktop) v External monitor only Note: To switch between the computer display and an external monitor, the Win+P key combination is playing. Change the settings of the UltraNav® pointing device. v Configure EasyEject Actions: Opens the ThinkPad EasyEject Utility main window. This function does not work while a DVD movie or a video...
... USB devices have been connected to start Presentation Director. For Windows 7: Switch a display output location v Computer display only (LCD) v Computer display and external monitor (same image) v Computer display and external monitor (extended desktop) v External monitor only Note: To switch between the computer display and an external monitor, the Win+P key combination is playing. Change the settings of the UltraNav® pointing device. v Configure EasyEject Actions: Opens the ThinkPad EasyEject Utility main window. This function does not work while a DVD movie or a video...
Hardware Maintenance Manual
Page 157
... as xxU (where U is specified. v "Overall" on page 150 v "LCD FRUs" on page 277 v "Keyboard" on page 348 v "Miscellaneous parts" on page 350 v "AC adapters" on page 352 v "Power cords" on page 353 v "Recovery discs" on page 354 v "Common service tools" on product design may include a memory, a wireless card, a keyboard, and a palm rest with specific models listed and described as options. © Copyright Lenovo 2008, 2009 149
... as xxU (where U is specified. v "Overall" on page 150 v "LCD FRUs" on page 277 v "Keyboard" on page 348 v "Miscellaneous parts" on page 350 v "AC adapters" on page 352 v "Power cords" on page 353 v "Recovery discs" on page 354 v "Common service tools" on product design may include a memory, a wireless card, a keyboard, and a palm rest with specific models listed and described as options. © Copyright Lenovo 2008, 2009 149


