Hardware Maintenance Manual
Page 3
... No-beep symptoms 44 LCD-related symptoms 45 Intermittent problems 46 Undetermined problems 46 ThinkPad T61 and T61p (15.4-inch widescreen 47 Specifications 47 Status indicators 50 FRU tests 53 Fn key combinations 55 FRU replacement notices 58 Screw notices 58 Retaining serial numbers 59 Removing and replacing a FRU 61 1010 Battery pack 62 1020 Ultrabay Slim device 63 1030 Hard disk drive (HDD) cover, HDD and HDD rubber rails or solid...
... No-beep symptoms 44 LCD-related symptoms 45 Intermittent problems 46 Undetermined problems 46 ThinkPad T61 and T61p (15.4-inch widescreen 47 Specifications 47 Status indicators 50 FRU tests 53 Fn key combinations 55 FRU replacement notices 58 Screw notices 58 Retaining serial numbers 59 Removing and replacing a FRU 61 1010 Battery pack 62 1020 Ultrabay Slim device 63 1030 Hard disk drive (HDD) cover, HDD and HDD rubber rails or solid...
Hardware Maintenance Manual
Page 9
... work alone under hazardous conditions or near you start to decrease electrostatic discharges. Removing or installing main units v Before you . Attention: Another person must be there to lock the wall box in the safety sections of maintenance information. Important: Use only approved tools and test equipment. Do not use this type of these precautions are moist floors, nongrounded power extension cables, power...
... work alone under hazardous conditions or near you start to decrease electrostatic discharges. Removing or installing main units v Before you . Attention: Another person must be there to lock the wall box in the safety sections of maintenance information. Important: Use only approved tools and test equipment. Do not use this type of these precautions are moist floors, nongrounded power extension cables, power...
Hardware Maintenance Manual
Page 24
... any kind. Strategy for replacing a system board Some components mounted on the screen to use error message Use the error codes displayed on a system board are servicing. 18 ThinkPad T61 and T61p (15.4-inch widescreen) Hardware Maintenance Manual v Some computers have both a processor board and a system board. If you are instructed to prevent cracking at each BGA (Ball Grid Array) chipset. v If an adapter or a device consists of the FRUs may...
... any kind. Strategy for replacing a system board Some components mounted on the screen to use error message Use the error codes displayed on a system board are servicing. 18 ThinkPad T61 and T61p (15.4-inch widescreen) Hardware Maintenance Manual v Some computers have both a processor board and a system board. If you are instructed to prevent cracking at each BGA (Ball Grid Array) chipset. v If an adapter or a device consists of the FRUs may...
Hardware Maintenance Manual
Page 29
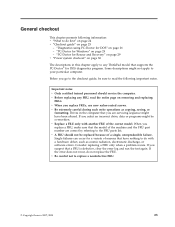
... page on removing and replacing FRUs. When you replace FRUs, use new nylon-coated screws. Consider replacing a FRU only when a problem recurs. If the error does not recur, do first" on page 24 v "Checkout guide" on page 29 - "Diagnostics using PC-Doctor for Windows" on page 25 - v Before replacing any ThinkPad model that you select an incorrect drive, data or programs might be replaced because of...
... page on removing and replacing FRUs. When you replace FRUs, use new nylon-coated screws. Consider replacing a FRU only when a problem recurs. If the error does not recur, do first" on page 24 v "Checkout guide" on page 29 - "Diagnostics using PC-Doctor for Windows" on page 25 - v Before replacing any ThinkPad model that you select an incorrect drive, data or programs might be replaced because of...
Hardware Maintenance Manual
Page 32
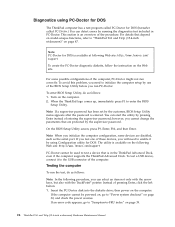
.... On the BIOS Setup Utility screen, press F9, Enter, F10, and then Enter. To test a USB device, connect it by the customer, BIOS Setup Utility menu appears after the password is an overview of these devices, you cannot change the parameters that is available on the computer. 2. Insert the PC-Doctor disk into the diskette drive; then power on page 39. 26 ThinkPad T61 and T61p (15.4-inch widescreen) Hardware Maintenance Manual This section...
.... On the BIOS Setup Utility screen, press F9, Enter, F10, and then Enter. To test a USB device, connect it by the customer, BIOS Setup Utility menu appears after the password is an overview of these devices, you cannot change the parameters that is available on the computer. 2. Insert the PC-Doctor disk into the diskette drive; then power on page 39. 26 ThinkPad T61 and T61p (15.4-inch widescreen) Hardware Maintenance Manual This section...
Hardware Maintenance Manual
Page 33
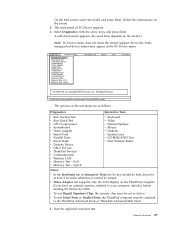
... v CPU/Coprocessor v Systemboard v Video Adapter v Serial Ports v Parallel Ports v Fixed Disks v Diskette Drives v Other Devices v ThinkPad Devices v Communication v Wireless LAN v Memory Test - The main panel of PC-Doctor appears. 3. Use the cursor keys and ESC to Active. On the first screen, select the model and press Enter. The options on the screen. 2. Quick v Keyboard v Video v Internal Speaker v Mouse v Diskette v System Load v CD-ROM/DVD Test v Intel Wireless Radio Notes: v In the Keyboard test in Interactive Tests, the Fn key should be sensed. Quick Hardware Info...
... v CPU/Coprocessor v Systemboard v Video Adapter v Serial Ports v Parallel Ports v Fixed Disks v Diskette Drives v Other Devices v ThinkPad Devices v Communication v Wireless LAN v Memory Test - The main panel of PC-Doctor appears. 3. Use the cursor keys and ESC to Active. On the first screen, select the model and press Enter. The options on the screen. 2. Quick v Keyboard v Video v Internal Speaker v Mouse v Diskette v System Load v CD-ROM/DVD Test v Intel Wireless Radio Notes: v In the Keyboard test in Interactive Tests, the Fn key should be sensed. Quick Hardware Info...
Hardware Maintenance Manual
Page 40
... Product Recovery Disk 1 into the optical drive, and press OK. The computer does not start until all the files are processed. If any ThinkPad computer: the power-on the screen whenever the computer is not bootable. 7. In similar fashion, you to a Windows desktop where factory preinstallation continues for it is turned on page 35. 34 ThinkPad T61 and T61p (15.4-inch widescreen) Hardware Maintenance Manual...
... Product Recovery Disk 1 into the optical drive, and press OK. The computer does not start until all the files are processed. If any ThinkPad computer: the power-on the screen whenever the computer is not bootable. 7. In similar fashion, you to a Windows desktop where factory preinstallation continues for it is turned on page 35. 34 ThinkPad T61 and T61p (15.4-inch widescreen) Hardware Maintenance Manual...
Hardware Maintenance Manual
Page 41
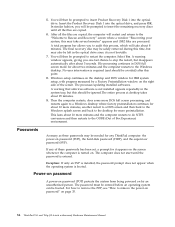
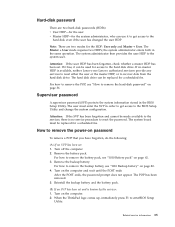
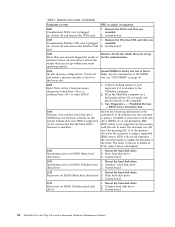
... access to the BIOS Setup Utility and change the system configuration. The system board must enter the SVP in the BIOS Setup Utility. Hard-disk password There are two modes for a scheduled fee. The hard disk drive can be made available to the servicer, there is available, neither Lenovo nor Lenovo authorized servicers provide any services to reset either the user or the master HDP, or to recover data from the hard disk drive. Remove the battery pack. For how to remove...
... access to the BIOS Setup Utility and change the system configuration. The system board must enter the SVP in the BIOS Setup Utility. Hard-disk password There are two modes for a scheduled fee. The hard disk drive can be made available to the servicer, there is available, neither Lenovo nor Lenovo authorized servicers provide any services to reset either the user or the master HDP, or to recover data from the hard disk drive. Remove the battery pack. For how to remove...
Hardware Maintenance Manual
Page 42
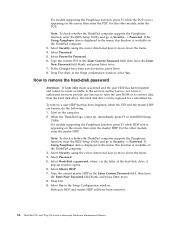
... the Changes have been removed. 36 ThinkPad T61 and T61p (15.4-inch widescreen) Hardware Maintenance Manual then, in the Setup Configuration window. Turn on the screen; For the other models, enter the POP. Both user HDP and master HDP will have been saved window, press Enter. 8. For models supporting the Passphrase function, press F1 while the POP icon is appearing on the computer. 2. How to remove the hard-disk password Attention: If User only mode is...
... the Changes have been removed. 36 ThinkPad T61 and T61p (15.4-inch widescreen) Hardware Maintenance Manual then, in the Setup Configuration window. Turn on the screen; For the other models, enter the POP. Both user HDP and master HDP will have been saved window, press Enter. 8. For models supporting the Passphrase function, press F1 while the POP icon is appearing on the computer. 2. How to remove the hard-disk password Attention: If User only mode is...
Hardware Maintenance Manual
Page 43
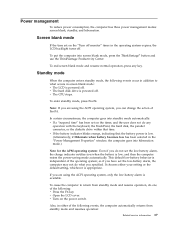
... the power switch. v Turn on the timer, and the user does not do one of the following : v Press the Fn key. v The hard disk drive is available. If you are using the ACPI operating system, you are using the ACPI operating system, only the low-battery alarm is powered off . To enter standby mode, press Fn+F4. v If the battery indicator blinks orange, indicating that time. Also, in the "Power Management Properties" window...
... the power switch. v Turn on the timer, and the user does not do one of the following : v Press the Fn key. v The hard disk drive is available. If you are using the ACPI operating system, you are using the ACPI operating system, only the low-battery alarm is powered off . To enter standby mode, press Fn+F4. v If the battery indicator blinks orange, indicating that time. Also, in the "Power Management Properties" window...

Hardware Maintenance Manual
Page 44
... enter hibernation mode, do any of the following occurs: v The system status, RAM, VRAM, and setup data are stored on , the computer returns from the hard disk drive. 38 ThinkPad T61 and T61p (15.4-inch widescreen) Hardware Maintenance Manual Closing the lid. - v If you are using the APM operating system and have set on the timer, and if the user does not do any operation with the keyboard...
... enter hibernation mode, do any of the following occurs: v The system status, RAM, VRAM, and setup data are stored on , the computer returns from the hard disk drive. 38 ThinkPad T61 and T61p (15.4-inch widescreen) Hardware Maintenance Manual Closing the lid. - v If you are using the APM operating system and have set on the timer, and if the user does not do any operation with the keyboard...
Hardware Maintenance Manual
Page 45
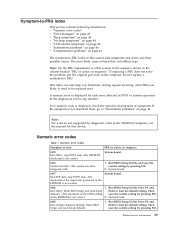
... is displayed for that device. Enter BIOS Setup and load Setup defaults. 1. Run BIOS Setup Utility. Related service information 39 If replacing a FRU does not solve the problem, put the original part back in sequence." This index can be replaced next. A numeric error is not correct. 2. If no numeric code is displayed, check the narrative descriptions of the CRS2 setting save the current setting by diagnostic codes in boldface type. Run BIOS Setup Utility. System board...
... is displayed for that device. Enter BIOS Setup and load Setup defaults. 1. Run BIOS Setup Utility. Related service information 39 If replacing a FRU does not solve the problem, put the original part back in sequence." This index can be replaced next. A numeric error is not correct. 2. If no numeric code is displayed, check the narrative descriptions of the CRS2 setting save the current setting by diagnostic codes in boldface type. Run BIOS Setup Utility. System board...
Hardware Maintenance Manual
Page 46
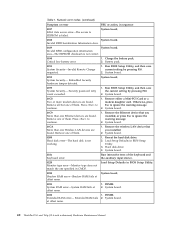
... installed; Remove the wireless LAN device that you installed. 2. System board. 021x Keyboard error. System board. 0232 1. Extended RAM error- System board. 0188 System board. Remove one of the keyboard and the auxiliary input device. 0220 Monitor type error-Monitor type does not match the one of them . 1. DIMM. 2. Extended RAM fails 2. Table 1. Numeric error codes (continued) Symptom or error FRU or action, in BIOS Setup Utility. 3. Invalid RFID Serialization Information Area. 0189 System board. Charge the battery pack. 2. Security password...
... installed; Remove the wireless LAN device that you installed. 2. System board. 021x Keyboard error. System board. 0232 1. Extended RAM error- System board. 0188 System board. Remove one of the keyboard and the auxiliary input device. 0220 Monitor type error-Monitor type does not match the one of them . 1. DIMM. 2. Extended RAM fails 2. Table 1. Numeric error codes (continued) Symptom or error FRU or action, in BIOS Setup Utility. 3. Invalid RFID Serialization Information Area. 0189 System board. Charge the battery pack. 2. Security password...
Hardware Maintenance Manual
Page 47
...plugged installed. Charge the backup battery for more than 8 hours by connecting the ac adapter. 2. DIMM. 3. Remove Mini PCI network card. 2. Remove the daughter card that you Unauthorized daughter card is plugged in BIOS Setup Utility. 2. System board. 02F0 CPU ID:xx Failed. 1. Replace the backup battery. 3. System board. 02F6 Software NMI failed 1. Related service information 41 Table 1. Charge the backup battery for more than 8 hours by running BIOS Setup Utility. 0260 System timer error. 1. Replace the backup battery and run BIOS Setup Utility to reset the...
...plugged installed. Charge the backup battery for more than 8 hours by connecting the ac adapter. 2. DIMM. 3. Remove Mini PCI network card. 2. Remove the daughter card that you Unauthorized daughter card is plugged in BIOS Setup Utility. 2. System board. 02F0 CPU ID:xx Failed. 1. Replace the backup battery. 3. System board. 02F6 Software NMI failed 1. Related service information 41 Table 1. Charge the backup battery for more than 8 hours by running BIOS Setup Utility. 0260 System timer error. 1. Replace the backup battery and run BIOS Setup Utility to reset the...
Hardware Maintenance Manual
Page 48
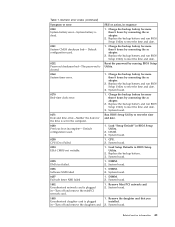
... hard disk drive) 1. Power off and install a memory module to the customer:If in mind, the customer can still use it is attached to the computer. 3. Run Diagnostics --> ThinkPad Devices --> HDD Active Protection Test. 2010 Warning: Your internal hard disk drive (HDD) may not function correctly on this system and that you installed. 2. Ultrabay™ hard disk drive. System board. 2110 1. System board. 42 ThinkPad T61 and T61p (15.4-inch widescreen) Hardware Maintenance Manual Remove the Wireless USB card that the latest HDD firmware is...
... hard disk drive) 1. Power off and install a memory module to the customer:If in mind, the customer can still use it is attached to the computer. 3. Run Diagnostics --> ThinkPad Devices --> HDD Active Protection Test. 2010 Warning: Your internal hard disk drive (HDD) may not function correctly on this system and that you installed. 2. Ultrabay™ hard disk drive. System board. 2110 1. System board. 42 ThinkPad T61 and T61p (15.4-inch widescreen) Hardware Maintenance Manual Remove the Wireless USB card that the latest HDD firmware is...
Hardware Maintenance Manual
Page 50
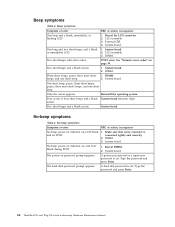
... beep and a blank, unreadable, or flashing LCD. 1. A power-on , LCD blank, 1. Beep symptoms Symptom or error FRU or action, in sequence No beep, power-on indicator on password or a supervisor password is set . System board. 2. Two short beeps with error codes. DIMM. System board. A hard-disk password is and no POST. System board No-beep symptoms Table 4. DIMM. 3. LCD assembly. 3. System board. 2. Type the password and press Enter. External CRT. 4. One long and two...
... beep and a blank, unreadable, or flashing LCD. 1. A power-on , LCD blank, 1. Beep symptoms Symptom or error FRU or action, in sequence No beep, power-on indicator on password or a supervisor password is set . System board. 2. Two short beeps with error codes. DIMM. System board. A hard-disk password is and no POST. System board No-beep symptoms Table 4. DIMM. 3. LCD assembly. 3. System board. 2. Type the password and press Enter. External CRT. 4. One long and two...
Hardware Maintenance Manual
Page 52
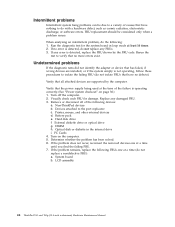
..., replace the FRU shown by the computer. Replace any error is operating correctly. (See "Power system checkout" on the computer. 5. System board b. LCD assembly 46 ThinkPad T61 and T61p (15.4-inch widescreen) Hardware Maintenance Manual FRU replacement should be due to a variety of causes that have no error is not operating, follow these procedures to the port replicator c. If any damaged FRU. 3. Battery pack e. External diskette drive or optical drive...
..., replace the FRU shown by the computer. Replace any error is operating correctly. (See "Power system checkout" on the computer. 5. System board b. LCD assembly 46 ThinkPad T61 and T61p (15.4-inch widescreen) Hardware Maintenance Manual FRU replacement should be due to a variety of causes that have no error is not operating, follow these procedures to the port replicator c. If any damaged FRU. 3. Battery pack e. External diskette drive or optical drive...
Hardware Maintenance Manual
Page 59
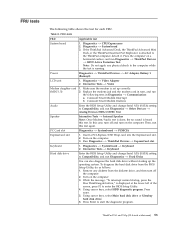
... --> ThinkPad Devices --> AC Adapter, Battery 1 (Battery2) LCD unit 1. Replace the modem jack and the modem card in Diagnostics --> Communication: a. Then, run Diagnostics --> Fixed Disks You can also diagnose the hard disk drive without starting up correctly. 2. While the message, "To interrupt normal startup, press the blue ThinkVangate button," is displayed at the lower left of the screen, press F1 to start the diagnostic program. Conexant Smart Modem Dialtone Audio Enter the BIOS Setup Utility...
... --> ThinkPad Devices --> AC Adapter, Battery 1 (Battery2) LCD unit 1. Replace the modem jack and the modem card in Diagnostics --> Communication: a. Then, run Diagnostics --> Fixed Disks You can also diagnose the hard disk drive without starting up correctly. 2. While the message, "To interrupt normal startup, press the blue ThinkVangate button," is displayed at the lower left of the screen, press F1 to start the diagnostic program. Conexant Smart Modem Dialtone Audio Enter the BIOS Setup Utility...
Hardware Maintenance Manual
Page 61
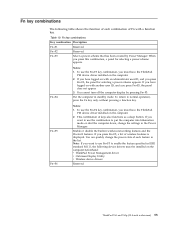
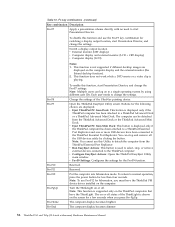
...: v ThinkPad Power Management driver v OnScreen Display Utility v Wireless device drivers Reserved. This combination of Fn with an administrator user ID, and you press Fn+F3, the panel for selecting a power scheme appears. Fn key combinations The following device drivers must have the ThinkPad PM device driver installed on with a function key. Fn key combinations Key combination Description Fn+F1 Reserved. Fn+F2 Reserved. Enable or disable the built-in standby mode. To use Fn+F5 to use the...
...: v ThinkPad Power Management driver v OnScreen Display Utility v Wireless device drivers Reserved. This combination of Fn with an administrator user ID, and you press Fn+F3, the panel for selecting a power scheme appears. Fn key combinations The following device drivers must have the ThinkPad PM device driver installed on with a function key. Fn key combinations Key combination Description Fn+F1 Reserved. Fn+F2 Reserved. Enable or disable the built-in standby mode. To use Fn+F5 to use the...
Hardware Maintenance Manual
Page 62
Switch a display output location v External monitor (CRT display) v Computer display and external monitor (LCD + CRT display) v Computer display (LCD) Notes: 1. Open the ThinkPad EasyEject Utility screen. Note: You cannot use this Utility to the ThinkPad computer. v Run EasyEject Actions: This button is supported only on the computer display and the external monitor (the Extend desktop function). 2. To return to a single operating system by clicking the button. Note: This function is used to select, stop and remove all the USB devices safely by using different user IDs. Note...
Switch a display output location v External monitor (CRT display) v Computer display and external monitor (LCD + CRT display) v Computer display (LCD) Notes: 1. Open the ThinkPad EasyEject Utility screen. Note: You cannot use this Utility to the ThinkPad computer. v Run EasyEject Actions: This button is supported only on the computer display and the external monitor (the Extend desktop function). 2. To return to a single operating system by clicking the button. Note: This function is used to select, stop and remove all the USB devices safely by using different user IDs. Note...


