Service Guide
Page 5
...tablet mode 4 Tips on using the Tablet Digitizer Pen . . . 5 Tips on the Web 37 Calling the Customer Support Center . . . 37 Getting help around the world 39 Appendix A. Recovery options 27 Introducing Rescue and Recovery . . . . . 27 Restoring factory contents 27 Recovering data 28 Chapter 5. Caring for your ThinkPad...Computer screen problems 21 Battery problems 23 A hard disk drive problem 24 Fingerprint authentication problems . . . 24 A startup problem 25 Other problems 25 Starting BIOS Setup Utility 25 © Copyright Lenovo 2006 Chapter 4. Notices 55 Notices 55 ...
...tablet mode 4 Tips on using the Tablet Digitizer Pen . . . 5 Tips on the Web 37 Calling the Customer Support Center . . . 37 Getting help around the world 39 Appendix A. Recovery options 27 Introducing Rescue and Recovery . . . . . 27 Restoring factory contents 27 Recovering data 28 Chapter 5. Caring for your ThinkPad...Computer screen problems 21 Battery problems 23 A hard disk drive problem 24 Fingerprint authentication problems . . . 24 A startup problem 25 Other problems 25 Starting BIOS Setup Utility 25 © Copyright Lenovo 2006 Chapter 4. Notices 55 Notices 55 ...
Service Guide
Page 8
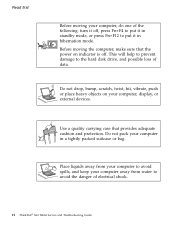
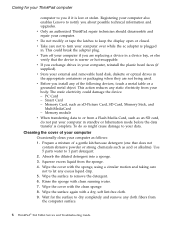
...provides adequate cushion and protection. Use a quality carrying case that the power on your computer in a tightly packed suitcase or bag. vi ThinkPad® X60 Tablet Service and Troubleshooting Guide Before moving your computer, do one of electrical shock. Do not pack your computer, display, or external devices. ... it in hibernation mode. Place liquids away from your computer to avoid spills, and keep your computer away from water to the hard disk drive, and possible loss of data. This will help to prevent damage to avoid the danger of the following: turn it in standby...
...provides adequate cushion and protection. Use a quality carrying case that the power on your computer in a tightly packed suitcase or bag. vi ThinkPad® X60 Tablet Service and Troubleshooting Guide Before moving your computer, do one of electrical shock. Do not pack your computer, display, or external devices. ... it in hibernation mode. Place liquids away from your computer to avoid spills, and keep your computer away from water to the hard disk drive, and possible loss of data. This will help to prevent damage to avoid the danger of the following: turn it in standby...
Service Guide
Page 12
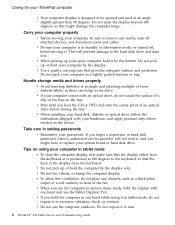
... turned off attached devices, and disconnect cords and cables. v Be sure your ThinkPad computer v Your computer display is positioned at 180 degrees to replace your system board or hard disk drive. Do not pick up or hold your open the display beyond 180 degrees, ... or rotation. Carry your computer properly v Before moving it to the hard disk drive and data loss. If you forget a supervisor or hard disk password, Lenovo authorized service provider will prevent damage to rain. 4 ThinkPad® X60 Tablet Service and Troubleshooting Guide Do not expose it . v If you hear ...
... turned off attached devices, and disconnect cords and cables. v Be sure your ThinkPad computer v Your computer display is positioned at 180 degrees to replace your system board or hard disk drive. Do not pick up or hold your open the display beyond 180 degrees, ... or rotation. Carry your computer properly v Before moving it to the hard disk drive and data loss. If you forget a supervisor or hard disk password, Lenovo authorized service provider will prevent damage to rain. 4 ThinkPad® X60 Tablet Service and Troubleshooting Guide Do not expose it . v If you hear ...
Service Guide
Page 14
... Stick, and MultiMediaCard - v Store your external and removable hard disk, diskette or optical drives in the appropriate containers or packaging when they are replacing a... part detergent. 2. This action reduces any cloth fibers from the computer surface. 6 ThinkPad® X60 Tablet Service and Troubleshooting Guide Memory Card, such as follows: 1. Wipe the cover with ...Lenovo to keep the display open or closed. v Do not modify or tape the latches to notify you exchange drives in standby or hibernation mode before the data transfer is warm- v Only an authorized ThinkPad...
... Stick, and MultiMediaCard - v Store your external and removable hard disk, diskette or optical drives in the appropriate containers or packaging when they are replacing a... part detergent. 2. This action reduces any cloth fibers from the computer surface. 6 ThinkPad® X60 Tablet Service and Troubleshooting Guide Memory Card, such as follows: 1. Wipe the cover with ...Lenovo to keep the display open or closed. v Do not modify or tape the latches to notify you exchange drives in standby or hibernation mode before the data transfer is warm- v Only an authorized ThinkPad...
Service Guide
Page 17
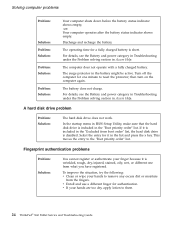
... messages 18 A password problem 19 Keyboard problems 19 Pointing device problems 20 Standby or hibernation problems . . . . 20 Computer screen problems 21 Battery problems 23 A hard disk drive problem 24 Fingerprint authentication problems . . . 24 A startup problem 25 Other problems 25 Starting BIOS Setup Utility 25 Note: See Access Help if your system is...
... messages 18 A password problem 19 Keyboard problems 19 Pointing device problems 20 Standby or hibernation problems . . . . 20 Computer screen problems 21 Battery problems 23 A hard disk drive problem 24 Fingerprint authentication problems . . . 24 A startup problem 25 Other problems 25 Starting BIOS Setup Utility 25 Note: See Access Help if your system is...

Service Guide
Page 18
... hardware features of this Guide. 10 ThinkPad® X60 Tablet Service and Troubleshooting Guide Your computer did not come with my ThinkPad computer? See the separate Safety and Warranty Guide for removing or replacing components. More tips can find the detailed specifications for my machine? See http://www.lenovo.com/think/support. For an explanation...
... hardware features of this Guide. 10 ThinkPad® X60 Tablet Service and Troubleshooting Guide Your computer did not come with my ThinkPad computer? See the separate Safety and Warranty Guide for removing or replacing components. More tips can find the detailed specifications for my machine? See http://www.lenovo.com/think/support. For an explanation...
Service Guide
Page 19
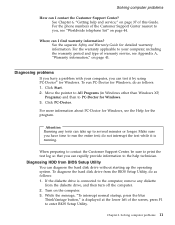
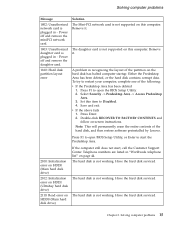
See the separate Safety and Warranty Guide for Windows. Click Start. 2. Click PC-Doctor. To diagnose the hard disk drive from the BIOS Setup Utility, do as follows: 1. Chapter 3. For the phone numbers of warranty service, see the Help for Windows. 3. Where ...How can I find warranty information? Attention Running any diskette from BIOS Setup Utility You can diagnose the hard disk drive without starting up to PC-Doctor for the program. If the diskette drive is displayed at the lower left of this Guide. For more information about PC-Doctor for Windows,...
See the separate Safety and Warranty Guide for Windows. Click Start. 2. Click PC-Doctor. To diagnose the hard disk drive from the BIOS Setup Utility, do as follows: 1. Chapter 3. For the phone numbers of warranty service, see the Help for Windows. 3. Where ...How can I find warranty information? Attention Running any diskette from BIOS Setup Utility You can diagnose the hard disk drive without starting up to PC-Doctor for the program. If the diskette drive is displayed at the lower left of this Guide. For more information about PC-Doctor for Windows,...

Service Guide
Page 20
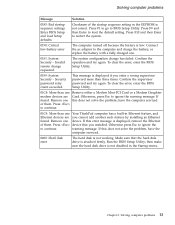
...the computer serviced. Enter BIOS Setup and load Setup defaults. Checksum of the CRC2 setting in the service partition of the hard disk drive, you from the diskette drive, and then turn off the computer. 2. Using cursor keys, select HDD diagnostic program. In the charts, x can...This message is connected to enter the Rescue and Recovery workspace. 4. Press F9 and then Enter to restart the system. 12 ThinkPad® X60 Tablet Service and Troubleshooting Guide Message 0176: System Security - Diagnosing problems using PC-Doctor from the service partition By using PC-Doctor ...
...the computer serviced. Enter BIOS Setup and load Setup defaults. Checksum of the CRC2 setting in the service partition of the hard disk drive, you from the diskette drive, and then turn off the computer. 2. Using cursor keys, select HDD diagnostic program. In the charts, x can...This message is connected to enter the Rescue and Recovery workspace. 4. Press F9 and then Enter to restart the system. 12 ThinkPad® X60 Tablet Service and Troubleshooting Guide Message 0176: System Security - Diagnosing problems using PC-Doctor from the service partition By using PC-Doctor ...
Service Guide
Page 21
...than one this does not solve the problem, have the computer serviced. Press device that the hard disk drive is low. Otherwise press Esc to ignore the to ignore the warning message. then make sure the hard disk drive is not disabled in the EEPROM is displayed if you enter a wrong supervisor password more... change has failed. The system configuration change requested. Confirm the operation and try again. Confirm the supervisor password and try again. Remove one Your ThinkPad computer has a built-in Ethernet feature, and Ethernet devices are Card. warning message.
...than one this does not solve the problem, have the computer serviced. Press device that the hard disk drive is low. Otherwise press Esc to ignore the to ignore the warning message. then make sure the hard disk drive is not disabled in the EEPROM is displayed if you enter a wrong supervisor password more... change has failed. The system configuration change requested. Confirm the operation and try again. Confirm the supervisor password and try again. Remove one Your ThinkPad computer has a built-in Ethernet feature, and Ethernet devices are Card. warning message.
Service Guide
Page 23
.... 4. Remove it . To try to start the Predesktop Area. 2100: Initialization error on HDD0 (Main hard disk drive) 2102: Initialization error on HDD1 (Ultrabay hard disk drive) 2110: Read error on -screen instructions. Press F1 to open BIOS Setup Utility, or Enter to restart... your computer, complete one of the hard disk, and then restore software preinstalled by Lenovo. Select Security -> Predesktop Area -> Access Predesktop ...
.... 4. Remove it . To try to start the Predesktop Area. 2100: Initialization error on HDD0 (Main hard disk drive) 2102: Initialization error on HDD1 (Ultrabay hard disk drive) 2110: Read error on -screen instructions. Press F1 to open BIOS Setup Utility, or Enter to restart... your computer, complete one of the hard disk, and then restore software preinstalled by Lenovo. Select Security -> Predesktop Area -> Access Predesktop ...
Service Guide
Page 24
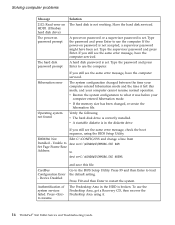
...Frame Base Address. Solving computer problems Message 2112: Read error on HDD1 (Ultrabay hard disk drive) The power-on password prompt The hard disk password prompt Solution The hard disk is broken. A hard disk password is in the HDD is not working. EMM386 Not Installed - Unable... computer entered hibernation mode. The Predesktop Area in the diskette drive If you still see the same error message, have the computer serviced. v Restore the system configuration to what it . 16 ThinkPad® X60 Tablet Service and Troubleshooting Guide Edit C:\CONFIG.SYS and change a line...
...Frame Base Address. Solving computer problems Message 2112: Read error on HDD1 (Ultrabay hard disk drive) The power-on password prompt The hard disk password prompt Solution The hard disk is broken. A hard disk password is in the HDD is not working. EMM386 Not Installed - Unable... computer entered hibernation mode. The Predesktop Area in the diskette drive If you still see the same error message, have the computer serviced. v Restore the system configuration to what it . 16 ThinkPad® X60 Tablet Service and Troubleshooting Guide Edit C:\CONFIG.SYS and change a line...
Service Guide
Page 27
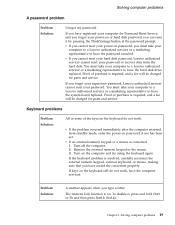
You must take your computer to a Lenovo authorized servicer or a marketing representative to have the hard disk drive replaced. Proof of purchase is resolved, carefully reconnect the external numeric keypad, external keyboard, or mouse, making sure that you must take your password. If ...
You must take your computer to a Lenovo authorized servicer or a marketing representative to have the hard disk drive replaced. Proof of purchase is resolved, carefully reconnect the external numeric keypad, external keyboard, or mouse, making sure that you must take your password. If ...
Service Guide
Page 28
...charged. Change the mouse driver to the computer, or replace the battery with a fully charged one. 20 ThinkPad® X60 Tablet Service and Troubleshooting Guide Solving computer problems Problem: Solution: All or some of the keys on the external ...numeric keypad do not work. Connect the ac adapter to Standard PS/2 Port Mouse, and then reinstall PS/2 TrackPoint. Check the mouse driver in the C:\SWTOOLS\DRIVERS directory on your hard disk drive...
...charged. Change the mouse driver to the computer, or replace the battery with a fully charged one. 20 ThinkPad® X60 Tablet Service and Troubleshooting Guide Solving computer problems Problem: Solution: All or some of the keys on the external ...numeric keypad do not work. Connect the ac adapter to Standard PS/2 Port Mouse, and then reinstall PS/2 TrackPoint. Check the mouse driver in the C:\SWTOOLS\DRIVERS directory on your hard disk drive...
Service Guide
Page 32
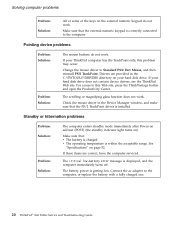
... not work. In the startup menu in BIOS Setup Utility, make sure that the hard disk drive is included in Access Help. This moves the entry to reset the protector; v If your hands to them. 24 ThinkPad® X60 Tablet Service and Troubleshooting Guide then turn on the computer again. Select the entry for authentication..., try the following: v Clean or wipe your hands are too dry, apply lotion to remove any excess dirt or moisture from boot order" list, the hard disk drive is included in the list and press the x key.
... not work. In the startup menu in BIOS Setup Utility, make sure that the hard disk drive is included in Access Help. This moves the entry to reset the protector; v If your hands to them. 24 ThinkPad® X60 Tablet Service and Troubleshooting Guide then turn on the computer again. Select the entry for authentication..., try the following: v Clean or wipe your hands are too dry, apply lotion to remove any excess dirt or moisture from boot order" list, the hard disk drive is included in the list and press the x key.

Service Guide
Page 36
...save all your files and shut down your hard disk, or a network drive, or on removable media, depending on the options you are unable to 2 hours. Turn off your ThinkPad computer during the backup operation. Recovering data...prompted during startup. The Rescue and Recovery workspace opens. 4. Recovery options Notes: 1. If the optical drive is displayed, press the ThinkVantage button. To ensure that reflect the contents of the Windows operating system.... the Rescue and Recovery workspace opens you can start Windows. 28 ThinkPad® X60 Tablet Service and Troubleshooting Guide
...save all your files and shut down your hard disk, or a network drive, or on removable media, depending on the options you are unable to 2 hours. Turn off your ThinkPad computer during the backup operation. Recovering data...prompted during startup. The Rescue and Recovery workspace opens. 4. Recovery options Notes: 1. If the optical drive is displayed, press the ThinkVantage button. To ensure that reflect the contents of the Windows operating system.... the Rescue and Recovery workspace opens you can start Windows. 28 ThinkPad® X60 Tablet Service and Troubleshooting Guide
Service Guide
Page 39
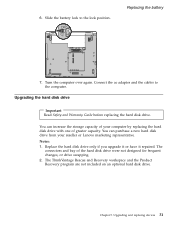
... the storage capacity of your reseller or Lenovo marketing representative. The connectors and bay of greater capacity. Chapter 5. 6. Replacing the battery 7. You can purchase a new hard disk drive from your computer by replacing the hard disk drive with one of the hard disk drive were not designed for frequent changes, or drive swapping. 2. Notes: 1. The ThinkVantage Rescue and...
... the storage capacity of your reseller or Lenovo marketing representative. The connectors and bay of greater capacity. Chapter 5. 6. Replacing the battery 7. You can purchase a new hard disk drive from your computer by replacing the hard disk drive with one of the hard disk drive were not designed for frequent changes, or drive swapping. 2. Notes: 1. The ThinkVantage Rescue and...
Service Guide
Page 40
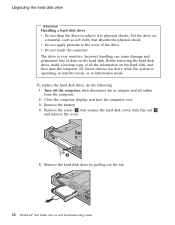
... the battery. 4. then flip out 2 and remove the cover . 5. Remove the hard disk drive by pulling out the tab. 32 ThinkPad® X60 Tablet Service and Troubleshooting Guide Put the drive on the hard disk. Upgrading the hard disk drive Attention Handling a hard disk drive v Do not drop the drive or subject it to the cover of data on a material, such as...
... the battery. 4. then flip out 2 and remove the cover . 5. Remove the hard disk drive by pulling out the tab. 32 ThinkPad® X60 Tablet Service and Troubleshooting Guide Put the drive on the hard disk. Upgrading the hard disk drive Attention Handling a hard disk drive v Do not drop the drive or subject it to the cover of data on a material, such as...
Service Guide
Page 41
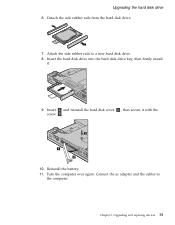
Upgrading the hard disk drive 6. Reinstall the battery. 11. Chapter 5. Detach the side rubber rails from the hard disk drive. 7. Attach the side rubber rails to the computer. Insert the hard disk drive into the hard disk drive bay; Connect the ac adapter and the cables to a new hard disk drive. 8. then firmly install it with the screw 3 . 10. then secure it . 9. Turn the computer over again. Insert 1 and reinstall the hard disk cover 2 ; Upgrading and replacing devices 33
Upgrading the hard disk drive 6. Reinstall the battery. 11. Chapter 5. Detach the side rubber rails from the hard disk drive. 7. Attach the side rubber rails to the computer. Insert the hard disk drive into the hard disk drive bay; Connect the ac adapter and the cables to a new hard disk drive. 8. then firmly install it with the screw 3 . 10. then secure it . 9. Turn the computer over again. Insert 1 and reinstall the hard disk cover 2 ; Upgrading and replacing devices 33
Service Guide
Page 57
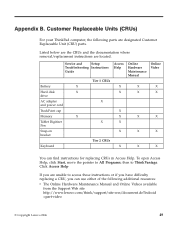
To open Access Help, click Start, move the pointer to ThinkVantage. Service and Setup Troubleshooting Instructions Guide Battery X Hard disk X drive AC adapter and power cord TrackPoint cap Memory X Tablet Digitizer Pen Snap-on bracket Keyboard Tier 1 CRUs X X Tier 2 CRUs Access Help X X X X X X X Online Hardware Maintenance Manual X X X ...; Click Access Help If you are located. Customer Replaceable Units (CRUs) For your ThinkPad computer, the following additional resources: v The Online Hardware Maintenance Manual and Online Videos available from the Support Web site...
To open Access Help, click Start, move the pointer to ThinkVantage. Service and Setup Troubleshooting Instructions Guide Battery X Hard disk X drive AC adapter and power cord TrackPoint cap Memory X Tablet Digitizer Pen Snap-on bracket Keyboard Tier 1 CRUs X X Tier 2 CRUs Access Help X X X X X X X Online Hardware Maintenance Manual X X X ...; Click Access Help If you are located. Customer Replaceable Units (CRUs) For your ThinkPad computer, the following additional resources: v The Online Hardware Maintenance Manual and Online Videos available from the Support Web site...
Service Guide
Page 59
Memory v Double data rate (DDR) 2 synchronous dynamic random access memory (DRAM) Storage device v 2.5-inch hard disk drive Display The color display uses TFT technology (with the TouchPanel feature on some models): v Size: 12.1 inch Resolution: - Features and Specifications Features For... button v Volume control buttons Interface v Stereo headphone jack v Microphone jack v 3 Universal Serial Bus (USB) connectors v IEEE 1394 connector v RJ11 telephone connector © Copyright Lenovo 2006 51 then from the pull down menu select Properties. External monitor: Up to 2048-by -1050 -
Memory v Double data rate (DDR) 2 synchronous dynamic random access memory (DRAM) Storage device v 2.5-inch hard disk drive Display The color display uses TFT technology (with the TouchPanel feature on some models): v Size: 12.1 inch Resolution: - Features and Specifications Features For... button v Volume control buttons Interface v Stereo headphone jack v Microphone jack v 3 Universal Serial Bus (USB) connectors v IEEE 1394 connector v RJ11 telephone connector © Copyright Lenovo 2006 51 then from the pull down menu select Properties. External monitor: Up to 2048-by -1050 -