
Brochure
Page 1
...from USB peripheral devices (2): optional on Eco USFF GREEN COMPUTING • ThinkVantage Power Manager for up to the management console when chassis is opened • PS/2® (2) port available on all form factors • Lenovo's unique Hardware Password Manager(1) provides advanced password management. ... less energy than previous ThinkVision monitors and is also possible, along with your ideas with ThinkVision L197 Wide vs. and no other computer • Ready for easy worldwide deployment • Latest Intel® iAMT 5.0 vPro™ technology available on all I /O ports...
...from USB peripheral devices (2): optional on Eco USFF GREEN COMPUTING • ThinkVantage Power Manager for up to the management console when chassis is opened • PS/2® (2) port available on all form factors • Lenovo's unique Hardware Password Manager(1) provides advanced password management. ... less energy than previous ThinkVision monitors and is also possible, along with your ideas with ThinkVision L197 Wide vs. and no other computer • Ready for easy worldwide deployment • Latest Intel® iAMT 5.0 vPro™ technology available on all I /O ports...

Brochure
Page 2
... DisplayPort, the next generation digital display interface standard, is thoughtfully designed with Lenovo's Secure Managed Client solution provides even greater TCO benefits. Lenovo® recommends Windows Vista® Business. Lenovo THINKCENTRE M58/M58p Desktop THE NEWEST IN ROCK-SOLID DESIGN MEETS GREEN COMPUTING. Using ThinkCentre M58p in , IT-oriented business reports are delivered weekly...
... DisplayPort, the next generation digital display interface standard, is thoughtfully designed with Lenovo's Secure Managed Client solution provides even greater TCO benefits. Lenovo® recommends Windows Vista® Business. Lenovo THINKCENTRE M58/M58p Desktop THE NEWEST IN ROCK-SOLID DESIGN MEETS GREEN COMPUTING. Using ThinkCentre M58p in , IT-oriented business reports are delivered weekly...

Brochure
Page 4
...Array of Intel Corporation in Q2, 2009. [2] Optional on safe and effective computing. U.S. Citrix is a trademark of Discrete Graphics Cards 800 938 838 lenovo.com/hk ©2008 Lenovo. Adobe and Reader are registered trademarks of the Green Electronics Council. Roxio is... NVIDIA Corporation. Microsoft, Windows and Vista are trademarks of IBM Corporation in the U.S. NVIDIA is a registered trademark of Lenovo Group Limited. Reseller prices may apply. Creator is a registered trademark of Microsoft Corporation. English (73P4730) High performance, ...
...Array of Intel Corporation in Q2, 2009. [2] Optional on safe and effective computing. U.S. Citrix is a trademark of Discrete Graphics Cards 800 938 838 lenovo.com/hk ©2008 Lenovo. Adobe and Reader are registered trademarks of the Green Electronics Council. Roxio is... NVIDIA Corporation. Microsoft, Windows and Vista are trademarks of IBM Corporation in the U.S. NVIDIA is a registered trademark of Lenovo Group Limited. Reseller prices may apply. Creator is a registered trademark of Microsoft Corporation. English (73P4730) High performance, ...

User Manual
Page 4
...-05925. Third Edition (October 2009) © Copyright Lenovo 2009. LENOVO products, data, computer software, and services have been developed exclusively at private expense and are delivered pursuant a General Services Administration ″GSA″ contract, use , reproduction and disclosure. LIMITED AND RESTRICTED RIGHTS NOTICE: If products, data, computer software, or services are sold to governmental...
...-05925. Third Edition (October 2009) © Copyright Lenovo 2009. LENOVO products, data, computer software, and services have been developed exclusively at private expense and are delivered pursuant a General Services Administration ″GSA″ contract, use , reproduction and disclosure. LIMITED AND RESTRICTED RIGHTS NOTICE: If products, data, computer software, or services are sold to governmental...

User Manual
Page 5
...recovery repair diskette . . . . . 46 Using a recovery repair diskette 46 Installing or reinstalling device drivers . . . . . 47 © Copyright Lenovo 2009 Setting a rescue device in the startup sequence . . 48 Solving recovery problems 48 Chapter 4. Using the Setup Utility . . . 49 Starting the ...Features 1 Specifications 4 Software overview 5 Software provided with your Windows operating system 5 Locations 7 Locating connectors on the front of your computer 7 Locating connectors on the rear of your operating system 54 Recovering from the Setup Utility program . . . . . 52 Chapter...
...recovery repair diskette . . . . . 46 Using a recovery repair diskette 46 Installing or reinstalling device drivers . . . . . 47 © Copyright Lenovo 2009 Setting a rescue device in the startup sequence . . 48 Solving recovery problems 48 Chapter 4. Using the Setup Utility . . . 49 Starting the ...Features 1 Specifications 4 Software overview 5 Software provided with your Windows operating system 5 Locations 7 Locating connectors on the front of your computer 7 Locating connectors on the rear of your operating system 54 Recovering from the Setup Utility program . . . . . 52 Chapter...

User Manual
Page 9
... front panel v Internal speaker (some models) Connectivity v 10/100/1000 Mbps integrated Ethernet controller v PCI V.90 Data/Fax modem (some models) © Copyright Lenovo 2009 1 Product overview Features This chapter describes the computer features, specifications, preinstalled software programs, and part and connector locations. System information The following information covers a variety of the...
... front panel v Internal speaker (some models) Connectivity v 10/100/1000 Mbps integrated Ethernet controller v PCI V.90 Data/Fax modem (some models) © Copyright Lenovo 2009 1 Product overview Features This chapter describes the computer features, specifications, preinstalled software programs, and part and connector locations. System information The following information covers a variety of the...

User Manual
Page 11
... the publication of the operating system vendor. For more information, see "Software overview" on page 5. Chapter 1. Software programs, preinstalled Your computer might be identified by model type) Linux® 1. Corrections and additions to this publication goes to press. Product overview 3 Operating system, preinstalled v ... check the Web site of this booklet. To determine if an operating system has been certified or tested for compatibility1 (varies by Lenovo as compatible with preinstalled software programs. If it does, an operating system, device drivers to change.
... the publication of the operating system vendor. For more information, see "Software overview" on page 5. Chapter 1. Software programs, preinstalled Your computer might be identified by model type) Linux® 1. Corrections and additions to this publication goes to press. Product overview 3 Operating system, preinstalled v ... check the Web site of this booklet. To determine if an operating system has been certified or tested for compatibility1 (varies by Lenovo as compatible with preinstalled software programs. If it does, an operating system, device drivers to change.
User Manual
Page 12
... V ac Input frequency range: 50 to 60 Hz Voltage-selection switch setting: 230 V ac 4 User Guide Specifications This section lists the physical specifications for your computer.
... V ac Input frequency range: 50 to 60 Hz Voltage-selection switch setting: 230 V ac 4 User Guide Specifications This section lists the physical specifications for your computer.

User Manual
Page 13
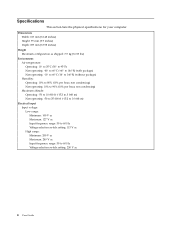
... operating system will not start. ThinkVantage Rescue and Recovery: The ThinkVantage Rescue and Recovery® (RnR) program is only available on computers preinstalled with maintaining your computer. Chapter 1. Lenovo ThinkVantage Tools: The Lenovo ThinkVantage® Tools program guides you to a host of information and tools to data. ThinkVantage Client Security Solution: The ThinkVantage Client...
... operating system will not start. ThinkVantage Rescue and Recovery: The ThinkVantage Rescue and Recovery® (RnR) program is only available on computers preinstalled with maintaining your computer. Chapter 1. Lenovo ThinkVantage Tools: The Lenovo ThinkVantage® Tools program guides you to a host of information and tools to data. ThinkVantage Client Security Solution: The ThinkVantage Client...
User Manual
Page 14
...provided on password, hard disk drive password, and Windows password. Note: The Lenovo ThinkVantage Toolbox program is only available on computers preinstalled with Windows 7 from Lenovo. See "Lenovo System Toolbox" on page 59 for more information. It is preinstalled on ...: The ThinkVantage Power Manager program provides convenient, flexible, and complete power management for computers that can cause hardware failures. Lenovo ThinkVantage Toolbox The Lenovo ThinkVantage Toolbox program helps you automatically capture and fill in authentication information for Rescue and...
...provided on password, hard disk drive password, and Windows password. Note: The Lenovo ThinkVantage Toolbox program is only available on computers preinstalled with Windows 7 from Lenovo. See "Lenovo System Toolbox" on page 59 for more information. It is preinstalled on ...: The ThinkVantage Power Manager program provides convenient, flexible, and complete power management for computers that can cause hardware failures. Lenovo ThinkVantage Toolbox The Lenovo ThinkVantage Toolbox program helps you automatically capture and fill in authentication information for Rescue and...
User Manual
Page 15
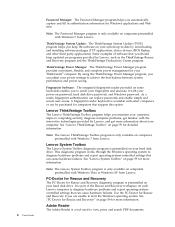
...7 See "Online Books folder" on page 63 for instructions on how to detect and eliminate viruses. For more information about updating your computer Figure 1 shows the locations of the connectors on the front of antivirus software on page 64 for more information about accessing the online books... site. Locations Locating connectors on the front of your antivirus software, refer to continue receiving the antivirus program updates. Figure 1. Lenovo provides a full version of your hard disk drive with antivirus software that you must renew the license to the Access Help. ...
...7 See "Online Books folder" on page 63 for instructions on how to detect and eliminate viruses. For more information about updating your computer Figure 1 shows the locations of the connectors on the front of antivirus software on page 64 for more information about accessing the online books... site. Locations Locating connectors on the front of your antivirus software, refer to continue receiving the antivirus program updates. Figure 1. Lenovo provides a full version of your hard disk drive with antivirus software that you must renew the license to the Access Help. ...
User Manual
Page 16
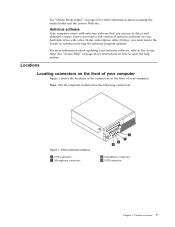
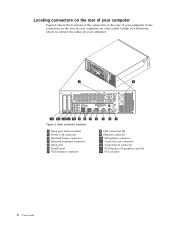
... color-coded to help you determine where to connect the cables on the rear of your computer. Figure 2. Some connectors on your computer. Rear connector locations 1 Serial port (some models) 2 Power cord connector 3 Standard mouse connector 4 Standard keyboard connector 5 Serial port 6 Parallel port 7 VGA monitor connector 8 USB connectors (4) 9 ...
... color-coded to help you determine where to connect the cables on the rear of your computer. Figure 2. Some connectors on your computer. Rear connector locations 1 Serial port (some models) 2 Power cord connector 3 Standard mouse connector 4 Standard keyboard connector 5 Serial port 6 Parallel port 7 VGA monitor connector 8 USB connectors (4) 9 ...
User Manual
Page 17
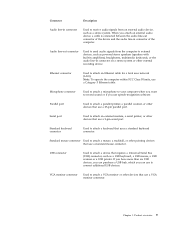
... other devices that uses a standard keyboard connector. Note: To operate the computer within FCC Class B limits, use to connect additional USB devices. Microphone connector Used to attach a microphone to your computer when you want to record sound or if you attach an external audio ...or other devices that use a 9-pin serial port. Connector Description Audio line-in connector Used to receive audio signals from the computer to external devices, such as powered stereo speakers (speakers with built-in amplifiers), headphones, multimedia keyboards, or the audio line-in connector...
... other devices that uses a standard keyboard connector. Note: To operate the computer within FCC Class B limits, use to connect additional USB devices. Microphone connector Used to attach a microphone to your computer when you want to record sound or if you attach an external audio ...or other devices that use a 9-pin serial port. Connector Description Audio line-in connector Used to receive audio signals from the computer to external devices, such as powered stereo speakers (speakers with built-in amplifiers), headphones, multimedia keyboards, or the audio line-in connector...
User Manual
Page 18
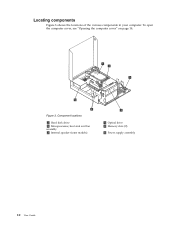
Figure 3. Component locations 1 Hard disk drive 2 Microprocessor, heat sink and fan assembly 3 Internal speaker (some models) 4 Optical drive 5 Memory slots (2) 6 Power supply assembly 10 User Guide Locating components Figure 3 shows the locations of the various components in your computer. To open the computer cover, see "Opening the computer cover" on page 14.
Figure 3. Component locations 1 Hard disk drive 2 Microprocessor, heat sink and fan assembly 3 Internal speaker (some models) 4 Optical drive 5 Memory slots (2) 6 Power supply assembly 10 User Guide Locating components Figure 3 shows the locations of the various components in your computer. To open the computer cover, see "Opening the computer cover" on page 14.
User Manual
Page 21
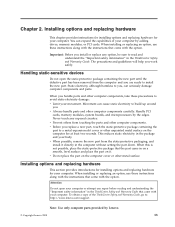
... setting the part down. Handling static-sensitive devices Do not open your body. When you are ready to : http://www.lenovo.com/support Note: Use only computer parts provided by Lenovo. © Copyright Lenovo 2009 13 Installing options and replacing hardware This section provides introductions for installing options and replacing hardware for your movement...
... setting the part down. Handling static-sensitive devices Do not open your body. When you are ready to : http://www.lenovo.com/support Note: Use only computer parts provided by Lenovo. © Copyright Lenovo 2009 13 Installing options and replacing hardware This section provides introductions for installing options and replacing hardware for your movement...

User Manual
Page 22
... Warranty Guide, go to: http://www.lenovo.com/support This section provides instructions on how to open the computer cover: 1. Remove any media from electrical outlets. 3. To open the computer cover. Opening the computer cover Attention Do not open your computer or attempt any other cables that are ...: Turn off all power cords from the drives, shut down your operating system, and turn off the computer and wait three to five minutes to let the computer cool before reading and understanding the "Important safety information" in addition to making the physical connection. Unplug ...
... Warranty Guide, go to: http://www.lenovo.com/support This section provides instructions on how to open the computer cover: 1. Remove any media from electrical outlets. 3. To open the computer cover. Opening the computer cover Attention Do not open your computer or attempt any other cables that are ...: Turn off all power cords from the drives, shut down your operating system, and turn off the computer and wait three to five minutes to let the computer cool before reading and understanding the "Important safety information" in addition to making the physical connection. Unplug ...

User Manual
Page 23
...and Warranty Guide, go to access the system board components and drives. To obtain a copy of the computer and pivot the computer cover upward to open your computer or attempt any repair before reading and understanding the "Important safety information" in the ThinkCentre Safety and ... came with your computer. Figure 5. Opening the computer cover Accessing the system board components and drives Attention Do not open . To access the system board components and drives: 1. Open the computer cover. Chapter 2. See "Opening the computer cover" on how to : http://www.lenovo.com/support This...
...and Warranty Guide, go to access the system board components and drives. To obtain a copy of the computer and pivot the computer cover upward to open your computer or attempt any repair before reading and understanding the "Important safety information" in the ThinkCentre Safety and ... came with your computer. Figure 5. Opening the computer cover Accessing the system board components and drives Attention Do not open . To access the system board components and drives: 1. Open the computer cover. Chapter 2. See "Opening the computer cover" on how to : http://www.lenovo.com/support This...

User Manual
Page 24
See "Replacing the hard disk drive" on how to : http://www.lenovo.com/support This section provides instructions on page 23. Make sure you note the locations of any cables that came with your computer or attempt any combination up to a maximum of the ThinkCentre Safety and ... disk drive assembly is in the latched down position before reading and understanding the "Important safety information" in any repair before closing the computer cover to prevent damage to access the internal components. Notes: a. Pivoting the drive bay assembly Installing or replacing a memory module Attention...
See "Replacing the hard disk drive" on how to : http://www.lenovo.com/support This section provides instructions on page 23. Make sure you note the locations of any cables that came with your computer or attempt any combination up to a maximum of the ThinkCentre Safety and ... disk drive assembly is in the latched down position before reading and understanding the "Important safety information" in any repair before closing the computer cover to prevent damage to access the internal components. Notes: a. Pivoting the drive bay assembly Installing or replacing a memory module Attention...
User Manual
Page 25
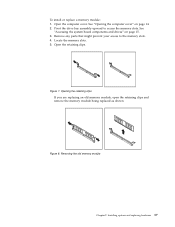
.... Figure 8. Removing the old memory module Chapter 2. Pivot the drive bay assembly upward to the memory slots. 4. Locate the memory slots. 5. Open the computer cover. See "Opening the computer cover" on page 15. 3. To install or replace a memory module: 1. Remove any parts that might prevent your access to access the memory slots.
.... Figure 8. Removing the old memory module Chapter 2. Pivot the drive bay assembly upward to the memory slots. 4. Locate the memory slots. 5. Open the computer cover. See "Opening the computer cover" on page 15. 3. To install or replace a memory module: 1. Remove any parts that might prevent your access to access the memory slots.

User Manual
Page 26
... before reading and understanding the "Important safety information" in the ThinkCentre Safety and Warranty Guide that came with the slot key 2 on page 37. Your computer has one standard PCI card slot and one PCI Express x16 graphics card slot. 18 User Guide v To complete the installation, go to install or... and Warranty Guide, go to the appropriate section. Installing the memory module What to do next: v To work with another option, go to: http://www.lenovo.com/support This section provides instructions on how to "Completing the parts replacement" on the system board.
... before reading and understanding the "Important safety information" in the ThinkCentre Safety and Warranty Guide that came with the slot key 2 on page 37. Your computer has one standard PCI card slot and one PCI Express x16 graphics card slot. 18 User Guide v To complete the installation, go to install or... and Warranty Guide, go to the appropriate section. Installing the memory module What to do next: v To work with another option, go to: http://www.lenovo.com/support This section provides instructions on how to "Completing the parts replacement" on the system board.


