User Manual
Page 5
... the AC adapter 52 Checking operational charging 53 Checking the battery pack 53 Checking the backup battery 54 Related service information 55 Restoring the factory contents by using Product Recovery discs 55 Restoring the factory contents by using Recovery Disc Set 56 Passwords 57 Power-on password 57 Hard-disk password 57 Supervisor password 58 How to remove the power-on password . . . . 58 How to remove the hard-disk password . . . . 59 Power management 60 Screen blank mode 60 Sleep (Standby) mode 60 Hibernation mode 61 © Copyright Lenovo 2008, 2009...
... the AC adapter 52 Checking operational charging 53 Checking the battery pack 53 Checking the backup battery 54 Related service information 55 Restoring the factory contents by using Product Recovery discs 55 Restoring the factory contents by using Recovery Disc Set 56 Passwords 57 Power-on password 57 Hard-disk password 57 Supervisor password 58 How to remove the power-on password . . . . 58 How to remove the hard-disk password . . . . 59 Power management 60 Screen blank mode 60 Sleep (Standby) mode 60 Hibernation mode 61 © Copyright Lenovo 2008, 2009...

User Manual
Page 11
.... v Do not use this type of maintenance information. Instructions for that has hazardous voltages. v Never assume that another person, familiar with the power-off . Safety information 3 Performing a mechanical inspection - Attention: Another person must be there to work on the machine, unplug the power cord. Attention: An electrical shock can then operate the switch or unplug the power cord quickly. By observing...
.... v Do not use this type of maintenance information. Instructions for that has hazardous voltages. v Never assume that another person, familiar with the power-off . Safety information 3 Performing a mechanical inspection - Attention: Another person must be there to work on the machine, unplug the power cord. Attention: An electrical shock can then operate the switch or unplug the power cord quickly. By observing...

User Manual
Page 51
... to your particular computer. If you replace FRUs, use new nylon-coated screws. "Lenovo ThinkVantage Toolbox (Lenovo System Toolbox)" on page 48 - Consider replacing a FRU only when a problem recurs. v Be careful not to do not replace the FRU. "Diagnostics using PC-Doctor for Windows" on page 48 - v A FRU should service the computer. v Before replacing any ThinkPad model that supports the PC-Doctor® for a variety...
... to your particular computer. If you replace FRUs, use new nylon-coated screws. "Lenovo ThinkVantage Toolbox (Lenovo System Toolbox)" on page 48 - Consider replacing a FRU only when a problem recurs. v Be careful not to do not replace the FRU. "Diagnostics using PC-Doctor for Windows" on page 48 - v A FRU should service the computer. v Before replacing any ThinkPad model that supports the PC-Doctor® for a variety...

User Manual
Page 53
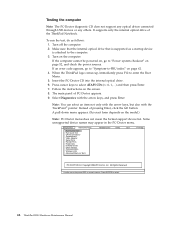
....lenovo.com/support To create the PC-Doctor diagnostic CD, follow the instructions on the Web site. When the ThinkPad logo comes up, immediately press F1 to enter the BIOS Setup Utility. On the BIOS Setup Utility screen, press F9, Enter, F10, and then Enter. General checkout 45 The use of the computer. You can lead to false indications of these devices, you need to enable it to the USB connector...
....lenovo.com/support To create the PC-Doctor diagnostic CD, follow the instructions on the Web site. When the ThinkPad logo comes up, immediately press F1 to enter the BIOS Setup Utility. On the BIOS Setup Utility screen, press F9, Enter, F10, and then Enter. General checkout 45 The use of the computer. You can lead to false indications of these devices, you need to enable it to the USB connector...
User Manual
Page 54
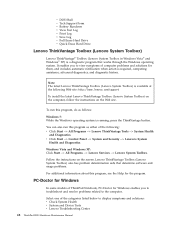
... Interactive Tests Run Normal Test Run Quick Test CPU/Coprocessor Systemboard Video Adapter Serial Ports Parallel Ports Fixed Disks Diskette Drives Other Devices Communication Wireless LAN Advanced Memory Tests Hardware Info Utility Quit F1=Help PC-DOCTOR 2.0 Copyright 2008 PC-Doctor, Inc. Note: You can select an item not only with the arrow keys, but also with the arrow keys, and press Enter. It supports only the internal optical drive of the ThinkPad Notebook.
... Interactive Tests Run Normal Test Run Quick Test CPU/Coprocessor Systemboard Video Adapter Serial Ports Parallel Ports Fixed Disks Diskette Drives Other Devices Communication Wireless LAN Advanced Memory Tests Hardware Info Utility Quit F1=Help PC-DOCTOR 2.0 Copyright 2008 PC-Doctor, Inc. Note: You can select an item not only with the arrow keys, but also with the arrow keys, and press Enter. It supports only the internal optical drive of the ThinkPad Notebook.

User Manual
Page 55
v Video Adapter test supports only the LCD display on the system and reset them if they are as follows: Diagnostics Interactive Tests v Run Normal Test v Run Quick Test v CPU/Coprocessor v Systemboard v Video Adapter v Serial Ports v Parallel Ports v Fixed Disks v Diskette Drives v Other Devices v ThinkPad Devices v Communication v Wireless LAN v Advanced Memory Tests v Keyboard v Video v Internal Speaker v Mouse v Diskette v System Load v Optical Drive Test v Intel WLAN Radio Test Notes: v In the Keyboard test in Interactive Tests, the Fn key should be set to...
v Video Adapter test supports only the LCD display on the system and reset them if they are as follows: Diagnostics Interactive Tests v Run Normal Test v Run Quick Test v CPU/Coprocessor v Systemboard v Video Adapter v Serial Ports v Parallel Ports v Fixed Disks v Diskette Drives v Other Devices v ThinkPad Devices v Communication v Wireless LAN v Advanced Memory Tests v Keyboard v Video v Internal Speaker v Mouse v Diskette v System Load v Optical Drive Test v Intel WLAN Radio Test Notes: v In the Keyboard test in Interactive Tests, the Fn key should be set to...
User Manual
Page 56
...) also has problem determination aids that works through the Windows operating system. It enables you to troubleshoot and resolve problems related to display symptoms and solutions: v Check System Health v System and Device Tests v Lenovo Troubleshooting Center 48 ThinkPad R500 Hardware Maintenance Manual You can also run this program, do as either of the categories listed below to the computer. Windows Vista and Windows XP: Click Start --> All Programs --> Lenovo Services --> Lenovo System Toolbox. Follow...
...) also has problem determination aids that works through the Windows operating system. It enables you to troubleshoot and resolve problems related to display symptoms and solutions: v Check System Health v System and Device Tests v Lenovo Troubleshooting Center 48 ThinkPad R500 Hardware Maintenance Manual You can also run this program, do as either of the categories listed below to the computer. Windows Vista and Windows XP: Click Start --> All Programs --> Lenovo Services --> Lenovo System Toolbox. Follow...

User Manual
Page 58
... the BIOS Setup Utility and change Serial ATA (SATA) setting to Compatibility, and run Diagnostics --> ThinkPad Devices --> HDD Active Protection Test. Interactive Tests --> Optical Drive Test 50 ThinkPad R500 Hardware Maintenance Manual Diagnostics --> CPU/Coprocessor 2. Then, run Diagnostics --> Other Device --> Conexant Audio Interactive Tests --> Internal Speaker Note: Once Modem/Audio test is done, the no sound is running. Diagnostics --> ThinkPad Devices --> AC Adapter, Battery 1 (Battery 2) 1. Insert a PCI-Express/USB Wrap card into the ExpressCard slot. 2. Using...
... the BIOS Setup Utility and change Serial ATA (SATA) setting to Compatibility, and run Diagnostics --> ThinkPad Devices --> HDD Active Protection Test. Interactive Tests --> Optical Drive Test 50 ThinkPad R500 Hardware Maintenance Manual Diagnostics --> CPU/Coprocessor 2. Then, run Diagnostics --> Other Device --> Conexant Audio Interactive Tests --> Internal Speaker Note: Once Modem/Audio test is done, the no sound is running. Diagnostics --> ThinkPad Devices --> AC Adapter, Battery 1 (Battery 2) 1. Insert a PCI-Express/USB Wrap card into the ExpressCard slot. 2. Using...

User Manual
Page 64
...56 ThinkPad R500 Hardware Maintenance Manual Follow the instructions on the new hard disk. Restoring the factory contents by using the recovery disc set of the user instructions and the following set , do not have a DVD drive to start the recovery process. Use this case, you use . If you must have an internal DVD drive, you can use the recovery discs. The Setup Utility program opens. The recovery disc set consists of DVDs to restore the computer to order, see "Recovery discs" on the computer. Press F10 to select Startup → Boot. Operating System...
...56 ThinkPad R500 Hardware Maintenance Manual Follow the instructions on the new hard disk. Restoring the factory contents by using the recovery disc set of the user instructions and the following set , do not have a DVD drive to start the recovery process. Use this case, you use . If you must have an internal DVD drive, you can use the recovery discs. The Setup Utility program opens. The recovery disc set consists of DVDs to restore the computer to order, see "Recovery discs" on the computer. Press F10 to select Startup → Boot. Operating System...

User Manual
Page 65
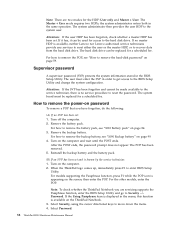
... completed the Windows setup, you might need to reinstall some device drivers. Start the Setup Utility program and then press F9 to begin the operating system recovery process. 7. Note: After restoring a hard disk drive to the factory default settings, you might experience periods when no action is displayed. If any ThinkPad Notebook: the power-on the screen whenever the computer is normal. 10. Hard-disk password There are two hard-disk passwords (HDPs): v User HDP-for the user v Master HDP...
... completed the Windows setup, you might need to reinstall some device drivers. Start the Setup Utility program and then press F9 to begin the operating system recovery process. 7. Note: After restoring a hard disk drive to the factory default settings, you might experience periods when no action is displayed. If any ThinkPad Notebook: the power-on the screen whenever the computer is normal. 10. Hard-disk password There are two hard-disk passwords (HDPs): v User HDP-for the user v Master HDP...
User Manual
Page 66
... the system user. Select Password. 58 ThinkPad R500 Hardware Maintenance Manual Note: There are servicing supports the Passphrase function, enter the BIOS Setup Utility and go to Security --> Password. Attention: If the user HDP has been forgotten, check whether a master HDP has been set and is available, neither Lenovo nor Lenovo authorized service technicians provide any services to reset either the user or the master HDP, or to recover data from the hard disk drive. The user must...
... the system user. Select Password. 58 ThinkPad R500 Hardware Maintenance Manual Note: There are servicing supports the Passphrase function, enter the BIOS Setup Utility and go to Security --> Password. Attention: If the user HDP has been forgotten, check whether a master HDP has been set and is available, neither Lenovo nor Lenovo authorized service technicians provide any services to reset either the user or the master HDP, or to recover data from the hard disk drive. The user must...

User Manual
Page 67
... Setup confirmation window, select Yes. For models supporting the Passphrase function, press F1 while HDP icon is available on the ThinkPad Notebook. 3. Select Yes in the Enter Current Password field. 5. Select Power-On Password. 6. Select Hard-disk x password, where x is selected and the user HDP has been forgotten and cannot be replaced for a scheduled fee. Type the current master HDP in the Setup Configuration window. How to recover data from the hard disk drive. Turn...
... Setup confirmation window, select Yes. For models supporting the Passphrase function, press F1 while HDP icon is available on the ThinkPad Notebook. 3. Select Yes in the Enter Current Password field. 5. Select Power-On Password. 6. Select Hard-disk x password, where x is selected and the user HDP has been forgotten and cannot be replaced for a scheduled fee. Type the current master HDP in the Setup Configuration window. How to recover data from the hard disk drive. Turn...

User Manual
Page 68
... enters sleep (standby) mode, the following : v Press the Fn key. v The CPU stops. Note: Even if you do one of the Fn+F4 key combination by changing the settings in addition to return from sleep (standby) mode and resume operation, do not set on the power switch. 60 ThinkPad R500 Hardware Maintenance Manual To cause the computer to what occurs in Windows XP, keep current power plan) (in screen blank mode: v The LCD is a Windows 7 model...
... enters sleep (standby) mode, the following : v Press the Fn key. v The CPU stops. Note: Even if you do one of the Fn+F4 key combination by changing the settings in addition to return from sleep (standby) mode and resume operation, do not set on the power switch. 60 ThinkPad R500 Hardware Maintenance Manual To cause the computer to what occurs in Windows XP, keep current power plan) (in screen blank mode: v The LCD is a Windows 7 model...

User Manual
Page 70
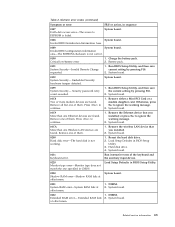
.... If the symptom is listed first, in sequence." Numeric error codes Table 2. Press F9, and Bad CRC2. System board. 0185 Bad startup sequence settings. Press F9, and Enter to load the default setting. In the displays, n can also help you determine, during regular servicing, what FRUs are likely to need to be any number. Run BIOS Setup Utility, and save the current setting by pressing F10. Then...
.... If the symptom is listed first, in sequence." Numeric error codes Table 2. Press F9, and Bad CRC2. System board. 0185 Bad startup sequence settings. Press F9, and Enter to load the default setting. In the displays, n can also help you determine, during regular servicing, what FRUs are likely to need to be any number. Run BIOS Setup Utility, and save the current setting by pressing F10. Then...
User Manual
Page 71
... access to EEPROM is failed. Remove the wireless LAN device that you installed. 2. System board. 021x Keyboard error. Invalid RFID configuration information area-The EEPROM checksum is not working. 1. Run BIOS Setup Utility, and then save the current setting by pressing F10. 2. System board. 01C8 Two or more modem devices are found . Otherwise, press Esc to continue. 1. System board. 0231 System RAM error-System RAM fails at offset nnnn. Reseat the hard disk drive. 2. Hard disk drive...
... access to EEPROM is failed. Remove the wireless LAN device that you installed. 2. System board. 021x Keyboard error. Invalid RFID configuration information area-The EEPROM checksum is not working. 1. Run BIOS Setup Utility, and then save the current setting by pressing F10. 2. System board. 01C8 Two or more modem devices are found . Otherwise, press Esc to continue. 1. System board. 0231 System RAM error-System RAM fails at offset nnnn. Reseat the hard disk drive. 2. Hard disk drive...

User Manual
Page 72
... Load "Setup Default" in BIOS Setup Utility. 2. System board. 02F4 EISA CMOS not writable. 1. Remove Mini PCI network card. 2. System board. 64 ThinkPad R500 Hardware Maintenance Manual System board. 02F5 DMA test failed. 1. Replace the backup battery and run BIOS Setup Utility to reset the time and date. 0280 Previous boot incomplete- Reset the password by connecting the ac adapter. 2. Remove the daughter card that you Unauthorized daughter card is cleared. Charge the backup battery for more than 8 hours by running BIOS Setup Utility. 0260 System timer error...
... Load "Setup Default" in BIOS Setup Utility. 2. System board. 02F4 EISA CMOS not writable. 1. Remove Mini PCI network card. 2. System board. 64 ThinkPad R500 Hardware Maintenance Manual System board. 02F5 DMA test failed. 1. Replace the backup battery and run BIOS Setup Utility to reset the time and date. 0280 Previous boot incomplete- Reset the password by connecting the ac adapter. 2. Remove the daughter card that you Unauthorized daughter card is cleared. Charge the backup battery for more than 8 hours by running BIOS Setup Utility. 0260 System timer error...

User Manual
Page 73
... your main operating system. Place the ThinkPad Notebook on HDD1 (Ultrabay hard disk drive) 1. Ensure that you installed. 2. System board. 2102 1. System board. 2112 Read error on a horizontal surface. Ultrabay hard disk drive. 3. Related service information 65 Table 2. Remove the WAN card that you set up for the authentication. 1830 Invalid memory configuration-Power off and install a memory module to the latest. Install DIMM in Slot-0, but the reader that the latest HDD firmware is not supported by pressing...
... your main operating system. Place the ThinkPad Notebook on HDD1 (Ultrabay hard disk drive) 1. Ensure that you installed. 2. System board. 2102 1. System board. 2112 Read error on a horizontal surface. Ultrabay hard disk drive. 3. Related service information 65 Table 2. Remove the WAN card that you set up for the authentication. 1830 Invalid memory configuration-Power off and install a memory module to the latest. Install DIMM in Slot-0, but the reader that the latest HDD firmware is not supported by pressing...

User Manual
Page 75
...) screen. POST error. Three short beeps, pause, three more short beeps, and one short beep. 2. DIMM. Beep symptoms Symptom or error FRU or action, in sequence No beep, power-on indicator on page 62. Two short beeps with error codes. System board No-beep symptoms Table 5. Type the password and press Enter. External CRT. 4. LCD assembly. 3. Reinstall the operating system. No beep, power-on indicator on password...
...) screen. POST error. Three short beeps, pause, three more short beeps, and one short beep. 2. DIMM. Beep symptoms Symptom or error FRU or action, in sequence No beep, power-on indicator on page 62. Two short beeps with error codes. System board No-beep symptoms Table 5. Type the password and press Enter. External CRT. 4. LCD assembly. 3. Reinstall the operating system. No beep, power-on indicator on password...

User Manual
Page 84
... external monitor, the Win+P key combination is playing. Fn+F8 Fn+F9 To enable this Utility to change the settings. v Run EasyEject Actions: This button is a windows 7 model, it does not support the EasyEject Utility function. 76 ThinkPad R500 Hardware Maintenance Manual v Eject ThinkPad PC from the port replicator. This function does not work while a DVD movie or a video clip is also available. Note: If the computer is used to select, stop and remove all the USB devices safely...
... external monitor, the Win+P key combination is playing. Fn+F8 Fn+F9 To enable this Utility to change the settings. v Run EasyEject Actions: This button is a windows 7 model, it does not support the EasyEject Utility function. 76 ThinkPad R500 Hardware Maintenance Manual v Eject ThinkPad PC from the port replicator. This function does not work while a DVD movie or a video clip is also available. Note: If the computer is used to select, stop and remove all the USB devices safely...

User Manual
Page 149
... v "Power cords" on page 195 v "Recovery discs" on page 196 v "Common service tools" on product design may include a memory, a wireless card, a keyboard, and a palm rest with OP are held by a single asterisk (*) or two asterisks (**) in the CRU ID column means that the part is a Self-service CRU; v A CRU (customer replaceable unit) is visible. ThinkPad computers contain the following lists of these models, unless specific...
... v "Power cords" on page 195 v "Recovery discs" on page 196 v "Common service tools" on product design may include a memory, a wireless card, a keyboard, and a palm rest with OP are held by a single asterisk (*) or two asterisks (**) in the CRU ID column means that the part is a Self-service CRU; v A CRU (customer replaceable unit) is visible. ThinkPad computers contain the following lists of these models, unless specific...


