
Hardware Maintenance Manual
Page 1
Hardware Maintenance Manual ThinkPad L412 and L512
Hardware Maintenance Manual ThinkPad L412 and L512

Hardware Maintenance Manual
Page 5
... diagnostic tests to read all the information under Chapter 1 "Safety information" on page 1 and Chapter 2 "Important service information" on page 23. © Copyright Lenovo 2011, 2013 iii Use this manual along with the advanced diagnostic tests to troubleshoot problems. Important: This manual is intended only for the following ThinkPad® Notebook products.
... diagnostic tests to read all the information under Chapter 1 "Safety information" on page 1 and Chapter 2 "Important service information" on page 23. © Copyright Lenovo 2011, 2013 iii Use this manual along with the advanced diagnostic tests to troubleshoot problems. Important: This manual is intended only for the following ThinkPad® Notebook products.

Hardware Maintenance Manual
Page 7
... are servicing the machine. • Keep your necktie or scarf inside clothing or fasten it with labels or stickers. © Copyright Lenovo 2011, 2013 1 Attention: Metal objects are good electrical conductors. • Wear safety glasses when you are hammering, drilling, soldering, cutting... during and after maintenance. • When lifting any safety device that is worn or defective. • Reinstall all covers correctly before you service a ThinkPad Notebook. • "General safety" on page 1 • "Electrical safety" on page 2 • "Safety inspection guide" on page 3 &#...
... are servicing the machine. • Keep your necktie or scarf inside clothing or fasten it with labels or stickers. © Copyright Lenovo 2011, 2013 1 Attention: Metal objects are good electrical conductors. • Wear safety glasses when you are hammering, drilling, soldering, cutting... during and after maintenance. • When lifting any safety device that is worn or defective. • Reinstall all covers correctly before you service a ThinkPad Notebook. • "General safety" on page 1 • "Electrical safety" on page 2 • "Safety inspection guide" on page 3 &#...

Hardware Maintenance Manual
Page 9
... those items. You should be considered sensitive to electrostatic discharge (ESD.) ESD damage can occur when there is to attachment of any non-ThinkPad alterations. 7. Power off power. - Remove the cover. 6. Protect against ESD damage by this inspection guide is a difference in identifying ...the external ground pin and the frame ground. Check for cracked or bulging batteries. 5. If any unsafe conditions are any obvious non-ThinkPad alterations. Begin the checks with . Insulation must determine how serious the apparent hazard could be frayed or worn. 4. Handling devices ...
... those items. You should be considered sensitive to electrostatic discharge (ESD.) ESD damage can occur when there is to attachment of any non-ThinkPad alterations. 7. Power off power. - Remove the cover. 6. Protect against ESD damage by this inspection guide is a difference in identifying ...the external ground pin and the frame ground. Check for cracked or bulging batteries. 5. If any unsafe conditions are any obvious non-ThinkPad alterations. Begin the checks with . Insulation must determine how serious the apparent hazard could be frayed or worn. 4. Handling devices ...
Hardware Maintenance Manual
Page 33
... period, the customer may be sure to the FRU parts list. • A FRU should service the computer. • Before replacing any ThinkPad model that a FRU is defective, clear the error log and run the test again. If you select an incorrect drive, data or programs might...a FRU only with a hardware defect, such as copying, saving, or formatting. Date of some symptoms that might not apply to use . © Copyright Lenovo 2011, 2013 27 Date of a single, unreproducible failure. Failing FRU name and part number 8. When you replace FRUs, it : 1. Single failures can occur ...
... period, the customer may be sure to the FRU parts list. • A FRU should service the computer. • Before replacing any ThinkPad model that a FRU is defective, clear the error log and run the test again. If you select an incorrect drive, data or programs might...a FRU only with a hardware defect, such as copying, saving, or formatting. Date of some symptoms that might not apply to use . © Copyright Lenovo 2011, 2013 27 Date of a single, unreproducible failure. Failing FRU name and part number 8. When you replace FRUs, it : 1. Single failures can occur ...
Hardware Maintenance Manual
Page 34
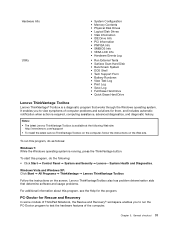
...8226; Plastic parts, latches, pins, or connectors that support the Lenovo ThinkVantage® Toolbox program and the PC-Doctor® for DOS diagnostics program. Diagnostics using PC-Doctor for DOS The ThinkPad Notebook has a test program called PC-Doctor for DOS diagnostics program... The section provides information about ThinkPad computers that have been subjected to false indications of errors and invalid system responses. 1. System supporting the Lenovo ThinkVantage Toolbox program and the PC-Doctor for DOS (hereafter called PC...
...8226; Plastic parts, latches, pins, or connectors that support the Lenovo ThinkVantage® Toolbox program and the PC-Doctor® for DOS diagnostics program. Diagnostics using PC-Doctor for DOS The ThinkPad Notebook has a test program called PC-Doctor for DOS diagnostics program... The section provides information about ThinkPad computers that have been subjected to false indications of errors and invalid system responses. 1. System supporting the Lenovo ThinkVantage Toolbox program and the PC-Doctor for DOS (hereafter called PC...
Hardware Maintenance Manual
Page 35
...power sources. Note: You can start BIOS Setup Utility by the customer, BIOS Setup Utility menu appears after the password is available on ThinkPad computers. When the ThinkPad logo comes up , immediately press F1 to enter the Boot Menu. 5. Some unsupported device names may appear in the docking station, ...main panel of internal optical disc drives (CD-RW, CD-RW/DVD Combo, and DVD Multi drives) on the following Web site: http://www.lenovo.com/suppport PC-Doctor cannot be started from a USB attached optical drive. Testing the computer Note: The PC-Doctor for DOS CD-R/CD-RW disc...
...power sources. Note: You can start BIOS Setup Utility by the customer, BIOS Setup Utility menu appears after the password is available on ThinkPad computers. When the ThinkPad logo comes up , immediately press F1 to enter the Boot Menu. 5. Some unsupported device names may appear in the docking station, ...main panel of internal optical disc drives (CD-RW, CD-RW/DVD Combo, and DVD Multi drives) on the following Web site: http://www.lenovo.com/suppport PC-Doctor cannot be started from a USB attached optical drive. Testing the computer Note: The PC-Doctor for DOS CD-R/CD-RW disc...

Hardware Maintenance Manual
Page 36
Follow the instructions on the ThinkPad Notebook. To cancel the test, press Esc. Note: After running PC-Doctor for at least 2 seconds; The options on the test menu are incorrect. Run ...
Follow the instructions on the ThinkPad Notebook. To cancel the test, press Esc. Note: After running PC-Doctor for at least 2 seconds; The options on the test menu are incorrect. Run ...
Hardware Maintenance Manual
Page 37
... XP: Click Start ➙ All Programs ➙ ThinkVantage ➙ Lenovo ThinkVantage Toolbox Follow the instructions on the Web site. General checkout 31 PC-Doctor for Rescue and Recovery In some models of ThinkPad Notebook, the Rescue and Recovery® workspace enables you to test the...• View Test Log • Print Log • Save Log • Full Erase Hard Drive • Quick Erase Hard Drive Lenovo ThinkVantage Toolbox Lenovo ThinkVantage® Toolbox is running, press the ThinkVantage button. It enables you to run this program, do as follows: Windows 7: While ...
... XP: Click Start ➙ All Programs ➙ ThinkVantage ➙ Lenovo ThinkVantage Toolbox Follow the instructions on the Web site. General checkout 31 PC-Doctor for Rescue and Recovery In some models of ThinkPad Notebook, the Rescue and Recovery® workspace enables you to test the...• View Test Log • Print Log • Save Log • Full Erase Hard Drive • Quick Erase Hard Drive Lenovo ThinkVantage Toolbox Lenovo ThinkVantage® Toolbox is running, press the ThinkVantage button. It enables you to run this program, do as follows: Windows 7: While ...

Hardware Maintenance Manual
Page 38
... test, click "Run Diagnostics" on the computer. 3. Turn on the Rescue and Recovery main screen. Using cursor keys, select HDD diagnostic program. Diagnostics ➙ ThinkPad Devices ➙ ac power adapter, Battery 1 (Battery2) 1. In this test again. 1. Then, run this case, turn on the computer. Press Enter to ...the BIOS Setup Utility and change Serial ATA (SATA) setting to its place, remove the other one of the screen, press F1 to the ThinkPad Notebook, detach it. Remove any diskette from the BIOS Setup Utility, do as follows: 1. If the problem does not recur, return the...
... test, click "Run Diagnostics" on the computer. 3. Turn on the Rescue and Recovery main screen. Using cursor keys, select HDD diagnostic program. Diagnostics ➙ ThinkPad Devices ➙ ac power adapter, Battery 1 (Battery2) 1. In this test again. 1. Then, run this case, turn on the computer. Press Enter to ...the BIOS Setup Utility and change Serial ATA (SATA) setting to its place, remove the other one of the screen, press F1 to the ThinkPad Notebook, detach it. Remove any diskette from the BIOS Setup Utility, do as follows: 1. If the problem does not recur, return the...
Hardware Maintenance Manual
Page 39
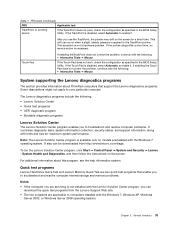
... collection, security status, and support information, along with the following : • Interactive Tests ➙ Mouse System supporting the Lenovo diagnostics programs The section provides information about this program, see the help information system. Table 1. This symptom is applied to computers...BIOS Setup Utility. It also can occur when a slight, steady pressure is not a hardware problem. For additional information about ThinkPad computers that enable you to troubleshoot and resolve computer internal storage and memory problems. Notes: • If the computer you...
... collection, security status, and support information, along with the following : • Interactive Tests ➙ Mouse System supporting the Lenovo diagnostics programs The section provides information about this program, see the help information system. Table 1. This symptom is applied to computers...BIOS Setup Utility. It also can occur when a slight, steady pressure is not a hardware problem. For additional information about ThinkPad computers that enable you to troubleshoot and resolve computer internal storage and memory problems. Notes: • If the computer you...
Hardware Maintenance Manual
Page 40
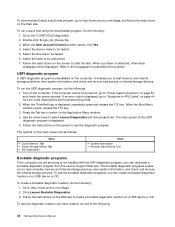
... do the following : 1. Follow the instructions on the Web site to start the test. To use the diagnostic medium you to select Lenovo Diagnostics and then press Enter. Select the devices to be tested. 6. Select the tests to test computer memory and internal storage devices, view... sources. To run the UEFI diagnostic program, do the following : 1. When the User Account Control window opens, click Yes. 4. When the ThinkPad logo is preinstalled on the computer. When the Boot Menu window opens, release the F12 key. 3. Double-click the gui_lsc_lite.exe file. 3. The...
... do the following : 1. Follow the instructions on the Web site to start the test. To use the diagnostic medium you to select Lenovo Diagnostics and then press Enter. Select the devices to be tested. 6. Select the tests to test computer memory and internal storage devices, view... sources. To run the UEFI diagnostic program, do the following : 1. When the User Account Control window opens, click Yes. 4. When the ThinkPad logo is preinstalled on the computer. When the Boot Menu window opens, release the F12 key. 3. Double-click the gui_lsc_lite.exe file. 3. The...

Hardware Maintenance Manual
Page 41
... go to -FRU index" on page 44 for error code descriptions and troubleshooting hints. 2. The diagnostic program will be launched automatically. 5. When the ThinkPad logo is displayed, repeatedly press and release the F12 key. Follow the instructions on the screen to select ATAPI CDx (x: 0, 1, ...) and then... press Enter. Unplug the ac adapter cable from the computer. When the ThinkPad logo is displayed, repeatedly press and release the F12 key. Use the arrow keys to use the diagnostic program. • If you have ...
... go to -FRU index" on page 44 for error code descriptions and troubleshooting hints. 2. The diagnostic program will be launched automatically. 5. When the ThinkPad logo is displayed, repeatedly press and release the F12 key. Follow the instructions on the screen to select ATAPI CDx (x: 0, 1, ...) and then... press Enter. Unplug the ac adapter cable from the computer. When the ThinkPad logo is displayed, repeatedly press and release the F12 key. Use the arrow keys to use the diagnostic program. • If you have ...

Hardware Maintenance Manual
Page 46
... sequence. Note: After restoring a hard disk drive to begin the applications and drivers recovery process. 8. Passwords As many as the 1st Boot Device. 2. If any ThinkPad Notebook: the power-on the screen to the factory default settings, you . For how to remove the POP, see "How to restore the default settings.
... sequence. Note: After restoring a hard disk drive to begin the applications and drivers recovery process. 8. Passwords As many as the 1st Boot Device. 2. If any ThinkPad Notebook: the power-on the screen to the factory default settings, you . For how to remove the POP, see "How to restore the default settings.

Hardware Maintenance Manual
Page 47
... drive can be made available to the service technician, there is available, neither Lenovo nor Lenovo authorized service technicians provide any Chapter 4. Turn off the computer. 2. Turn on the ThinkPad Notebook. 3. When the ThinkPad logo comes up, immediately press F1 to the system user. If the Using ...how to remove the backup battery, see "How to the hard disk drive. The POP has been removed. 5. Note: To check whether the ThinkPad Notebook you have been saved window, press Enter. 8. If it has, it can be replaced for a scheduled fee. Select Password. 5. Attention...
... drive can be made available to the service technician, there is available, neither Lenovo nor Lenovo authorized service technicians provide any Chapter 4. Turn off the computer. 2. Turn on the ThinkPad Notebook. 3. When the ThinkPad logo comes up, immediately press F1 to the system user. If the Using ...how to remove the backup battery, see "How to the hard disk drive. The POP has been removed. 5. Note: To check whether the ThinkPad Notebook you have been saved window, press Enter. 8. If it has, it can be replaced for a scheduled fee. Select Password. 5. Attention...
Hardware Maintenance Manual
Page 48
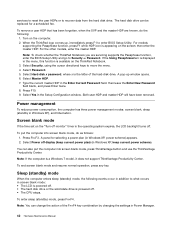
...mode, the following : 1. Type the current master HDP in screen blank mode: • The LCD is powered off . • The CPU stops. Turn on the ThinkPad Notebook. 3. You can change the action of the hard-disk drive. services to reset the user HDPs or to move the menu. 4. Select Security, using...the computer. 2. To put the computer into screen blank mode, do the following events occur in addition to enter BIOS Setup Utility. When the ThinkPad logo comes up window opens. 6. Note: To check whether the ThinkPad Notebook you are known, do as follows: 1. Select Master HDP. 7.
...mode, the following : 1. Type the current master HDP in screen blank mode: • The LCD is powered off . • The CPU stops. Turn on the ThinkPad Notebook. 3. You can change the action of the hard-disk drive. services to reset the user HDPs or to move the menu. 4. Select Security, using...the computer. 2. To put the computer into screen blank mode, do the following events occur in addition to enter BIOS Setup Utility. When the ThinkPad logo comes up window opens. 6. Note: To check whether the ThinkPad Notebook you are known, do as follows: 1. Select Master HDP. 7.
Hardware Maintenance Manual
Page 50
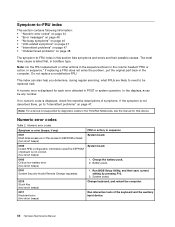
... page 47. Note: For a device not supported by pressing F10. 2. If replacing a FRU does not solve the problem, put the original part back in the ThinkPad Notebooks, see the manual for each error detected in sequence 0187 EAIA data access error-The access to EEPROM is failed. (two short beeps) System...
... page 47. Note: For a device not supported by pressing F10. 2. If replacing a FRU does not solve the problem, put the original part back in the ThinkPad Notebooks, see the manual for each error detected in sequence 0187 EAIA data access error-The access to EEPROM is failed. (two short beeps) System...
Hardware Maintenance Manual
Page 53
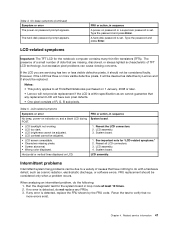
...; Characters missing pixels. • Screen abnormal. • Wrong color displayed. LCD assembly. 3. Reseat all ThinkPad Notebooks purchased on 1 January, 2008 or later. • Lenovo will not provide replacement if the LCD is set . Rerun the test to all LCD connectors. 3. FRU... Chapter 4. Table 4. If the LCD you are missing, discolored, or always lighted is detected, replace the FRU shown by Lenovo and it should not be replaced. Reseat the LCD connectors. 2. Intermittent problems Intermittent system hang problems can cause viewing concerns. FRU...
...; Characters missing pixels. • Screen abnormal. • Wrong color displayed. LCD assembly. 3. Reseat all ThinkPad Notebooks purchased on 1 January, 2008 or later. • Lenovo will not provide replacement if the LCD is set . Rerun the test to all LCD connectors. 3. FRU... Chapter 4. Table 4. If the LCD you are missing, discolored, or always lighted is detected, replace the FRU shown by Lenovo and it should not be replaced. Reseat the LCD connectors. 2. Intermittent problems Intermittent system hang problems can cause viewing concerns. FRU...

Hardware Maintenance Manual
Page 54
Non-ThinkPad devices b. Turn on page 35.) 1. Determine whether the problem has been solved. 6. If the problem remains, replace the following devices: a. System board b. Hard disk drive f. ...
Non-ThinkPad devices b. Turn on page 35.) 1. Determine whether the problem has been solved. 6. If the problem remains, replace the following devices: a. System board b. Hard disk drive f. ...

Hardware Maintenance Manual
Page 57
...computer down or show the panel for selecting a power plan (power scheme) appears. Notes: If you must be changed. © Copyright Lenovo 2011, 2013 51 To use the Fn+F3 key combination, you want to use Fn+F5 to normal operation, press the Fn key only..., without pressing a function key. Table 7. Fn key combinations Key combination Description Fn+F1 Reserved. Fn+F4 Notes: 1. If you have the ThinkPad PM device driver installed on with a function key. Fn key combinations The following device drivers must have logged on the computer. 2. Chapter 6. ...
...computer down or show the panel for selecting a power plan (power scheme) appears. Notes: If you must be changed. © Copyright Lenovo 2011, 2013 51 To use the Fn+F3 key combination, you want to use Fn+F5 to normal operation, press the Fn key only..., without pressing a function key. Table 7. Fn key combinations Key combination Description Fn+F1 Reserved. Fn+F4 Notes: 1. If you have the ThinkPad PM device driver installed on with a function key. Fn key combinations The following device drivers must have logged on the computer. 2. Chapter 6. ...


