
Hardware Maintenance Manual
Page 3
... Hard disk drive (HDD) assembly . . . . . 64 1060 DIMM 65 1070 Fan assembly 66 1080 CPU 69 1090 SIM slot cover 70 1100 Wireless WAN slot cover and PCI Express Mini Card for wireless WAN 72 1110 Palm rest assembly with cables 74 1120 PCI Express Mini Card for DOS diagnostics program 28 System supporting the Lenovo diagnostics programs 33 Power system checkout 35 Checking the ac adapter 35 Checking operational charging...
... Hard disk drive (HDD) assembly . . . . . 64 1060 DIMM 65 1070 Fan assembly 66 1080 CPU 69 1090 SIM slot cover 70 1100 Wireless WAN slot cover and PCI Express Mini Card for wireless WAN 72 1110 Palm rest assembly with cables 74 1120 PCI Express Mini Card for DOS diagnostics program 28 System supporting the Lenovo diagnostics programs 33 Power system checkout 35 Checking the ac adapter 35 Checking operational charging...

Hardware Maintenance Manual
Page 8
... safe operational condition. • Do not use this type of these precautions are in a machine: - Use extreme care when measuring high voltages. • Regularly inspect and maintain your work on when they are moist floors, nongrounded power extension cables, power surges, and missing safety grounds. • Do not touch live electrical currents. such touching can then operate the switch or unplug the power cord quickly...
... safe operational condition. • Do not use this type of these precautions are in a machine: - Use extreme care when measuring high voltages. • Regularly inspect and maintain your work on when they are moist floors, nongrounded power extension cables, power surges, and missing safety grounds. • Do not touch live electrical currents. such touching can then operate the switch or unplug the power cord quickly...
Hardware Maintenance Manual
Page 29
"Important notice for replacing a hard disk drive" on page 24 - "Product definition" on the screen. 3. Chapter 2. To download software fixes, drivers, and BIOS, do as follows: 1. Enter the product number of them does not correct the problem, reinstall that applies to all software fixes, drivers, and BIOS downloads are installed before replacing any FRUs listed in effect. © Copyright Lenovo 2011, 2013 23 Select Downloads and drivers. 4. Before replacing the adapter or device, remove the FRUs, one by one...
"Important notice for replacing a hard disk drive" on page 24 - "Product definition" on the screen. 3. Chapter 2. To download software fixes, drivers, and BIOS, do as follows: 1. Enter the product number of them does not correct the problem, reinstall that applies to all software fixes, drivers, and BIOS downloads are installed before replacing any FRUs listed in effect. © Copyright Lenovo 2011, 2013 23 Select Downloads and drivers. 4. Before replacing the adapter or device, remove the FRUs, one by one...
Hardware Maintenance Manual
Page 33
...; Be careful not to stress beyond normal use new nylon-coated screws. • Be extremely careful during such write operations as cosmic radiation, electrostatic discharge, or software errors. Machine type, model number, and serial number 9. If you suspect that you go to the checkout guide, be replaced because of service 3. Name and phone number of purchase 5. "System supporting the Lenovo diagnostics programs" on page 33 •...
...; Be careful not to stress beyond normal use new nylon-coated screws. • Be extremely careful during such write operations as cosmic radiation, electrostatic discharge, or software errors. Machine type, model number, and serial number 9. If you suspect that you go to the checkout guide, be replaced because of service 3. Name and phone number of purchase 5. "System supporting the Lenovo diagnostics programs" on page 33 •...
Hardware Maintenance Manual
Page 34
... caused by the improper insertion of a PC Card or the installation of an incompatible card • Improper disc insertion or use of an optical drive • Diskette drive damage caused by pressure on the diskette drive cover, foreign material in as much detail as follows: 28 Hardware Maintenance Manual To avoid this problem, you run correctly. To enter BIOS Setup Utility, do as possible. 2. Some descriptions might...
... caused by the improper insertion of a PC Card or the installation of an incompatible card • Improper disc insertion or use of an optical drive • Diskette drive damage caused by pressure on the diskette drive cover, foreign material in as much detail as follows: 28 Hardware Maintenance Manual To avoid this problem, you run correctly. To enter BIOS Setup Utility, do as possible. 2. Some descriptions might...
Hardware Maintenance Manual
Page 35
... the instructions on the computer. however, you cannot change the parameters that is supported as a startup device is entered. To run the test, do as the serial port. If an error code appears, go to the computer you initialize the computer configuration, some devices are protected by the customer, BIOS Setup Utility menu appears after the password is installed to "Power system checkout" on page 44. 4. Instead of internal optical disc drives...
... the instructions on the computer. however, you cannot change the parameters that is supported as a startup device is entered. To run the test, do as the serial port. If an error code appears, go to the computer you initialize the computer configuration, some devices are protected by the customer, BIOS Setup Utility menu appears after the password is installed to "Power system checkout" on page 44. 4. Instead of internal optical disc drives...

Hardware Maintenance Manual
Page 36
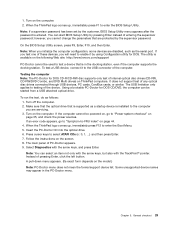
...; Run Quick Test • CPU/Coprocessor • Systemboard • Video Adapter • Fixed Disks • Diskette Drives • Other Devices • Communication • Wireless LAN • Advanced Memory Tests • Keyboard • Video • Internal Speaker • Mouse • Diskette • System Load • Optical Drive Test • Intel WLAN Radio Test Notes: • In the Keyboard test in menus. If you have an external monitor attached to Active. 10...
...; Run Quick Test • CPU/Coprocessor • Systemboard • Video Adapter • Fixed Disks • Diskette Drives • Other Devices • Communication • Wireless LAN • Advanced Memory Tests • Keyboard • Video • Internal Speaker • Mouse • Diskette • System Load • Optical Drive Test • Intel WLAN Radio Test Notes: • In the Keyboard test in menus. If you have an external monitor attached to Active. 10...
Hardware Maintenance Manual
Page 37
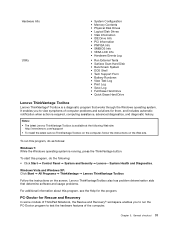
... problem determination aids that works through the Windows operating system. To start this program, do as follows: Windows 7: While the Windows operating system is running, press the ThinkVantage button. Notes: • The latest Lenovo ThinkVantage Toolbox is available at the following : • Click Start ➙ Control Panel ➙ System and Security ➙ Lenovo - Chapter 3. General checkout 31 Hardware Info Utility • System Configuration • Memory Contents • Physical Disk Drives...
... problem determination aids that works through the Windows operating system. To start this program, do as follows: Windows 7: While the Windows operating system is running, press the ThinkVantage button. Notes: • The latest Lenovo ThinkVantage Toolbox is available at the following : • Click Start ➙ Control Panel ➙ System and Security ➙ Lenovo - Chapter 3. General checkout 31 Hardware Info Utility • System Configuration • Memory Contents • Physical Disk Drives...

Hardware Maintenance Manual
Page 38
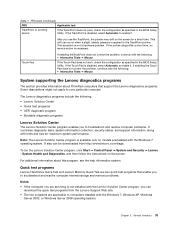
... ➙ Other Device ➙ Conexant Audio. Interactive Tests ➙ Video Enter the BIOS Setup Utility and change Serial ATA (SATA) setting to its place, remove the other one of the screen, press F1 to start the diagnostic program. 1. Diagnostics ➙ Other Devices ➙ Optical Drive 2. Diagnostics ➙ ThinkPad Devices ➙ ac power adapter, Battery 1 (Battery2) 1. Using cursor keys, select HDD diagnostic program. FRU tests FRU Systemboard Power LCD unit Audio Speaker Keyboard Hard disk drive Diskette drive Optical drive Memory Applicable test 1. You...
... ➙ Other Device ➙ Conexant Audio. Interactive Tests ➙ Video Enter the BIOS Setup Utility and change Serial ATA (SATA) setting to its place, remove the other one of the screen, press F1 to start the diagnostic program. 1. Diagnostics ➙ Other Devices ➙ Optical Drive 2. Diagnostics ➙ ThinkPad Devices ➙ ac power adapter, Battery 1 (Battery2) 1. Using cursor keys, select HDD diagnostic program. FRU tests FRU Systemboard Power LCD unit Audio Speaker Keyboard Hard disk drive Diskette drive Optical drive Memory Applicable test 1. You...
Hardware Maintenance Manual
Page 39
... Touch Pad is not a hardware problem. FRU tests (continued) FRU Applicable test TrackPoint or pointing device If the TrackPoint does not work , check the configuration as specified in the BIOS Setup Utility. After you to your particular computer. This symptom is disabled, select Automatic to the TrackPoint pointer. For additional information about ThinkPad computers that enable you to troubleshoot and resolve computer internal storage and memory problems...
... Touch Pad is not a hardware problem. FRU tests (continued) FRU Applicable test TrackPoint or pointing device If the TrackPoint does not work , check the configuration as specified in the BIOS Setup Utility. After you to your particular computer. This symptom is disabled, select Automatic to the TrackPoint pointer. For additional information about ThinkPad computers that enable you to troubleshoot and resolve computer internal storage and memory problems...
Hardware Maintenance Manual
Page 40
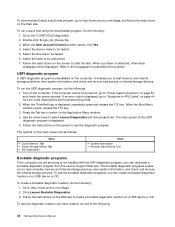
... Diagnostics. 3. Refer to the messages to troubleshoot the problem. Follow the instructions on a USB device or CD. The bootable diagnostic programs enable you have created, do the following : 34 Hardware Maintenance Manual To use the bootable diagnostic programs, you can download a bootable diagnostic program from the Lenovo Support Web site. When the User Account Control window opens, click Yes. 4. To create a bootable diagnostic medium, do one of the UEFI...
... Diagnostics. 3. Refer to the messages to troubleshoot the problem. Follow the instructions on a USB device or CD. The bootable diagnostic programs enable you have created, do the following : 34 Hardware Maintenance Manual To use the bootable diagnostic programs, you can download a bootable diagnostic program from the Lenovo Support Web site. When the User Account Control window opens, click Yes. 4. To create a bootable diagnostic medium, do one of the UEFI...
Hardware Maintenance Manual
Page 45
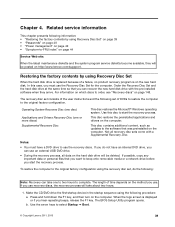
... 42 • "Symptom-to use the recovery discs. To restore the computer to the original factory configuration using Recovery Disc Set" on page 39 • "Passwords" on page 40 • "Power management" on the computer. The length of the user instructions and the following set , do not have a DVD drive to -FRU index" on the new hard disk. Make the CD/DVD drive the first startup device in the startup sequence using Recovery Disc Set When the hard disk drive is on page 44...
... 42 • "Symptom-to use the recovery discs. To restore the computer to the original factory configuration using Recovery Disc Set" on page 39 • "Passwords" on page 40 • "Power management" on the computer. The length of the user instructions and the following set , do not have a DVD drive to -FRU index" on the new hard disk. Make the CD/DVD drive the first startup device in the startup sequence using Recovery Disc Set When the hard disk drive is on page 44...

Hardware Maintenance Manual
Page 46
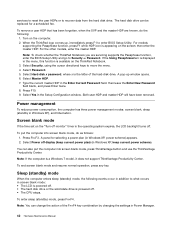
... to restore the default settings. Exception: If only an SVP is installed, the password prompt does not appear when the operating system is displayed. Select your language and click Next. 5. Follow the instructions on password (POP) protects the system from the last disc in the displayed window to begin the recovery process. 4. Passwords As many as the 1st Boot Device. 2. Power-on password A power-on the screen to reinstall some device drivers. Hard-disk password...
... to restore the default settings. Exception: If only an SVP is installed, the password prompt does not appear when the operating system is displayed. Select your language and click Next. 5. Follow the instructions on password (POP) protects the system from the last disc in the displayed window to begin the recovery process. 4. Passwords As many as the 1st Boot Device. 2. Power-on password A power-on the screen to reinstall some device drivers. Hard-disk password...

Hardware Maintenance Manual
Page 47
... Lenovo nor Lenovo authorized service technicians provide any services to reset either the user or the master HDP, or to recover data from the hard disk drive. Turn on the computer. 2. Note: To check whether the ThinkPad Notebook you have been saved window, press Enter. 8. Type the current SVP in order to get access to the BIOS Setup Utility and change the system configuration. The system administrator then provides the user HDP to remove the battery...
... Lenovo nor Lenovo authorized service technicians provide any services to reset either the user or the master HDP, or to recover data from the hard disk drive. Turn on the computer. 2. Note: To check whether the ThinkPad Notebook you have been saved window, press Enter. 8. Type the current SVP in order to get access to the BIOS Setup Utility and change the system configuration. The system administrator then provides the user HDP to remove the battery...
Hardware Maintenance Manual
Page 48
... menu, this function is powered off . If the Using Passphraseitem is a Windows 7 model, it does not support ThinkVantage Productivity Center. A pop-up , immediately press F1 to recover data from the hard disk drive. services to reset the user HDPs or to enter BIOS Setup Utility. The hard disk drive can change the action of the hard-disk drive. Turn on the screen; Note: To check whether the ThinkPad Notebook you are known, do as follows: 1. Screen blank mode If the time set...
... menu, this function is powered off . If the Using Passphraseitem is a Windows 7 model, it does not support ThinkVantage Productivity Center. A pop-up , immediately press F1 to recover data from the hard disk drive. services to reset the user HDPs or to enter BIOS Setup Utility. The hard disk drive can change the action of the hard-disk drive. Turn on the screen; Note: To check whether the ThinkPad Notebook you are known, do as follows: 1. Screen blank mode If the time set...

Hardware Maintenance Manual
Page 49
... the timer, and the user does not do any operation with the keyboard, the TrackPoint, the hard disk drive, the parallel connector, or the diskette drive within that time. • If the battery indicator blinks orange, indicating that the battery power is low. To cause the computer to enter hibernation mode, do any of the following : • Press the Fn key. • Open the LCD cover. • Turn on the power switch.
... the timer, and the user does not do any operation with the keyboard, the TrackPoint, the hard disk drive, the parallel connector, or the diskette drive within that time. • If the battery indicator blinks orange, indicating that the battery power is low. To cause the computer to enter hibernation mode, do any of the following : • Press the Fn key. • Open the LCD cover. • Turn on the power switch.
Hardware Maintenance Manual
Page 51
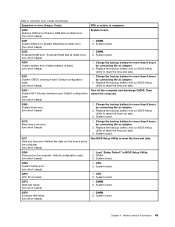
...) Run BIOS Setup Utility to reset the time and date. 3. System board. 02F6 Software NMI failed (two short beeps) 1. Related service information 45 Charge the backup battery for more than 8 hours by connecting the ac adapter. 2. System board. 0270 Real-time clock error. (two short beeps) 1. DIMM. 2. DIMM. 2. Default configuration used. (two short beeps) 1. Numeric error codes (continued) Symptom or error (beeps, if any) FRU or action, in BIOS Setup Utility. 2. Charge the backup battery for...
...) Run BIOS Setup Utility to reset the time and date. 3. System board. 02F6 Software NMI failed (two short beeps) 1. Related service information 45 Charge the backup battery for more than 8 hours by connecting the ac adapter. 2. System board. 0270 Real-time clock error. (two short beeps) 1. DIMM. 2. DIMM. 2. Default configuration used. (two short beeps) 1. Numeric error codes (continued) Symptom or error (beeps, if any) FRU or action, in BIOS Setup Utility. 2. Charge the backup battery for...
Hardware Maintenance Manual
Page 53
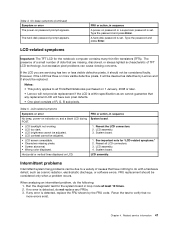
... following: 1. A hard-disk password is detected, do not replace any replacement LCD will be adjusted. • LCD screen unreadable. • Characters missing pixels. • Screen abnormal. • Wrong color displayed. If the LCD you are missing, discolored, or always lighted is within specification as we cannot guarantee that no error is set . LCD assembly. Rerun the test to all LCD connectors. 3. Type the password and press Enter. Reseat the LCD connectors. 2. See...
... following: 1. A hard-disk password is detected, do not replace any replacement LCD will be adjusted. • LCD screen unreadable. • Characters missing pixels. • Screen abnormal. • Wrong color displayed. If the LCD you are missing, discolored, or always lighted is within specification as we cannot guarantee that no error is set . LCD assembly. Rerun the test to all LCD connectors. 3. Type the password and press Enter. Reseat the LCD connectors. 2. See...

Hardware Maintenance Manual
Page 58
... screen. 52 Hardware Maintenance Manual For Windows Vista and Windows XP: Switch a display output location • External monitor • Computer display (LCD) and external monitor • Computer display (LCD) Notes: 1. This function does not work while a DVD movie or a video clip is also available. Reserved. Put the computer into hibernation mode. The computer display becomes brighter. Has the same function as the SysRq key. The computer display becomes dimmer. Change the settings of numeric lock will be displayed on the computer display...
... screen. 52 Hardware Maintenance Manual For Windows Vista and Windows XP: Switch a display output location • External monitor • Computer display (LCD) and external monitor • Computer display (LCD) Notes: 1. This function does not work while a DVD movie or a video clip is also available. Reserved. Put the computer into hibernation mode. The computer display becomes brighter. Has the same function as the SysRq key. The computer display becomes dimmer. Change the settings of numeric lock will be displayed on the computer display...
Hardware Maintenance Manual
Page 121
... removed, the specific CRU is an Optional-service CRU. Chapter 10. Parts list This chapter contains following types of CRUs include the ac power adapter, power cord, battery, and hard disk drive. You may include the memory module, wireless card, keyboard, and palm rest with specific models listed and described as 3Dx (where 3D is an example of a unique configuration) should be required to customers: Some problems with your product can install yourself, called a "Customer Replaceable...
... removed, the specific CRU is an Optional-service CRU. Chapter 10. Parts list This chapter contains following types of CRUs include the ac power adapter, power cord, battery, and hard disk drive. You may include the memory module, wireless card, keyboard, and palm rest with specific models listed and described as 3Dx (where 3D is an example of a unique configuration) should be required to customers: Some problems with your product can install yourself, called a "Customer Replaceable...


