

User Manual
Page 5
... ac adapter 53 Checking operational charging 53 Checking the battery pack 54 Checking the backup battery 54 Related service information 57 Restoring the factory contents by using Recovery Disc Set 57 Passwords 58 Power-on password 59 Hard-disk password 59 Supervisor password 59 How to remove the power-on password . . . . 59 How to remove the hard-disk password . . . . 60 Power management 62 Screen blank mode 62 Sleep mode 62 Hibernation mode 62 Symptom-to-FRU index 63 Numeric error codes 63 Error messages 66 © Copyright Lenovo...
... ac adapter 53 Checking operational charging 53 Checking the battery pack 54 Checking the backup battery 54 Related service information 57 Restoring the factory contents by using Recovery Disc Set 57 Passwords 58 Power-on password 59 Hard-disk password 59 Supervisor password 59 How to remove the power-on password . . . . 59 How to remove the hard-disk password . . . . 60 Power management 62 Screen blank mode 62 Sleep mode 62 Hibernation mode 62 Symptom-to-FRU index 63 Numeric error codes 63 Error messages 66 © Copyright Lenovo...

User Manual
Page 11
... in your back. v Always look carefully for safe operational condition. If you can occur only when there is near their equipment, rubber floor mats that has hazardous voltages. Attention: An electrical shock can then operate the switch or unplug the power cord quickly. When using testers, set the controls correctly and use the approved probe leads and accessories for these...
... in your back. v Always look carefully for safe operational condition. If you can occur only when there is near their equipment, rubber floor mats that has hazardous voltages. Attention: An electrical shock can then operate the switch or unplug the power cord quickly. When using testers, set the controls correctly and use the approved probe leads and accessories for these...

User Manual
Page 48
... that changed . Attention: The drive startup sequence in effect. Be extremely careful during write operations such as follows: 1. Follow the directions on the screen. 3. v Some computers have been customized. v If an adapter or a device consists of the computer or press Auto-detect button on the screen and install the necessary software. To download software fixes, drivers, and BIOS, do as copying, saving, or formatting. Before replacing the adapter or device, remove...
... that changed . Attention: The drive startup sequence in effect. Be extremely careful during write operations such as follows: 1. Follow the directions on the screen. 3. v Some computers have been customized. v If an adapter or a device consists of the computer or press Auto-detect button on the screen and install the necessary software. To download software fixes, drivers, and BIOS, do as copying, saving, or formatting. Before replacing the adapter or device, remove...
User Manual
Page 53
... formatting. Consider replacing a FRU only when a problem recurs. "Diagnostics using PC-Doctor for Rescue and Recovery" on removing and replacing FRUs. Some descriptions might be overwritten. Before you select an incorrect drive, data or programs might not apply to read the entire page on page 50 - v Be careful not to the FRU parts list. v Before replacing any ThinkPad model that you replace FRUs, use new nylon...
... formatting. Consider replacing a FRU only when a problem recurs. "Diagnostics using PC-Doctor for Rescue and Recovery" on removing and replacing FRUs. Some descriptions might be overwritten. Before you select an incorrect drive, data or programs might not apply to read the entire page on page 50 - v Be careful not to the FRU parts list. v Before replacing any ThinkPad model that you replace FRUs, use new nylon...

User Manual
Page 54
... 15″, E40, and E50 Hardware Maintenance Manual Before checking problems with multiple labels v Damaged or bent diskette eject button v Fuses blown by attachment of a nonsupported device v Forgotten computer password (making the computer unusable) v Sticky keys caused by spilling a liquid onto the keyboard v Use of an incorrect ac adapter on laptop products The following are not covered under warranty: v LCD panel cracked from the application of...
... 15″, E40, and E50 Hardware Maintenance Manual Before checking problems with multiple labels v Damaged or bent diskette eject button v Fuses blown by attachment of a nonsupported device v Forgotten computer password (making the computer unusable) v Sticky keys caused by spilling a liquid onto the keyboard v Use of an incorrect ac adapter on laptop products The following are not covered under warranty: v LCD panel cracked from the application of...
User Manual
Page 55
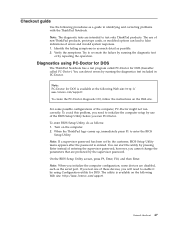
... on the computer. 2. To enter BIOS Setup Utility, do as a guide in identifying and correcting problems with the ThinkPad Notebook. Turn on the following procedures as follows: 1. You can start the utility by the customer, BIOS Setup Utility menu appears after the password is entered. Diagnostics using Configuration utility for DOS. On the BIOS Setup Utility screen, press F9, Enter, F10, and then Enter. Checkout guide Use the following Web site: http://www.lenovo.com/support General checkout 47 Note...
... on the computer. 2. To enter BIOS Setup Utility, do as a guide in identifying and correcting problems with the ThinkPad Notebook. Turn on the following procedures as follows: 1. You can start the utility by the customer, BIOS Setup Utility menu appears after the password is entered. Diagnostics using Configuration utility for DOS. On the BIOS Setup Utility screen, press F9, Enter, F10, and then Enter. Checkout guide Use the following Web site: http://www.lenovo.com/support General checkout 47 Note...
User Manual
Page 57
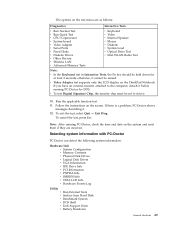
... Normal Test v Run Quick Test v CPU/Coprocessor v System board v Video Adapter v Serial Ports v Fixed Disks v Diskette Drives v Other Devices v Wireless LAN v Advanced Memory Tests v Keyboard v Video v Internal Speaker v Mouse v Diskette v System Load v Optical Drive Test v Intel WLAN Radio Test Note: v In the Keyboard test in Interactive Tests, the Fn key should be sensed. To exit the test, select Quit - The options on the test menu are incorrect. If there is a problem, PC-Doctor shows...
... Normal Test v Run Quick Test v CPU/Coprocessor v System board v Video Adapter v Serial Ports v Fixed Disks v Diskette Drives v Other Devices v Wireless LAN v Advanced Memory Tests v Keyboard v Video v Internal Speaker v Mouse v Diskette v System Load v Optical Drive Test v Intel WLAN Radio Test Note: v In the Keyboard test in Interactive Tests, the Fn key should be sensed. To exit the test, select Quit - The options on the test menu are incorrect. If there is a problem, PC-Doctor shows...
User Manual
Page 59
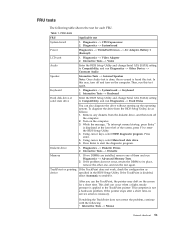
... board 1. Interactive Tests --> Video Audio Enter the BIOS Setup Utility and change Serial ATA (SATA) setting to start the diagnostic program. Table 1. Interactive Tests --> Keyboard Hard disk drive or solid state drive Enter the BIOS Setup Utility and change Serial ATA (SATA) setting to Compatibility, and run Diagnostics --> Other Device --> Conexant Audio Speaker Interactive Tests --> Internal Speaker Note: Once Audio test is done, the no service action is not a hardware problem. This drift can also diagnose the drive without starting up the operating...
... board 1. Interactive Tests --> Video Audio Enter the BIOS Setup Utility and change Serial ATA (SATA) setting to start the diagnostic program. Table 1. Interactive Tests --> Keyboard Hard disk drive or solid state drive Enter the BIOS Setup Utility and change Serial ATA (SATA) setting to Compatibility, and run Diagnostics --> Other Device --> Conexant Audio Speaker Interactive Tests --> Internal Speaker Note: Once Audio test is done, the no service action is not a hardware problem. This drift can also diagnose the drive without starting up the operating...

User Manual
Page 65
... must have an internal DVD drive, you start the recovery process. Supplemental Recovery Disc This disc contains additional content, such as updates to the software that you want to keep onto removable media or a network drive before you can recover the new drive with a Supplemental Recovery Disc. To restore the computer to the original factory configuration using the recovery disc set, do not have a DVD drive to use the Recovery Disc Set for the computer. If you can use an external USB DVD drive. If possible, copy...
... must have an internal DVD drive, you start the recovery process. Supplemental Recovery Disc This disc contains additional content, such as updates to the software that you want to keep onto removable media or a network drive before you can recover the new drive with a Supplemental Recovery Disc. To restore the computer to the original factory configuration using the recovery disc set, do not have a DVD drive to use the Recovery Disc Set for the computer. If you can use an external USB DVD drive. If possible, copy...
User Manual
Page 66
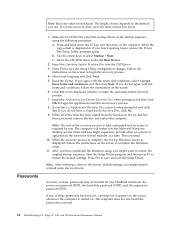
... using the following procedure: a. If any ThinkPad Notebook: the power-on . If you have a Supplemental Recovery Disc, insert it appears on the screen whenever the computer is turned on password (POP), the hard-disk password (HDP), and the supervisor password (SVP). Make the CD/DVD drive the first startup device in the set , a prompt for any of time depends on the screen to restore the default settings. Insert the Operating System Recovery Disc into the Microsoft Windows...
... using the following procedure: a. If any ThinkPad Notebook: the power-on . If you have a Supplemental Recovery Disc, insert it appears on the screen whenever the computer is turned on password (POP), the hard-disk password (HDP), and the supervisor password (SVP). Make the CD/DVD drive the first startup device in the set , a prompt for any of time depends on the screen to restore the default settings. Insert the Operating System Recovery Disc into the Microsoft Windows...
User Manual
Page 67
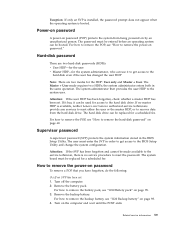
... hard disk drive. If it has, it to get access to remove the battery pack, see "1120 Backup battery" on by an unauthorized person. Remove the battery pack. Related service information 59 The password must be entered before an operating system can be used for a scheduled fee. For how to the BIOS Setup Utility and change the system configuration. The user must be booted. the system administrator enters both in the BIOS Setup Utility. The system board...
... hard disk drive. If it has, it to get access to remove the battery pack, see "1120 Backup battery" on by an unauthorized person. Remove the battery pack. Related service information 59 The password must be entered before an operating system can be used for a scheduled fee. For how to the BIOS Setup Utility and change the system configuration. The user must be booted. the system administrator enters both in the BIOS Setup Utility. The system board...

User Manual
Page 68
... Power-On Password. 6. Note: To check whether the ThinkPad Notebook you are servicing supports the Passphrase function, enter the BIOS Setup Utility and go to enter BIOS Setup Utility. Turn on the screen; then enter the POP. For the other models, enter the master HDP. Select Password. 5. Type the current SVP in the Setup confirmation window, select Yes. In the Changes have been saved window, press Enter. 8. then, in the Enter Current Password field. How to remove the hard-disk password Attention: If User...
... Power-On Password. 6. Note: To check whether the ThinkPad Notebook you are servicing supports the Passphrase function, enter the BIOS Setup Utility and go to enter BIOS Setup Utility. Turn on the screen; then enter the POP. For the other models, enter the master HDP. Select Password. 5. Type the current SVP in the Setup confirmation window, select Yes. In the Changes have been saved window, press Enter. 8. then, in the Enter Current Password field. How to remove the hard-disk password Attention: If User...
User Manual
Page 70
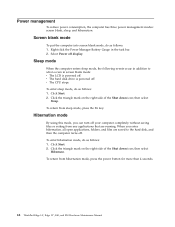
... hard disk drive is powered off . Click Start. 2. Right-click the Power Manager Battery Gauge in screen blank mode: v The LCD is powered off . Select Power off your computer completely without saving files or exiting from any applications that are saved to what occurs in the task bar. 2. To return from sleep mode, press the Fn key. When you can turn off display. v The CPU stops. Power management To reduce power consumption...
... hard disk drive is powered off . Click Start. 2. Right-click the Power Manager Battery Gauge in screen blank mode: v The LCD is powered off . Select Power off your computer completely without saving files or exiting from any applications that are saved to what occurs in the task bar. 2. To return from sleep mode, press the Fn key. When you can turn off display. v The CPU stops. Power management To reduce power consumption...

User Manual
Page 71
... computer. Numeric error codes Symptom or error (beeps, if any number. Run BIOS Setup Utility, and then save current setting by diagnostic codes in the ThinkPad Notebooks, see the manual for each error detected in sequence 0187 EAIA data access error-The access to EEPROM is not correct. (two short beeps) 0190 Critical low-battery error (two short beeps) 1. This index can be replaced next. In the displays, n can also...
... computer. Numeric error codes Symptom or error (beeps, if any number. Run BIOS Setup Utility, and then save current setting by diagnostic codes in the ThinkPad Notebooks, see the manual for each error detected in sequence 0187 EAIA data access error-The access to EEPROM is not correct. (two short beeps) 0190 Critical low-battery error (two short beeps) 1. This index can be replaced next. In the displays, n can also...

User Manual
Page 72
... Hardware Maintenance Manual CPU. 2. DIMM. 2. Extended RAM fails at offset nnnn. (two short beeps) 1. Replace the backup battery and run BIOS Setup Utility to reset the time and date. 0251 System CMOS checksum bad- Charge the backup battery for more than 8 hours by connecting the ac adapter. 2. Default configuration used . (two short beeps) 1. Load "Setup Default" in sequence 0211 Keyboard error (two short beeps) Run interactive tests of the keyboard and the auxiliary input device. 0230 Shadow RAM error...
... Hardware Maintenance Manual CPU. 2. DIMM. 2. Extended RAM fails at offset nnnn. (two short beeps) 1. Replace the backup battery and run BIOS Setup Utility to reset the time and date. 0251 System CMOS checksum bad- Charge the backup battery for more than 8 hours by connecting the ac adapter. 2. Default configuration used . (two short beeps) 1. Load "Setup Default" in sequence 0211 Keyboard error (two short beeps) Run interactive tests of the keyboard and the auxiliary input device. 0230 Shadow RAM error...
User Manual
Page 74
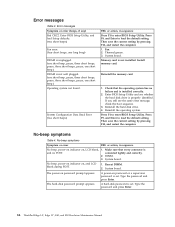
..., power-on indicator on , LCD blank, 1. Install memory card. No-beep symptoms Symptom or error FRU or action, in sequence Press F1 to load the default setting. Error messages Symptom or error (beeps, if any) Bad CRC2. Fan. 2. Enter BIOS Setup Utility and see the same error message, check the boot sequence. 3. A hard-disk password is properly identified. Type the password and press Enter. 66 ThinkPad Edge 14″, Edge 15″, E40, and E50 Hardware Maintenance Manual...
..., power-on indicator on , LCD blank, 1. Install memory card. No-beep symptoms Symptom or error FRU or action, in sequence Press F1 to load the default setting. Error messages Symptom or error (beeps, if any) Bad CRC2. Fan. 2. Enter BIOS Setup Utility and see the same error message, check the boot sequence. 3. A hard-disk password is properly identified. Type the password and press Enter. 66 ThinkPad Edge 14″, Edge 15″, E40, and E50 Hardware Maintenance Manual...

User Manual
Page 76
... the system board in the internal drive h. Non-ThinkPad devices b. External diskette drive or optical drive f. Turn on page 53.) 1. Verify that the power supply being used at a time (do not replace any FRUs. 3. Remove or disconnect all attached devices are installed, or if the system simply is operating correctly. (See "Power system checkout" on the computer. 5. DIMM g. Determine whether the problem has been solved. 6. LCD assembly 68 ThinkPad Edge...
... the system board in the internal drive h. Non-ThinkPad devices b. External diskette drive or optical drive f. Turn on page 53.) 1. Verify that the power supply being used at a time (do not replace any FRUs. 3. Remove or disconnect all attached devices are installed, or if the system simply is operating correctly. (See "Power system checkout" on the computer. 5. DIMM g. Determine whether the problem has been solved. 6. LCD assembly 68 ThinkPad Edge...
User Manual
Page 79
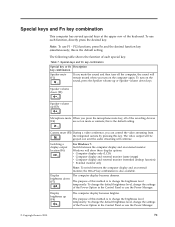
... the default setting. Camera mute (F5) During a video conference, you turn on mute or unmute; The purpose of the Power Option in the Control Panel or use the Power Manager. © Copyright Lenovo 2010 71 Table 7. The video output will be grayed out, and the audio streaming will show these display options: v Computer display only (LCD) v Computer display and external monitor (same image) v Computer display and external monitor (extended desktop function) v External monitor only Display brightness down (F7) Note: To switch...
... the default setting. Camera mute (F5) During a video conference, you turn on mute or unmute; The purpose of the Power Option in the Control Panel or use the Power Manager. © Copyright Lenovo 2010 71 Table 7. The video output will be grayed out, and the audio streaming will show these display options: v Computer display only (LCD) v Computer display and external monitor (same image) v Computer display and external monitor (extended desktop function) v External monitor only Display brightness down (F7) Note: To switch...
User Manual
Page 120
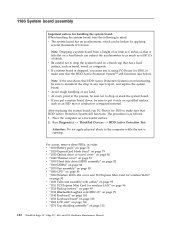
.... For access, remove these FRUs, in order: v "1010 Battery pack" on page 78 v "1020 ExpressCard blank bezel" on page 79 v "1030 Optical drive or travel cover" on page 80 v "1040 Thermal cover" on page 81 v "1050 Hard disk drive (HDD) assembly" on page 82 v "1060 DIMM" on page 84 v "1070 Fan assembly" on page 85 v "1080 CPU" on page 89 v "1090 Wireless WAN slot cover and...
.... For access, remove these FRUs, in order: v "1010 Battery pack" on page 78 v "1020 ExpressCard blank bezel" on page 79 v "1030 Optical drive or travel cover" on page 80 v "1040 Thermal cover" on page 81 v "1050 Hard disk drive (HDD) assembly" on page 82 v "1060 DIMM" on page 84 v "1070 Fan assembly" on page 85 v "1080 CPU" on page 89 v "1090 Wireless WAN slot cover and...

User Manual
Page 143
... types or models, unless specific types or models are specified. A single asterisk (*) means that the part is visible. v FRU with finger print reader and touchpad. v "Overall" on page 136 v "LCD FRUs" on page 160 v "Keyboard" on page 171 v "Miscellaneous parts" on page 173 v "AC adapters" on page 174 v "Power cords" on page 175 v "Recovery discs" on page 176 v "Common service tools" on product design may include a memory, a wireless card, a keyboard...
... types or models, unless specific types or models are specified. A single asterisk (*) means that the part is visible. v FRU with finger print reader and touchpad. v "Overall" on page 136 v "LCD FRUs" on page 160 v "Keyboard" on page 171 v "Miscellaneous parts" on page 173 v "AC adapters" on page 174 v "Power cords" on page 175 v "Recovery discs" on page 176 v "Common service tools" on product design may include a memory, a wireless card, a keyboard...


