
Lantronix SpiderDuo - Quick Start Guide
Page 3
SecureLinx Spider Duo QUICK START GUIDE CONTENTS Overview...2 What's In The Box...3 Installation and Network Settings 3-6 Spider Duo Web Configuration 7-9 Target Computer Setup 9-10 Client System Requirements 10 Connection to Target Computer and Basic Operation 11-12 Exit and Logout...13 Power Control Unit (PCU 13 Contact Information 15
SecureLinx Spider Duo QUICK START GUIDE CONTENTS Overview...2 What's In The Box...3 Installation and Network Settings 3-6 Spider Duo Web Configuration 7-9 Target Computer Setup 9-10 Client System Requirements 10 Connection to Target Computer and Basic Operation 11-12 Exit and Logout...13 Power Control Unit (PCU 13 Contact Information 15

Lantronix SpiderDuo - Quick Start Guide
Page 4
... both PS/2 and USB keyboard/mouse interfaces (software selectable), and one or more remote users. Typical Spider Duo Configuration This Quick Start Guide will step you through the hardware installation and . Quick Start Guide SecureLinx Spider Duo OVERVIEW SecureLinx Spider Duo The SecureLinx Spider Duo™ is a distributed KVM/IP device designed to plug directly into the target system's corresponding connector...
... both PS/2 and USB keyboard/mouse interfaces (software selectable), and one or more remote users. Typical Spider Duo Configuration This Quick Start Guide will step you through the hardware installation and . Quick Start Guide SecureLinx Spider Duo OVERVIEW SecureLinx Spider Duo The SecureLinx Spider Duo™ is a distributed KVM/IP device designed to plug directly into the target system's corresponding connector...

Lantronix SpiderDuo - Quick Start Guide
Page 8
..., n for the following features: -Initial IP configuration: "config". -Reset device: "reset". [172.18.100.17 spider]> 5. Quick Start Guide SecureLinx Spider Duo INSTALLATION AND NETWORK SETTINGS CONTINUED Welcome! Plug an Ethernet cable connected to enter the unit's IP address, subnet mask, default... gateway, and LAN interface information. [172.18.100.17 spider]> config IP autoconfiguration (none/dhcp/bootp) [dhcp]: ...
..., n for the following features: -Initial IP configuration: "config". -Reset device: "reset". [172.18.100.17 spider]> 5. Quick Start Guide SecureLinx Spider Duo INSTALLATION AND NETWORK SETTINGS CONTINUED Welcome! Plug an Ethernet cable connected to enter the unit's IP address, subnet mask, default... gateway, and LAN interface information. [172.18.100.17 spider]> config IP autoconfiguration (none/dhcp/bootp) [dhcp]: ...

Lantronix SpiderDuo - Quick Start Guide
Page 10
... ServicesgSecurity from the web page. The client system requires the ability to store your settings in nonvolatile memory. Quick Start Guide SecureLinx Spider Duo SPIDER DUO WEB CONFIGURATION CONTINUED 3. c. Click Save to access the Spider Duo's IP address as well as necessary. Network TCP Ports and Services: a. b. To change to force PS/2 or USB target interface, select...
... ServicesgSecurity from the web page. The client system requires the ability to store your settings in nonvolatile memory. Quick Start Guide SecureLinx Spider Duo SPIDER DUO WEB CONFIGURATION CONTINUED 3. c. Click Save to access the Spider Duo's IP address as well as necessary. Network TCP Ports and Services: a. b. To change to force PS/2 or USB target interface, select...

Lantronix SpiderDuo - Quick Start Guide
Page 12
... to exactly 1 and the threshold to effects. 3. Set the mouse pointer speed to a middle setting with no acceleration or snap-to exactly 1. Quick Start Guide SecureLinx Spider Duo TARGET COMPUTER SETUP CONTINUED Use generic mouse drivers when using PS/2 mouse interface for optimum mouse control during remote sessions.
... to exactly 1 and the threshold to effects. 3. Set the mouse pointer speed to a middle setting with no acceleration or snap-to exactly 1. Quick Start Guide SecureLinx Spider Duo TARGET COMPUTER SETUP CONTINUED Use generic mouse drivers when using PS/2 mouse interface for optimum mouse control during remote sessions.

Lantronix SpiderDuo - Quick Start Guide
Page 14
...remote console window's size. 5. To fit multiple remote console windows on the desktop, select Options g Scaling from the pull-down menu bar to the Lantronix Spider Duo Remote Console window. If the Sync button does not synchronize the cursors, select OptionsgMouse Handling gIntelligent Sync. 6. console window, select Options gLocal Cursor and ...Mouse HandlinggMouse ModegSingle Mouse Mode and click within the remote target system, move your mouse along the remote target system's screen. 3. Quick Start Guide SecureLinx Spider Duo CONNECTION TO TARGET COMPUTER CONTINUED 2.
...remote console window's size. 5. To fit multiple remote console windows on the desktop, select Options g Scaling from the pull-down menu bar to the Lantronix Spider Duo Remote Console window. If the Sync button does not synchronize the cursors, select OptionsgMouse Handling gIntelligent Sync. 6. console window, select Options gLocal Cursor and ...Mouse HandlinggMouse ModegSingle Mouse Mode and click within the remote target system, move your mouse along the remote target system's screen. 3. Quick Start Guide SecureLinx Spider Duo CONNECTION TO TARGET COMPUTER CONTINUED 2.

Lantronix SpiderDuo - Quick Start Guide
Page 16
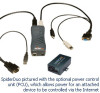
Connect power input plug to Spider Duo PCU CTRL port. 3. Connect RJ45 cable from PCU to AC power. . Green LED = ACTIVE, Blue LED = CONNECTED Power Output PCU CTRL Power Input 14 INSTALLATION 1. Connect power output plug to RJ45, CAT-5 (10 ft) POWER CONTROL UNIT (PCU) - Quick Start Guide SecureLinx Spider Duo WHAT'S IN THE BOX In addition to the PCU module, the box contains the following items: • AC Power cord (input) • AC Power cord IEC60320/C13 to IEC60320/C14 (output) • Cable RJ45 to target PC. 2.
Connect power input plug to Spider Duo PCU CTRL port. 3. Connect RJ45 cable from PCU to AC power. . Green LED = ACTIVE, Blue LED = CONNECTED Power Output PCU CTRL Power Input 14 INSTALLATION 1. Connect power output plug to RJ45, CAT-5 (10 ft) POWER CONTROL UNIT (PCU) - Quick Start Guide SecureLinx Spider Duo WHAT'S IN THE BOX In addition to the PCU module, the box contains the following items: • AC Power cord (input) • AC Power cord IEC60320/C13 to IEC60320/C14 (output) • Cable RJ45 to target PC. 2.

