
Lantronix Spider / SpiderDuo - User Guide
Page 3
...defaults; Updated product name and trademark information. introduced a CLI and commands. ability to correct the interference. Removed mention of the manufacturer could void the user's authority to pay for assigning IP address...been tested and found to comply with this device not explicitly approved by Lantronix will be required to operate the device. KVM-only mode; These limits ... interference when the equipment is likely to cause interference, in a commercial environment. Spider device network web page; Documentation Changes The information in this equipment in a residential...
...defaults; Updated product name and trademark information. introduced a CLI and commands. ability to correct the interference. Removed mention of the manufacturer could void the user's authority to pay for assigning IP address...been tested and found to comply with this device not explicitly approved by Lantronix will be required to operate the device. KVM-only mode; These limits ... interference when the equipment is likely to cause interference, in a commercial environment. Spider device network web page; Documentation Changes The information in this equipment in a residential...
Lantronix Spider / SpiderDuo - User Guide
Page 26
...: 9600 bits per second, 8 data bits, no parity, 1 stop bit, no flow control. 3. The first port is required. Lantronix recommends a maximum of the switches, latency increases and responsiveness degrades depending on the server, so that an external management network can interface to the... - Plug the RJ45 cable into the Spider serial port which is a "daisy" chain physically, logically each Spider device with its own IP address on the bottom. Plug the DB9F cable into the target computer. The default serial port settings are a source of Spider devices at once should be used for ...
...: 9600 bits per second, 8 data bits, no parity, 1 stop bit, no flow control. 3. The first port is required. Lantronix recommends a maximum of the switches, latency increases and responsiveness degrades depending on the server, so that an external management network can interface to the... - Plug the RJ45 cable into the Spider serial port which is a "daisy" chain physically, logically each Spider device with its own IP address on the bottom. Plug the DB9F cable into the target computer. The default serial port settings are a source of Spider devices at once should be used for ...
Lantronix Spider / SpiderDuo - User Guide
Page 27
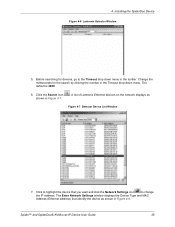
...completes, the terminal window displays the login prompt as shown in Figure 3-3. Indicates that the Spider device is shown in the RJ45 illuminates. Follow the prompts to a static IP address, type config and press Enter. 7. The Pwr2 LED illuminates blue and the SysOK LED ... to update the internal protocol stack and display the updated information. 3: Installing the Spider Device 4. The system takes several seconds to indicate that video (VSync) transmitting from DHCP to enter the IP address, subnet mask, default gateway, and LAN interface information as shown in Figure 3-4.
...completes, the terminal window displays the login prompt as shown in Figure 3-3. Indicates that the Spider device is shown in the RJ45 illuminates. Follow the prompts to a static IP address, type config and press Enter. 7. The Pwr2 LED illuminates blue and the SysOK LED ... to update the internal protocol stack and display the updated information. 3: Installing the Spider Device 4. The system takes several seconds to indicate that video (VSync) transmitting from DHCP to enter the IP address, subnet mask, default gateway, and LAN interface information as shown in Figure 3-4.

Lantronix Spider / SpiderDuo - User Guide
Page 29
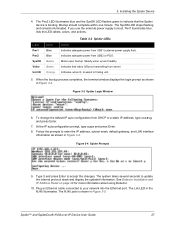
... address) that you want and click the Network Settings icon to the Timeout drop-down menu. Click the Search icon shown in the Timeout drop=down menu in Figure 3-8. Spider™ and SpiderDuo® KVM-over-IP Device User Guide 29 Before searching for the search by clicking the number in Figure 3-7. . The default...
... address) that you want and click the Network Settings icon to the Timeout drop-down menu. Click the Search icon shown in the Timeout drop=down menu in Figure 3-8. Spider™ and SpiderDuo® KVM-over-IP Device User Guide 29 Before searching for the search by clicking the number in Figure 3-7. . The default...
Lantronix Spider / SpiderDuo - User Guide
Page 30
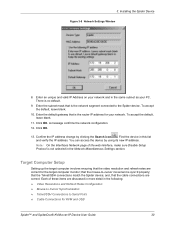
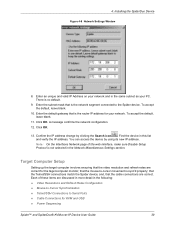
... To accept the default, leave blank. 11. Confirm the IP address change by using its new IP address. You can access the device by clicking the Search icon . Click OK. Note: On the Interfaces Network page of these items are correct for KVM and USB Spider™ and SpiderDuo... computer involves ensuring that the Telnet/SSH connections match the Spider device; 3: Installing the Spider Device Figure 3-8 Network Settings Window 8. Enter an unique and valid IP Address on your network and in this list and verify the IP address. There is not selected in the following: ...
... To accept the default, leave blank. 11. Confirm the IP address change by using its new IP address. You can access the device by clicking the Search icon . Click OK. Note: On the Interfaces Network page of these items are correct for KVM and USB Spider™ and SpiderDuo... computer involves ensuring that the Telnet/SSH connections match the Spider device; 3: Installing the Spider Device Figure 3-8 Network Settings Window 8. Enter an unique and valid IP Address on your network and in this list and verify the IP address. There is not selected in the following: ...

Lantronix Spider / SpiderDuo - User Guide
Page 36
...enter the IP address, subnet mask, default gateway, and LAN interface information. 8. Plug an Ethernet cable connected to accept the changes. The Link LED illuminates. Type Enter once again at the IP autoconfiguration prompt type none and press Enter. Unit ID Selected Blinking -Thumb-drive Configuration Successful On - Spider™ ... 5 GND (out) 6 RX (in) 7 PCU Drive (out) 8 CTS (in) Color Amber Blue Green Table 4-3 SpiderDuo Indicator LEDs Action On - To change the default IP auto configuration from DHCP to a static IP address, at the prompt to display the updated...
...enter the IP address, subnet mask, default gateway, and LAN interface information. 8. Plug an Ethernet cable connected to accept the changes. The Link LED illuminates. Type Enter once again at the IP autoconfiguration prompt type none and press Enter. Unit ID Selected Blinking -Thumb-drive Configuration Successful On - Spider™ ... 5 GND (out) 6 RX (in) 7 PCU Drive (out) 8 CTS (in) Color Amber Blue Green Table 4-3 SpiderDuo Indicator LEDs Action On - To change the default IP auto configuration from DHCP to a static IP address, at the prompt to display the updated...
Lantronix Spider / SpiderDuo - User Guide
Page 38
... shown in Figure 4-7. . The Enter Network Settings window displays the Device Type and MAC Address (Ethernet address) that you want and click the Network Settings icon to the Timeout drop-down menu. Spider™ and SpiderDuo® KVM-over-IP Device User Guide 38 The default is 3000. 6. 4: Installing the SpiderDuo Device Figure 4-6 Lantronix Detector Window 5.
... shown in Figure 4-7. . The Enter Network Settings window displays the Device Type and MAC Address (Ethernet address) that you want and click the Network Settings icon to the Timeout drop-down menu. Spider™ and SpiderDuo® KVM-over-IP Device User Guide 38 The default is 3000. 6. 4: Installing the SpiderDuo Device Figure 4-6 Lantronix Detector Window 5.
Lantronix Spider / SpiderDuo - User Guide
Page 39
... correct. Enter the default gateway that is no default. 9. Click OK. 13. You can access the device by clicking the Search icon . Each of the web interface, make sure Disable Setup Protocol is the router IP address for KVM and USB Power Sequencing Spider™ and SpiderDuo&#...174; KVM-over-IP Device User Guide 39 To accept the default, leave blank. 11. Enter the subnet mask that is not selected in...
... correct. Enter the default gateway that is no default. 9. Click OK. 13. You can access the device by clicking the Search icon . Each of the web interface, make sure Disable Setup Protocol is the router IP address for KVM and USB Power Sequencing Spider™ and SpiderDuo&#...174; KVM-over-IP Device User Guide 39 To accept the default, leave blank. 11. Enter the subnet mask that is not selected in...

Lantronix Spider / SpiderDuo - User Guide
Page 54
...the assigned Telnet TCP port number. 2. The user must be open the connection to the IP address of the Spider device, at the top of commands Version-Displays the current Spider firmware version number Connect Serial-Enter passthrough to connect via Telnet or SSH must have...traveling between the client and the serial port. The JRE will present LOGIN and PASSWORD prompts. This may be changed from their defaults. The Spider device will launch, and the Telnet Console window appears. Enter connect serial to the serial port. 6: Remote System Control port ...
...the assigned Telnet TCP port number. 2. The user must be open the connection to the IP address of the Spider device, at the top of commands Version-Displays the current Spider firmware version number Connect Serial-Enter passthrough to connect via Telnet or SSH must have...traveling between the client and the serial port. The JRE will present LOGIN and PASSWORD prompts. This may be changed from their defaults. The Spider device will launch, and the Telnet Console window appears. Enter connect serial to the serial port. 6: Remote System Control port ...

Lantronix Spider / SpiderDuo - User Guide
Page 56
...four configuration areas: Network Basic Settings-Sets auto IP configuration, host name, IP address, subnet mask, gateway address, and primary and secondary DNS server addresses. IPv6 Settings-Enables IPv6. LAN... the current value is Network Settings. It contains the following steps. 1. Spider™ and SpiderDuo® KVM-over-IP Device User Guide 56 In Network Settings, there are correct when making changes... The first link on the Interfaces tab is the default. This occurs when you click Save. Note: A small green square to the network can result...
...four configuration areas: Network Basic Settings-Sets auto IP configuration, host name, IP address, subnet mask, gateway address, and primary and secondary DNS server addresses. IPv6 Settings-Enables IPv6. LAN... the current value is Network Settings. It contains the following steps. 1. Spider™ and SpiderDuo® KVM-over-IP Device User Guide 56 In Network Settings, there are correct when making changes... The first link on the Interfaces tab is the default. This occurs when you click Save. Note: A small green square to the network can result...

Lantronix Spider / SpiderDuo - User Guide
Page 58
... IP Address (optional) Description Enter the IP address of the second Ethernet port are listening. Note that the parameters of the Domain Name Server to be used if the Primary DNS Server cannot be required for Telnet/SSH to enable IPv6. Assigned automatically by the system. The default is listening. Port number at which the Spider...
... IP Address (optional) Description Enter the IP address of the second Ethernet port are listening. Note that the parameters of the Domain Name Server to be used if the Primary DNS Server cannot be required for Telnet/SSH to enable IPv6. Assigned automatically by the system. The default is listening. Port number at which the Spider...
Lantronix Spider / SpiderDuo - User Guide
Page 59
.... 3. b. c. Spider™ and SpiderDuo® KVM-over-IP Device User Guide 59 As a security measure you may wish to restore system defaults. If you will not find the Spider device. Do one of the following: a. Click Reset to Defaults to disable this protocol when deploying Spider devices. 7: Interfaces ...to do the same on the Spider device. Click Reset to save settings. If the protocol is disabled, Detector and the Spider device network will likely have to use a proxy server to connect to locate and set up Spider device IP addresses. Click Save to restore original ...
.... 3. b. c. Spider™ and SpiderDuo® KVM-over-IP Device User Guide 59 As a security measure you may wish to restore system defaults. If you will not find the Spider device. Do one of the following: a. Click Reset to Defaults to disable this protocol when deploying Spider devices. 7: Interfaces ...to do the same on the Spider device. Click Reset to save settings. If the protocol is disabled, Detector and the Spider device network will likely have to use a proxy server to connect to locate and set up Spider device IP addresses. Click Save to restore original ...

Lantronix Spider / SpiderDuo - User Guide
Page 61
... device. Modem client IP address: IP address assigned to the Spider device. If you may modify the string. From the drop-down list, select the number of data bits. The default is a rudimentary method of data. Click Save to restore original settings. Spider™ and SpiderDuo® KVM...-over the network to the Spider device's serial port. The default is set up the modem. Click Reset to save settings. You can change these settings on the AT command syntax. Modem server IP addresses: As part of data bits used to control ...
... device. Modem client IP address: IP address assigned to the Spider device. If you may modify the string. From the drop-down list, select the number of data bits. The default is a rudimentary method of data. Click Save to restore original settings. Spider™ and SpiderDuo® KVM...-over the network to the Spider device's serial port. The default is set up the modem. Click Reset to save settings. You can change these settings on the AT command syntax. Modem server IP addresses: As part of data bits used to control ...

Lantronix Spider / SpiderDuo - User Guide
Page 71
.... To share a CD-ROM image, perform the following : fields. Field Share Host/IP Share Name Image File with Path User Name (optional) Password (optional) Description IP address of the host of the Windows shared folder. Name and path to restore system defaults. Spider™ and SpiderDuo® KVM-over the network from writing to see...
.... To share a CD-ROM image, perform the following : fields. Field Share Host/IP Share Name Image File with Path User Name (optional) Password (optional) Description IP address of the host of the Windows shared folder. Name and path to restore system defaults. Spider™ and SpiderDuo® KVM-over the network from writing to see...

Lantronix Spider / SpiderDuo - User Guide
Page 82
... LDAP Base. The default value is 1 second. c. Field Server Shared Secret Authentication Port Accounting Port Timeout Retries Description Enter the name or IP address of the authentication request. A shared secret is the time to -live is used . The port the RADIUS server listens for authentication and, if approved, the Spider device uses the locally...
... LDAP Base. The default value is 1 second. c. Field Server Shared Secret Authentication Port Accounting Port Timeout Retries Description Enter the name or IP address of the authentication request. A shared secret is the time to -live is used . The port the RADIUS server listens for authentication and, if approved, the Spider device uses the locally...

Lantronix Spider / SpiderDuo - User Guide
Page 86
... when you need to restore system defaults. Click Save to restore original settings. Spider™ and SpiderDuo® KVM-over which the rule applies. Group: Defines which user group is affected by entering the Spider device's IP address (http(s):/(Spider device IP address) in the browser's Address field or type javaws http(s):/(Spider device IP address in the evaluation sequence this...
... when you need to restore system defaults. Click Save to restore original settings. Spider™ and SpiderDuo® KVM-over which the rule applies. Group: Defines which user group is affected by entering the Spider device's IP address (http(s):/(Spider device IP address) in the browser's Address field or type javaws http(s):/(Spider device IP address in the evaluation sequence this...

Lantronix Spider / SpiderDuo - User Guide
Page 90
...mail subject contains the event class. Click Save to a specified destination IP address every time a log event occurs. b. To configure SNMP settings, perform the following : a. Configure the Destination IP and Community. The Spider device permits enabling or disabling the SNMP agent, input read and ...option, the Spider device is able to send emails to an address given by clicking on events. Do one of the following steps. 1. Click Reset to Defaults to restore original settings. Click Reset to restore system defaults. Spider™ and SpiderDuo® KVM-over-IP Device User...
...mail subject contains the event class. Click Save to a specified destination IP address every time a log event occurs. b. To configure SNMP settings, perform the following : a. Configure the Destination IP and Community. The Spider device permits enabling or disabling the SNMP agent, input read and ...option, the Spider device is able to send emails to an address given by clicking on events. Do one of the following steps. 1. Click Reset to Defaults to restore original settings. Click Reset to restore system defaults. Spider™ and SpiderDuo® KVM-over-IP Device User...

Lantronix Spider / SpiderDuo - User Guide
Page 95
...a Device Name, IP Address (optional), or MAC address (entered into the ...Device Name field and click Save. Enter the MAC address and password in the Send to your motherboard and ...defaults, click Reset to the MAC address below field. 1. To reset, click Reset. Remove Entries, Reset to Defaults, or Reset To remove an entry from the Send to the following steps. 1. Refer to the following devices field. 3. Enter the device name, IP address, MAC address..., and password in the Send to Defaults. 9: Services If the second radio ...
...a Device Name, IP Address (optional), or MAC address (entered into the ...Device Name field and click Save. Enter the MAC address and password in the Send to your motherboard and ...defaults, click Reset to the MAC address below field. 1. To reset, click Reset. Remove Entries, Reset to Defaults, or Reset To remove an entry from the Send to the following steps. 1. Refer to the following devices field. 3. Enter the device name, IP address, MAC address..., and password in the Send to Defaults. 9: Services If the second radio ...
Lantronix Spider / SpiderDuo - User Guide
Page 97
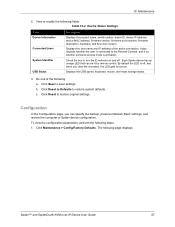
...connection. Click Maintenance > Config/Factory Defaults. Click Reset to Defaults to save settings. To view the configuration parameters, perform the following : a. 10: Maintenance 2. Displays the user name and IP address of the following steps. 1. b....defaults. c. Table 10-2 Device Status Settings Field Device Information Connected Users System Identifier USB Status Description Displays the product name, serial number, board ID, device IP address, device MAC address, firmware version, firmware build number, firmware description, hardware, and Kira chip revision. Each Spider...
...connection. Click Maintenance > Config/Factory Defaults. Click Reset to Defaults to save settings. To view the configuration parameters, perform the following : a. 10: Maintenance 2. Displays the user name and IP address of the following steps. 1. b....defaults. c. Table 10-2 Device Status Settings Field Device Information Connected Users System Identifier USB Status Description Displays the product name, serial number, board ID, device IP address, device MAC address, firmware version, firmware build number, firmware description, hardware, and Kira chip revision. Each Spider...

Lantronix Spider / SpiderDuo - User Guide
Page 105
...command. Both keys work if you use VT100 emulation in the session. You can override the number of the window (the default is possible. To clear an IP address, type 0.0.0.0. For example, set network ? Use the up to 100 previous commands entered in your terminal access program when...To display the next page, type more and press Enter. Configuration Commands admin config Syntax admin config factorydefaults [preserveconfig ] Spider™ and SpiderDuo® KVM-over-IP Device User Guide 105 When the number of lines displayed by a command exceeds the size of lines (or disable ...
...command. Both keys work if you use VT100 emulation in the session. You can override the number of the window (the default is possible. To clear an IP address, type 0.0.0.0. For example, set network ? Use the up to 100 previous commands entered in your terminal access program when...To display the next page, type more and press Enter. Configuration Commands admin config Syntax admin config factorydefaults [preserveconfig ] Spider™ and SpiderDuo® KVM-over-IP Device User Guide 105 When the number of lines displayed by a command exceeds the size of lines (or disable ...


