
Lantronix Spider / SpiderDuo - User Guide
Page 3
...ability to firmware version 3.01. iGoogle gadget; Updated to enable drive redirection, configure backup/restore, and reset factory defaults; Spider™ and SpiderDuo® KVM-over-IP Device User Guide 3 This equipment generates, uses, and can radiate radio frequency energy and, if not installed and... 2.2, VIP access. Updated to preserve network settings for to take whatever measures may be required to correct the interference at www.lantronix.com/support/documentation. Operation of this equipment in a residential area is likely to cause interference, in which case the user,...
...ability to firmware version 3.01. iGoogle gadget; Updated to enable drive redirection, configure backup/restore, and reset factory defaults; Spider™ and SpiderDuo® KVM-over-IP Device User Guide 3 This equipment generates, uses, and can radiate radio frequency energy and, if not installed and... 2.2, VIP access. Updated to preserve network settings for to take whatever measures may be required to correct the interference at www.lantronix.com/support/documentation. Operation of this equipment in a residential area is likely to cause interference, in which case the user,...
Lantronix Spider / SpiderDuo - User Guide
Page 7
... Drive 73 User Interface Settings 75 8: User Accounts 76 Local vs. Virtual Media Options 71 Image on Windows Share 71 Floppy Image 72 Connecting to Defaults, or Reset 95 Spider™ and SpiderDuo® KVM-over-IP Device User Guide 7
... Drive 73 User Interface Settings 75 8: User Accounts 76 Local vs. Virtual Media Options 71 Image on Windows Share 71 Floppy Image 72 Connecting to Defaults, or Reset 95 Spider™ and SpiderDuo® KVM-over-IP Device User Guide 7

Lantronix Spider / SpiderDuo - User Guide
Page 10
... Input and Serial Ports 36 Figure 4-4 SpiderDuo Welcome Screen 36 Figure 4-5 SpiderDuo Default IP Configuration Screen 36 Figure 4-6 Lantronix Detector Window 38 Figure 4-7 Detector Device List Window 38 Figure 4-8 Network Settings Window 39 Figure 4-10 PCU Layout and Dimensions 43 Figure 5-1 Spider device Home Page 45 Figure 6-1 Remote Console Window Components 47 Figure 6-2 Remote...
... Input and Serial Ports 36 Figure 4-4 SpiderDuo Welcome Screen 36 Figure 4-5 SpiderDuo Default IP Configuration Screen 36 Figure 4-6 Lantronix Detector Window 38 Figure 4-7 Detector Device List Window 38 Figure 4-8 Network Settings Window 39 Figure 4-10 PCU Layout and Dimensions 43 Figure 5-1 Spider device Home Page 45 Figure 6-1 Remote Console Window Components 47 Figure 6-2 Remote...
Lantronix Spider / SpiderDuo - User Guide
Page 14
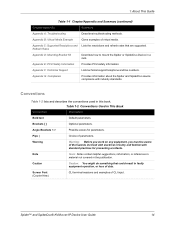
...the hazards involved with electrical circuitry and familiar with industry standards. Table 1-2 Conventions Used in a rack. Spider™ and SpiderDuo® KVM-over-IP Device User Guide 14 Appendix B: Virtual Media Example Gives examples of parameters. Pipe | Choice of virtual...and fax numbers. Note Note: Notes contain helpful suggestions, information, or references to mount the Spider or SpiderDuo Device in This Book Convention Description Bold text Default parameters. Caution Caution: You might do something that are supported. Brackets [ ] Optional parameters...
...the hazards involved with electrical circuitry and familiar with industry standards. Table 1-2 Conventions Used in a rack. Spider™ and SpiderDuo® KVM-over-IP Device User Guide 14 Appendix B: Virtual Media Example Gives examples of parameters. Pipe | Choice of virtual...and fax numbers. Note Note: Notes contain helpful suggestions, information, or references to mount the Spider or SpiderDuo Device in This Book Convention Description Bold text Default parameters. Caution Caution: You might do something that are supported. Brackets [ ] Optional parameters...
Lantronix Spider / SpiderDuo - User Guide
Page 26
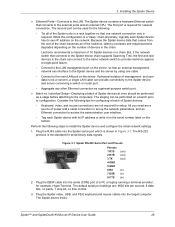
...IP Device User Guide 26 The Spider device contains a hardware Ethernet switch that an external management network can be performed as a general-purpose switch port. Batch vs. Tie all of management and user data is required for serial binary data signals. Lantronix recommends a maximum of Spider... to the Spider device and server conserving a switch or router port. - Plug the Spider video, USB, and PS/2 keyboard and mouse cables into the Spider serial port which is the standard for network connection. The default serial port settings are a source of Spider devices: -...
...IP Device User Guide 26 The Spider device contains a hardware Ethernet switch that an external management network can be performed as a general-purpose switch port. Batch vs. Tie all of management and user data is required for serial binary data signals. Lantronix recommends a maximum of Spider... to the Spider device and server conserving a switch or router port. - Plug the Spider video, USB, and PS/2 keyboard and mouse cables into the Spider serial port which is the standard for network connection. The default serial port settings are a source of Spider devices: -...
Lantronix Spider / SpiderDuo - User Guide
Page 27
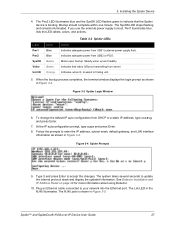
...PS/2. Indicates adequate power from USB1 (external power supply first). To change the default IP auto configuration from server. Figure 3-4 Spider Prompts 9. Spider™ and SpiderDuo® KVM-over-IP Device User Guide 27 The Pwr2 LED illuminates blue and the SysOK LED flashes ...to accept the changes. Indicates that the Spider device is shown in Figure 3-3. Plug an Ethernet cable connected to enter the IP address, subnet mask, default gateway, and LAN interface information as shown in Figure 3-5. 3: Installing the Spider Device 4. The SysOK LED stops flashing and...
...PS/2. Indicates adequate power from USB1 (external power supply first). To change the default IP auto configuration from server. Figure 3-4 Spider Prompts 9. Spider™ and SpiderDuo® KVM-over-IP Device User Guide 27 The Pwr2 LED illuminates blue and the SysOK LED flashes ...to accept the changes. Indicates that the Spider device is shown in Figure 3-3. Plug an Ethernet cable connected to enter the IP address, subnet mask, default gateway, and LAN interface information as shown in Figure 3-5. 3: Installing the Spider Device 4. The SysOK LED stops flashing and...

Lantronix Spider / SpiderDuo - User Guide
Page 29
... want and click the Network Settings icon to the Timeout drop-down menu. Spider™ and SpiderDuo® KVM-over-IP Device User Guide 29 The default is 3000. 6. Click to highlight the device that identify the device as ...Figure 3-7 Detector Device List Window 7. Click the Search icon shown in the Timeout drop=down menu in Figure 3-8. 3: Installing the Spider Device 5. Change the milliseconds for devices, go to change the IP address. A list of Lantronix...
... want and click the Network Settings icon to the Timeout drop-down menu. Spider™ and SpiderDuo® KVM-over-IP Device User Guide 29 The default is 3000. 6. Click to highlight the device that identify the device as ...Figure 3-7 Detector Device List Window 7. Click the Search icon shown in the Timeout drop=down menu in Figure 3-8. 3: Installing the Spider Device 5. Change the milliseconds for devices, go to change the IP address. A list of Lantronix...
Lantronix Spider / SpiderDuo - User Guide
Page 30
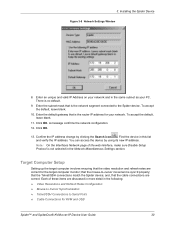
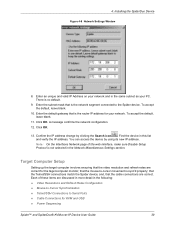
...network and in this list and verify the IP address. A message confirms the network configuration. 12. Note: On the Interfaces Network page of these items are correct. 3: Installing the Spider Device Figure 3-8 Network Settings Window 8. To accept the default, leave blank. 11. Each of the... web interface, make sure Disable Setup Protocol is the router IP address for the target computer monitor; There is no...
...network and in this list and verify the IP address. A message confirms the network configuration. 12. Note: On the Interfaces Network page of these items are correct. 3: Installing the Spider Device Figure 3-8 Network Settings Window 8. To accept the default, leave blank. 11. Each of the... web interface, make sure Disable Setup Protocol is the router IP address for the target computer monitor; There is no...

Lantronix Spider / SpiderDuo - User Guide
Page 32
...the Daisy Chain If a device fails or there is a redundant outside network cable into the Spider device. Spider™ and SpiderDuo® KVM-over-IP Device User Guide 32 Cable Connections for KVM and USB Connections for redundant connection. Connect the ... as necessary. Then, connect the last Spider device from the cable break or device failure. 3: Installing the Spider Device Perform the following steps when daisy chaining Spider devices. 1. This connects your Spider device to -cursor synchronization. Windows Server 1. The default settings are 9600 bps, 8 data bits...
...the Daisy Chain If a device fails or there is a redundant outside network cable into the Spider device. Spider™ and SpiderDuo® KVM-over-IP Device User Guide 32 Cable Connections for KVM and USB Connections for redundant connection. Connect the ... as necessary. Then, connect the last Spider device from the cable break or device failure. 3: Installing the Spider Device Perform the following steps when daisy chaining Spider devices. 1. This connects your Spider device to -cursor synchronization. Windows Server 1. The default settings are 9600 bps, 8 data bits...
Lantronix Spider / SpiderDuo - User Guide
Page 35
...for use as an AC power passthrough. Plug the power adaptor into the SpiderDuo serial port. 2. The SpiderDuo device has one minute. The default serial port settings are integrated into the target computer. The blue LED SysOK lluminates and flashes to indicate that connects to the LAN. &#..., and PS/2 keyboard and mouse (if applicable) cables into the SpiderDuo device. The SysOK LED stops flashing and remains illuminated. Spider™ and SpiderDuo® KVM-over-IP Device User Guide 35 4: Installing the SpiderDuo Device cases, the PS/2-interface model may be required.
...for use as an AC power passthrough. Plug the power adaptor into the SpiderDuo serial port. 2. The SpiderDuo device has one minute. The default serial port settings are integrated into the target computer. The blue LED SysOK lluminates and flashes to indicate that connects to the LAN. &#..., and PS/2 keyboard and mouse (if applicable) cables into the SpiderDuo device. The SysOK LED stops flashing and remains illuminated. Spider™ and SpiderDuo® KVM-over-IP Device User Guide 35 4: Installing the SpiderDuo Device cases, the PS/2-interface model may be required.

Lantronix Spider / SpiderDuo - User Guide
Page 36
...Default IP Configuration Screen 7. Type Enter once again at the IP autoconfiguration prompt type none and press Enter. Upon bootup, the terminal window displays the IP Configuration screen. The system takes about 20 seconds to your network into the Ethernet port. Spider™ and SpiderDuo® KVM-over-IP... Ethernet cable connected to complete. Power Unit Connected, AC power is passed through 5. Type Enter, to enter the IP address, subnet mask, default gateway, and LAN interface information. 8. Follow the prompts to accept the changes. Figure 4-4 SpiderDuo Welcome Screen 6....
...Default IP Configuration Screen 7. Type Enter once again at the IP autoconfiguration prompt type none and press Enter. Upon bootup, the terminal window displays the IP Configuration screen. The system takes about 20 seconds to your network into the Ethernet port. Spider™ and SpiderDuo® KVM-over-IP... Ethernet cable connected to complete. Power Unit Connected, AC power is passed through 5. Type Enter, to enter the IP address, subnet mask, default gateway, and LAN interface information. 8. Follow the prompts to accept the changes. Figure 4-4 SpiderDuo Welcome Screen 6....
Lantronix Spider / SpiderDuo - User Guide
Page 38
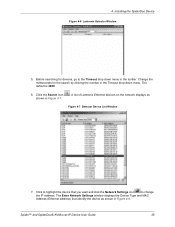
The default is 3000. 6. The Enter Network Settings window displays the Device Type and MAC Address (Ethernet address) that you want and click the Network Settings icon to change the IP address. Click the Search icon shown in Figure 4-8. Before searching for the ... device that identify the device as Figure 4-7 Detector Device List Window 7. Spider™ and SpiderDuo® KVM-over-IP Device User Guide 38 4: Installing the SpiderDuo Device Figure 4-6 Lantronix Detector Window 5. A list of Lantronix Ethernet devices on the network displays as shown in Figure 4-7. . Click ...
The default is 3000. 6. The Enter Network Settings window displays the Device Type and MAC Address (Ethernet address) that you want and click the Network Settings icon to change the IP address. Click the Search icon shown in Figure 4-8. Before searching for the ... device that identify the device as Figure 4-7 Detector Device List Window 7. Spider™ and SpiderDuo® KVM-over-IP Device User Guide 38 4: Installing the SpiderDuo Device Figure 4-6 Lantronix Detector Window 5. A list of Lantronix Ethernet devices on the network displays as shown in Figure 4-7. . Click ...
Lantronix Spider / SpiderDuo - User Guide
Page 39
...video resolution and refresh rates are correct for KVM and USB Power Sequencing Spider™ and SpiderDuo® KVM-over-IP Device User Guide 39 Enter an unique and valid IP Address on your network and in the following: Video Resolutions and Refresh... Serial Ports Cable Connections for the taget computer monitor; Confirm the IP address change by using its new IP address. that is no default. 9. 4: Installing the SpiderDuo Device Figure 4-8 Network Settings Window 8. Enter the default gateway that the Telnet/SSH connections match the Spider device;
...video resolution and refresh rates are correct for KVM and USB Power Sequencing Spider™ and SpiderDuo® KVM-over-IP Device User Guide 39 Enter an unique and valid IP Address on your network and in the following: Video Resolutions and Refresh... Serial Ports Cable Connections for the taget computer monitor; Confirm the IP address change by using its new IP address. that is no default. 9. 4: Installing the SpiderDuo Device Figure 4-8 Network Settings Window 8. Enter the default gateway that the Telnet/SSH connections match the Spider device;

Lantronix Spider / SpiderDuo - User Guide
Page 41
...default settings are shown in .) VGA cable Part Number 500-199-R 500-200-R Power Sequencing To ensure that the system (PC, local keyboard and mouse, and SpiderDuo device) function properly at http://www.lantronix.com/support/documentation.html for video, USB, and keyboard/mouse are connected through the Spider...are integrated into the appropriate ports on steady. 4. If using the CDE control panel to the Spider View User Guide at power up completely. Spider™ and SpiderDuo® KVM-over-IP Device User Guide 41 Refer to "1:1, no flow control. Set the pointer speed to the ...
...default settings are shown in .) VGA cable Part Number 500-199-R 500-200-R Power Sequencing To ensure that the system (PC, local keyboard and mouse, and SpiderDuo device) function properly at http://www.lantronix.com/support/documentation.html for video, USB, and keyboard/mouse are connected through the Spider...are integrated into the appropriate ports on steady. 4. If using the CDE control panel to the Spider View User Guide at power up completely. Spider™ and SpiderDuo® KVM-over-IP Device User Guide 41 Refer to "1:1, no flow control. Set the pointer speed to the ...

Lantronix Spider / SpiderDuo - User Guide
Page 44
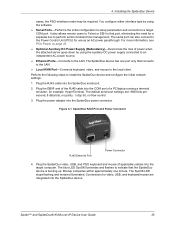
Replacement power supplies are available. Spider™ and SpiderDuo® KVM-over-IP Device User Guide 44 The SpiderDuo device gets its power from the PCU. 4: Installing the SpiderDuo Device Warning: AC power passes through by default if the RJ45 cable is disconnected from an external DC supply.
Replacement power supplies are available. Spider™ and SpiderDuo® KVM-over-IP Device User Guide 44 The SpiderDuo device gets its power from the PCU. 4: Installing the SpiderDuo Device Warning: AC power passes through by default if the RJ45 cable is disconnected from an external DC supply.

Lantronix Spider / SpiderDuo - User Guide
Page 45
Enter your user name (default is sysadmin) and password (default is PASS) at the prompt. Accessing the KVM ... parameters, and perform maintenance operations. The browser must accept cookies for an unsecure connection). Access the Spider or SpiderDuo device over the network by using a web browser by using a Web browser or remote...make changes to the configuration and user database. Figure 5-1 Spider device Home Page The home page contains the following steps to use the Lantronix Spider and SpiderDuo KVM-over-IP device to access and manage a target computer by entering ...
Enter your user name (default is sysadmin) and password (default is PASS) at the prompt. Accessing the KVM ... parameters, and perform maintenance operations. The browser must accept cookies for an unsecure connection). Access the Spider or SpiderDuo device over the network by using a web browser by using a Web browser or remote...make changes to the configuration and user database. Figure 5-1 Spider device Home Page The home page contains the following steps to use the Lantronix Spider and SpiderDuo KVM-over-IP device to access and manage a target computer by entering ...
Lantronix Spider / SpiderDuo - User Guide
Page 50
... the cursor seems to activate Single Mouse Mode. Select Options > Local Cursor and select one of the following cursor options: Default-the local cursor maintains its appearance regardless of the focus location Transparent-the local cursor is invisible when the focus is accessed .../Double button. Note: Single Mouse Mode requires Sun Java 1.4 or higher Local Cursor The Spider device has an option to correct a fixed skew. Spider™ and SpiderDuo® KVM-over-IP Device User Guide 50 Single and Double Mouse Modes Continuous synchronization of local and remote cursors ...
... the cursor seems to activate Single Mouse Mode. Select Options > Local Cursor and select one of the following cursor options: Default-the local cursor maintains its appearance regardless of the focus location Transparent-the local cursor is invisible when the focus is accessed .../Double button. Note: Single Mouse Mode requires Sun Java 1.4 or higher Local Cursor The Spider device has an option to correct a fixed skew. Spider™ and SpiderDuo® KVM-over-IP Device User Guide 50 Single and Double Mouse Modes Continuous synchronization of local and remote cursors ...
Lantronix Spider / SpiderDuo - User Guide
Page 51
...what is correct alignment, click Save Changes to provide a picture as soon as presented by Lantronix Tech Support. If it recognizes and locks onto the video in the digitization process. Adjust ... made in the Local Cursor submenu are established in the KVM Console Spider™ and SpiderDuo® KVM-over-IP Device User Guide 51 This is slightly off the opposite side of ... automatically make adjustments to video settings including clock and phase, and encoding to the original factory defaults, click Reset this Mode or Reset All. To return a particular setting or all settings to...
...what is correct alignment, click Save Changes to provide a picture as soon as presented by Lantronix Tech Support. If it recognizes and locks onto the video in the digitization process. Adjust ... made in the Local Cursor submenu are established in the KVM Console Spider™ and SpiderDuo® KVM-over-IP Device User Guide 51 This is slightly off the opposite side of ... automatically make adjustments to video settings including clock and phase, and encoding to the original factory defaults, click Reset this Mode or Reset All. To return a particular setting or all settings to...

Lantronix Spider / SpiderDuo - User Guide
Page 52
...the button will be that a code has not been sent. There may be circumstances where it may be sent. If Spider™ and SpiderDuo® KVM-over-IP Device User Guide 52 To change its keyboard language mapping automatically from the Options > Scaling selection. The Soft Keyboard sends ... By using a Soft Keyboard, the local user can have the keycodes available to send to the 1:1 pixel mapping mode, which is the default when the Remote Console window is first launched, scaling factors may be lost when the Remote Console window is clicked." Click the Close button ...
...the button will be that a code has not been sent. There may be circumstances where it may be sent. If Spider™ and SpiderDuo® KVM-over-IP Device User Guide 52 To change its keyboard language mapping automatically from the Options > Scaling selection. The Soft Keyboard sends ... By using a Soft Keyboard, the local user can have the keycodes available to send to the 1:1 pixel mapping mode, which is the default when the Remote Console window is first launched, scaling factors may be lost when the Remote Console window is clicked." Click the Close button ...
Lantronix Spider - Quick Start Guide
Page 4
...displays the login prompt. To change the default IP auto configuration from source 2 (USB2 or PS/2) Blinks upon bootup. At the IP autoconfiguration prompt, type none and press Enter. The Spider is complete within approximately one minute. The default serial port settings are 9600 bits per ... Spider INSTALLATION AND NETWORK SETTINGS CONTINUED... Plug the RJ45 end of a PC/laptop running a terminal emulation (e.g. HyperTerminal). The two blue power LEDs will illuminate and the green system OK LED flashes to a static IP address, type config and press Enter. 4. WWW.LANTRONIX.COM...
...displays the login prompt. To change the default IP auto configuration from source 2 (USB2 or PS/2) Blinks upon bootup. At the IP autoconfiguration prompt, type none and press Enter. The Spider is complete within approximately one minute. The default serial port settings are 9600 bits per ... Spider INSTALLATION AND NETWORK SETTINGS CONTINUED... Plug the RJ45 end of a PC/laptop running a terminal emulation (e.g. HyperTerminal). The two blue power LEDs will illuminate and the green system OK LED flashes to a static IP address, type config and press Enter. 4. WWW.LANTRONIX.COM...

