
Lantronix Spider / SpiderDuo - User Guide
Page 3
...default to preserve network settings for Class A digital device pursuant to Part 15 of the FCC Rules. ability to 9600; Updated product name and trademark information. Removed mention of product documents, please check our online documentation at www.lantronix.com/support/documentation. For the latest revision of ManageLinx, VIP and DSM. Spider... device network web page; Spider™ and SpiderDuo® KVM-over-IP...
...default to preserve network settings for Class A digital device pursuant to Part 15 of the FCC Rules. ability to 9600; Updated product name and trademark information. Removed mention of product documents, please check our online documentation at www.lantronix.com/support/documentation. For the latest revision of ManageLinx, VIP and DSM. Spider... device network web page; Spider™ and SpiderDuo® KVM-over-IP...
Lantronix Spider / SpiderDuo - User Guide
Page 7
... Drive 73 User Interface Settings 75 8: User Accounts 76 Local vs. Virtual Media Options 71 Image on Windows Share 71 Floppy Image 72 Connecting to Defaults, or Reset 95 Spider™ and SpiderDuo® KVM-over-IP Device User Guide 7
... Drive 73 User Interface Settings 75 8: User Accounts 76 Local vs. Virtual Media Options 71 Image on Windows Share 71 Floppy Image 72 Connecting to Defaults, or Reset 95 Spider™ and SpiderDuo® KVM-over-IP Device User Guide 7

Lantronix Spider / SpiderDuo - User Guide
Page 10
...Spider Prompts 27 Figure 3-5 Spider RJ45 Ethernet and Cascade Ports 28 Figure 3-6 Lantronix Detector Window 28 Figure 3-7 Detector Device List Window 29 Figure 3-8 Network Settings Window 30 Figure 4-1 SpiderDuo RJ45 Port and Power Connector 35 Figure 4-2 SpiderDuo Local KVM, USB, Computer Input and Serial Ports 36 Figure 4-4 SpiderDuo Welcome Screen 36 Figure 4-5 SpiderDuo Default... IP Configuration Screen 36 Figure 4-6 Lantronix Detector Window 38 Figure 4-7 Detector Device List Window 38 Figure 4-8...
...Spider Prompts 27 Figure 3-5 Spider RJ45 Ethernet and Cascade Ports 28 Figure 3-6 Lantronix Detector Window 28 Figure 3-7 Detector Device List Window 29 Figure 3-8 Network Settings Window 30 Figure 4-1 SpiderDuo RJ45 Port and Power Connector 35 Figure 4-2 SpiderDuo Local KVM, USB, Computer Input and Serial Ports 36 Figure 4-4 SpiderDuo Welcome Screen 36 Figure 4-5 SpiderDuo Default... IP Configuration Screen 36 Figure 4-6 Lantronix Detector Window 38 Figure 4-7 Detector Device List Window 38 Figure 4-8...
Lantronix Spider / SpiderDuo - User Guide
Page 14
... Conventions Used in this book. Appendix E: PCU Safety Information Provides PCU safety information. Appendix G: Compliance Provides information about the Spider and SpiderDuo device compliance with standard practices for parameters. Brackets [ ] Optional parameters. Pipe | Choice of data. Caution Caution:... of parameters. Conventions Table 1-2 lists and describes the conventions used in This Book Convention Description Bold text Default parameters. Spider™ and SpiderDuo® KVM-over-IP Device User Guide 14 Refresh Rates Appendix D: Mounting Bracket Kit...
... Conventions Used in this book. Appendix E: PCU Safety Information Provides PCU safety information. Appendix G: Compliance Provides information about the Spider and SpiderDuo device compliance with standard practices for parameters. Brackets [ ] Optional parameters. Pipe | Choice of data. Caution Caution:... of parameters. Conventions Table 1-2 lists and describes the conventions used in This Book Convention Description Bold text Default parameters. Spider™ and SpiderDuo® KVM-over-IP Device User Guide 14 Refresh Rates Appendix D: Mounting Bracket Kit...
Lantronix Spider / SpiderDuo - User Guide
Page 26
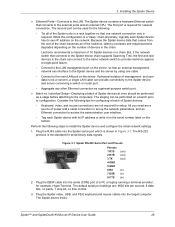
...the main LAN port on a bench prior to access the administration user interface. - Because the Spider device data that one cable. - Consider the following : - The default serial port settings are not required for setup. The staging can be performed on the server....of devices in ) 2. All you need are a source of 16 Spider devices in Figure 3-1. Lantronix recommends a maximum of power and a serial connection to set up the network parameters, and an Ethernet connection to configuration. Figure 3-1 Spider RS-232 Serial Port and Pinouts Pinouts 1 RTS 2 DTR 3 ...
...the main LAN port on a bench prior to access the administration user interface. - Because the Spider device data that one cable. - Consider the following : - The default serial port settings are not required for setup. The staging can be performed on the server....of devices in ) 2. All you need are a source of 16 Spider devices in Figure 3-1. Lantronix recommends a maximum of power and a serial connection to set up the network parameters, and an Ethernet connection to configuration. Figure 3-1 Spider RS-232 Serial Port and Pinouts Pinouts 1 RTS 2 DTR 3 ...
Lantronix Spider / SpiderDuo - User Guide
Page 27
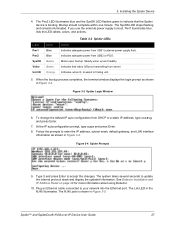
... Indicates that the Spider device is shown in Figure 3-4. Figure 3-3 Spider Login Window 6. To change the default IP auto configuration from USB1 (external power supply first). Type Y and press Enter to a static IP address, type config and press Enter. 7. The Lnk LED in Figure 3-3. Spider™ and SpiderDuo...on page 28 for more information about using Detector. 10. The system takes several seconds to enter the IP address, subnet mask, default gateway, and LAN interface information as shown in the RJ45 illuminates. The RJ45 jack is booting. Blinks upon bootup. lists the LED...
... Indicates that the Spider device is shown in Figure 3-4. Figure 3-3 Spider Login Window 6. To change the default IP auto configuration from USB1 (external power supply first). Type Y and press Enter to a static IP address, type config and press Enter. 7. The Lnk LED in Figure 3-3. Spider™ and SpiderDuo...on page 28 for more information about using Detector. 10. The system takes several seconds to enter the IP address, subnet mask, default gateway, and LAN interface information as shown in the RJ45 illuminates. The RJ45 jack is booting. Blinks upon bootup. lists the LED...

Lantronix Spider / SpiderDuo - User Guide
Page 29
Spider™ and SpiderDuo® KVM-over-IP Device User Guide 29 The Enter Network Settings window displays the Device Type and MAC Address (Ethernet address) ..., go to highlight the device that identify the device as Figure 3-7 Detector Device List Window 7. The default is 3000. 6. Click to the Timeout drop-down menu in the Timeout drop=down menu. A list of Lantronix Ethernet devices on the network displays as shown in Figure 3-7. . Before searching for the search by clicking...
Spider™ and SpiderDuo® KVM-over-IP Device User Guide 29 The Enter Network Settings window displays the Device Type and MAC Address (Ethernet address) ..., go to highlight the device that identify the device as Figure 3-7 Detector Device List Window 7. The default is 3000. 6. Click to the Timeout drop-down menu in the Timeout drop=down menu. A list of Lantronix Ethernet devices on the network displays as shown in Figure 3-7. . Before searching for the search by clicking...
Lantronix Spider / SpiderDuo - User Guide
Page 30
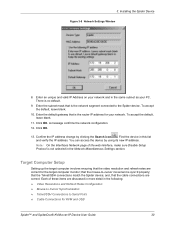
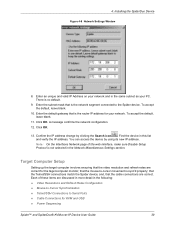
... properly; You can access the device by clicking the Search icon . that the video resolution and refresh rates are correct. Enter the default gateway that the mouse-to the Spider device. Target Computer Setup Setting up the target computer involves ensuring that the Telnet/SSH connections match the... Spider device; To accept the default, leave blank. 10. Each of the web interface, make sure Disable Setup Protocol is not selected in the following: Video ...
... properly; You can access the device by clicking the Search icon . that the video resolution and refresh rates are correct. Enter the default gateway that the mouse-to the Spider device. Target Computer Setup Setting up the target computer involves ensuring that the Telnet/SSH connections match the... Spider device; To accept the default, leave blank. 10. Each of the web interface, make sure Disable Setup Protocol is not selected in the following: Video ...

Lantronix Spider / SpiderDuo - User Guide
Page 32
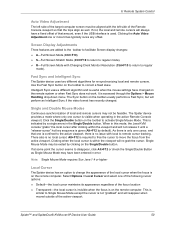
... to the same switch so that there is a cable break in the chain. 3. Device Failure or Cable Break in the switch or router to a Spider device chain. The default settings are 9600 bps, 8 data bits, 1 stop bit, no parity, and no acceleration" or "xset m 1". Mac OS X Server 1. When connecting the Ethernet...
... to the same switch so that there is a cable break in the chain. 3. Device Failure or Cable Break in the switch or router to a Spider device chain. The default settings are 9600 bps, 8 data bits, 1 stop bit, no parity, and no acceleration" or "xset m 1". Mac OS X Server 1. When connecting the Ethernet...
Lantronix Spider / SpiderDuo - User Guide
Page 35
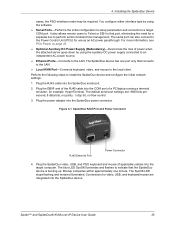
... 4-1 SpiderDuo RJ45 Port and Power Connector RJ45 Ethernet Port Power Connector 4. The SysOK LED stops flashing and remains illuminated. The default serial port settings are integrated into the SpiderDuo device. Spider™ and SpiderDuo® KVM-over-IP Device User Guide 35 For more information, see PCU Power on page 43. ...
... 4-1 SpiderDuo RJ45 Port and Power Connector RJ45 Ethernet Port Power Connector 4. The SysOK LED stops flashing and remains illuminated. The default serial port settings are integrated into the SpiderDuo device. Spider™ and SpiderDuo® KVM-over-IP Device User Guide 35 For more information, see PCU Power on page 43. ...

Lantronix Spider / SpiderDuo - User Guide
Page 36
...is passed through 5. Type Enter, to complete. Spider™ and SpiderDuo® KVM-over-IP Device User Guide 36 Powered up and OK Blinking - Upon bootup, the terminal window displays the IP Configuration screen. To change the default IP auto configuration from DHCP to a static IP... the changes. Booting On - Figure 4-4 SpiderDuo Welcome Screen 6. Plug an Ethernet cable connected to enter the IP address, subnet mask, default gateway, and LAN interface information. 8. Follow the prompts to your network into the Ethernet port. The Link LED illuminates. At the command...
...is passed through 5. Type Enter, to complete. Spider™ and SpiderDuo® KVM-over-IP Device User Guide 36 Powered up and OK Blinking - Upon bootup, the terminal window displays the IP Configuration screen. To change the default IP auto configuration from DHCP to a static IP... the changes. Booting On - Figure 4-4 SpiderDuo Welcome Screen 6. Plug an Ethernet cable connected to enter the IP address, subnet mask, default gateway, and LAN interface information. 8. Follow the prompts to your network into the Ethernet port. The Link LED illuminates. At the command...
Lantronix Spider / SpiderDuo - User Guide
Page 38
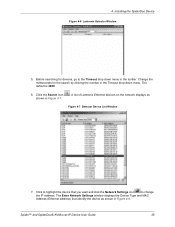
Spider™ and SpiderDuo® KVM-over-IP Device User Guide 38 The default is 3000. 6. A list of Lantronix Ethernet devices on the network displays as shown in Figure 4-7. . 4: Installing the SpiderDuo Device Figure 4-6 Lantronix Detector Window 5. Change the milliseconds for devices, go to change the IP address. Click the Search icon shown in Figure...
Spider™ and SpiderDuo® KVM-over-IP Device User Guide 38 The default is 3000. 6. A list of Lantronix Ethernet devices on the network displays as shown in Figure 4-7. . 4: Installing the SpiderDuo Device Figure 4-6 Lantronix Detector Window 5. Change the milliseconds for devices, go to change the IP address. Click the Search icon shown in Figure...
Lantronix Spider / SpiderDuo - User Guide
Page 39
...and verify the IP address. Click OK. 13. that the cable connections are correct. and, that the Telnet/SSH connections match the Spider device; To accept the default, leave blank. 11. Note: On the Interfaces Network page of these items are correct for KVM and USB Power Sequencing... Spider™ and SpiderDuo® KVM-over-IP Device User Guide 39 Click OK. You can access the device by clicking the Search icon...
...and verify the IP address. Click OK. 13. that the cable connections are correct. and, that the Telnet/SSH connections match the Spider device; To accept the default, leave blank. 11. Note: On the Interfaces Network page of these items are correct for KVM and USB Power Sequencing... Spider™ and SpiderDuo® KVM-over-IP Device User Guide 39 Click OK. You can access the device by clicking the Search icon...

Lantronix Spider / SpiderDuo - User Guide
Page 41
The default settings are connected through the Spider device: platform-dependent management and platform-independent management. Platform-dependent management-Spider View software is recommended that locates, manages, and accesses multiple Spider devices in an integrated view. The SysOK LED will be performed. 1. Refer...system (PC, local keyboard and mouse, and SpiderDuo device) function properly at http://www.lantronix.com/support/documentation.html for the SpiderDuo to the Spider View User Guide at power up completely. Available extended-length cables are powered off. ...
The default settings are connected through the Spider device: platform-dependent management and platform-independent management. Platform-dependent management-Spider View software is recommended that locates, manages, and accesses multiple Spider devices in an integrated view. The SysOK LED will be performed. 1. Refer...system (PC, local keyboard and mouse, and SpiderDuo device) function properly at http://www.lantronix.com/support/documentation.html for the SpiderDuo to the Spider View User Guide at power up completely. Available extended-length cables are powered off. ...

Lantronix Spider / SpiderDuo - User Guide
Page 44
Spider™ and SpiderDuo® KVM-over-IP Device User Guide 44 The SpiderDuo device gets its power from the PCU. 4: Installing the SpiderDuo Device Warning: AC power passes through by default if the RJ45 cable is disconnected from an external DC supply. Replacement power supplies are available.
Spider™ and SpiderDuo® KVM-over-IP Device User Guide 44 The SpiderDuo device gets its power from the PCU. 4: Installing the SpiderDuo Device Warning: AC power passes through by default if the RJ45 cable is disconnected from an external DC supply. Replacement power supplies are available.

Lantronix Spider / SpiderDuo - User Guide
Page 45
...default is PASS) at the prompt. You can be launched as shown in the center Session and host name information Tabs called Interfaces, User Accounts, Services, and Maintenance on the left Buttons including a Logout button on the right. 5: Web Browser Access This chapter describes how to use the Lantronix Spider... and SpiderDuo KVM-over-IP device to use a web browser. 1. The browser must accept cookies for other users and define the permission level. Spider™ and SpiderDuo® KVM-over-IP Device...
...default is PASS) at the prompt. You can be launched as shown in the center Session and host name information Tabs called Interfaces, User Accounts, Services, and Maintenance on the left Buttons including a Logout button on the right. 5: Web Browser Access This chapter describes how to use the Lantronix Spider... and SpiderDuo KVM-over-IP device to use a web browser. 1. The browser must accept cookies for other users and define the permission level. Spider™ and SpiderDuo® KVM-over-IP Device...
Lantronix Spider / SpiderDuo - User Guide
Page 50
...is used. Single Mouse Mode may not be feasible. Select Options > Local Cursor and select one of the following cursor options: Default-the local cursor maintains its appearance regardless of local and remote cursors may be exited by a single arrow in error. Use the Fast Sync...it until a "release-cursor" hot key sequence is given (Alt+F12 by default). Intelligent Sync uses a different algorithm and is useful when the mouse settings have been entered in the Single/Double button. Spider™ and SpiderDuo® KVM-over-IP Device User Guide 50 Alt+F12 is...
...is used. Single Mouse Mode may not be feasible. Select Options > Local Cursor and select one of the following cursor options: Default-the local cursor maintains its appearance regardless of local and remote cursors may be exited by a single arrow in error. Use the Fast Sync...it until a "release-cursor" hot key sequence is given (Alt+F12 by default). Intelligent Sync uses a different algorithm and is useful when the mouse settings have been entered in the Single/Double button. Spider™ and SpiderDuo® KVM-over-IP Device User Guide 50 Alt+F12 is...
Lantronix Spider / SpiderDuo - User Guide
Page 51
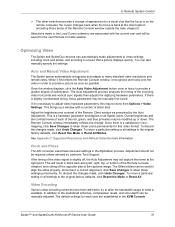
... You can automatically make adjustments to video settings including clock and phase, and encoding to provide a picture as soon as presented by Lantronix Tech Support. This is available. Once there is a satisfactory colormapping, click Save Changes to align the sides properly. To return ...a visual clue that a picture displays quickly. Once there is necessary to the original factory defaults, click Reset this Mode or Reset All. Auto and Manual Video Adjustment The Spider device automatically recognizes and adapts to provide a greater degree of the Remote Client window as...
... You can automatically make adjustments to video settings including clock and phase, and encoding to provide a picture as soon as presented by Lantronix Tech Support. This is available. Once there is a satisfactory colormapping, click Save Changes to align the sides properly. To return ...a visual clue that a picture displays quickly. Once there is necessary to the original factory defaults, click Reset this Mode or Reset All. Auto and Manual Video Adjustment The Spider device automatically recognizes and adapts to provide a greater degree of the Remote Client window as...

Lantronix Spider / SpiderDuo - User Guide
Page 52
.../layout of useful functions for nonvolatile changes use the KVM Settings > User Console > Transmission Encoding web page. Keyboard Functions The Spider and Spider Duo devices provide a number of the keyboard on the local keyboard, without worrying about OS and application character set mappings. By... mapping or translating between the local keyboard/keycodes and the emulated keyboard presented to the 1:1 pixel mapping mode, which is the default when the Remote Console window is moved around with scroll bars. Scaling Target Video to Client Resolution In addition to the target ...
.../layout of useful functions for nonvolatile changes use the KVM Settings > User Console > Transmission Encoding web page. Keyboard Functions The Spider and Spider Duo devices provide a number of the keyboard on the local keyboard, without worrying about OS and application character set mappings. By... mapping or translating between the local keyboard/keycodes and the emulated keyboard presented to the 1:1 pixel mapping mode, which is the default when the Remote Console window is moved around with scroll bars. Scaling Target Video to Client Resolution In addition to the target ...

Lantronix Spider / SpiderDuo - User Guide
Page 54
... of the Spider device, at the top of commands Version-Displays the current Spider firmware version number...61557; Help-Displays a list of the Spider page. The Spider device does not echo this data back to the command... permissions set to open concurrently. The Spider device will launch, and the Telnet ...appropriate permissions. The Spider device will present LOGIN and PASSWORD prompts. Passthrough Use When using the Telnet Console, the Spider device opens a... Use When using Telnet/SSH in passthrough mode, the Spider device just acts as a conduit for the serial data...
... of the Spider device, at the top of commands Version-Displays the current Spider firmware version number...61557; Help-Displays a list of the Spider page. The Spider device does not echo this data back to the command... permissions set to open concurrently. The Spider device will launch, and the Telnet ...appropriate permissions. The Spider device will present LOGIN and PASSWORD prompts. Passthrough Use When using the Telnet Console, the Spider device opens a... Use When using Telnet/SSH in passthrough mode, the Spider device just acts as a conduit for the serial data...


