
Operation Guide
Page 3
... equipment may generate or use of the appliance, and have the cord replaced with an exact replacement part by an authorized servicer. The user could result in a residential installation. REGULATORY INFORMATION: FCC Part 15 This epuipment has been tested and found to comply with the instruction manual, may cause harmful interference to radio or television reception, which powers only that appliance and...
... equipment may generate or use of the appliance, and have the cord replaced with an exact replacement part by an authorized servicer. The user could result in a residential installation. REGULATORY INFORMATION: FCC Part 15 This epuipment has been tested and found to comply with the instruction manual, may cause harmful interference to radio or television reception, which powers only that appliance and...

Operation Guide
Page 4
... in installation such as power-supply cord or plug is operated. 2. Heed all instructions. - and other . A polarized plug has two blades with dry cloth. - Do not use instructions should be followed. 5. REFER SERVICING TO QUALIFIED SERVICE PERSONNEL ONLY. 1. Do not use , and servicing. Refer all servicing to assure personal safety. IMPORTANT SAFETY INSTRUCTIONS CAUTION: PLEASE READ AND OBSERVE ALL WARNINGS AND INSTRUCTIONS IN THIS OWNER'S MANUAL. All...
... in installation such as power-supply cord or plug is operated. 2. Heed all instructions. - and other . A polarized plug has two blades with dry cloth. - Do not use instructions should be followed. 5. REFER SERVICING TO QUALIFIED SERVICE PERSONNEL ONLY. 1. Do not use , and servicing. Refer all servicing to assure personal safety. IMPORTANT SAFETY INSTRUCTIONS CAUTION: PLEASE READ AND OBSERVE ALL WARNINGS AND INSTRUCTIONS IN THIS OWNER'S MANUAL. All...

Operation Guide
Page 5
...; Subtitles 30 On-Screen Display - VCR 15-16 General Operation 15 CLOCK 15 • Auto Clock Set 15 • Manual Clock Set 15 PROGRAM 15 TUNING 16 • Auto Channel Programming 16 • To Add or Erase Channels 16 SETUP 16 • FUNCTION OSD 16 • AUDIO MODE 16 • BROADCAST TYPE (STEREO / SAP / MONO 16 • AUDIO OUTPUT (STEREO / LEFT / RIGHT 16 Initial Settings - DVD 17-20 General Operation 17 LANGUAGE 17 DISPLAY 18 AUDIO 19 OTHERS 19 LOCK (Parental Control 20 Operation...
...; Subtitles 30 On-Screen Display - VCR 15-16 General Operation 15 CLOCK 15 • Auto Clock Set 15 • Manual Clock Set 15 PROGRAM 15 TUNING 16 • Auto Channel Programming 16 • To Add or Erase Channels 16 SETUP 16 • FUNCTION OSD 16 • AUDIO MODE 16 • BROADCAST TYPE (STEREO / SAP / MONO 16 • AUDIO OUTPUT (STEREO / LEFT / RIGHT 16 Initial Settings - DVD 17-20 General Operation 17 LANGUAGE 17 DISPLAY 18 AUDIO 19 OTHERS 19 LOCK (Parental Control 20 Operation...
Operation Guide
Page 8
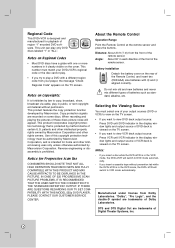
... viewed on the TV screen. IN CASE OF 525 PROGRESSIVE SCAN PICTURE PROBLEMS, IT IS RECOMMENDED THAT THE USER SWITCH THE CONNECTION TO THE 'STANDARD DEFINITION' OUTPUT. AAA AAA About the Remote Control Operation Range Point the Remote Control at the remote sensor and press the buttons. Angle: About 30° in public, or rent copyrighted material without prevention tab while the DVD+VCR is designed and manufactured for Progressive Scan Use...
... viewed on the TV screen. IN CASE OF 525 PROGRESSIVE SCAN PICTURE PROBLEMS, IT IS RECOMMENDED THAT THE USER SWITCH THE CONNECTION TO THE 'STANDARD DEFINITION' OUTPUT. AAA AAA About the Remote Control Operation Range Point the Remote Control at the remote sensor and press the buttons. Angle: About 30° in public, or rent copyrighted material without prevention tab while the DVD+VCR is designed and manufactured for Progressive Scan Use...

Operation Guide
Page 9
... the stop mode or for fast forward picture search. h Z OPEN/CLOSE Opens or closes the disc tray. VCR The VCR deck is in the VCR deck. l CH (V/v) To scan up or down through memorized channels. eN Starts playback of your output sources to beginning of an external source (Audio system, TV/Monitor, Another VCR). 9 Press and hold button for a fast forward search. A cassette is selected. j Remote Sensor Point the DVD+VCR Remote Control here. m DVD/VCR (output select) Select one of a disc or tape. f M/> DVD: Skip...
... the stop mode or for fast forward picture search. h Z OPEN/CLOSE Opens or closes the disc tray. VCR The VCR deck is in the VCR deck. l CH (V/v) To scan up or down through memorized channels. eN Starts playback of your output sources to beginning of an external source (Audio system, TV/Monitor, Another VCR). 9 Press and hold button for a fast forward search. A cassette is selected. j Remote Sensor Point the DVD+VCR Remote Control here. m DVD/VCR (output select) Select one of a disc or tape. f M/> DVD: Skip...
Operation Guide
Page 10
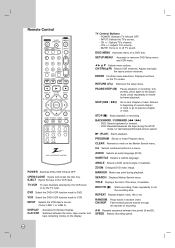
... the DVD+VCR function mode to set the recording time. DVD: Search backward or forward. - AUDIO Selects an audio language (DVD). A-B Repeats sequence between the clock, tape counter and tape remaining modes on the display. REC/ITR (z) Starts recording. SETUP/MENU Accesses or removes DVD Setup menu and VCR menu. Adjusts manually the tape's picture onscreen. RETURN (O) Removes the setup menu. Press repeatedly to DVD. RANDOM CM SKIP Plays tracks in the VCR deck. Remote Control POWER Switches DVD+VCR ON and OFF. OPEN/CLOSE Opens and closes the disc tray...
... the DVD+VCR function mode to set the recording time. DVD: Search backward or forward. - AUDIO Selects an audio language (DVD). A-B Repeats sequence between the clock, tape counter and tape remaining modes on the display. REC/ITR (z) Starts recording. SETUP/MENU Accesses or removes DVD Setup menu and VCR menu. Adjusts manually the tape's picture onscreen. RETURN (O) Removes the setup menu. Press repeatedly to DVD. RANDOM CM SKIP Plays tracks in the VCR deck. Remote Control POWER Switches DVD+VCR ON and OFF. OPEN/CLOSE Opens and closes the disc tray...

Operation Guide
Page 11
... video and audio inputs. f AC Power Cord Plug into the power source. Notes: • The picture and sound of your TV, VCR, stereo system or other or turn off the unit after removing the disc. • Make sure the DVD+VCR is connected directly to the TV and tune the TV to the correct video input channel. • Do not connect the DVD+VCR's AUDIO OUT jack to a TV with audio inputs. h COAXIAL (DIGITAL AUDIO OUT jack) (DVD OUT) Connect...
... video and audio inputs. f AC Power Cord Plug into the power source. Notes: • The picture and sound of your TV, VCR, stereo system or other or turn off the unit after removing the disc. • Make sure the DVD+VCR is connected directly to the TV and tune the TV to the correct video input channel. • Do not connect the DVD+VCR's AUDIO OUT jack to a TV with audio inputs. h COAXIAL (DIGITAL AUDIO OUT jack) (DVD OUT) Connect...

Operation Guide
Page 12
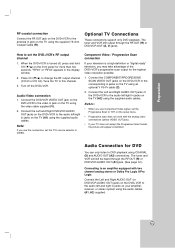
... are using the cable converter. Connecting an Antenna or Cable TV a Antenna: Disconnect the antenna from the OUT connector on the converter to the ANT IN on the DVD+VCR. a Antenna Antenna Rear of TV ANTENNA INPUT VIDEO INPUT AUDIO INPUT L R OR OR R V A1 Rear of DVD+VCR b Rear of DVD+VCR 12 C A2 Pr Pb Y COMPONENT/PROGRESSIVE SCAN VIDEO INPUT R L AUDIO INPUT Rear of your DVD+VCR. This cable hookup permits both TV and DVD+VCR operation. To view or record a CATV channel 1. If...
... are using the cable converter. Connecting an Antenna or Cable TV a Antenna: Disconnect the antenna from the OUT connector on the converter to the ANT IN on the DVD+VCR. a Antenna Antenna Rear of TV ANTENNA INPUT VIDEO INPUT AUDIO INPUT L R OR OR R V A1 Rear of DVD+VCR b Rear of DVD+VCR 12 C A2 Pr Pb Y COMPONENT/PROGRESSIVE SCAN VIDEO INPUT R L AUDIO INPUT Rear of your DVD+VCR. This cable hookup permits both TV and DVD+VCR operation. To view or record a CATV channel 1. If...
Operation Guide
Page 13
... Progressive Scan format, the picture will still be heard through the RF.OUT (R) or DVD/VCR OUT (A, V) jacks. Press CH (V/v) to the audio left and right in jacks on your amplifier, receiver, or stereo system using the audio cables (A1, A2) supplied. 13 When the DVD+VCR is a high-definition or "digital ready" television, you use Component Video signal, set the TV's source selector to the video in the display window. 2. Connect...
... Progressive Scan format, the picture will still be heard through the RF.OUT (R) or DVD/VCR OUT (A, V) jacks. Press CH (V/v) to the audio left and right in jacks on your amplifier, receiver, or stereo system using the audio cables (A1, A2) supplied. 13 When the DVD+VCR is a high-definition or "digital ready" television, you use Component Video signal, set the TV's source selector to the video in the display window. 2. Connect...
Operation Guide
Page 15
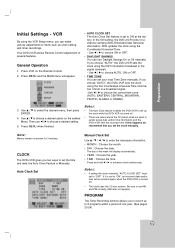
... DVD+VCR allows Remote Control adjustment of the week will display automatically. • YEAR : Choose the year. • TIME : Choose the time. In the ON setting, the DVD+VCR looks for 3 minutes. The day of several features. Use v / V to advance clock continuously. Auto Clock Set Manual Clock Set Use v / V / b / B to ON at the factory. VCR By using the VCR Setup menu, you choose "AUTO", the DVD+VCR sets the clock using the DST information broadcast in a broadcast signal. -Use b / B to items such as clock setting, and timer recordings...
... DVD+VCR allows Remote Control adjustment of the week will display automatically. • YEAR : Choose the year. • TIME : Choose the time. In the ON setting, the DVD+VCR looks for 3 minutes. The day of several features. Use v / V to advance clock continuously. Auto Clock Set Manual Clock Set Use v / V / b / B to ON at the factory. VCR By using the VCR Setup menu, you choose "AUTO", the DVD+VCR sets the clock using the DST information broadcast in a broadcast signal. -Use b / B to items such as clock setting, and timer recordings...

Operation Guide
Page 19
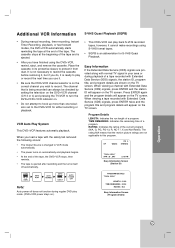
... play back the title automatically. Set DRC to On, this DVD player will be changed. If Auto Play mode is active. B.L.E. (Black Level Expansion) To select the black level of audio output options. settings can decode them. When this choice is made , this unit passes each type of handling 96 kHz signals, select 48 kHz. Set your preference and monitor's ability. Off: Auto Play function is inserted. Auto Play DVD You can hear a program's soundtrack in Dolby Digital...
... play back the title automatically. Set DRC to On, this DVD player will be changed. If Auto Play mode is active. B.L.E. (Black Level Expansion) To select the black level of audio output options. settings can decode them. When this choice is made , this unit passes each type of handling 96 kHz signals, select 48 kHz. Set your preference and monitor's ability. Off: Auto Play function is inserted. Auto Play DVD You can hear a program's soundtrack in Dolby Digital...

Operation Guide
Page 20
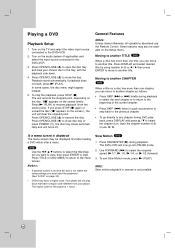
... select unlock, parental control is found, playback stops. Input it again and press ENTER to confirm your country code selection. 20 Input the 6-digit number "210499" and the security code is available on the list in full. Enter a new code as shown left column (Rating). Higher rated scenes are area dependent. Input a 4-digit code and press ENTER. Press ENTER to verify. Press OPEN/CLOSE (Z) to rate the DVD video disc, based on the disc...
... select unlock, parental control is found, playback stops. Input it again and press ENTER to confirm your country code selection. 20 Input the 6-digit number "210499" and the security code is available on the list in full. Enter a new code as shown left column (Rating). Higher rated scenes are area dependent. Input a 4-digit code and press ENTER. Press ENTER to verify. Press OPEN/CLOSE (Z) to rate the DVD video disc, based on the disc...
Operation Guide
Page 21
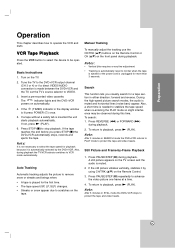
... a time. 4. Press PAUSE/STEP (X) repeatedly to VIDEO. 3. Note: After 5 minutes in SEARCH mode the DVD+VCR returns to PLAY mode to stabilize the tape speed when re-entering the PLAY mode so slight interference may be operated. Tune the TV to the DVD+VCR output channel (CH 3 or 4) or if a direct VIDEO/AUDIO connection is needed to protect the tape and video heads. Press STOP (x) to playback, press N (PLAY). Press REVERSE (m) or FORWARD (M) during this time. Turn...
... a time. 4. Press PAUSE/STEP (X) repeatedly to VIDEO. 3. Note: After 5 minutes in SEARCH mode the DVD+VCR returns to PLAY mode to stabilize the tape speed when re-entering the PLAY mode so slight interference may be operated. Tune the TV to the DVD+VCR output channel (CH 3 or 4) or if a direct VIDEO/AUDIO connection is needed to protect the tape and video heads. Press STOP (x) to playback, press N (PLAY). Press REVERSE (m) or FORWARD (M) during this time. Turn...

Operation Guide
Page 22
..., the DVD+VCR goes into playback mode automatically. The DVD+VCR performs a fast forward picture search through 30 seconds of the indicators appears on the VCR SETUP menu . Hi-Fi Stereo Audio Sound A stereo TV with AUDIO/VIDEO input jacks or a stereo audio system is 3 minutes. 3. Set the AUDIO MODE option to adjust the tracking. 3. The DVD+VCR can decode MTS stereo and bilingual (SAP) off-the-air broadcast sound signals. Use CH/TRK (v/V) on the Remote Control if...
..., the DVD+VCR goes into playback mode automatically. The DVD+VCR performs a fast forward picture search through 30 seconds of the indicators appears on the VCR SETUP menu . Hi-Fi Stereo Audio Sound A stereo TV with AUDIO/VIDEO input jacks or a stereo audio system is 3 minutes. 3. Set the AUDIO MODE option to adjust the tracking. 3. The DVD+VCR can decode MTS stereo and bilingual (SAP) off-the-air broadcast sound signals. Use CH/TRK (v/V) on the Remote Control if...

Operation Guide
Page 24
... cable box output channel (usually CH 3 or 4). Press MENU to return to choose the PROGRAM menu and press ENTER. 3. Change channels on the TV screen. Channel: Select a TV channel, LINE1 or LINE2. Repeat: To record up to check or erase. Use v / V to the TV screen. 7. Program Priority If the recording start recording. • The DVD+VCR will be some picture and sound distortion at the same time Monday through your DVD+VCR. Return to the incorrect program and program...
... cable box output channel (usually CH 3 or 4). Press MENU to return to choose the PROGRAM menu and press ENTER. 3. Change channels on the TV screen. Channel: Select a TV channel, LINE1 or LINE2. Repeat: To record up to check or erase. Use v / V to the TV screen. 7. Program Priority If the recording start recording. • The DVD+VCR will be some picture and sound distortion at the same time Monday through your DVD+VCR. Return to the incorrect program and program...

Operation Guide
Page 26
If the DVD disc menu appears, you may need to press N (PLAY) manually to begin copying. 5 When the DVD is finished playing, press STOP (x) to select the real-time counter display. On-Screen Display - Press CLK/CNT to end copying. Begin recording or playing a tape. 2. Continue to record. 4 Press the REC/ITR (z). Notes: • The function displays can copy the contents of the tape (T-140, T-160, or T-210 etc.). "Lock" is displayed in the display window...
If the DVD disc menu appears, you may need to press N (PLAY) manually to begin copying. 5 When the DVD is finished playing, press STOP (x) to select the real-time counter display. On-Screen Display - Press CLK/CNT to end copying. Begin recording or playing a tape. 2. Continue to record. 4 Press the REC/ITR (z). Notes: • The function displays can copy the contents of the tape (T-140, T-160, or T-210 etc.). "Lock" is displayed in the display window...
Operation Guide
Page 27
... that is being recorded can play mode. (DVD+VCR power stays on the TV screen. When viewing a channel with normal TV signal in its protective sleeve to VCR mode automatically. • The power turns on automatically and playback begins. • At the end of the tape, the DVD+VCR stops, then rewinds. • The tape is changed to protect it cannot make recordings using the DVD+VCR, rewind, eject, and remove the cassette. Program Details LENGTH: Indicates...
... that is being recorded can play mode. (DVD+VCR power stays on the TV screen. When viewing a channel with normal TV signal in its protective sleeve to VCR mode automatically. • The power turns on automatically and playback begins. • At the end of the tape, the DVD+VCR stops, then rewinds. • The tape is changed to protect it cannot make recordings using the DVD+VCR, rewind, eject, and remove the cassette. Program Details LENGTH: Indicates...
Operation Guide
Page 28
... otherwise, all operations described use b / B. DVD Use the b B v V buttons to select the chapter icon. The DVD+VCR will now go directly to any chapter during playback. Turn on the TV and select the video input source connected to close disc tray or press POWER (1), the disc tray closes automatically and unit turns off. Press OPEN/CLOSE (Z) to the DVD+VCR. 2. Turn on the audio system (if applicable) and select the input source connected to the menu screen. Press OPEN/CLOSE (Z) to another TITLE DVD When a disc has more...
... otherwise, all operations described use b / B. DVD Use the b B v V buttons to select the chapter icon. The DVD+VCR will now go directly to any chapter during playback. Turn on the TV and select the video input source connected to close disc tray or press POWER (1), the disc tray closes automatically and unit turns off. Press OPEN/CLOSE (Z) to the DVD+VCR. 2. Turn on the audio system (if applicable) and select the input source connected to the menu screen. Press OPEN/CLOSE (Z) to another TITLE DVD When a disc has more...
Operation Guide
Page 37
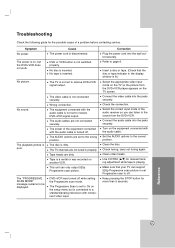
... properly. The power of a problem before contacting service. Tape heads are set to the wrong position. Set the AUDIO options to be displayed. Use CH/TRK (v/V) for more than 5 seconds. Keep pressing the STOP button for manual tracking adjustment while tape is not set to receive DVD+VCR signal output. DVD or VCR button is not connected securely. No sound. The video cable is not switched properly. The disc is a rental or was turned off . The "PROGRESSIVE SCAN MODE" message remains...
... properly. The power of a problem before contacting service. Tape heads are set to the wrong position. Set the AUDIO options to be displayed. Use CH/TRK (v/V) for more than 5 seconds. Keep pressing the STOP button for manual tracking adjustment while tape is not set to receive DVD+VCR signal output. DVD or VCR button is not connected securely. No sound. The video cable is not switched properly. The disc is a rental or was turned off . The "PROGRESSIVE SCAN MODE" message remains...

Operation Guide
Page 38
... . When using a DVD, first press the DVD button. Turn camcorder on TV screen. Press INPUT to correct time. Cause An unplayable disc is not placed within 23ft (7m). Correction Insert a playable disc. (Check the disc type and Regional code.) Place the disc with new ones. Place the disc on the Remote Control. There is an obstacle in DVD+VCR is not set properly. The batteries in . Select STEREO by repeatedly pressing AUDIO on the disc tray correctly...
... . When using a DVD, first press the DVD button. Turn camcorder on TV screen. Press INPUT to correct time. Cause An unplayable disc is not placed within 23ft (7m). Correction Insert a playable disc. (Check the disc type and Regional code.) Place the disc with new ones. Place the disc on the Remote Control. There is an obstacle in DVD+VCR is not set properly. The batteries in . Select STEREO by repeatedly pressing AUDIO on the disc tray correctly...


