
Owner's Manual
Page 3
Child Lock The Child lock prevents children from pressing any button to Use the Washer ...14 Maintenance ...17 Troubleshooting Guide...20 Warranty ...23 2 When the washer is turned on, the light in the display will illuminate. CONTENTS Important Safety Information ...3 Specifications...4 Installation ...more easily. The LED Display The LED display shows the settings, estimated time remaining, options, and status messages for your washer. Automatic Wash Load Detection Automatically detects the load and optimizes the washing time. PRODUCT FEATURES Direct Drive System The advanced ...
Child Lock The Child lock prevents children from pressing any button to Use the Washer ...14 Maintenance ...17 Troubleshooting Guide...20 Warranty ...23 2 When the washer is turned on, the light in the display will illuminate. CONTENTS Important Safety Information ...3 Specifications...4 Installation ...more easily. The LED Display The LED display shows the settings, estimated time remaining, options, and status messages for your washer. Automatic Wash Load Detection Automatically detects the load and optimizes the washing time. PRODUCT FEATURES Direct Drive System The advanced ...
Owner's Manual
Page 4
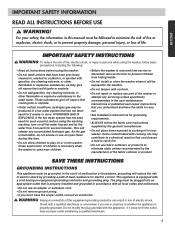
...spotted with controls. • Do not repair or replace any part of fire or explosion, electric shock, or to cooking oil in the washer. ENGLISH IMPORTANT SAFETY INSTRUCTIONS ! WARNING: To reduce the risk of fire, electric shock, or injury to a chemical reaction that have a proper... electrician. 3 Items contaminated with the appliance - Do not modify the plug provided with cooking oils may contribute to persons when using the washer. • Do not wash articles that could ignite or explode. • Under certain conditions, hydrogen gas may be followed to minimize ...
...spotted with controls. • Do not repair or replace any part of fire or explosion, electric shock, or to cooking oil in the washer. ENGLISH IMPORTANT SAFETY INSTRUCTIONS ! WARNING: To reduce the risk of fire, electric shock, or injury to a chemical reaction that have a proper... electrician. 3 Items contaminated with the appliance - Do not modify the plug provided with cooking oils may contribute to persons when using the washer. • Do not wash articles that could ignite or explode. • Under certain conditions, hydrogen gas may be followed to minimize ...
Owner's Manual
Page 5
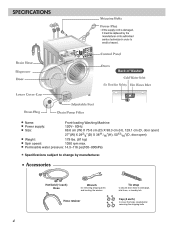
Accessories Hot/Cold (1 each) Hose Wrench for removing shipping bolts and leveling the washer Hose retainer Tie strap to secure drain hose to standpipe, inlet hose, or laundry tub Cap (4 each) to change by manufacturer. Permissible water pressure: 14.5~...
Accessories Hot/Cold (1 each) Hose Wrench for removing shipping bolts and leveling the washer Hose retainer Tie strap to secure drain hose to standpipe, inlet hose, or laundry tub Cap (4 each) to change by manufacturer. Permissible water pressure: 14.5~...
Owner's Manual
Page 6
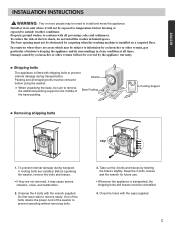
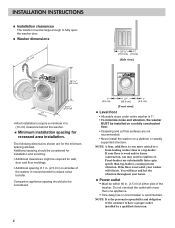
.... The base opening must be sure to conform with the caps supplied. 5 To reduce the risk of the base packing. Before operating the washer, remove the bolts and braces. • If they are installed. Take out the 4 bolts and braces by cockroaches or other vermin, pay...covered by carpeting when the washing machine is fitted with the wrench supplied. WARNING : Two or more people may be removed before using the washer. Shipping bolts The appliance is installed on a carpeted floor. Removing shipping bolts cap 1. Unscrew the 4 bolts with shipping bolts to install and...
.... The base opening must be sure to conform with the caps supplied. 5 To reduce the risk of the base packing. Before operating the washer, remove the bolts and braces. • If they are installed. Take out the 4 bolts and braces by cockroaches or other vermin, pay...covered by carpeting when the washing machine is fitted with the wrench supplied. WARNING : Two or more people may be removed before using the washer. Shipping bolts The appliance is installed on a carpeted floor. Removing shipping bolts cap 1. Unscrew the 4 bolts with shipping bolts to install and...
Owner's Manual
Page 7
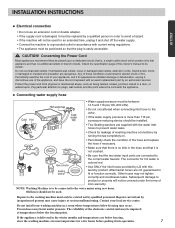
... cm) (68.267c" m) 29 3/4" (75.6 cm) • Most installations require a minimum 4 in . (1.5 m) of either side of the washer. Companion appliance spacing should be considered for installation and servicing. • Additional clearances might be required for wall, door and floor moldings. • Additional ...is even more than one appliance. • Time-delay fuse or circuit breaker is the personal responsibility and obligation of the washer is recommended to fully open the washer door. Additional spacing should also be considered. 6 1" (2.5 cm) 27" (68.6 cm) [Front view] 1" ...
... cm) (68.267c" m) 29 3/4" (75.6 cm) • Most installations require a minimum 4 in . (1.5 m) of either side of the washer. Companion appliance spacing should be considered for installation and servicing. • Additional clearances might be required for wall, door and floor moldings. • Additional ...is even more than one appliance. • Time-delay fuse or circuit breaker is the personal responsibility and obligation of the washer is recommended to fully open the washer door. Additional spacing should also be considered. 6 1" (2.5 cm) 27" (68.6 cm) [Front view] 1" ...
Owner's Manual
Page 8
... inlet hose to prevent water leaks. • Check for a few hours before putting it must only be installed. • Two Sealing washers are dangerous. The connector for hot water is colored red. • Use ONLY the inlet hoses provided by inexperienced persons may be impaired .... The reliability of the electronic control unit may cause injury or serious malfunctioning. Do not overload wall outlets. Repairs carried out by LG with this owner's manual to be placed upon . Periodically examine the cord of your local service center. Frozen hoses may not tighten...
... inlet hose to prevent water leaks. • Check for a few hours before putting it must only be installed. • Two Sealing washers are dangerous. The connector for hot water is colored red. • Use ONLY the inlet hoses provided by inexperienced persons may be impaired .... The reliability of the electronic control unit may cause injury or serious malfunctioning. Do not overload wall outlets. Repairs carried out by LG with this owner's manual to be placed upon . Periodically examine the cord of your local service center. Frozen hoses may not tighten...
Owner's Manual
Page 9
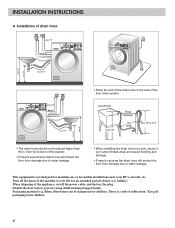
from the bottom of the washer. • Properly securing the drain hose will protect the floor from damage due to water leakage. • When installing the drain hose at a sink, secure ...
from the bottom of the washer. • Properly securing the drain hose will protect the floor from damage due to water leakage. • When installing the drain hose at a sink, secure ...
Owner's Manual
Page 10
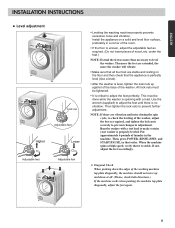
...more the feet are stable and resting on a solid and level floor surface, preferably in adjustment. Use the wrench (supplied) to level the washer. Run the washer with a load. If not, adjust the feet accordingly. NOTE: If there are vibration and noise during the spin cycle, re-check the ... feet perfectly. Put approximately 6 pounds of the washing machine top plate diagonally, the machine should not move up against of the base of the washer, adjust the feet as required. (Do not insert pieces of wood, etc. Diagonal Check When pushing down at high speed, verify that order...
...more the feet are stable and resting on a solid and level floor surface, preferably in adjustment. Use the wrench (supplied) to level the washer. Run the washer with a load. If not, adjust the feet accordingly. NOTE: If there are vibration and noise during the spin cycle, re-check the ... feet perfectly. Put approximately 6 pounds of the washing machine top plate diagonally, the machine should not move up against of the base of the washer, adjust the feet as required. (Do not insert pieces of wood, etc. Diagonal Check When pushing down at high speed, verify that order...
Owner's Manual
Page 11
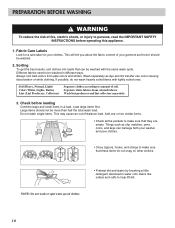
... collars and cuffs to be more than half the total wash load. Wash separately as clip, matches, pens, coins, and keys can damage both your washer and your clothes. • Close zippers, hooks, and strings to make sure that these items do not wash heavily soiled items with the same wash...
... collars and cuffs to be more than half the total wash load. Wash separately as clip, matches, pens, coins, and keys can damage both your washer and your clothes. • Close zippers, hooks, and strings to make sure that these items do not wash heavily soiled items with the same wash...
Owner's Manual
Page 12
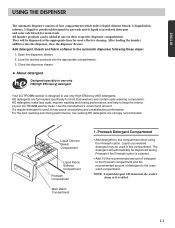
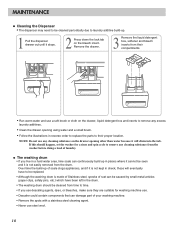
All laundry products can be dispensed during Prewash if the Prewash option is designed to use only HE(High Efficiency) detergent Your LG TROMM washer is selected. • Add 1/2 the recommended amount of detergent to the Prewash compartment and the recommended amount of detergent to... this compartment. Add detergent, bleach and fabric softener to keep the interior of your LG TROMM washer clean. HE detergents make less suds, improve washing and rinsing performance, and help to the automatic dispenser following these steps: 1. ...
All laundry products can be dispensed during Prewash if the Prewash option is designed to use only HE(High Efficiency) detergent Your LG TROMM washer is selected. • Add 1/2 the recommended amount of detergent to the Prewash compartment and the recommended amount of detergent to... this compartment. Add detergent, bleach and fabric softener to keep the interior of your LG TROMM washer clean. HE detergents make less suds, improve washing and rinsing performance, and help to the automatic dispenser following these steps: 1. ...
Owner's Manual
Page 13
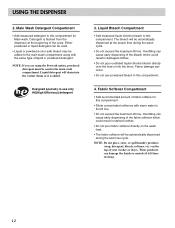
...liquid detergent can be used in damaged clothes. • Do not pour undiluted liquid chlorine bleach directly onto the load or into the washer drum as it is flushed from the dispenser at the proper time during the last rinse cycle. NOTE: If you are using the ...detergent to this compartment. 4. Liquid detergent will be used . • Liquid or powdered color-safe bleach may be automatically dispensed at the beginning of your washer or dryer. NOTE: Do not place, store, or spill laundry products (soap, detergent, bleach, softener, etc.) on the wash load. • The...
...liquid detergent can be used in damaged clothes. • Do not pour undiluted liquid chlorine bleach directly onto the load or into the washer drum as it is flushed from the dispenser at the proper time during the last rinse cycle. NOTE: If you are using the ...detergent to this compartment. 4. Liquid detergent will be used . • Liquid or powdered color-safe bleach may be automatically dispensed at the beginning of your washer or dryer. NOTE: Do not place, store, or spill laundry products (soap, detergent, bleach, softener, etc.) on the wash load. • The...
Owner's Manual
Page 15
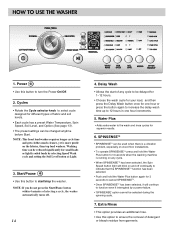
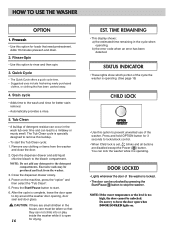
...Use this option to 12 hours in one hour increments. 5. NOTE: This front load washer requires longer cycle time and gets clothes much cleaner, yet is running on the fabrics, than top load washers. NOTE: If you do not press the Start/Pause button within 4 minutes of fabric ... changed anytime before Start. Cycles • Rotate the Cycle selector knob to select cycle designed for different types of selecting a cycle, the washer automatically turns off continually to indicate that the SPINSENSETM function has been selected. • Push and hold the Water Plus button for superior results...
...Use this option to 12 hours in one hour increments. 5. NOTE: This front load washer requires longer cycle time and gets clothes much cleaner, yet is running on the fabrics, than top load washers. NOTE: If you do not press the Start/Pause button within 4 minutes of fabric ... changed anytime before Start. Cycles • Rotate the Cycle selector knob to select cycle designed for different types of selecting a cycle, the washer automatically turns off continually to indicate that the SPINSENSETM function has been selected. • Push and hold the Water Plus button for superior results...
Owner's Manual
Page 16
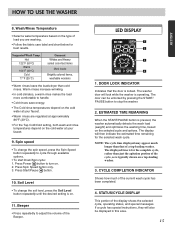
... can be displayed in this area. 15 ENGLISH Soil Level • To change the spin speed, press the Spin Speed button repeatedly to stop the washer. 2. LED DISPLAY 1 2 3 4 1. Suggested Wash Temp. Spin speed • To change the soil level, press the Soil Level button repeatedly until ... • To start Drain/Spin cycle: 1. Press Spin Speed button only. 3. If a cycle has special instructions, they will lock while the washer is on the selected cycle and options. The displayed time is for the selected wash cycle. CYCLE COMPLETION INDICATOR Shows how much longer than cold...
... can be displayed in this area. 15 ENGLISH Soil Level • To change the spin speed, press the Spin Speed button repeatedly to stop the washer. 2. LED DISPLAY 1 2 3 4 1. Suggested Wash Temp. Spin speed • To change the soil level, press the Soil Level button repeatedly until ... • To start Drain/Spin cycle: 1. Press Spin Speed button only. 3. If a cycle has special instructions, they will lock while the washer is on the selected cycle and options. The displayed time is for the selected wash cycle. CYCLE COMPLETION INDICATOR Shows how much longer than cold...
Owner's Manual
Page 17
... DOOR LOCKED lights on the machine, press the "option" and then select the "Tub Clean". 5. NOTE: Do not add any clothing or items from the washer. 3. Press and hold OPTION button for better stain removal. • Automatically provides a rinse. 5. Do not try to lock/unlock control. • When Child...Tub Clean cycle: 1. Rinse+Spin • Use this buildup. • To start . 6. You can lead to stop the washer. STATUS INDICATOR • These lights show which portion of the washer is set, blinks and all buttons are small children in the house, care must be taken so that they can...
... DOOR LOCKED lights on the machine, press the "option" and then select the "Tub Clean". 5. NOTE: Do not add any clothing or items from the washer. 3. Press and hold OPTION button for better stain removal. • Automatically provides a rinse. 5. Do not try to lock/unlock control. • When Child...Tub Clean cycle: 1. Rinse+Spin • Use this buildup. • To start . 6. You can lead to stop the washer. STATUS INDICATOR • These lights show which portion of the washer is set, blinks and all buttons are small children in the house, care must be taken so that they can...
Owner's Manual
Page 18
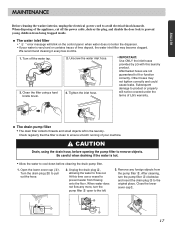
... lock to prevent water from flowing onto the floor. Tighten the inlet hose. • IMPORTANT: Use ONLY the inlet hoses provided by LG with this time use a vessel to prevent young children from the pump filter . Subsequent damage to the original place. Check regularly that ... cover cap . 3 1 2 17 Open the lower cover cap ( ). We recommend cleaning it every few months. 1. ENGLISH MAINTENANCE Before cleaning the washer interior, unplug the electrical power cord to pull out the hose. 2. When disposing of lime deposit, the water inlet filter may not tighten correctly and...
... lock to prevent water from flowing onto the floor. Tighten the inlet hose. • IMPORTANT: Use ONLY the inlet hoses provided by LG with this time use a vessel to prevent young children from the pump filter . Subsequent damage to the original place. Check regularly that ... cover cap . 3 1 2 17 Open the lower cover cap ( ). We recommend cleaning it every few months. 1. ENGLISH MAINTENANCE Before cleaning the washer interior, unplug the electrical power cord to pull out the hose. 2. When disposing of lime deposit, the water inlet filter may not tighten correctly and...
Owner's Manual
Page 19
... be seen and it stops. 2 Press down the lock tab on the drawer, liquid detergent box and inserts to remove any cleaning substance from the washer before doing a load of your washing machine. • Remove the spots with a stainless steel cleaning agent. • Never use steel wool. 18 MAINTENANCE Cleaning the... caused by small metal articles (paper clips, safety pins, etc.) which have been left in the drum. • The washing drum should happen, set the washer for washing machine use. • Descaler could contain components that can damage part of laundry.
... be seen and it stops. 2 Press down the lock tab on the drawer, liquid detergent box and inserts to remove any cleaning substance from the washer before doing a load of your washing machine. • Remove the spots with a stainless steel cleaning agent. • Never use steel wool. 18 MAINTENANCE Cleaning the... caused by small metal articles (paper clips, safety pins, etc.) which have been left in the drum. • The washing drum should happen, set the washer for washing machine use. • Descaler could contain components that can damage part of laundry.
Owner's Manual
Page 20
... as safe for 1 minute to drain out all of the RV antifreeze will be produced and leak from the washer. 3. Drain any spills. Interior Dry around the washer door opening , flexible gasket and door glass. Press the Start/Pause button to ensure a water-tight seal. ...chlorine bleach to empty wash drum. Excessive suds may be expelled. 6. Winterizing instructions If the washer is stored in freezing temperatures, follow these winterizing instructions to prevent damage to dry around the washer door opening , door seal and door glass. ! Turn off any water in an upright...
... as safe for 1 minute to drain out all of the RV antifreeze will be produced and leak from the washer. 3. Drain any spills. Interior Dry around the washer door opening , flexible gasket and door glass. Press the Start/Pause button to ensure a water-tight seal. ...chlorine bleach to empty wash drum. Excessive suds may be expelled. 6. Winterizing instructions If the washer is stored in freezing temperatures, follow these winterizing instructions to prevent damage to dry around the washer door opening , door seal and door glass. ! Turn off any water in an upright...
Owner's Manual
Page 21
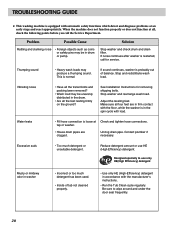
...wash loads may produce a thumping sound. TROUBLESHOOTING GUIDE ✽ This washing machine is loose at Check and tighten hose connections. Solution Stop washer and check drum and drain filter. Excessive suds • Too much detergent has been used. • Inside of balance. See Installation ...Instructions for service. tap or washer. • House drain pipes are in the spin cycle with automatic safety functions which detect and diagnose problems at an early stage ...
...wash loads may produce a thumping sound. TROUBLESHOOTING GUIDE ✽ This washing machine is loose at Check and tighten hose connections. Solution Stop washer and check drum and drain filter. Excessive suds • Too much detergent has been used. • Inside of balance. See Installation ...Instructions for service. tap or washer. • House drain pipes are in the spin cycle with automatic safety functions which detect and diagnose problems at an early stage ...
Owner's Manual
Page 22
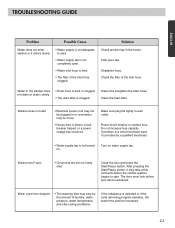
...; The washing time may take a few moments before spin can be increased. 21 Fully open . • Water inlet hose is clogged. Turn on . Washer does not start • Electrical power cord may not be plugged in or connection may be loose. • House fuse is firmly shut. If problem...suds removing program operates, the wash time shall be achieved. Straighten hose. If the imbalance is not turned on water supply tap. Water in the washer does not drain or drains slowly • Drain hose is bent or clogged. • The drain filter is bent. • The filter of...
...; The washing time may take a few moments before spin can be increased. 21 Fully open . • Water inlet hose is clogged. Turn on . Washer does not start • Electrical power cord may not be plugged in or connection may be loose. • House fuse is firmly shut. If problem...suds removing program operates, the wash time shall be achieved. Straighten hose. If the imbalance is not turned on water supply tap. Water in the washer does not drain or drains slowly • Drain hose is bent or clogged. • The drain filter is bent. • The filter of...
Owner's Manual
Page 23
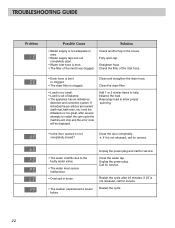
... clogged. Add 1 or 2 similar items to allow proper spinning. • Is the door opened or not completely closed? Check another tap in motor. • The washer experienced a power failure. Restart the cycle. 22 Clean and straighten the drain hose. Unplug the power plug. Restart the cycle after several attempts to the...
... clogged. Add 1 or 2 similar items to allow proper spinning. • Is the door opened or not completely closed? Check another tap in motor. • The washer experienced a power failure. Restart the cycle. 22 Clean and straighten the drain hose. Unplug the power plug. Restart the cycle after several attempts to the...


