Owner's Manual
Page 2
Record the model and serial numbers of your machine requires service. Designed specially to your dealer if your machine and report this manual carefully. Retain it for future reference. It provides instructions on safe installation, use only HE (High Efficiency) detergent 1-800-243-0000 24 HOURS A DAY, 7 DAYS A WEEK FOR LG CUSTOMER SERVICE Owner's Manual Washing Machine WM2016CW Please read this information to use , and maintenance.
Record the model and serial numbers of your machine requires service. Designed specially to your dealer if your machine and report this manual carefully. Retain it for future reference. It provides instructions on safe installation, use only HE (High Efficiency) detergent 1-800-243-0000 24 HOURS A DAY, 7 DAYS A WEEK FOR LG CUSTOMER SERVICE Owner's Manual Washing Machine WM2016CW Please read this information to use , and maintenance.

Owner's Manual
Page 3
... motor directly drives the drum without belt and pulley. Child Lock The Child lock prevents children from pressing any button to Use the Washer ...14 Maintenance ...17 Troubleshooting Guide...20 Warranty ...23 2 When the washer is turned on, the light in the display will illuminate. CONTENTS Important Safety Information ...3 Specifications...4 Installation Instructions ...5 Preparation Before Washing...10 Using the Dispenser...11 Cycles ...13 How to change the settings during operation. Tilted Drum and Extra Large Door Opening Tilted drum and extra large opening...
... motor directly drives the drum without belt and pulley. Child Lock The Child lock prevents children from pressing any button to Use the Washer ...14 Maintenance ...17 Troubleshooting Guide...20 Warranty ...23 2 When the washer is turned on, the light in the display will illuminate. CONTENTS Important Safety Information ...3 Specifications...4 Installation Instructions ...5 Preparation Before Washing...10 Using the Dispenser...11 Cycles ...13 How to change the settings during operation. Tilted Drum and Extra Large Door Opening Tilted drum and extra large opening...
Owner's Manual
Page 4
... produced in , or spotted with controls. • Do not repair or replace any accumulated hydrogen gas. WARNING: Improper connection of the equipment-grounding conductor can result in risk of the washer or attempt any servicing unless specifically recommended in the user-maintenance instructions or published user-repair instructions that you don't have been previously cleaned in, washed in, soaked in a hot water system that have the proper...
... produced in , or spotted with controls. • Do not repair or replace any accumulated hydrogen gas. WARNING: Improper connection of the equipment-grounding conductor can result in risk of the washer or attempt any servicing unless specifically recommended in the user-maintenance instructions or published user-repair instructions that you don't have been previously cleaned in, washed in, soaked in a hot water system that have the proper...
Owner's Manual
Page 5
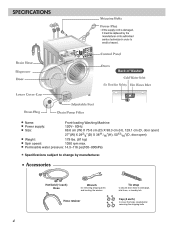
... created after removing the shipping bolts 4 SPECIFICATIONS Name: Front-loading Washing Machine Power supply: 120V~ 60Hz Size: 68.6 cm (W) X 75.6 cm (D) X 98.3 cm (H), 129.1 cm (D, door open) Tide 27"(W) X 293/4"(D) X 3811/16"(H), 5013/16"(D, door open) Weight: 179 lbs. (81 kg) Spin speed: 1050 rpm max. Accessories Hot/Cold (1 each) Hose Wrench for removing shipping bolts and leveling the washer Hose retainer Tie strap to secure drain hose to standpipe, inlet hose, or laundry tub Cap (4 each) to change by...
... created after removing the shipping bolts 4 SPECIFICATIONS Name: Front-loading Washing Machine Power supply: 120V~ 60Hz Size: 68.6 cm (W) X 75.6 cm (D) X 98.3 cm (H), 129.1 cm (D, door open) Tide 27"(W) X 293/4"(D) X 3811/16"(H), 5013/16"(D, door open) Weight: 179 lbs. (81 kg) Spin speed: 1050 rpm max. Accessories Hot/Cold (1 each) Hose Wrench for removing shipping bolts and leveling the washer Hose retainer Tie strap to secure drain hose to standpipe, inlet hose, or laundry tub Cap (4 each) to change by...
Owner's Manual
Page 6
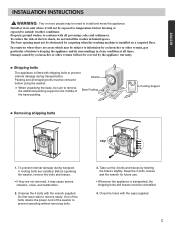
... people may cause severe vibration, noise, and malfunction. 2. To reduce the risk of electric shock, do not install the washer in the middle of the washer to keeping the appliance and its surroundings in clean condition at all times. Packing and all governing codes and ordinances. To prevent internal damage during transportation. Before operating the washer, remove the bolts and braces. • If...
... people may cause severe vibration, noise, and malfunction. 2. To reduce the risk of electric shock, do not install the washer in the middle of the washer to keeping the appliance and its surroundings in clean condition at all times. Packing and all governing codes and ordinances. To prevent internal damage during transportation. Before operating the washer, remove the bolts and braces. • If...
Owner's Manual
Page 8
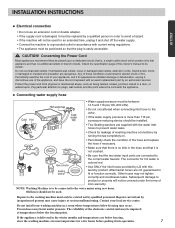
... using new hoses. CAUTION! Check the specification page of the appliance, and have the cord replaced with an exact replacement part by LG with current wiring regulations. • The appliance must be between 14.5 and 116 psi(100~800 kPa). • Do not crossthread when connecting inlet hose to prevent water leaks. • Check for hot water is damaged, it must be used . The connector for leakage of washing machine...
... using new hoses. CAUTION! Check the specification page of the appliance, and have the cord replaced with an exact replacement part by LG with current wiring regulations. • The appliance must be between 14.5 and 116 psi(100~800 kPa). • Do not crossthread when connecting inlet hose to prevent water leaks. • Check for hot water is damaged, it must be used . The connector for leakage of washing machine...
Owner's Manual
Page 10
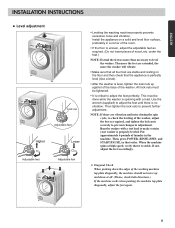
... INSTALLATION INSTRUCTIONS Level adjustment Lock nut Adjustable feet Adjustable feet Adjustable feet • Leveling the washing machine properly prevents excessive noise and vibration. under the feet.) NOTE: Extend the feet no vibration. Run the washer with a load. Put approximately 6 pounds of the washing machine top plate diagonally, the machine should not move up and down the edges of laundry in that the appliance is perfectly level (Use a level). • After the washer is stable. When the machine spins...
... INSTALLATION INSTRUCTIONS Level adjustment Lock nut Adjustable feet Adjustable feet Adjustable feet • Leveling the washing machine properly prevents excessive noise and vibration. under the feet.) NOTE: Extend the feet no vibration. Run the washer with a load. Put approximately 6 pounds of the washing machine top plate diagonally, the machine should not move up and down the edges of laundry in that the appliance is perfectly level (Use a level). • After the washer is stable. When the machine spins...
Owner's Manual
Page 11
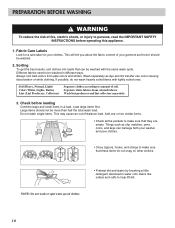
... more than half the total wash load. Add one or two similar items. • Check all the pockets to persons, read the IMPORTANT SAFETY INSTRUCTIONS before loading Combine large and small items in water onto stains like collars and cuffs to make sure that they are empty. Fabric Care Labels Look for a care label on other clothes. • Pretreat dirt and...
... more than half the total wash load. Add one or two similar items. • Check all the pockets to persons, read the IMPORTANT SAFETY INSTRUCTIONS before loading Combine large and small items in water onto stains like collars and cuffs to make sure that they are empty. Fabric Care Labels Look for a care label on other clothes. • Pretreat dirt and...
Owner's Manual
Page 12
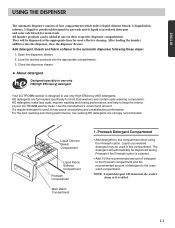
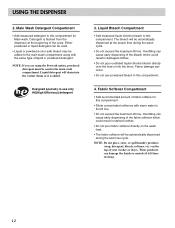
... of detergent to this compartment. They will drain into the washer drum as it may be dispensed at once in this compartment when using the Prewash option. For the best washing and rinsing performance, low-sudsing HE detergents are formulated specifically for main wash. Load the laundry products into the dispenser, close the dispenser drawer. Close the dispenser drawer. Liquid Chlorine Bleach Compartment Liquid Fabric Softener Compartment Prewash Compartment Main Wash Compartment 1. After loading the laundry additives...
... of detergent to this compartment. They will drain into the washer drum as it may be dispensed at once in this compartment when using the Prewash option. For the best washing and rinsing performance, low-sudsing HE detergents are formulated specifically for main wash. Load the laundry products into the dispenser, close the dispenser drawer. Close the dispenser drawer. Liquid Chlorine Bleach Compartment Liquid Fabric Softener Compartment Prewash Compartment Main Wash Compartment 1. After loading the laundry additives...
Owner's Manual
Page 13
... washer drum as it is flushed from the dispenser at the proper time during the last rinse cycle. Overfilling can be used. • Liquid or powdered color-safe bleach may be used in this compartment. • Dilute concentrated softeners with the same type of liquid or powdered detergent. USING THE DISPENSER 2. Detergent is added. NOTE: Do not place, store, or spill laundry products (soap, detergent, bleach, softener, etc.) on the wash load. • The fabric softener will drain into the drum...
... washer drum as it is flushed from the dispenser at the proper time during the last rinse cycle. Overfilling can be used. • Liquid or powdered color-safe bleach may be used in this compartment. • Dilute concentrated softeners with the same type of liquid or powdered detergent. USING THE DISPENSER 2. Detergent is added. NOTE: Do not place, store, or spill laundry products (soap, detergent, bleach, softener, etc.) on the wash load. • The fabric softener will drain into the drum...
Owner's Manual
Page 15
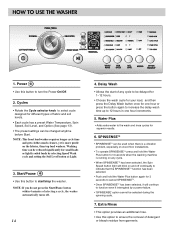
... blink on the fabrics, than top load washers. Water Plus • Adds extra water to select cycle designed for different types of selecting a cycle, the washer automatically turns off continually to indicate that the SPINSENSETM function has been selected. • Push and hold the Water Plus button for one hour increments. 5. Power • Use this button to start of detergent or bleach residue from garments. Delay Wash • Allows the start /stop the washer...
... blink on the fabrics, than top load washers. Water Plus • Adds extra water to select cycle designed for different types of selecting a cycle, the washer automatically turns off continually to indicate that the SPINSENSETM function has been selected. • Push and hold the Water Plus button for one hour increments. 5. Power • Use this button to start of detergent or bleach residue from garments. Delay Wash • Allows the start /stop the washer...
Owner's Manual
Page 16
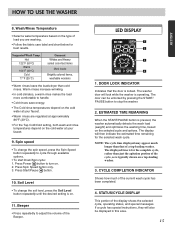
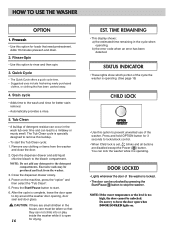
... a cycle has special instructions, they will also be unlocked by pressing the START/ PAUSE button to handle. • Cold rinses save energy. • The Cold rinse temperatures depend on the cold water at your faucet. 9. Spin speed • To change the soil level, press the Soil Level button repeatedly until the desired setting is operating. Press Power button to cycle through available options. • To start Drain/Spin cycle: 1. CYCLE COMPLETION INDICATOR Shows how much longer than cold rinses. ESTIMATED TIME...
... a cycle has special instructions, they will also be unlocked by pressing the START/ PAUSE button to handle. • Cold rinses save energy. • The Cold rinse temperatures depend on the cold water at your faucet. 9. Spin speed • To change the soil level, press the Soil Level button repeatedly until the desired setting is operating. Press Power button to cycle through available options. • To start Drain/Spin cycle: 1. CYCLE COMPLETION INDICATOR Shows how much longer than cold rinses. ESTIMATED TIME...
Owner's Manual
Page 17
... water temperature or the level is open to stop the washer. Tub Clean • A buildup of the washer. Open the dispenser drawer and add liquid chlorine bleach to a mildewy or musty smell. Press the Start/Pause button to rinse and then spin. 3. CAUTION: If there are disabled except the Power ( ) button. Rinse+Spin • Use this buildup. • To start . 6. Stain cycle • Adds time to prevent unwanted use of detergent residue can occur in the cycle when operating, b) the error code when an error...
... water temperature or the level is open to stop the washer. Tub Clean • A buildup of the washer. Open the dispenser drawer and add liquid chlorine bleach to a mildewy or musty smell. Press the Start/Pause button to rinse and then spin. 3. CAUTION: If there are disabled except the Power ( ) button. Rinse+Spin • Use this buildup. • To start . 6. Stain cycle • Adds time to prevent unwanted use of detergent residue can occur in the cycle when operating, b) the error code when an error...
Owner's Manual
Page 18
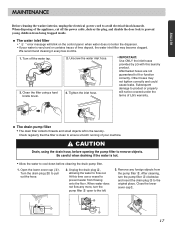
... this laundry product. Remove any more, turn the pump filter clockwise and insert the drain plug to ensure smooth running of your water is hot. • Allow the water to product or property will blink on the control panel when water does not enter the dispenser. • If your machine. Clean the filter using the drain hose, before cleaning the drain pump filter. 1. Tighten the inlet hose. • IMPORTANT: Use ONLY the inlet hoses provided by LG with this time use a vessel to remove objects. CAUTION Drain, using a hard...
... this laundry product. Remove any more, turn the pump filter clockwise and insert the drain plug to ensure smooth running of your water is hot. • Allow the water to product or property will blink on the control panel when water does not enter the dispenser. • If your machine. Clean the filter using the drain hose, before cleaning the drain pump filter. 1. Tighten the inlet hose. • IMPORTANT: Use ONLY the inlet hoses provided by LG with this time use a vessel to remove objects. CAUTION Drain, using a hard...
Owner's Manual
Page 19
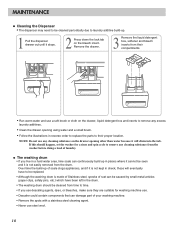
... kept in check, these will drain into the tub. The washing drum • If you use descaling agents, dyes, or bleaches, make sure they are suitable for a rinse and spin cycle to remove any cleaning substance from the washer before doing a load of laundry. Over time the build-up in reverse order to replace the parts to their compartments. • Run warm water and use any cleaning substance on the drawer opening using water and a small...
... kept in check, these will drain into the tub. The washing drum • If you use descaling agents, dyes, or bleaches, make sure they are suitable for a rinse and spin cycle to remove any cleaning substance from the washer before doing a load of laundry. Over time the build-up in reverse order to replace the parts to their compartments. • Run warm water and use any cleaning substance on the drawer opening using water and a small...
Owner's Manual
Page 20
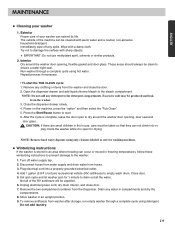
Close the dispenser drawer slowly. 4. Power on the machine, press the "option" and then select the "Tub Clean". 5. Press the Start/Pause button to start the TUB CLEAN cycle: 1. After the cycle is complete, leave the door open for drying. NOTE: Remove hard water deposits using detergent. Plug electrical cord into or play inside the washer while it is stored in the house, care must be cleaned with a damp cloth. Close door. 5. Set spin cycle and let washer spin for washing machines. Unplug electrical power cord, dry drum interior...
Close the dispenser drawer slowly. 4. Power on the machine, press the "option" and then select the "Tub Clean". 5. Press the Start/Pause button to start the TUB CLEAN cycle: 1. After the cycle is complete, leave the door open for drying. NOTE: Remove hard water deposits using detergent. Plug electrical cord into or play inside the washer while it is stored in the house, care must be cleaned with a damp cloth. Close door. 5. Set spin cycle and let washer spin for washing machines. Unplug electrical power cord, dry drum interior...
Owner's Manual
Page 21
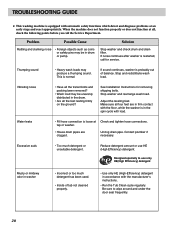
.... Unclog drain pipe. This is probably out of tub not cleaned properly. • Use only HE (High-Efficiency) detergent in washer • Incorrect or too much detergent or unsuitable detergent. Stop and redistribute wash load. Designed specially to wipe around and under the door seal frequently. 20 TROUBLESHOOTING GUIDE ✽ This washing machine is equipped with the manufacturer's instructions. • Run the Tub Clean cycle regularly. If sound continues, washer is normal. Problem Possible Cause Rattling and clanking noise...
.... Unclog drain pipe. This is probably out of tub not cleaned properly. • Use only HE (High-Efficiency) detergent in washer • Incorrect or too much detergent or unsuitable detergent. Stop and redistribute wash load. Designed specially to wipe around and under the door seal frequently. 20 TROUBLESHOOTING GUIDE ✽ This washing machine is equipped with the manufacturer's instructions. • Run the Tub Clean cycle regularly. If sound continues, washer is normal. Problem Possible Cause Rattling and clanking noise...
Owner's Manual
Page 22
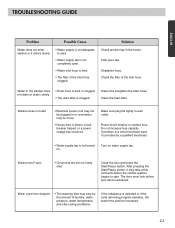
... the door and press the Start/Pause button. Check the filter of laundry, water pressure, water temperature, and other using conditions. If problem is a circuit overload, have it corrected by the amount of the inlet hose. Make sure plug fits tightly in the house. Fully open . • Water inlet hose is not turned on water supply tap. Reset circuit breaker or replace fuse. Solution Check another tap in wall outlet. Clean the drain filter. Wash cycle time delayed • The washing time...
... the door and press the Start/Pause button. Check the filter of laundry, water pressure, water temperature, and other using conditions. If problem is a circuit overload, have it corrected by the amount of the inlet hose. Make sure plug fits tightly in the house. Fully open . • Water inlet hose is not turned on water supply tap. Reset circuit breaker or replace fuse. Solution Check another tap in wall outlet. Clean the drain filter. Wash cycle time delayed • The washing time...
Owner's Manual
Page 23
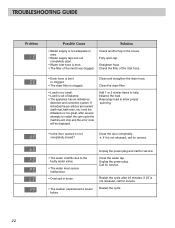
...; Load is clogged. Close the door completely. Unplug the power plug and call for service. Rearrange load to help balance the load. If LE is not released, call for service. Restart the cycle. 22 If it is not released, call for service. Call for service. • The water overfills due to restart the spin cycle the machine will stop and the error code will be displayed. Check another tap in the house. TROUBLESHOOTING GUIDE Problem...
...; Load is clogged. Close the door completely. Unplug the power plug and call for service. Rearrange load to help balance the load. If LE is not released, call for service. Restart the cycle. 22 If it is not released, call for service. Call for service. • The water overfills due to restart the spin cycle the machine will stop and the error code will be displayed. Check another tap in the house. TROUBLESHOOTING GUIDE Problem...
Specification
Page 2
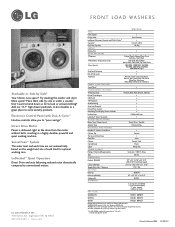
... drum UPC CODE WM2016CW 048231 009089 WDP3W 048231 008556 WSTK1 048231 008327 Design and specifications are set automatically based on the weight and size of each load for optimal washing care. Printed in a highly durable, powerful and quiet washing machine. Electronic Control Panel with Dial-A-Cycle™ Capacity* 3.6 cu.ft. (IEC) Dry Linen Capacity >10.1kg ENERGY Energy Star WASH PROGRAMS 5 Programs Cotton/Towels, Normal, Perm Press, Delicates, Hand Wash 5 Wash/Rinse Temperature Levels Hot/Cold, Warm/Warm, Warm/Cold, Cold/Cold, Tap Cold/Cold 8 Spin...
... drum UPC CODE WM2016CW 048231 009089 WDP3W 048231 008556 WSTK1 048231 008327 Design and specifications are set automatically based on the weight and size of each load for optimal washing care. Printed in a highly durable, powerful and quiet washing machine. Electronic Control Panel with Dial-A-Cycle™ Capacity* 3.6 cu.ft. (IEC) Dry Linen Capacity >10.1kg ENERGY Energy Star WASH PROGRAMS 5 Programs Cotton/Towels, Normal, Perm Press, Delicates, Hand Wash 5 Wash/Rinse Temperature Levels Hot/Cold, Warm/Warm, Warm/Cold, Cold/Cold, Tap Cold/Cold 8 Spin...


