Owner's Manual (English)
Page 3
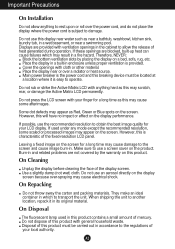
...damage. Do not rub or strike the Active Matrix LCD with cloth or other material. Do not press the LCD screen with general household waste. If possible, use an aerosol directly on the screen. Do not use the recommended resolution to another location, repack it is provided. They ...in this may appear as this product contains a small amount of mercury. On Cleaning Unplug the display before cleaning the face of the fixed-resolution LCD panel. Leaving a fixed image on the product. Disposal of this may cause some scaled or processed images may cause electrical shock. Do not...
...damage. Do not rub or strike the Active Matrix LCD with cloth or other material. Do not press the LCD screen with general household waste. If possible, use an aerosol directly on the screen. Do not use the recommended resolution to another location, repack it is provided. They ...in this may appear as this product contains a small amount of mercury. On Cleaning Unplug the display before cleaning the face of the fixed-resolution LCD panel. Leaving a fixed image on the product. Disposal of this may cause some scaled or processed images may cause electrical shock. Do not...
Owner's Manual (English)
Page 8
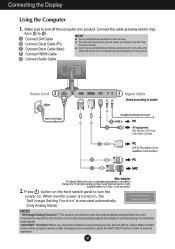
...use shielded signal interface cables (D-sub 15 pin cable, DVI cable) with optimal display settings.When the user connects the monitor for the first time, this function automatically adjusts the display to maintain standard compliance for individual input signals. 'AUTO/SET' Function? When... the product. When you encounter problems such as blurry screen, blurred letters, screen flicker or tilted screen while using the device or after changing screen resolution, press the AUTO/SET function button to 2 . C Connect Dsub Cable (Mac) D Connect HDMI Cable User must use , a separate plug ...
...use shielded signal interface cables (D-sub 15 pin cable, DVI cable) with optimal display settings.When the user connects the monitor for the first time, this function automatically adjusts the display to maintain standard compliance for individual input signals. 'AUTO/SET' Function? When... the product. When you encounter problems such as blurry screen, blurred letters, screen flicker or tilted screen while using the device or after changing screen resolution, press the AUTO/SET function button to 2 . C Connect Dsub Cable (Mac) D Connect HDMI Cable User must use , a separate plug ...
Owner's Manual (English)
Page 10
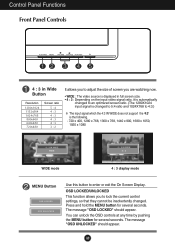
... MENU button for several seconds. OSD LOCKED/UNLOCKED This function allows you are watching now. • WIDE : The video source is displayed in Wide Button Resolution 1280x1024 1152x864 1024x768 800x600 640x480 720x480 Screen ratio 5 : 4 4 : 3 4 : 3 4 : 3 4 : 3 3 : 2 It allows you to adjust the size of screen you to lock the current control settings, so...
... MENU button for several seconds. OSD LOCKED/UNLOCKED This function allows you are watching now. • WIDE : The video source is displayed in Wide Button Resolution 1280x1024 1152x864 1024x768 800x600 640x480 720x480 Screen ratio 5 : 4 4 : 3 4 : 3 4 : 3 4 : 3 3 : 2 It allows you to adjust the size of screen you to lock the current control settings, so...
Owner's Manual (English)
Page 11
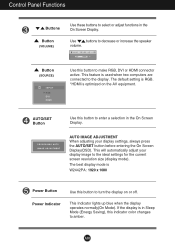
... the On Screen Display(OSD). If the display is used when two computers are connected to amber. A10 The default setting is RGB. *HDMI is W2442PA : 1920 x 1080 Power Button Power Indicator Use this button to turn the display on the AV equipment. AUTO/SET Button Use this indicator color changes... or adjust functions in the On Screen Display. Control Panel Functions Buttons Button (VOLUME) Use these buttons to the ideal settings for the current screen resolution size (display mode).
... the On Screen Display(OSD). If the display is used when two computers are connected to amber. A10 The default setting is RGB. *HDMI is W2442PA : 1920 x 1080 Power Button Power Indicator Use this button to turn the display on the AV equipment. AUTO/SET Button Use this indicator color changes... or adjust functions in the On Screen Display. Control Panel Functions Buttons Button (VOLUME) Use these buttons to the ideal settings for the current screen resolution size (display mode).

Owner's Manual (English)
Page 21
...24 bits (true color). If yes, readjust the video card to the computer or the video card manufacturer. Important Check Control Panel --> Display --> Settings and see if the frequency or the resolution were changed. The setting method can differ by computer and O/S (Operation System), and resolution...V position icon in the on screen display. • Check Control Panel --> Display --> Settings and adjust the display to the recommended resolution or adjust the display image to the ideal setting. If the results are unsatisfactory, decrease the vertical bars or stripes using the PHASE icon...
...24 bits (true color). If yes, readjust the video card to the computer or the video card manufacturer. Important Check Control Panel --> Display --> Settings and see if the frequency or the resolution were changed. The setting method can differ by computer and O/S (Operation System), and resolution...V position icon in the on screen display. • Check Control Panel --> Display --> Settings and adjust the display to the recommended resolution or adjust the display image to the ideal setting. If the results are unsatisfactory, decrease the vertical bars or stripes using the PHASE icon...
Owner's Manual (English)
Page 22
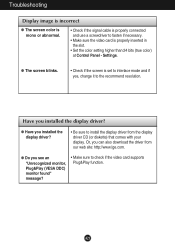
...the video card is set to interlace mode and if yes, change it to the recommend resolution. Have you installed the display driver? ● Have you see an "Unrecognized monitor, Plug&Play (VESA DDC) monitor found" message? • Make sure to check if the video card supports Plug&Play ...function. A21 Settings. ● The screen blinks. • Check if the screen is properly inserted in the slot. • Set the color setting higher than 24 bits (...
...the video card is set to interlace mode and if yes, change it to the recommend resolution. Have you installed the display driver? ● Have you see an "Unrecognized monitor, Plug&Play (VESA DDC) monitor found" message? • Make sure to check if the video card supports Plug&Play ...function. A21 Settings. ● The screen blinks. • Check if the screen is properly inserted in the slot. • Set the color setting higher than 24 bits (...
Owner's Manual (English)
Page 23
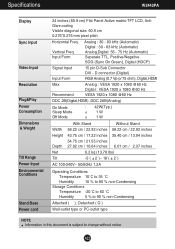
... Information in this document is subject to change without notice. Specifications W2442PA Display Sync Input Video Input Resolution Plug&Play Power Consumption Dimensions & Weight Tilt Range Power Input Environmental Conditions Stand Base Power cord 24 inches (60.9 cm) Flat Panel Active matrix-TFT LCD, AntiGlare coating Visible diagonal size: 60.9 cm 0.276*0.276 mm...
... Information in this document is subject to change without notice. Specifications W2442PA Display Sync Input Video Input Resolution Plug&Play Power Consumption Dimensions & Weight Tilt Range Power Input Environmental Conditions Stand Base Power cord 24 inches (60.9 cm) Flat Panel Active matrix-TFT LCD, AntiGlare coating Visible diagonal size: 60.9 cm 0.276*0.276 mm...
Owner's Manual (English)
Page 24
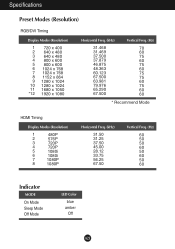
Specifications Preset Modes (Resolution) RGB/DVI Timing Display Modes (Resolution) 1 720 x 400 2 640 x 480 3 640 x 480 4 800 x 600 5 800 x 600 6 1024 x 768 7 1024 x 768 8 1152 x 864 9 1280 x 1024 10 1280 x 1024 11 1680 x 1050 *12 ... 65.290 67.500 Vertical Freq. (Hz) 70 60 75 60 75 60 75 75 60 75 60 60 * Recommend Mode HDMI Timing Display Modes (Resolution) 1 480P 2 576P 3 720P 4 720P 5 1080i 6 1080i 7 1080P 8 1080P Horizontal Freq. (kHz) 31.50 31.25 37.50 45.00 28.12 33.75 56.25...
Specifications Preset Modes (Resolution) RGB/DVI Timing Display Modes (Resolution) 1 720 x 400 2 640 x 480 3 640 x 480 4 800 x 600 5 800 x 600 6 1024 x 768 7 1024 x 768 8 1152 x 864 9 1280 x 1024 10 1280 x 1024 11 1680 x 1050 *12 ... 65.290 67.500 Vertical Freq. (Hz) 70 60 75 60 75 60 75 75 60 75 60 60 * Recommend Mode HDMI Timing Display Modes (Resolution) 1 480P 2 576P 3 720P 4 720P 5 1080i 6 1080i 7 1080P 8 1080P Horizontal Freq. (kHz) 31.50 31.25 37.50 45.00 28.12 33.75 56.25...


