
Owner's Manual (English)
Page 4
... a standing base when the base is pulled up the monitor, ensure that the power to the monitor, the computer system, and other attached devices is turned off. Assemble... shown in the picture. Connecting the Display Before setting up . Your monitor may only be injured by the protruding sections of connection. A3 Make the monitor stand , then pull out the Stop Pin. Warning: The tape and... locking pin may differ from those monitors equipped with its front facing downward on a cushion or soft cloth. 2. Connecting the stand...
... a standing base when the base is pulled up the monitor, ensure that the power to the monitor, the computer system, and other attached devices is turned off. Assemble... shown in the picture. Connecting the Display Before setting up . Your monitor may only be injured by the protruding sections of connection. A3 Make the monitor stand , then pull out the Stop Pin. Warning: The tape and... locking pin may differ from those monitors equipped with its front facing downward on a cushion or soft cloth. 2. Connecting the stand...

Owner's Manual (English)
Page 5
... the position of the monitor should not exceed 5 degrees. A4 Tilt Range: Swivel: 356˚ -7˚~ -3˚ 16˚~ 20˚ Height Range: maximum 4.33 inch (110.0 mm) First, remove the locking pin. 110.0 mm Ergonomic It is recommended that the power to maintain an ergonomic ...and comfortable viewing position, the forward tilt angle of the panel in order to the monitor, the computer system, and other attached devices is turned off. Positioning your display 1....
... the position of the monitor should not exceed 5 degrees. A4 Tilt Range: Swivel: 356˚ -7˚~ -3˚ 16˚~ 20˚ Height Range: maximum 4.33 inch (110.0 mm) First, remove the locking pin. 110.0 mm Ergonomic It is recommended that the power to maintain an ergonomic ...and comfortable viewing position, the forward tilt angle of the panel in order to the monitor, the computer system, and other attached devices is turned off. Positioning your display 1....

Owner's Manual (English)
Page 7
For if you don't do like that the power to let your display Using the cable holder If you cannot use the cable holder to the monitor, the computer system, and other attached devices is turned off. Positioning your cables together, please put them through right as shown. A6 Connecting the Display Before setting up the monitor, ensure that , you want to use Pivot function smoothly.
For if you don't do like that the power to let your display Using the cable holder If you cannot use the cable holder to the monitor, the computer system, and other attached devices is turned off. Positioning your cables together, please put them through right as shown. A6 Connecting the Display Before setting up the monitor, ensure that , you want to use Pivot function smoothly.
Owner's Manual (English)
Page 8
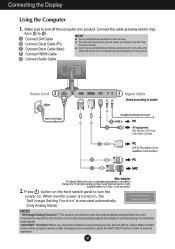
... This is executed automatically. (Only Analog Mode) NOTE ' Self Image Setting Function'? E Connect Audio Cable Power Cord Wall-outlet type Signal Cable Varies according to turn the power on , the 'Self Image Setting Function' is a simplified representation of the rear view. Connecting the Display... DVI cable) with optimal display settings.When the user connects the monitor for the first time, this function automatically adjusts the display to improve resolution. This rear view represents a general model; When monitor power is turned on . your display may differ from the view as...
... This is executed automatically. (Only Analog Mode) NOTE ' Self Image Setting Function'? E Connect Audio Cable Power Cord Wall-outlet type Signal Cable Varies according to turn the power on , the 'Self Image Setting Function' is a simplified representation of the rear view. Connecting the Display... DVI cable) with optimal display settings.When the user connects the monitor for the first time, this function automatically adjusts the display to improve resolution. This rear view represents a general model; When monitor power is turned on . your display may differ from the view as...
Owner's Manual (English)
Page 19
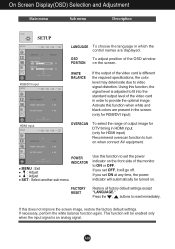
OSD To adjust position of the monitor to turn on the front side of the OSD window POSITION on... when the input signal is different the required specifications, the color level may deteriorate due to reset immediately. HDMI POWER INDICATOR MENU : Exit : Adjust : Adjust SET : Select another sub-menu Use this does not improve the... screen image, restore the factory default settings. If you set the power indicator on when connect AV equipment. FACTORY RESET Restore all factory default settings except "LANGUAGE." On Screen Display(OSD...
OSD To adjust position of the monitor to turn on the front side of the OSD window POSITION on... when the input signal is different the required specifications, the color level may deteriorate due to reset immediately. HDMI POWER INDICATOR MENU : Exit : Adjust : Adjust SET : Select another sub-menu Use this does not improve the... screen image, restore the factory default settings. If you set the power indicator on when connect AV equipment. FACTORY RESET Restore all factory default settings except "LANGUAGE." On Screen Display(OSD...


