Owner's Manual (English)
Page 3
... in a fire hazard. Do not rub or strike the Active Matrix LCD with general household waste. If possible, use the recommended resolution to another location, repack it is characteristic of the fixed-resolution LCD panel. On Cleaning Unplug the display before cleaning the face of the ... Some dot defects may result in its original material. On Disposal The fluorescent lamp used under any mode except the recommended resolution, some afterimages. They make an ideal container in enclosure unless proper ventilation is subject to the regulations of your local authority...
... in a fire hazard. Do not rub or strike the Active Matrix LCD with general household waste. If possible, use the recommended resolution to another location, repack it is characteristic of the fixed-resolution LCD panel. On Cleaning Unplug the display before cleaning the face of the ... Some dot defects may result in its original material. On Disposal The fluorescent lamp used under any mode except the recommended resolution, some afterimages. They make an ideal container in enclosure unless proper ventilation is subject to the regulations of your local authority...
Owner's Manual (English)
Page 7
... and product. This function provides the user with optimal display settings.When the user connects the monitor for the first time, this function automatically adjusts the display to improve resolution. Press button on the front switch panel to turn the power on. When you encounter problems... to a 15 pin 2 row connector. A6 When monitor power is turned on the supplied cable to 2 . Connect the cable as blurry screen, blurred letters, screen flicker or tilted screen while using the device or after changing screen resolution, press the AUTO/SET function button to optimal settings...
... and product. This function provides the user with optimal display settings.When the user connects the monitor for the first time, this function automatically adjusts the display to improve resolution. Press button on the front switch panel to turn the power on. When you encounter problems... to a 15 pin 2 row connector. A6 When monitor power is turned on the supplied cable to 2 . Connect the cable as blurry screen, blurred letters, screen flicker or tilted screen while using the device or after changing screen resolution, press the AUTO/SET function button to optimal settings...
Owner's Manual (English)
Page 9
AUTO IMAGE ADJUSTMENT When adjusting your display image to the ideal settings for the current screen resolution size (display mode). This will automatically adjust your display settings, always press the AUTO/SET button before entering the On Screen Display(OSD). The best ... these buttons to select or adjust functions in the On Screen Display. Use this indicator color changes to amber. If the display is - 19 inch monitor : 1440 x 900 - 20.1/22 inch monitor : 1680 x 1050 Power Button Power Indicator Use this button to page A15.
AUTO IMAGE ADJUSTMENT When adjusting your display image to the ideal settings for the current screen resolution size (display mode). This will automatically adjust your display settings, always press the AUTO/SET button before entering the On Screen Display(OSD). The best ... these buttons to select or adjust functions in the On Screen Display. Use this indicator color changes to amber. If the display is - 19 inch monitor : 1440 x 900 - 20.1/22 inch monitor : 1680 x 1050 Power Button Power Indicator Use this button to page A15.
Owner's Manual (English)
Page 18
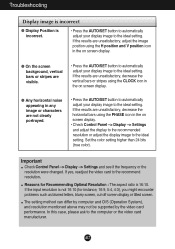
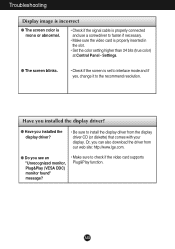
...PHASE icon in the on screen display. • Check Control Panel --> Display --> Settings and adjust the display to the recommended resolution or adjust the display image to the computer or the video card manufacturer. If the results are unsatisfactory, decrease the vertical bars ... adjust your display image to the ideal setting. Important Check Control Panel --> Display --> Settings and see if the frequency or the resolution were changed. Troubleshooting Display image is incorrect ● Display Position is incorrect. • Press the AUTO/SET button to automatically adjust...
...PHASE icon in the on screen display. • Check Control Panel --> Display --> Settings and adjust the display to the recommended resolution or adjust the display image to the computer or the video card manufacturer. If the results are unsatisfactory, decrease the vertical bars ... adjust your display image to the ideal setting. Important Check Control Panel --> Display --> Settings and see if the frequency or the resolution were changed. Troubleshooting Display image is incorrect ● Display Position is incorrect. • Press the AUTO/SET button to automatically adjust...
Owner's Manual (English)
Page 19
Have you installed the display driver? ● Have you see an "Unrecognized monitor, Plug&Play (VESA DDC) monitor found" message? • Make sure to check if the video card supports Plug&Play function. Troubleshooting Display image is incorrect ● The screen color is ... use a screwdriver to fasten if necessary. • Make sure the video card is set to interlace mode and if yes, change it to the recommend resolution. A18 Or, you can also download the driver from our web site: http://www.lge.com. ● Do you installed the display driver? • Be...
Have you installed the display driver? ● Have you see an "Unrecognized monitor, Plug&Play (VESA DDC) monitor found" message? • Make sure to check if the video card supports Plug&Play function. Troubleshooting Display image is incorrect ● The screen color is ... use a screwdriver to fasten if necessary. • Make sure the video card is set to interlace mode and if yes, change it to the recommend resolution. A18 Or, you can also download the driver from our web site: http://www.lge.com. ● Do you installed the display driver? • Be...
Owner's Manual (English)
Page 20
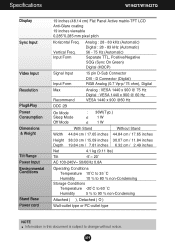
... or PC-outlet type NOTE Information in this document is subject to change without notice. Vertical Freq. Specifications W1942T/W1942TQ Display Sync Input Video Input Resolution Plug&Play Power Consumption Dimensions & Weight Tilt Range Power Input Environmental Conditions Stand Base Power cord 19 inches (48.14 cm) Flat Panel Active matrix...
... or PC-outlet type NOTE Information in this document is subject to change without notice. Vertical Freq. Specifications W1942T/W1942TQ Display Sync Input Video Input Resolution Plug&Play Power Consumption Dimensions & Weight Tilt Range Power Input Environmental Conditions Stand Base Power cord 19 inches (48.14 cm) Flat Panel Active matrix...

Owner's Manual (English)
Page 21
...-outlet type or PC-outlet type NOTE Information in this document is subject to change without notice. Specifications W2042T/W2042TQ Display Sync Input Video Input Resolution Plug&Play Power Consumption Dimensions & Weight Tilt Range Power Input Environmental Conditions Stand Base Power cord 20.1 inches (51.11 cm) Flat Panel Active matrix...
...-outlet type or PC-outlet type NOTE Information in this document is subject to change without notice. Specifications W2042T/W2042TQ Display Sync Input Video Input Resolution Plug&Play Power Consumption Dimensions & Weight Tilt Range Power Input Environmental Conditions Stand Base Power cord 20.1 inches (51.11 cm) Flat Panel Active matrix...

Owner's Manual (English)
Page 22
... to change without notice. Vertical Freq. Specifications W2242T/W2242TQ Display Sync Input Video Input Resolution Plug&Play Power Consumption Dimensions & Weight Tilt Range Power Input Environmental Conditions Stand Base Power cord 22 inches (55.868 cm) Flat Panel Active matrix-TFT LCD, Anti-Glare coating 22 inches viewable 0.282*0.282 mm pixel pitch Horizontal Freq...
... to change without notice. Vertical Freq. Specifications W2242T/W2242TQ Display Sync Input Video Input Resolution Plug&Play Power Consumption Dimensions & Weight Tilt Range Power Input Environmental Conditions Stand Base Power cord 22 inches (55.868 cm) Flat Panel Active matrix-TFT LCD, Anti-Glare coating 22 inches viewable 0.282*0.282 mm pixel pitch Horizontal Freq...
Owner's Manual (English)
Page 23
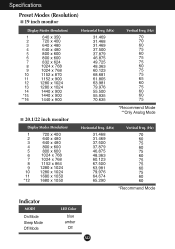
... 9 1024 x 768 10 1152 x 870 11 1152 x 900 12 1280 x 1024 13 1280 x 1024 14 1440 x 900 *15 1440 x 900 **16 1440 x 900 20.1/22 inch monitor Display Modes (Resolution) 1 720 x 400 2 640 x 480 3 640 x 480 4 800 x 600 5 800 x 600 6 1024 x 768 7 1024 x 768 8 1152 x 864 9 1280 x 1024 10 1280 x 1024 11 1680...
... 9 1024 x 768 10 1152 x 870 11 1152 x 900 12 1280 x 1024 13 1280 x 1024 14 1440 x 900 *15 1440 x 900 **16 1440 x 900 20.1/22 inch monitor Display Modes (Resolution) 1 720 x 400 2 640 x 480 3 640 x 480 4 800 x 600 5 800 x 600 6 1024 x 768 7 1024 x 768 8 1152 x 864 9 1280 x 1024 10 1280 x 1024 11 1680...


