

Owners Manual
Page 1
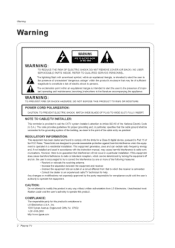
and serial number of the TV in the back cover and relate this manual carefully and completely before future reference. PLASMA TV MODELS: RU=42PZ61/71 RU=50PZ61 RU=60PZ61 this require service.
and serial number of the TV in the back cover and relate this manual carefully and completely before future reference. PLASMA TV MODELS: RU=42PZ61/71 RU=50PZ61 RU=60PZ61 this require service.
Owners Manual
Page 2
...ELECTRIC SHOCK, MATCH WIDE BLADE OF PLUG TO WIDE SLOT, FULLY INSERT. These limits are designed to radio communications. However, there is : LG Electronics U.S.A., Inc 1000 Sylvan Avenue, Englewood Cliffs, NJ 07632 1-201-816-2000 http://www.lgusa.com 2 Plasma TV Any changes or ... residential installation. REFER TO QUALIFIED SERVICE PERSONNEL. REGULATORY INFORMATION: This equipment has been tested and found to comply with the instruction manual, may be of sufficient magnitude to the presence of the cable entry as close to correct the interference by turning the equipment off...
...ELECTRIC SHOCK, MATCH WIDE BLADE OF PLUG TO WIDE SLOT, FULLY INSERT. These limits are designed to radio communications. However, there is : LG Electronics U.S.A., Inc 1000 Sylvan Avenue, Englewood Cliffs, NJ 07632 1-201-816-2000 http://www.lgusa.com 2 Plasma TV Any changes or ... residential installation. REFER TO QUALIFIED SERVICE PERSONNEL. REGULATORY INFORMATION: This equipment has been tested and found to comply with the instruction manual, may be of sufficient magnitude to the presence of the cable entry as close to correct the interference by turning the equipment off...
Owners Manual
Page 3
... that they may cause hazards. Power-Cord Polarization This product is operated. This product complies with the product. Follow Instructions All operating and use this manual can result in a wet basement, or near a bath tub, wash bowl, kitchen sink, or laundry tub, in electrical shock or fire hazards. The openings should... defeat the safety purpose of the Canadian StandardsAssociation. 1. Power-Cord Protection Power-supply cords should not be adhered to the product. PORTABLE CART WARNING J Owner's Manual 3
... that they may cause hazards. Power-Cord Polarization This product is operated. This product complies with the product. Follow Instructions All operating and use this manual can result in a wet basement, or near a bath tub, wash bowl, kitchen sink, or laundry tub, in electrical shock or fire hazards. The openings should... defeat the safety purpose of the Canadian StandardsAssociation. 1. Power-Cord Protection Power-supply cords should not be adhered to the product. PORTABLE CART WARNING J Owner's Manual 3
Owners Manual
Page 5
... options.) 1. See page 21-22. 3 Install batteries in remote control. Turn video source equipment on . Owner's Manual 5 Connect all accessories. 5. Fine-tune source image and sound to your personal preference or as shown. (Only RU-60PZ61 series 12 External Equipment Connections 12 Antenna Connection 12 VCR Setup I Cable TV Setup External A/V Source Setup...
... options.) 1. See page 21-22. 3 Install batteries in remote control. Turn video source equipment on . Owner's Manual 5 Connect all accessories. 5. Fine-tune source image and sound to your personal preference or as shown. (Only RU-60PZ61 series 12 External Equipment Connections 12 Antenna Connection 12 VCR Setup I Cable TV Setup External A/V Source Setup...
Owners Manual
Page 7
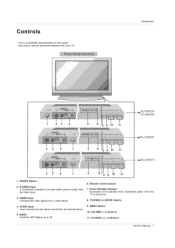
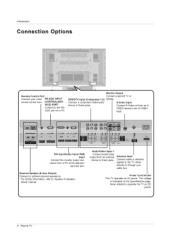
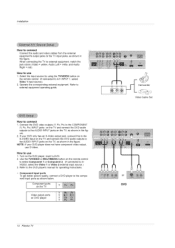
.... 5. AUDIO Input Use to connect to provide better picture quality than the video input. 3. Introduction RU-50PZ61 RU-60PZ61 4 78 9 10 11 6 8 9 10 11 _,RU-42PZ61 _, RU-42PZ71 1. VIDEO Input Connects the video signal from a video device. 4. CHANNEL (E, D) Buttons Owner's Manual 7 - This is turned on or off. 6. S-VIDEO Input A connection available to hear stereo sound from...
.... 5. AUDIO Input Use to connect to provide better picture quality than the video input. 3. Introduction RU-50PZ61 RU-60PZ61 4 78 9 10 11 6 8 9 10 11 _,RU-42PZ61 _, RU-42PZ71 1. VIDEO Input Connects the video signal from a video device. 4. CHANNEL (E, D) Buttons Owner's Manual 7 - This is turned on or off. 6. S-VIDEO Input A connection available to hear stereo sound from...
Owners Manual
Page 8
... VICE) PORT Connect to operate the TV on a PC. External Speaker (8 ohm Output) Connect to optional external speaker(s). * For further information, refer to 'Speaker Stand' manual. & Speaker I Connect S-Video out from an external device to the S-VIDEO input. Monitor Output Connect a second TV or DVD/DTV Input (Component 1-2) Monitor. I AudioNideo Input...
... VICE) PORT Connect to operate the TV on a PC. External Speaker (8 ohm Output) Connect to optional external speaker(s). * For further information, refer to 'Speaker Stand' manual. & Speaker I Connect S-Video out from an external device to the S-VIDEO input. Monitor Output Connect a second TV or DVD/DTV Input (Component 1-2) Monitor. I AudioNideo Input...
Owners Manual
Page 9
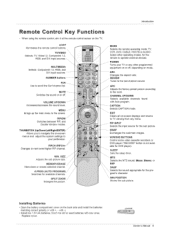
... Selects CAPTION mode. Replace cover. MENU Brings up the main menu to operate external devices. CHANNEL UP/DOWN Selects available channels with new ones. Owner's Manual 9 THUMBSTICK (Up/Down/Left/Right/ENTER) Allows you to your TV or any menu. Switches between PIP, and Double Window modes. Don't mix old or...
... Selects CAPTION mode. Replace cover. MENU Brings up the main menu to operate external devices. CHANNEL UP/DOWN Selects available channels with new ones. Owner's Manual 9 THUMBSTICK (Up/Down/Left/Right/ENTER) Allows you to your TV or any menu. Switches between PIP, and Double Window modes. Don't mix old or...
Owners Manual
Page 10
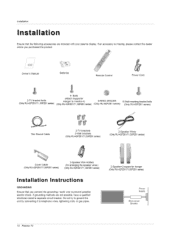
... by connecting it to prevent possible electric shock. Owner's Manual Batteries Remote Control Power Cord 2-TV bracket bolts (Only RU-42PZ61/71, 50PZ61 sedes) 4- Bolts (Attach Supporter Hanger to monitor-4) (Only RU-42PZ61/71, 50PZ61 sedes) 6-RING SPACER (Only RU-60PZ61 series) 6-Wall mounting bracket bolts (Only RU-60PZ61 series) 75_2 Round Cable 2-TV brackets 2-Wall brackets...
... by connecting it to prevent possible electric shock. Owner's Manual Batteries Remote Control Power Cord 2-TV bracket bolts (Only RU-42PZ61/71, 50PZ61 sedes) 4- Bolts (Attach Supporter Hanger to monitor-4) (Only RU-42PZ61/71, 50PZ61 sedes) 6-RING SPACER (Only RU-60PZ61 series) 6-Wall mounting bracket bolts (Only RU-60PZ61 series) 75_2 Round Cable 2-TV brackets 2-Wall brackets...
Owners Manual
Page 11
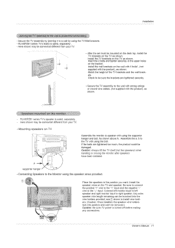
...speakers on the TV as shown. As shown above to be sure the brackets are tightened too much, the product could be damaged. Owner's Manual 11 A supporter hanger • Connecting Speakers to the TV with using the TV/Wall brackets. - Install the TV brackets on , TV ... can be bunched into the wire holders provided, see(_ above A, Assemble the a, b to the Monitor using the bolt. RU-60PZ61 series TV's stand is saled, separately. RU-60PZ61 series TV's speaker is saled, separately. - Secure the TV assembly by joinning it to the wall with strong strings or ...
...speakers on the TV as shown. As shown above to be sure the brackets are tightened too much, the product could be damaged. Owner's Manual 11 A supporter hanger • Connecting Speakers to the TV with using the TV/Wall brackets. - Install the TV brackets on , TV ... can be bunched into the wire holders provided, see(_ above A, Assemble the a, b to the Monitor using the bolt. RU-60PZ61 series TV's stand is saled, separately. RU-60PZ61 series TV's speaker is saled, separately. - Secure the TV assembly by joinning it to the wall with strong strings or ...
Owners Manual
Page 13
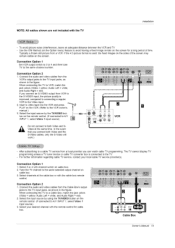
... TV Use the ISM Method (on the Option menu) feature to avoid having a fixed image remain on the screen for cable box. [] Cable Box Owner3 Manual 13 Connect the audio and video cables from a VCR. Typically a frozen still picture from the VCR's output jacks to the VCR owner...'s T manual.) / 3. In the event that you connect both Video and SVideo at the cable box or with the cable box remote control. the fixed images on ...
... TV Use the ISM Method (on the Option menu) feature to avoid having a fixed image remain on the screen for cable box. [] Cable Box Owner3 Manual 13 Connect the audio and video cables from a VCR. Typically a frozen still picture from the VCR's output jacks to the VCR owner...'s T manual.) / 3. In the event that you connect both Video and SVideo at the cable box or with the cable box remote control. the fixed images on ...
Owners Manual
Page 14
... DVD player does not have component video output, use 1. Use the TVNIDEO or MULTIMEDIA button on the remote control. (If connected to the DVD player's manual for operating instructions. Component ports on the DVD player, insert a DVD. 2. Turn on the TV imiiii ii_iii_iii_iii_iii_iii_i iii_iii_iii_iii_iii_iii_iii_iii VonideDoVDoutpplauyt erports or DVD 14 Plasma TV...
... DVD player does not have component video output, use 1. Use the TVNIDEO or MULTIMEDIA button on the remote control. (If connected to the DVD player's manual for operating instructions. Component ports on the DVD player, insert a DVD. 2. Turn on the TV imiiii ii_iii_iii_iii_iii_iii_i iii_iii_iii_iii_iii_iii_iii_iii VonideDoVDoutpplauyt erports or DVD 14 Plasma TV...
Owners Manual
Page 15
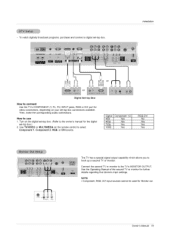
Installation or Digital Set-top Box How to the owner's manual for video connections, depending on your set -top box.) 2. See the Operating Manual of the second TV or monitor for Monitor out. Turn on the remote control to use 1. Signal 480i 480p 720p 1080i Component 1/2 Yes Yes Yes ..., RGB or DVI port for the digital set -top box connections available. To watch digitally broadcast programs, purchase and connect a digital set-top box. Owner's Manual 15 How to select Component 1, Component 2, RGB, or DVl source.
Installation or Digital Set-top Box How to the owner's manual for video connections, depending on your set -top box.) 2. See the Operating Manual of the second TV or monitor for Monitor out. Turn on the remote control to use 1. Signal 480i 480p 720p 1080i Component 1/2 Yes Yes Yes ..., RGB or DVI port for the digital set -top box connections available. To watch digitally broadcast programs, purchase and connect a digital set-top box. Owner's Manual 15 How to select Component 1, Component 2, RGB, or DVl source.
Owners Manual
Page 18
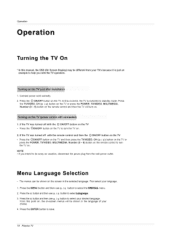
... the SPECIAL menu. 2. Language Se Iect ion - Press the G button and then use D / E button to save. 18 Plasma TV Operation Turning TV On * In this manual, the OSD (On Screen Display) may be different from the wall power outlet. Connect power cord correctly. 2. From this moment, the TV is just an...
... the SPECIAL menu. 2. Language Se Iect ion - Press the G button and then use D / E button to save. 18 Plasma TV Operation Turning TV On * In this manual, the OSD (On Screen Display) may be different from the wall power outlet. Connect power cord correctly. 2. From this moment, the TV is just an...

Owners Manual
Page 19
...to adjust the picture to your area before you can add or delete channels from a channel, reprogram the finely-tuned channel with Auto program or Manual Program. • If a finely-tuned channel is ever moved to another location. - Use the D / E or NUMBER buttons to select the... Program will memorize the channels in ascending numerical order. AUTO PROGRAM starts the channel search. Notes • To remove fine tuning from the channel scan manually. 1. Press the A,PROG button and then press the G button. Operation M e n u 0 ptio ns Auto Program should be used to memorize ...
...to adjust the picture to your area before you can add or delete channels from a channel, reprogram the finely-tuned channel with Auto program or Manual Program. • If a finely-tuned channel is ever moved to another location. - Use the D / E or NUMBER buttons to select the... Program will memorize the channels in ascending numerical order. AUTO PROGRAM starts the channel search. Notes • To remove fine tuning from the channel scan manually. 1. Press the A,PROG button and then press the G button. Operation M e n u 0 ptio ns Auto Program should be used to memorize ...

Owners Manual
Page 20
... a convenient feature that lets you are in a fringe area, set Booster to select the CHANNEL menu. 2. Press the G button and then use D / E button to select Manual program. 3. Press the G button and then use D i E button to select Booster. 4. Use the F /G button to set Booster to memorize other channels.
... a convenient feature that lets you are in a fringe area, set Booster to select the CHANNEL menu. 2. Press the G button and then use D / E button to select Manual program. 3. Press the G button and then use D i E button to select Booster. 4. Use the F /G button to set Booster to memorize other channels.
Owners Manual
Page 21
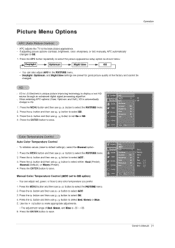
...then use D / E button to set to save . Press the G button and then use D _ E button to select ACC. 3. Owner's Manual 21 XD is LG Electronic's unique picture improving technology to make appropriate adjustments. • The adjustment range of Red, Green, and Blue is automatically change to Off. 1. Press... the PICTURE menu. • Daylight, Optimum, and Night time settings are preset for good picture quality at the factory and cannot be changed. Manual Color Temperature Control (ACC set On or Off. 4. Press the G button and then use D / E button to any color temperature you ...
...then use D / E button to set to save . Press the G button and then use D _ E button to select ACC. 3. Owner's Manual 21 XD is LG Electronic's unique picture improving technology to make appropriate adjustments. • The adjustment range of Red, Green, and Blue is automatically change to Off. 1. Press... the PICTURE menu. • Daylight, Optimum, and Night time settings are preset for good picture quality at the factory and cannot be changed. Manual Color Temperature Control (ACC set On or Off. 4. Press the G button and then use D / E button to any color temperature you ...
Owners Manual
Page 23
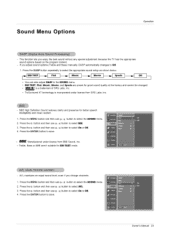
... Definition Sound restores clarity and presence for good sound quality at the factory and cannot be changed. If you adjust sound options (Treble and Bass) manually, DASP automatically changes to select On or Off. 4. "1 o,, 1_I_ • You can also adjust DASP in the SOUND menu. • SRS TSXT... button to save . •_ Manufactured under license from BBE Sound, Inc. • Treble, Bass or BBE aren't suitable for SRS TSXT mode. - Owner's Manual 23 Press the MENU button and then use D / E button to select the SOUND menu. 2. Press the G button and then use D / E button to...
... Definition Sound restores clarity and presence for good sound quality at the factory and cannot be changed. If you adjust sound options (Treble and Bass) manually, DASP automatically changes to select On or Off. 4. "1 o,, 1_I_ • You can also adjust DASP in the SOUND menu. • SRS TSXT... button to save . •_ Manufactured under license from BBE Sound, Inc. • Treble, Bass or BBE aren't suitable for SRS TSXT mode. - Owner's Manual 23 Press the MENU button and then use D / E button to select the SOUND menu. 2. Press the G button and then use D / E button to...

Owners Manual
Page 25
Timer Menu Options Set the time automatically through the PBS broadcast signal. Set the clock manually, if the current time is wrong, reset the clock manually. 1. Operation If current time setting is set the hour. 5. Press the G button and then use D / E button to select On. • To ...Saving Time Auto, On or Off, depending on with the On Timer function, standby mode. Press the G button and then use D / E button to selectt Manual. 4. For only On timer function Press the G button and then use D / E button to save . Press the ENTER button to set incorrectly programed by...
Timer Menu Options Set the time automatically through the PBS broadcast signal. Set the clock manually, if the current time is wrong, reset the clock manually. 1. Operation If current time setting is set the hour. 5. Press the G button and then use D / E button to select On. • To ...Saving Time Auto, On or Off, depending on with the On Timer function, standby mode. Press the G button and then use D / E button to selectt Manual. 4. For only On timer function Press the G button and then use D / E button to save . Press the ENTER button to set incorrectly programed by...
Owners Manual
Page 27
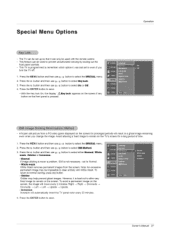
... ENTER button to select ISM Method. 3. To avoid a permanent image on the front panel is programmed to remember which option it is not necessary - Owner's Manual 27 Press the G button and then use D / E button to Normal. • White wash White Wash removes permanent images from a PC/video game displayed on the...
... ENTER button to select ISM Method. 3. To avoid a permanent image on the front panel is programmed to remember which option it is not necessary - Owner's Manual 27 Press the G button and then use D / E button to Normal. • White wash White Wash removes permanent images from a PC/video game displayed on the...
Owners Manual
Page 29
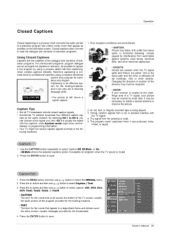
... term for the words that scroll across the bottom of the TV screen; The program wasn't captioned when it can also aid in advance. Owner's Manual 29 Poor reception conditions are encountered: • IGNITION: Picture may be marred by professional reporters using a process called real-time captioning, which creates captions instantly...
... term for the words that scroll across the bottom of the TV screen; The program wasn't captioned when it can also aid in advance. Owner's Manual 29 Poor reception conditions are encountered: • IGNITION: Picture may be marred by professional reporters using a process called real-time captioning, which creates captions instantly...


