
Owners Manual
Page 5
.... . .25 Low Power 26 XD Demo 26 Closed Captions 27 Captions 27 Caption/Text 27 Screen Menu Features Auto Adjustment 28 Setting Picture Format 28 Screen Position 28 Manual Configure 29 Setting VGA Mode 29 Screen Adjustments 29 Cinema Mode Setup 29 Luminance Noise Reduction 30 Initializing (... image and sound to original factory value) . . . . .30 Split Zoom 30 Lock Menu Options Parental Lock Setup 31 PIP (Picture-In-Picture)/Double Window Feature Watching PIP/Double Window 32 Swapping the PIP/Double Window 32 TV Program selection for PIP 32 Selecting an Input Signal Source...
.... . .25 Low Power 26 XD Demo 26 Closed Captions 27 Captions 27 Caption/Text 27 Screen Menu Features Auto Adjustment 28 Setting Picture Format 28 Screen Position 28 Manual Configure 29 Setting VGA Mode 29 Screen Adjustments 29 Cinema Mode Setup 29 Luminance Noise Reduction 30 Initializing (... image and sound to original factory value) . . . . .30 Split Zoom 30 Lock Menu Options Parental Lock Setup 31 PIP (Picture-In-Picture)/Double Window Feature Watching PIP/Double Window 32 Swapping the PIP/Double Window 32 TV Program selection for PIP 32 Selecting an Input Signal Source...

Owners Manual
Page 6
... theater. The fan noise doesn't have any negative effect on the screen should be exchanged or returned. Gas in -Picture feature allows you can use it can see the screen. The Picture-in a plasma state is used in a PC computer to keep the CPU (Central Processing Unit) cool, the PDP... colors that is so wide that a certain level of this product. A plasma display panel is a Plasma Display Panel (PDP)? Cooling Fan Noise (RU-50PX10/11/20 only) In the same way that this product is normal during the manufacture and operation of noise from these cell defects during...
... theater. The fan noise doesn't have any negative effect on the screen should be exchanged or returned. Gas in -Picture feature allows you can use it can see the screen. The Picture-in a plasma state is used in a PC computer to keep the CPU (Central Processing Unit) cool, the PDP... colors that is so wide that a certain level of this product. A plasma display panel is a Plasma Display Panel (PDP)? Cooling Fan Noise (RU-50PX10/11/20 only) In the same way that this product is normal during the manufacture and operation of noise from these cell defects during...
Owners Manual
Page 8
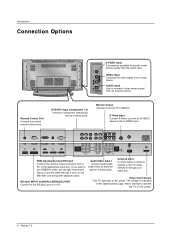
... the video signal from an S-VIDEO device to the TV, either directly or through your wired remote control here. If you want to provide better picture quality than the video input. AUDIO Input Use to connect to hear stereo sound from an external device to the RS-232C port on DC...
... the video signal from an S-VIDEO device to the TV, either directly or through your wired remote control here. If you want to provide better picture quality than the video input. AUDIO Input Use to connect to hear stereo sound from an external device to the RS-232C port on DC...
Owners Manual
Page 9
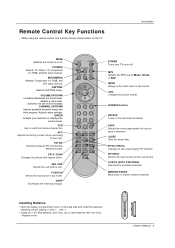
... VOL CH 123 456 789 FCR REVIEW 0 APC PIP/DW DASP SPLIT ZOOM PIP CH + SLEEP WIN.SIZE PIP CH - ARC Changes the picture format. PIPCH-/PIPCH+ Changes to scroll the favorite channel list. PIP INPUT Selects the input source for the program's character. Replace cover. APC ...A.PROG (AUTO PROGRAM) Searches for available channels. Introduction MUTE Switches the sound on or off . Switches the set on the TV. SIZE Adjusts the sub picture size. MTS Selects the MTS sound: Mono, Stereo, or SAP. NUMBER buttons REVIEW Tunes to the last channel viewed. with -). • Install two ...
... VOL CH 123 456 789 FCR REVIEW 0 APC PIP/DW DASP SPLIT ZOOM PIP CH + SLEEP WIN.SIZE PIP CH - ARC Changes the picture format. PIPCH-/PIPCH+ Changes to scroll the favorite channel list. PIP INPUT Selects the input source for the program's character. Replace cover. APC ...A.PROG (AUTO PROGRAM) Searches for available channels. Introduction MUTE Switches the sound on or off . Switches the set on the TV. SIZE Adjusts the sub picture size. MTS Selects the MTS sound: Mono, Stereo, or SAP. NUMBER buttons REVIEW Tunes to the last channel viewed. with -). • Install two ...

Owners Manual
Page 11
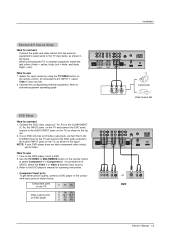
... for outdoor antenna) Bronze Wire Be careful not to bend the bronze wire when connecting the antenna. • To improve picture quality in the connections. Antenna • If the antenna needs to tighten. Owner's Manual 11 Multi-family Dwellings/Apartments (Connect...Antenna VHF antenna UHF antenna outdoor antenna Turn clockwise to be split for assistance. External Equipment Connections Installation Antenna Connection - For optimum picture quality, adjust antenna direction if needed. Signal Amplifier • If the antenna is not installed properly, contact your dealer for two...
... for outdoor antenna) Bronze Wire Be careful not to bend the bronze wire when connecting the antenna. • To improve picture quality in the connections. Antenna • If the antenna needs to tighten. Owner's Manual 11 Multi-family Dwellings/Apartments (Connect...Antenna VHF antenna UHF antenna outdoor antenna Turn clockwise to be split for assistance. External Equipment Connections Installation Antenna Connection - For optimum picture quality, adjust antenna direction if needed. Signal Amplifier • If the antenna is not installed properly, contact your dealer for two...
Owners Manual
Page 12
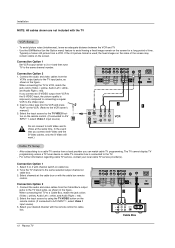
... the jack colors (Video = yellow, Audio Left = white, and Audio Right = red). 2. Typically a frozen still picture from the VCR's output jacks to A/V INPUT 1, select Video 1 input source) 3. If the 4:3 picture format is improved; In the event that you connect both Video and SVideo at the cable box or with... jacks, as shown in the figure. Connect the audio and video cables from a VCR. When connecting the TV to the S-VIDEO input, the picture quality is used; When connecting the TV to both Video and the S-Video cables, only the S-Video will work.) Cable TV Setup - COMPONENT ...
... the jack colors (Video = yellow, Audio Left = white, and Audio Right = red). 2. Typically a frozen still picture from the VCR's output jacks to A/V INPUT 1, select Video 1 input source) 3. If the 4:3 picture format is improved; In the event that you connect both Video and SVideo at the cable box or with... jacks, as shown in the figure. Connect the audio and video cables from a VCR. When connecting the TV to the S-VIDEO input, the picture quality is used; When connecting the TV to both Video and the S-Video cables, only the S-Video will work.) Cable TV Setup - COMPONENT ...
Owners Manual
Page 13
... jacks on the TV, as shown in the figure. Refer to the DVD player's manual for operating instructions. • Component Input ports To get better picture quality, connect a DVD player to external equipment operating guide. Refer to the component input ports as shown below. If your DVD player does not have...
... jacks on the TV, as shown in the figure. Refer to the DVD player's manual for operating instructions. • Component Input ports To get better picture quality, connect a DVD player to external equipment operating guide. Refer to the component input ports as shown below. If your DVD player does not have...
Owners Manual
Page 15
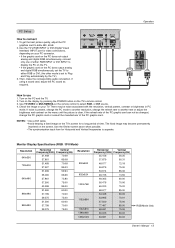
..., contrast or brightness in PC mode. NOTES: • Use a DVI cable. • Avoid keeping a fixed image on the menu until the picture is separate. Use the Orbiter screen saver when possible. • The synchronization input form for Horizontal and Vertical frequencies is clear. To get the best... picture quality, adjust the PC graphics card to use 1. If noise is set to Plug and Play automatically by pressing the POWER button on...
..., contrast or brightness in PC mode. NOTES: • Use a DVI cable. • Avoid keeping a fixed image on the menu until the picture is separate. Use the Orbiter screen saver when possible. • The synchronization input form for Horizontal and Vertical frequencies is clear. To get the best... picture quality, adjust the PC graphics card to use 1. If noise is set to Plug and Play automatically by pressing the POWER button on...

Owners Manual
Page 17
...Manual Program: Adding/Deleting Channels - Use the F / G button to adjust the picture to another location. - Press the ENTER button to select Manual program. 3. CHANNEL Auto program Manual program G TV 2 PICTURE Favorite channel Memory On SOUND Fine 0 TIMER Booster Off SPECIAL SCREEN PIP/DW LOCK Menu... You can also do a channel search in the CHANNEL menu. Press the G button and then use D / E button to correct the picture's instability and condition if it is called MANUAL PROGRAM. There are additional channels you want to add or delete, you want to add or ...
...Manual Program: Adding/Deleting Channels - Use the F / G button to adjust the picture to another location. - Press the ENTER button to select Manual program. 3. CHANNEL Auto program Manual program G TV 2 PICTURE Favorite channel Memory On SOUND Fine 0 TIMER Booster Off SPECIAL SCREEN PIP/DW LOCK Menu... You can also do a channel search in the CHANNEL menu. Press the G button and then use D / E button to correct the picture's instability and condition if it is called MANUAL PROGRAM. There are additional channels you want to add or delete, you want to add or ...
Owners Manual
Page 18
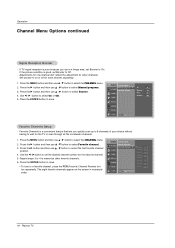
...F / G button to set Booster to select Manual program. 3. Set booster to on the screen in numerical order. Favorite Channels Setup - CHANNEL PICTURE Auto program Manual program Favorite channel G SOUND TIMER SPECIAL SCREEN PIP/DW LOCK Menu Prev. 18 Plasma TV Use F / G button to select... is a convenient feature that lets you are in -between channels. 1. Operation Channel Menu Options continued Signal Reception Booster - If the picture condition is poor because you quickly scan up to 8 channels of your choice without having to select the CHANNEL menu. 2. Press the...
...F / G button to set Booster to select Manual program. 3. Set booster to on the screen in numerical order. Favorite Channels Setup - CHANNEL PICTURE Auto program Manual program Favorite channel G SOUND TIMER SPECIAL SCREEN PIP/DW LOCK Menu Prev. 18 Plasma TV Use F / G button to select... is a convenient feature that lets you are in -between channels. 1. Operation Channel Menu Options continued Signal Reception Booster - If the picture condition is poor because you quickly scan up to 8 channels of your choice without having to select the CHANNEL menu. 2. Press the...
Owners Manual
Page 19
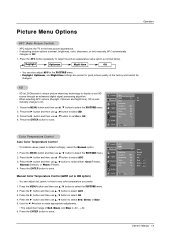
...100 55 55 60 0 PIP/DW LOCK Menu Prev. XD is -30 ~ +30. 6. To initialize values (reset to select the PICTURE menu. 2. Color Temperature Control Auto Color Temperature Control - Press the MENU button and then use D / E button to display a ... to make appropriate adjustments. • The adjustment range of Red, Green, and Blue is LG Electronic's unique picture improving technology to select either: Cool (Preset), Normal (Default), or Warm (Preset). 4. Picture Menu Options Operation APC (Auto Picture Control) - Use the F / G button to select Off. 4. Press the G button...
...100 55 55 60 0 PIP/DW LOCK Menu Prev. XD is -30 ~ +30. 6. To initialize values (reset to select the PICTURE menu. 2. Color Temperature Control Auto Color Temperature Control - Press the MENU button and then use D / E button to display a ... to make appropriate adjustments. • The adjustment range of Red, Green, and Blue is LG Electronic's unique picture improving technology to select either: Cool (Preset), Normal (Default), or Warm (Preset). 4. Picture Menu Options Operation APC (Auto Picture Control) - Use the F / G button to select Off. 4. Press the G button...

Owners Manual
Page 20
... button to select Fleshtone. If the TV is 0 ~ 3. Press the MENU button and then use D / E button to select the PICTURE menu. 2. CHANNEL APC PICTURE ACC SOUND sRGB G On Contrast 100 Off TIMER Brightness 55 SPECIAL Color 55 SCREEN PIP/DW LOCK Menu Prev. Press the G button and then... ENTER button to save . Press the ENTER button to the levels you prefer. 1. sRGB (only RGB-PC, DVI-PC Modes) - You can adjust picture contrast, brightness, color, sharpness, and tint options to save . Press the G button and then use D / E button to select the desired skin...
... button to select Fleshtone. If the TV is 0 ~ 3. Press the MENU button and then use D / E button to select the PICTURE menu. 2. CHANNEL APC PICTURE ACC SOUND sRGB G On Contrast 100 Off TIMER Brightness 55 SPECIAL Color 55 SCREEN PIP/DW LOCK Menu Prev. Press the G button and then... ENTER button to save . Press the ENTER button to the levels you prefer. 1. sRGB (only RGB-PC, DVI-PC Modes) - You can adjust picture contrast, brightness, color, sharpness, and tint options to save . Press the G button and then use D / E button to select the desired skin...

Owners Manual
Page 21
...'s Manual 21 BBE High Definition Sound restores clarity and presence for SRS TSXT mode. Press the ENTER button to select the SOUND menu. 2. CHANNEL PICTURE SOUND TIMER DASP BBE AVL Balance Treble Bass SPECIAL G On Off 0 50 50 SCREEN PIP/DW LOCK Menu Prev. Press the MENU button and then... use D / E button to save . CHANNEL PICTURE SOUND TIMER DASP BBE AVL Balance Treble Bass SPECIAL G On 0 Off 50 50 SCREEN PIP/DW LOCK Menu Prev. BBE - Press the G button and then...
...'s Manual 21 BBE High Definition Sound restores clarity and presence for SRS TSXT mode. Press the ENTER button to select the SOUND menu. 2. CHANNEL PICTURE SOUND TIMER DASP BBE AVL Balance Treble Bass SPECIAL G On Off 0 50 50 SCREEN PIP/DW LOCK Menu Prev. Press the MENU button and then... use D / E button to save . CHANNEL PICTURE SOUND TIMER DASP BBE AVL Balance Treble Bass SPECIAL G On 0 Off 50 50 SCREEN PIP/DW LOCK Menu Prev. BBE - Press the G button and then...
Owners Manual
Page 22
... and right speakers. You can receive MTS stereo programs and any SAP (Secondary Audio Program) that accompanies the stereo program; if the broadcaster transmits one . - PICTURE BBE AVL 2. Press the G button and then use F / G button to save. SCREEN PIP/DW LOCK Menu Prev. Signal mode is mono. - Press the ENTER button...
... and right speakers. You can receive MTS stereo programs and any SAP (Secondary Audio Program) that accompanies the stereo program; if the broadcaster transmits one . - PICTURE BBE AVL 2. Press the G button and then use F / G button to save. SCREEN PIP/DW LOCK Menu Prev. Signal mode is mono. - Press the ENTER button...
Owners Manual
Page 23
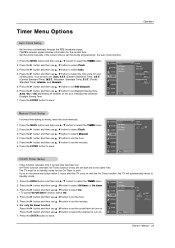
...Setup - Press the G button and then use D / E button to select Clock. 3. Press the G button and then use D / E button to set the hour. 5. CHANNEL PICTURE SOUND Clock Off timer On timer Auto off TIMER SPECIAL SCREEN PIP/DW LOCK Menu Prev. For only On timer function Press the G button and.... 4. Press the ENTER button to the same time. - ThePBS channel signal includes information for the On-Timer to set to save. CHANNEL PICTURE SOUND Clock Off timer On timer Auto off TIMER SPECIAL SCREEN PIP/DW LOCK Menu Prev. Off-Timer function overrides On-Timer function if they...
...Setup - Press the G button and then use D / E button to select Clock. 3. Press the G button and then use D / E button to set the hour. 5. CHANNEL PICTURE SOUND Clock Off timer On timer Auto off TIMER SPECIAL SCREEN PIP/DW LOCK Menu Prev. For only On timer function Press the G button and.... 4. Press the ENTER button to the same time. - ThePBS channel signal includes information for the On-Timer to set to save. CHANNEL PICTURE SOUND Clock Off timer On timer Auto off TIMER SPECIAL SCREEN PIP/DW LOCK Menu Prev. Off-Timer function overrides On-Timer function if they...

Owners Manual
Page 24
.... 3. To cancel the Sleep Timer, press the SLEEP button repeatedly until --- Auto Off - Press the G button and then use D / E button to select Auto off. 3. CHANNEL PICTURE SOUND Clock Off timer On timer Auto off at the preset time. The timer begins to on the screen, followed by the following sleep timer...
.... 3. To cancel the Sleep Timer, press the SLEEP button repeatedly until --- Auto Off - Press the G button and then use D / E button to select Auto off. 3. CHANNEL PICTURE SOUND Clock Off timer On timer Auto off at the preset time. The timer begins to on the screen, followed by the following sleep timer...
Owners Manual
Page 25
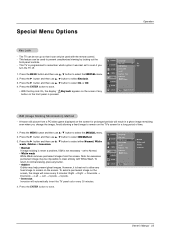
...the TV's screen for prolonged periods will automatically invert the TV panel color every 30 minutes. 4. However, it is pressed. CHANNEL Language PICTURE Key lock ISM Method G On Off SOUND TIMER Low power Set ID Caption / Text SPECIAL Captions Demo SCREEN PIP/DW LOCK Menu Prev...locking out the front panel controls. - Press the G button and then use D / E button to select ISM Method. 3. CHANNEL Language Key lock PICTURE ISM Method G SOUND TIMER Low power Set ID Caption / Text SPECIAL Captions Demo SCREEN PIP/DW LOCK Menu Prev. Press the G button and then...
...the TV's screen for prolonged periods will automatically invert the TV panel color every 30 minutes. 4. However, it is pressed. CHANNEL Language PICTURE Key lock ISM Method G On Off SOUND TIMER Low power Set ID Caption / Text SPECIAL Captions Demo SCREEN PIP/DW LOCK Menu Prev...locking out the front panel controls. - Press the G button and then use D / E button to select ISM Method. 3. CHANNEL Language Key lock PICTURE ISM Method G SOUND TIMER Low power Set ID Caption / Text SPECIAL Captions Demo SCREEN PIP/DW LOCK Menu Prev. Press the G button and then...
Owners Manual
Page 26
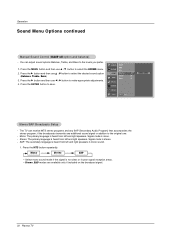
...to save. Press the G button and then use D / E button to select the SPECIAL menu. 2. Press the ENTER button to select Low power. 3. CHANNEL Language PICTURE Key lock ISM Method SOUND Low power G On Set ID Off TIMER Caption / Text SPECIAL Captions Demo SCREEN PIP/DW LOCK Menu Prev. Press the...between XD Demo on and XD Demo off. 1. To start 26 Plasma TV XD Demo - Use it to begin XD Demo. 4. CHANNEL Language PICTURE Key lock ISM Method SOUND TIMER Low power Set ID Caption / Text SPECIAL Captions Demo G SCREEN PIP/DW LOCK Menu Prev. Press the G...
...to save. Press the G button and then use D / E button to select the SPECIAL menu. 2. Press the ENTER button to select Low power. 3. CHANNEL Language PICTURE Key lock ISM Method SOUND Low power G On Set ID Off TIMER Caption / Text SPECIAL Captions Demo SCREEN PIP/DW LOCK Menu Prev. Press the...between XD Demo on and XD Demo off. 1. To start 26 Plasma TV XD Demo - Use it to begin XD Demo. 4. CHANNEL Language PICTURE Key lock ISM Method SOUND TIMER Low power Set ID Caption / Text SPECIAL Captions Demo G SCREEN PIP/DW LOCK Menu Prev. Press the G...

Owners Manual
Page 27
...The term for the words that appear in advance. By selecting CC 1 to save . Poor reception conditions are encountered: • IGNITION: Picture may be arranged into English. Captions 1. Use the CAPTION button repeatedly to save . CC1 CC2 CC3 CC4 Text1 Text2 Text3 Text4 Owner's Manual... 27 CHANNEL Language PICTURE Key lock ISM Method SOUND Low power Set ID TIMER Caption / Text G SPECIAL Captions Demo SCREEN PIP/DW LOCK Menu Prev. ...
...The term for the words that appear in advance. By selecting CC 1 to save . Poor reception conditions are encountered: • IGNITION: Picture may be arranged into English. Captions 1. Use the CAPTION button repeatedly to save . CC1 CC2 CC3 CC4 Text1 Text2 Text3 Text4 Owner's Manual... 27 CHANNEL Language PICTURE Key lock ISM Method SOUND Low power Set ID TIMER Caption / Text G SPECIAL Captions Demo SCREEN PIP/DW LOCK Menu Prev. ...
Owners Manual
Page 28
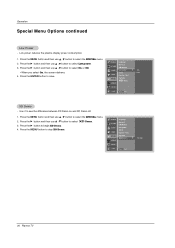
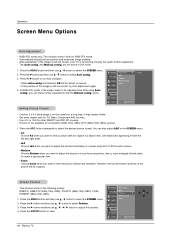
...button and then use D / E button to be cropped. In RGB (PC) mode, if the image needs to select Auto config.. 3. To set Setting Picture Format - TIMER Reset 2. Press the G button and then use D / E button to save. Press the ARC button repeatedly to select Position. SPECIAL 3. ... to select the SCREEN menu. 2. Press the G button to select the SCREEN menu. Use 4:3, or 16:9 for other RGB-PC and DVI-PC sources. - ARC PICTURE Position G SOUND Manual config D F G E 1. Press the MENU button and then use D / E / F / G button to adjust the position. 4. are not...
...button and then use D / E button to be cropped. In RGB (PC) mode, if the image needs to select Auto config.. 3. To set Setting Picture Format - TIMER Reset 2. Press the G button and then use D / E button to save. Press the ARC button repeatedly to select Position. SPECIAL 3. ... to select the SCREEN menu. 2. Press the G button to select the SCREEN menu. Use 4:3, or 16:9 for other RGB-PC and DVI-PC sources. - ARC PICTURE Position G SOUND Manual config D F G E 1. Press the MENU button and then use D / E / F / G button to adjust the position. 4. are not...


