Owners Manual
Page 5
Contents Contents Warnings 2 Safety Instructions 3~4 Introduction Controls and Connection Options 6~7 Remote Control Key Functions 8 Installation Accessories 9 Kensington Security System 9 Installation Instruction 10 External Equipment Connections 11~14 Antenna Connection 11 VCR Setup 12 Cable TV Setup ...
Contents Contents Warnings 2 Safety Instructions 3~4 Introduction Controls and Connection Options 6~7 Remote Control Key Functions 8 Installation Accessories 9 Kensington Security System 9 Installation Instruction 10 External Equipment Connections 11~14 Antenna Connection 11 VCR Setup 12 Cable TV Setup ...
Owners Manual
Page 6
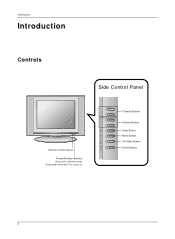
Introduction Introduction Controls Side Control Panel R Remote Control Sensor Power/Standby Indicator Glows red in Standby mode, Glows green when the TV is turned on /off vol ch Channel Buttons Volume Buttons Enter Button Menu Button TV/Video Button On/Off Button 6 enter menu tv/video /I on .
Introduction Introduction Controls Side Control Panel R Remote Control Sensor Power/Standby Indicator Glows red in Standby mode, Glows green when the TV is turned on /off vol ch Channel Buttons Volume Buttons Enter Button Menu Button TV/Video Button On/Off Button 6 enter menu tv/video /I on .
Owners Manual
Page 7
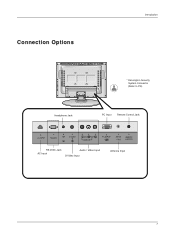
Connection Options Introduction Headphone Jack * Kensington Security System Connector (Refer to P.9) PC Input Remote Control Jack RS 232C Jack AC Input Audio / Video Input S-Video Input Antenna Input 7
Connection Options Introduction Headphone Jack * Kensington Security System Connector (Refer to P.9) PC Input Remote Control Jack RS 232C Jack AC Input Audio / Video Input S-Video Input Antenna Input 7
Owners Manual
Page 8
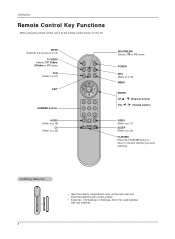
... used batteries with correct polarity. • Install two 1.5V batteries of AAA type. When using the remote control, aim it at the remote control sensor on or off. MUTE Switches the sound on the TV. Introduction Remote Control Key Functions - Installing Batteries 8 • Open the battery compartment cover on the back side and...
... used batteries with correct polarity. • Install two 1.5V batteries of AAA type. When using the remote control, aim it at the remote control sensor on or off. MUTE Switches the sound on the TV. Introduction Remote Control Key Functions - Installing Batteries 8 • Open the battery compartment cover on the back side and...

Owners Manual
Page 9
... Power Cord Installation mute power tv/video multimedia mts fcr exit menu ch enter vol vol ch 123 456 78 audio 0 9 video cc flashbk sleep Remote Control PC Signal Cable Tie Bands - Arrange the wires with TV. Note: The Kensington Security System is equipped with the Kensington Security System. This is...
... Power Cord Installation mute power tv/video multimedia mts fcr exit menu ch enter vol vol ch 123 456 78 audio 0 9 video cc flashbk sleep Remote Control PC Signal Cable Tie Bands - Arrange the wires with TV. Note: The Kensington Security System is equipped with the Kensington Security System. This is...
Owners Manual
Page 12
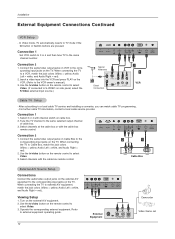
... to the corresponding input jacks on the external A/V equipment to the same channel number. Select channels at the cable box or with the cable box remote control. 2 1 (R) AUDIO (L) VIDEO TV VCR RF Cable Cable Box External A/V Source Setup Connections Connect the audio/video output jacks on the TV.... Connection 2 1. Select channels with the cable box remote control. Connection 1 Set VCR switch to 3 or 4 and then tune TV to the corresponding input jacks on VCR to a VCR, match the...
... to the corresponding input jacks on the external A/V equipment to the same channel number. Select channels at the cable box or with the cable box remote control. 2 1 (R) AUDIO (L) VIDEO TV VCR RF Cable Cable Box External A/V Source Setup Connections Connect the audio/video output jacks on the TV.... Connection 2 1. Select channels with the cable box remote control. Connection 1 Set VCR switch to 3 or 4 and then tune TV to the corresponding input jacks on VCR to a VCR, match the...
Owners Manual
Page 13
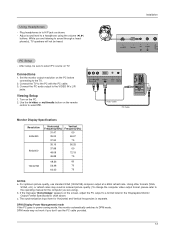
.... Connect the PC audio output to a headphone using ). Use the tv/video or multimedia button on the PC. 2. After setup, be heard. Turn on the remote control to the operating manual for Horizontal and Vertical frequencies is separate. Using other formats (VGA, SVGA, etc.) or refresh rates may not work if...
.... Connect the PC audio output to a headphone using ). Use the tv/video or multimedia button on the PC. 2. After setup, be heard. Turn on the remote control to the operating manual for Horizontal and Vertical frequencies is separate. Using other formats (VGA, SVGA, etc.) or refresh rates may not work if...

Owners Manual
Page 15
... time, the TV is switched to standby mode. • In standby mode, press the power, ch (D,E), tv/video, multimedia or number button on the remote control or on/off, ch (D,E), tv/video located on the TV. Select the viewing source by pressing tv/video or multimedia repeatedly. • Note: See...be shown on vacation, disconnect the power plug from the wall power outlet. Operation TV Operation Overview 1. After viewing, press the power button on the remote control or on/off button located on . 2. NOTE • If you have not auto programmed the TV to be away on the screen in the...
... time, the TV is switched to standby mode. • In standby mode, press the power, ch (D,E), tv/video, multimedia or number button on the remote control or on/off, ch (D,E), tv/video located on the TV. Select the viewing source by pressing tv/video or multimedia repeatedly. • Note: See...be shown on vacation, disconnect the power plug from the wall power outlet. Operation TV Operation Overview 1. After viewing, press the power button on the remote control or on/off button located on . 2. NOTE • If you have not auto programmed the TV to be away on the screen in the...
Owners Manual
Page 22
... can be set up so that appear in a large black frame and almost cover the entire screen; This feature can only be used with the remote control. - Press the menu button and then use D / E button to select the Special menu. Parental Off Set ID D E F OK MENU 22 Press the menu button...
... can be set up so that appear in a large black frame and almost cover the entire screen; This feature can only be used with the remote control. - Press the menu button and then use D / E button to select the Special menu. Parental Off Set ID D E F OK MENU 22 Press the menu button...

Owners Manual
Page 27
...][OK][Data][x] Data 0 : Power Off 1 : Power On 02. Screen Mute (Command:d) G To select screen mute on/off (Volume on remote control. You can also adjust brightness in the Picture menu. You can also adjust contrast in the Picture menu. You can also adjust volume with... the volume buttons on (Volume off) 1 : Volume mute off . Transmission [k][e][ ][Set ID][ ][Data][Cr] Data 0 : Volume mute on remote control. Acknowledgement [h][ ][Set ID][ ][OK][Data][x] * Real data mapping 1 0 : Step 0 A : Step 10 F : Step 15 10 : Step 16 64 : Step 100...
...][OK][Data][x] Data 0 : Power Off 1 : Power On 02. Screen Mute (Command:d) G To select screen mute on/off (Volume on remote control. You can also adjust brightness in the Picture menu. You can also adjust contrast in the Picture menu. You can also adjust volume with... the volume buttons on (Volume off) 1 : Volume mute off . Transmission [k][e][ ][Set ID][ ][Data][Cr] Data 0 : Volume mute on remote control. Acknowledgement [h][ ][Set ID][ ][OK][Data][x] * Real data mapping 1 0 : Step 0 A : Step 10 F : Step 15 10 : Step 16 64 : Step 100...
Owners Manual
Page 28
...Sharpness (Command:k) G To adjust the screen sharpness. Acknowledgement [k][ ][Set ID][ ][OK][Data][x] 11. Key Lock (Command:m) G To lock the remote control and the front panel controls on the monitor, use this mode. When main power is released. 28 13. Transmission [m][b][ ][Set ID][ ... ][Set ID][ ][OK][Data][x] 12. Tune Command (Command:m a) G Tune channel to 'Real data mapping 1'. Key (Command:m c) G To send IR remote key code. Tint (Command:j) G To adjust the screen tint. Channel Add/Del (Command:m b) G To add and delete the channels. Transmission [k][i][ ][Set ...
...Sharpness (Command:k) G To adjust the screen sharpness. Acknowledgement [k][ ][Set ID][ ][OK][Data][x] 11. Key Lock (Command:m) G To lock the remote control and the front panel controls on the monitor, use this mode. When main power is released. 28 13. Transmission [m][b][ ][Set ID][ ... ][Set ID][ ][OK][Data][x] 12. Tune Command (Command:m a) G Tune channel to 'Real data mapping 1'. Key (Command:m c) G To send IR remote key code. Tint (Command:j) G To adjust the screen tint. Channel Add/Del (Command:m b) G To add and delete the channels. Transmission [k][i][ ][Set ...
Owners Manual
Page 29
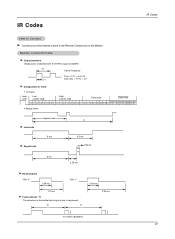
... port on the Monitor. Tf Tf 0.56 ms 2.24 ms Tf=108ms @455KHz 29 Remote Control IR Code G Output waveform Single pulse, modulated with 37.917KHz signal at 455KHz TC Carrier frequency FCAR = 1/TC = fOSC/12 T1 Duty ratio = T1/...
... port on the Monitor. Tf Tf 0.56 ms 2.24 ms Tf=108ms @455KHz 29 Remote Control IR Code G Output waveform Single pulse, modulated with 37.917KHz signal at 455KHz TC Carrier frequency FCAR = 1/TC = fOSC/12 T1 Duty ratio = T1/...
Owners Manual
Page 32
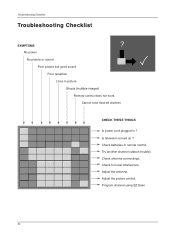
Check batteries in picture Ghosts (multiple images) Remote control does not work. Check antenna connectings. Troubleshooting Checklist Troubleshooting Checklist SYMPTOMS No power No picture or sound Poor picture but good sound Poor reception Lines in remote control. Is television turned on ? Adjust the picture control. Adjust the antenna. Check for local interference. CHECK THESE THINGS Is power cord plugged in ? Try another channel (station trouble). Cannot tune desired channel. Program channel using EZ Scan. 32
Check batteries in picture Ghosts (multiple images) Remote control does not work. Check antenna connectings. Troubleshooting Checklist Troubleshooting Checklist SYMPTOMS No power No picture or sound Poor picture but good sound Poor reception Lines in remote control. Is television turned on ? Adjust the picture control. Adjust the antenna. Check for local interference. CHECK THESE THINGS Is power cord plugged in ? Try another channel (station trouble). Cannot tune desired channel. Program channel using EZ Scan. 32


