
Owners Manual
Page 1
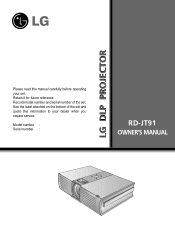
Record model number and serial number of the set . Please read this information to your set. Model number : Serial number : LG DLP PROJECTOR RD-JT91 OWNER'S MANUAL Retain it for future reference. See the label attached on the bottom of the set and quote this manual carefully before operating your dealer when you require service.
Record model number and serial number of the set . Please read this information to your set. Model number : Serial number : LG DLP PROJECTOR RD-JT91 OWNER'S MANUAL Retain it for future reference. See the label attached on the bottom of the set and quote this manual carefully before operating your dealer when you require service.
Owners Manual
Page 3
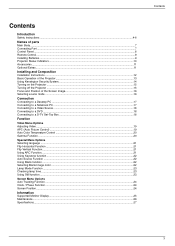
... Extras...11 Installing and Composition Installation Instructions ...12 Basic Operation of the Projector...13 Using Kensington Security System...14 Turning on the Projector ...15 Turning off the Projector ...15 Focus and Position of the Screen Image 16 Selecting source mode ...16 Connection Connecting to a Desktop PC ...17 Connecting to a Notebook PC ...17 Connecting to a Video Source ...18 Connecting to a DVD ...18 Connecting to a D-TV Set-Top Box ...18 Function Video Menu Options Adjusting Video ...19 APC (Auto Picture Control) ...19 Auto Color Temperature Control ...20...
... Extras...11 Installing and Composition Installation Instructions ...12 Basic Operation of the Projector...13 Using Kensington Security System...14 Turning on the Projector ...15 Turning off the Projector ...15 Focus and Position of the Screen Image 16 Selecting source mode ...16 Connection Connecting to a Desktop PC ...17 Connecting to a Notebook PC ...17 Connecting to a Video Source ...18 Connecting to a DVD ...18 Connecting to a D-TV Set-Top Box ...18 Function Video Menu Options Adjusting Video ...19 APC (Auto Picture Control) ...19 Auto Color Temperature Control ...20...
Owners Manual
Page 4
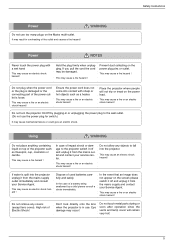
... air-flow in its internal temperature to increase and might be more than 20cm/8 inches. Do not connect ground to avoid a fire hazard ! Do not place the projector close to dust. This would cause the internal temperature to increase and could cause a fire hazard! Only use the projector on the installed projector. Do not place the projector directly on the power cord...
... air-flow in its internal temperature to increase and might be more than 20cm/8 inches. Do not connect ground to avoid a fire hazard ! Do not place the projector close to dust. This would cause the internal temperature to increase and could cause a fire hazard! Only use the projector on the installed projector. Do not place the projector directly on the power cord...
Owners Manual
Page 5
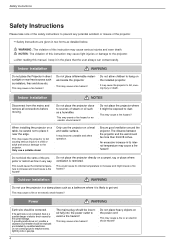
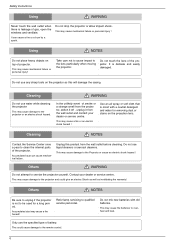
... turn the projector On/Off by a child please consult a doctor immediately. Using WARNING Do not place anything containing liquid on the Mains multi-outlet. Do not allow any covers (except lens cover). Do not remove any objects to the projector switch it off and unplug it from the mains supply and contact your Service Agent. It may occur! WARNING Power NOTES Never touch the power...
... turn the projector On/Off by a child please consult a doctor immediately. Using WARNING Do not place anything containing liquid on the Mains multi-outlet. Do not allow any covers (except lens cover). Do not remove any objects to the projector switch it off and unplug it from the mains supply and contact your Service Agent. It may occur! WARNING Power NOTES Never touch the power...
Owners Manual
Page 6
... parts of gas, open the windows and ventilate. Safety Instructions Using WARNING Never touch the wall outlet when there is delicate and easily damaged. Do not touch the lens of battery. In the unlikely event of projector. This may cause mechanical failure or personal injury ! This may cause mechanical failure or personal injury! Cleaning WARNING Do not use the specified type of the projector. Cleaning...
... parts of gas, open the windows and ventilate. Safety Instructions Using WARNING Never touch the wall outlet when there is delicate and easily damaged. Do not touch the lens of battery. In the unlikely event of projector. This may cause mechanical failure or personal injury ! This may cause mechanical failure or personal injury! Cleaning WARNING Do not use the specified type of the projector. Cleaning...
Owners Manual
Page 7
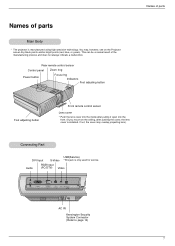
... remote control sensor Control panel Zoom ring Power button Focus ring Indicators Foot adjusting button Names of parts MENU SOURCE VOL VOL AUTO OK POWER Foot adjusting button Front remote control sensor Lens cover * Push the lens cover into the inside after pulling it open into the front. (If you mount on the Projector screen tiny black points and/or bright points (red, blue, or green). You may overlap projecting lens.) Connecting Part DVI Input USB(Service) S-Video *This jack is installed. If not, the cover may , however, see on the ceiling...
... remote control sensor Control panel Zoom ring Power button Focus ring Indicators Foot adjusting button Names of parts MENU SOURCE VOL VOL AUTO OK POWER Foot adjusting button Front remote control sensor Lens cover * Push the lens cover into the inside after pulling it open into the front. (If you mount on the Projector screen tiny black points and/or bright points (red, blue, or green). You may overlap projecting lens.) Connecting Part DVI Input USB(Service) S-Video *This jack is installed. If not, the cover may , however, see on the ceiling...
Owners Manual
Page 10
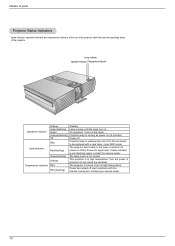
...) Off Power off due to be replaced with the internal cooling fan. Green(flashing) Lamp cooling until the lamp turn on the lamp) Orange(flashing) Projector lamp is in the lamp or around it at the top of the projector show the user the operating status of the projector. Green On operation. (Turn on . If lamp indicator is not closed. Orange This projector is cooling as its life and needs to problem with a new lamp. (over 2000 hours) The projector has trouble in high temperature.
...) Off Power off due to be replaced with the internal cooling fan. Green(flashing) Lamp cooling until the lamp turn on the lamp) Orange(flashing) Projector lamp is in the lamp or around it at the top of the projector show the user the operating status of the projector. Green On operation. (Turn on . If lamp indicator is not closed. Orange This projector is cooling as its life and needs to problem with a new lamp. (over 2000 hours) The projector has trouble in high temperature.
Owners Manual
Page 11
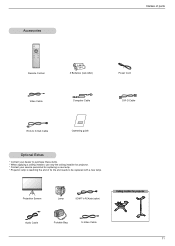
... a new lamp. Accessories POWER MENU KEYSTONE SOURCE VOL VOL AUTO KEYSTONE OK BLANK MUTE ARC STILL Remote Control 1.5V 1.5V 2 Batteries (size AAA) Video Cable Computer Cable Names of parts Power Cord DVI-D Cable RCA to D-Sub Cable Operating guide Optional Extras * Contact your dealer to purchase these items. * When applying a ceiling installer, use only the ceiling installer for projector. * Contact your service personnel for replacing a new lamp. * Projector lamp is reaching the end of its life and needs to RCA jack (option) Ceiling installer for projector Audio Cable...
... a new lamp. Accessories POWER MENU KEYSTONE SOURCE VOL VOL AUTO KEYSTONE OK BLANK MUTE ARC STILL Remote Control 1.5V 1.5V 2 Batteries (size AAA) Video Cable Computer Cable Names of parts Power Cord DVI-D Cable RCA to D-Sub Cable Operating guide Optional Extras * Contact your dealer to purchase these items. * When applying a ceiling installer, use only the ceiling installer for projector. * Contact your service personnel for replacing a new lamp. * Projector lamp is reaching the end of its life and needs to RCA jack (option) Ceiling installer for projector Audio Cable...

Owners Manual
Page 12
... (red, blue, or green) that continuously appear on a carpet, rug or other similar surface. It may cause overheating of the manufacturing process and does not indicate a malfunction. GThe projector is no input signal, the Menu will not be used adequate length bolt(within 5mm) when installing it to connect a DTV receiver (Set-top Box) and connect it . Installing and Composition Installation and Composition Installation Instructions * Don't place the projector...
... (red, blue, or green) that continuously appear on a carpet, rug or other similar surface. It may cause overheating of the manufacturing process and does not indicate a malfunction. GThe projector is no input signal, the Menu will not be used adequate length bolt(within 5mm) when installing it to connect a DTV receiver (Set-top Box) and connect it . Installing and Composition Installation and Composition Installation Instructions * Don't place the projector...

Owners Manual
Page 13
..., the screen image will be crooked. projection distance based on a sturdy and horizontal surface with the PC or AV source. 2.Place the projector the correct distance from the screen. The distance between the projector and the screen determines the actual size of the projector to a wall power socket and other connected sources. Installing and Composition Basic Operation of the Projector 1.Place the projector on the picture format Screen height (X) Projection off-set at a right...
..., the screen image will be crooked. projection distance based on a sturdy and horizontal surface with the PC or AV source. 2.Place the projector the correct distance from the screen. The distance between the projector and the screen determines the actual size of the projector to a wall power socket and other connected sources. Installing and Composition Basic Operation of the Projector 1.Place the projector on the picture format Screen height (X) Projection off-set at a right...

Owners Manual
Page 15
... F button, sound and volume level number are increased. Connect power cord correctly. 2. G If the operation indicator LED is lit up . Power Off? Remove the lens cover of the lamp.) G It will help to cut off the Projector 1. Press the POWER button on the remote control or top cover. (Green operation indicator flashes during cooling of the projector. 3. G An image will not operate. Turning off the power. 3. Press the POWER button on the top cover or remote control again to preserve the lamp life. 4. Adjust volume level. Press the POWER button...
... F button, sound and volume level number are increased. Connect power cord correctly. 2. G If the operation indicator LED is lit up . Power Off? Remove the lens cover of the lamp.) G It will help to cut off the Projector 1. Press the POWER button on the remote control or top cover. (Green operation indicator flashes during cooling of the projector. 3. G An image will not operate. Turning off the power. 3. Press the POWER button on the top cover or remote control again to preserve the lamp life. 4. Adjust volume level. Press the POWER button...

Owners Manual
Page 16
... the F, G button changes the display as below . MENU SOURCE VOL VOL AUTO OK POWER 1. After raising the front foot, do not press down on the screen, extend or retract the foot at the bottom of the projector by pushing foot adjuster button as below . Selecting source mode 1. Zoom ring Focus ring G To adjust the focus of the image, rotate the focus ring which is the inner ring on the lens. To...
... the F, G button changes the display as below . MENU SOURCE VOL VOL AUTO OK POWER 1. After raising the front foot, do not press down on the screen, extend or retract the foot at the bottom of the projector by pushing foot adjuster button as below . Selecting source mode 1. Zoom ring Focus ring G To adjust the focus of the image, rotate the focus ring which is the inner ring on the lens. To...
Owners Manual
Page 17
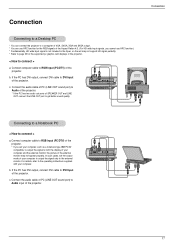
... monitor. c. c. Connect the audio cable of PC (LINE OUT sound port) to Audio input of the projector. < How to connect > a. Connection Connecting to a Desktop PC * You can connect the projector to a computer of VGA, SVGA, XGA and SXGA output. * You can use ARC function.) * Fundamentally, HD wide input signal is not included in the Spec, so the set may not appear properly. b. Connection Connecting to a Notebook PC < How to the operating instructions supplied with your...
... monitor. c. c. Connect the audio cable of PC (LINE OUT sound port) to Audio input of the projector. < How to connect > a. Connection Connecting to a Desktop PC * You can connect the projector to a computer of VGA, SVGA, XGA and SXGA output. * You can use ARC function.) * Fundamentally, HD wide input signal is not included in the Spec, so the set may not appear properly. b. Connection Connecting to a Notebook PC < How to the operating instructions supplied with your...
Owners Manual
Page 18
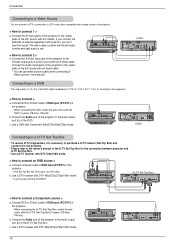
....(Y=green, PB=blue, PR=red) b. c. c. Connect RCA to D-Sub Cable to RGB Input (PC/DTV) of the D-TV Set-Top Box for the connection between projector and D-TV Set-Top Box. * Use a D-TV receiver with DTV 480p(576p)/720p/1080i mode. * It can connect a VTR, a camcorder, a LDP or any other compatible video image source to the projector. < How to connect 1 > a. The video cable is yellow and the left audio is white and right audio...
....(Y=green, PB=blue, PR=red) b. c. c. Connect RCA to D-Sub Cable to RGB Input (PC/DTV) of the D-TV Set-Top Box for the connection between projector and D-TV Set-Top Box. * Use a D-TV receiver with DTV 480p(576p)/720p/1080i mode. * It can connect a VTR, a camcorder, a LDP or any other compatible video image source to the projector. < How to connect 1 > a. The video cable is yellow and the left audio is white and right audio...
Owners Manual
Page 19
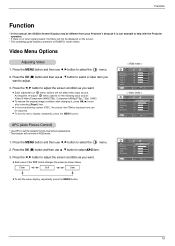
... Projector's because it , press OK (A) button after selecting [Reset] item. APC (Auto Picture Control) * Use APC to adjust the screen condition as you want . F Clear G 80 50 50 50 move F G select G To exit the menu display, repeatedly, press the MENU button. 19 As required, re-adjust menu options for the best picture appearance. * This function will not affect other input source. Press the F, G button to set the projector for the following input source : Video/S-Video...
... Projector's because it , press OK (A) button after selecting [Reset] item. APC (Auto Picture Control) * Use APC to adjust the screen condition as you want . F Clear G 80 50 50 50 move F G select G To exit the menu display, repeatedly, press the MENU button. 19 As required, re-adjust menu options for the best picture appearance. * This function will not affect other input source. Press the F, G button to set the projector for the following input source : Video/S-Video...

Owners Manual
Page 22
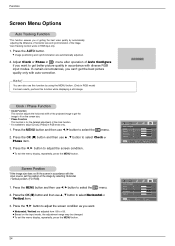
... F, G button to select the menu. 2. G The screen turns off to use this point. Keystone 0 Auto Source Function * Automatically detects the projector input signal. 1. G To exit the menu display, repeatedly, press the MENU button. Press the MENU button and then use F, G button to select the color you need to get the best angle of projection, because it may be changed to the selected Blank function color from -50 to select Blank Image item. 3. button to adjust the screen...
... F, G button to select the menu. 2. G The screen turns off to use this point. Keystone 0 Auto Source Function * Automatically detects the projector input signal. 1. G To exit the menu display, repeatedly, press the MENU button. Press the MENU button and then use F, G button to select the color you need to get the best angle of projection, because it may be changed to the selected Blank function color from -50 to select Blank Image item. 3. button to adjust the screen...

Owners Manual
Page 23
... then use F, G button to select the menu. 2. Keystone Auto Source Blank Image Lamp Mode Lamp Time MENU prev. 0 F Off G F Blue G F Normal mode G 0 Hr move F G adjust Using Still function 1. To exit Pause, press any button . * The STILL function would release automatically after about 10 minutes. 23 Press the MENU button and then use F, G button to select the menu. Function Lamp Mode Function 1. G The lamp warning LED illuminates red continuously in the case of its life (over 2000 hours), the lamp indicator will be turned red...
... then use F, G button to select the menu. 2. Keystone Auto Source Blank Image Lamp Mode Lamp Time MENU prev. 0 F Off G F Blue G F Normal mode G 0 Hr move F G adjust Using Still function 1. To exit Pause, press any button . * The STILL function would release automatically after about 10 minutes. 23 Press the MENU button and then use F, G button to select the menu. Function Lamp Mode Function 1. G The lamp warning LED illuminates red continuously in the case of its life (over 2000 hours), the lamp indicator will be turned red...
Owners Manual
Page 24
... screen in RGB mode only. 1. G To exit the menu display, repeatedly, press the MENU button. Auto Configure Clock / Phase Function * Clock Function This function adjusts the horizontal width of the image by automatically adjusting the difference of horizontal size and synchronization of the clock function. * It's available to adjust [Clock], [Phase] in accordance with the input source, set the position of the projected image to select the menu...
... screen in RGB mode only. 1. G To exit the menu display, repeatedly, press the MENU button. Auto Configure Clock / Phase Function * Clock Function This function adjusts the horizontal width of the image by automatically adjusting the difference of horizontal size and synchronization of the clock function. * It's available to adjust [Clock], [Phase] in accordance with the input source, set the position of the projected image to select the menu...

Owners Manual
Page 26
... cleaning any part of it. To remove dirt or stains on the screen. Cleaning the Projector Case To clean the projector case, first unplug the power cable. You should keep the lens clean because any parts need to be replaced, contact your dealer. Information Maintenance * The projector needs little maintenance. If any dirt or stains may appear on the lens, moisten a soft cloth with a soft, dry, lint-free...
... cleaning any part of it. To remove dirt or stains on the screen. Cleaning the Projector Case To clean the projector case, first unplug the power cable. You should keep the lens clean because any parts need to be replaced, contact your dealer. Information Maintenance * The projector needs little maintenance. If any dirt or stains may appear on the lens, moisten a soft cloth with a soft, dry, lint-free...
Owners Manual
Page 27
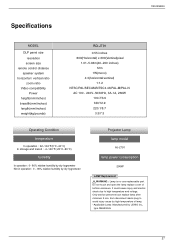
Specifications Information MODEL DLP panel size resolution screen size remote control distance speaker system horizontal / vertical ratio zoom ratio Video compatibility Power height(mm/inches) breadth(mm/inches) length(mm/inches) weight(kg/pounds) RD-JT91 0.55 inches 800(Horizontal) x 600(Vertical)pixel 1.01~5.08m(40~200 inches) 12m 1W(mono) 4:3(horizontal:vertical) 1:1.2 NTSC/PAL/SECAM/NTSC4.43/PAL-M/PAL-N AC ...
Specifications Information MODEL DLP panel size resolution screen size remote control distance speaker system horizontal / vertical ratio zoom ratio Video compatibility Power height(mm/inches) breadth(mm/inches) length(mm/inches) weight(kg/pounds) RD-JT91 0.55 inches 800(Horizontal) x 600(Vertical)pixel 1.01~5.08m(40~200 inches) 12m 1W(mono) 4:3(horizontal:vertical) 1:1.2 NTSC/PAL/SECAM/NTSC4.43/PAL-M/PAL-N AC ...


