

User Guide
Page 1
High Resolution 3. One Touch Auto-Adjustment Function 6. Easy Keystone Adjustment FEATURES 1. DLP PROJECTOR USER'S GUIDE Thank you for Portability 4. Please read this user's guide for future reference. OUTLINE This DLPTM Projector can display various computer signals and NTSC/PAL/SECAM video signals. RGB and DVI-D Input Terminal 5. Compact Size, Feather Weight for purchasing the DLPTM Projector. High Brightness 2. Save this user's guide to ensure correct use of the device.
High Resolution 3. One Touch Auto-Adjustment Function 6. Easy Keystone Adjustment FEATURES 1. DLP PROJECTOR USER'S GUIDE Thank you for Portability 4. Please read this user's guide for future reference. OUTLINE This DLPTM Projector can display various computer signals and NTSC/PAL/SECAM video signals. RGB and DVI-D Input Terminal 5. Compact Size, Feather Weight for purchasing the DLPTM Projector. High Brightness 2. Save this user's guide to ensure correct use of the device.
User Guide
Page 3
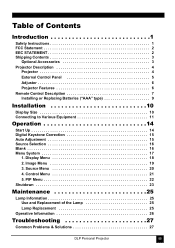
...Use and Replacement of Contents Introduction 1 Safety Instructions 1 FCC Statement 2 EEC STATEMENT 2 Shipping Contents 3 Optional Accessories 3 Projector Description 4 Projector 4 External Control Panel 5 Adjuster 6 Projector Features 6 Remote Control Description 7 Installing or Replacing Batteries ("AAA" type 9 Installation 10 Display Size 10 Connecting to ...the Lamp 25 Lamp Replacement 25 Operative Information 26 Troubleshooting 27 Common Problems & Solutions 27 DLP Personal Projector iii Image Menu 19 3. Source Menu 20 4. Control Menu 21 5. Display Menu 18 2.
...Use and Replacement of Contents Introduction 1 Safety Instructions 1 FCC Statement 2 EEC STATEMENT 2 Shipping Contents 3 Optional Accessories 3 Projector Description 4 Projector 4 External Control Panel 5 Adjuster 6 Projector Features 6 Remote Control Description 7 Installing or Replacing Batteries ("AAA" type 9 Installation 10 Display Size 10 Connecting to ...the Lamp 25 Lamp Replacement 25 Operative Information 26 Troubleshooting 27 Common Problems & Solutions 27 DLP Personal Projector iii Image Menu 19 3. Source Menu 20 4. Control Menu 21 5. Display Menu 18 2.

User Guide
Page 4
Status Messages 28 Specifications 29 Projector Specifications 29 Timing Chart 30 Suppoted timing for Analog RGB and DVI inputs 30 Supported timing for YPbPr input 30 Supported timing for Video and S-Video inputs 31 Dimensions 32 iv DLP Personal Projector
Status Messages 28 Specifications 29 Projector Specifications 29 Timing Chart 30 Suppoted timing for Analog RGB and DVI inputs 30 Supported timing for YPbPr input 30 Supported timing for Video and S-Video inputs 31 Dimensions 32 iv DLP Personal Projector

User Guide
Page 5
...explode on an unstable cart, stand, or table. Incorrect reassembly can cause electric shock when the appliance is required. The projector must be packaged into a carry bag while moving to removing the lamp assembly for replacement. To avoid the lamp being damaged... this product on rare occasions. 3. The normal operation procedures are to a qualified technician when service or repair is subsequently used. 5. DLP Personal Projector 1 Take it for operation. 8. INTRODUCTION Caution TO PREVENT SHOCK, DO NOT OPEN THE CABINET. NO USER -SERVICEABLE PARTS INSIDE. PLEASE...
...explode on an unstable cart, stand, or table. Incorrect reassembly can cause electric shock when the appliance is required. The projector must be packaged into a carry bag while moving to removing the lamp assembly for replacement. To avoid the lamp being damaged... this product on rare occasions. 3. The normal operation procedures are to a qualified technician when service or repair is subsequently used. 5. DLP Personal Projector 1 Take it for operation. 8. INTRODUCTION Caution TO PREVENT SHOCK, DO NOT OPEN THE CABINET. NO USER -SERVICEABLE PARTS INSIDE. PLEASE...
User Guide
Page 6
... can be used in a particular installation. Increase the distance between the equipment and receiver. - In these requirements. 2 DLP Personal Projector However, there is under operation. If this projector on the top of cloth or carpet. • Do not touch the ventilation grill when the... interference will assist you in conjuction with the instructions, may damage your personal projector. Reorient or relocate the receiving antenna. - Caution • Always open the lens shutter when the projector lamp is designed to operate safely within a bandwidth of 100 to 240 volts...
... can be used in a particular installation. Increase the distance between the equipment and receiver. - In these requirements. 2 DLP Personal Projector However, there is under operation. If this projector on the top of cloth or carpet. • Do not touch the ventilation grill when the... interference will assist you in conjuction with the instructions, may damage your personal projector. Reorient or relocate the receiving antenna. - Caution • Always open the lens shutter when the projector lamp is designed to operate safely within a bandwidth of 100 to 240 volts...

User Guide
Page 7
Macintosh adapter 3. If any of these items are missing, please contact personnel at the place of purchase. Projector User's Guide Quick Start Guide Batteries Remote Control 3-2 Converter Deluxe Soft Carry Case Audio Cable HDTV Cable (YPbPr) VGA Cable DVI-D Cable USB Cable Video ... S.A. & India 240V 220V Power Cord Optional Accessories 1. 250W lamp module 2. Carefully unpack and verify that you have all the items shown below. Shipping Contents The projector is shipped with the cables required for connection to standard PC or laptop computers. Ceiling mount kit 110V...
Macintosh adapter 3. If any of these items are missing, please contact personnel at the place of purchase. Projector User's Guide Quick Start Guide Batteries Remote Control 3-2 Converter Deluxe Soft Carry Case Audio Cable HDTV Cable (YPbPr) VGA Cable DVI-D Cable USB Cable Video ... S.A. & India 240V 220V Power Cord Optional Accessories 1. 250W lamp module 2. Carefully unpack and verify that you have all the items shown below. Shipping Contents The projector is shipped with the cables required for connection to standard PC or laptop computers. Ceiling mount kit 110V...

User Guide
Page 8
Projector Description Projector RGB (PC / Mac) / YPbPr signal input Video connector Audio input USB mouse connector Video Audio USB S-Video RS-232 S-Video connector RS232 control port IR remote sensor D-SUB IN DVI-D AC IN Main power switch AC power cord inlet DVI-D signal input Kensington lock Rear adjuster foot Projection lens adjuster External control panel (See "External Control Panel" on page 5 for more detailed information.) Ventilation grill Front adjuster foot Projection lens IR remote sensor Lamp door Rear adjuster foot 4 DLP Personal Projector Speaker
Projector Description Projector RGB (PC / Mac) / YPbPr signal input Video connector Audio input USB mouse connector Video Audio USB S-Video RS-232 S-Video connector RS232 control port IR remote sensor D-SUB IN DVI-D AC IN Main power switch AC power cord inlet DVI-D signal input Kensington lock Rear adjuster foot Projection lens adjuster External control panel (See "External Control Panel" on page 5 for more detailed information.) Ventilation grill Front adjuster foot Projection lens IR remote sensor Lamp door Rear adjuster foot 4 DLP Personal Projector Speaker

User Guide
Page 9
... correct a image that is activated, the four buttons help you press MUTE. 9. Temp Indicator 3. KEYSTONE - / Left 7. BLANK BLANK 1. When the projector is wider at the top. Temp indicator The Temp indicator shows red or flashed red when the system temperature is too high or has fan...key for more detailed information. 4. You can press BLANK again or RETURN to hide the screen image. POWER 5. MENU / EXIT 9. DLP Personal Projector 5 Lamp Indicator 4. AUTO 12. Power Indicator POWER 11. Right > 11. Lamp Indicator The Lamp Indicator will not affect the current ...
... correct a image that is activated, the four buttons help you press MUTE. 9. Temp Indicator 3. KEYSTONE - / Left 7. BLANK BLANK 1. When the projector is wider at the top. Temp indicator The Temp indicator shows red or flashed red when the system temperature is too high or has fan...key for more detailed information. 4. You can press BLANK again or RETURN to hide the screen image. POWER 5. MENU / EXIT 9. DLP Personal Projector 5 Lamp Indicator 4. AUTO 12. Power Indicator POWER 11. Right > 11. Lamp Indicator The Lamp Indicator will not affect the current ...

User Guide
Page 10
...-friendly design to deliver high reliability and ease of the projector itself . Please do not place any additional burden on the ambient lighting conditions and contrast/brightness settings. 6 DLP Personal Projector The projector offers the following features: • Small and light for... portability. • Full-function remote control with 1 quick-release adjuster foot. Lift the projector up and press the adjuster button to ...
...-friendly design to deliver high reliability and ease of the projector itself . Please do not place any additional burden on the ambient lighting conditions and contrast/brightness settings. 6 DLP Personal Projector The projector offers the following features: • Small and light for... portability. • Full-function remote control with 1 quick-release adjuster foot. Lift the projector up and press the adjuster button to ...

User Guide
Page 11
For the rest of the projector. DLP Personal Projector 7 MOUSE PAD, MOUSE , L-CLICK, R-CLICK When a PC or notebook is activated, the buttons function as 3 Left / 4 Right. PIP SIZE RATIO 1. 3 LEFT / KEYSTONE - ,4 RIGHT / KEYSTONE + Whe the OSD menu is connected to the projector with a USB connector, these buttons work as Keystone - / Keystone +. 2. ZOOM IN/ OUT RETURN...
For the rest of the projector. DLP Personal Projector 7 MOUSE PAD, MOUSE , L-CLICK, R-CLICK When a PC or notebook is activated, the buttons function as 3 Left / 4 Right. PIP SIZE RATIO 1. 3 LEFT / KEYSTONE - ,4 RIGHT / KEYSTONE + Whe the OSD menu is connected to the projector with a USB connector, these buttons work as Keystone - / Keystone +. 2. ZOOM IN/ OUT RETURN...
User Guide
Page 12
...the Ratio button, you can enable the PIP (Picture In Picture) function and choose the position and size of the image is lower than the projector provides, you prefer: 4:3,16:9 or native input source resolution in the lower right corner of the picture will appear in RGB or DVI mode... the screen. FREEZE The image is frozen when FREEZE is further magnified, up to the last state from "ZOOM", "BLANK", "FREEZE" or "PIP". 8 DLP Personal Projector RETURN Back to four times the original size. By pressing ZOOM OUT -, the size of the PIP image. 6. 3. When the + button is pressed again,...
...the Ratio button, you can enable the PIP (Picture In Picture) function and choose the position and size of the image is lower than the projector provides, you prefer: 4:3,16:9 or native input source resolution in the lower right corner of the picture will appear in RGB or DVI mode... the screen. FREEZE The image is frozen when FREEZE is further magnified, up to the last state from "ZOOM", "BLANK", "FREEZE" or "PIP". 8 DLP Personal Projector RETURN Back to four times the original size. By pressing ZOOM OUT -, the size of the PIP image. 6. 3. When the + button is pressed again,...
User Guide
Page 13
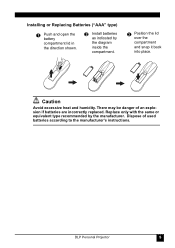
Caution Avoid excessive heat and humidity. DLP Personal Projector 9 There may be danger of used batteries according to the manufacturer's instructions. Replace only with the same or equivalent type recommended by the diagram inside the compartment. 3 Position the lid over the compartment and snap it back into place. Dispose of an explosion if batteries are incorrectly replaced. Installing or Replacing Batteries ("AAA" type) 1 Push and open the battery compartment lid in the direction shown. 2 Install batteries as indicated by the manufacturer.
Caution Avoid excessive heat and humidity. DLP Personal Projector 9 There may be danger of used batteries according to the manufacturer's instructions. Replace only with the same or equivalent type recommended by the diagram inside the compartment. 3 Position the lid over the compartment and snap it back into place. Dispose of an explosion if batteries are incorrectly replaced. Installing or Replacing Batteries ("AAA" type) 1 Push and open the battery compartment lid in the direction shown. 2 Install batteries as indicated by the manufacturer.

User Guide
Page 14
RD-JT50 / RD-JT52 display size chart (4:3 aspect ratio) Distance from screen feet inches 6 72 8 96 10 120 12 144 14 168 16 192 ....2 14.94 179.2 18.29 219.5 Distance from the screen according to the desired picture size (see the table below). INSTALLATION Display Size Place the projector at the required distance from screen meters cm 1.5 150 2.0 200 2.5 250 3.0 300 3.5 350 4.0 400 4.5 450 5.0 500 5.5 550 6.0 600 Diagonal measurement ... 1.14 1.52 1.91 2.29 2.67 3.05 3.43 3.81 4.19 4.57 cm 114.3 152.4 190.5 228.6 266.7 304.8 342.9 381.0 419.1 457.2 10 DLP Personal Projector
RD-JT50 / RD-JT52 display size chart (4:3 aspect ratio) Distance from screen feet inches 6 72 8 96 10 120 12 144 14 168 16 192 ....2 14.94 179.2 18.29 219.5 Distance from the screen according to the desired picture size (see the table below). INSTALLATION Display Size Place the projector at the required distance from screen meters cm 1.5 150 2.0 200 2.5 250 3.0 300 3.5 350 4.0 400 4.5 450 5.0 500 5.5 550 6.0 600 Diagonal measurement ... 1.14 1.52 1.91 2.29 2.67 3.05 3.43 3.81 4.19 4.57 cm 114.3 152.4 190.5 228.6 266.7 304.8 342.9 381.0 419.1 457.2 10 DLP Personal Projector

User Guide
Page 15
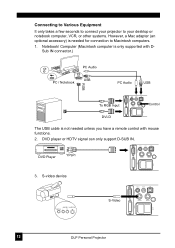
...Some of displaying various High Definition TV display modes. The projector is needed for information on page 17 for connection to Macintosh computers. RD-JT50 / RD-JT52 (XGA) screen size chart (16:9 aspect ratio) Distance from...28 feet, 1 feet = 0.305m, 1m = 100cm, 1 feet = 12 inches Connecting to Various Equipment HDTV description The projector is capable of these sources are supported in the HDTV function: • 480i • 480p • 576i •...It only takes a few seconds to connect your projector to your projector to "Menu System" on the HDTV (YPbPr) OSD selections...
...Some of displaying various High Definition TV display modes. The projector is needed for information on page 17 for connection to Macintosh computers. RD-JT50 / RD-JT52 (XGA) screen size chart (16:9 aspect ratio) Distance from...28 feet, 1 feet = 0.305m, 1m = 100cm, 1 feet = 12 inches Connecting to Various Equipment HDTV description The projector is capable of these sources are supported in the HDTV function: • 480i • 480p • 576i •...It only takes a few seconds to connect your projector to your projector to "Menu System" on the HDTV (YPbPr) OSD selections...
User Guide
Page 16
... IN DVD Player YPbPr S-Video RS-232 DVI-D AC IN 3. S-video device S-Video D-SUB IN Video Audio USB S-Video RS-232 DVI-D AC IN 12 DLP Personal Projector DVD player or HDTV signal can only support D-SUB IN. Connecting to Various Equipment It only takes a few seconds to connect your... projector to your desktop or notebook computer, VCR, or other systems. However, a Mac adapter (an optional accessory) is not needed unless you have a remote control with...
... IN DVD Player YPbPr S-Video RS-232 DVI-D AC IN 3. S-video device S-Video D-SUB IN Video Audio USB S-Video RS-232 DVI-D AC IN 12 DLP Personal Projector DVD player or HDTV signal can only support D-SUB IN. Connecting to Various Equipment It only takes a few seconds to connect your... projector to your desktop or notebook computer, VCR, or other systems. However, a Mac adapter (an optional accessory) is not needed unless you have a remote control with...
User Guide
Page 18
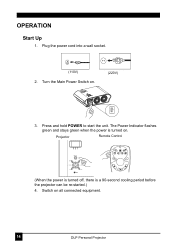
The Power Indicator flashes green and stays green when the power is a 90-second cooling period before the projector can be re-started.) 4. Turn the Main Power Switch on . Press and hold POWER to start the unit. OPERATION Start Up 1. Projector Remote Control POWER MENU /EXIT KEYSTONE - SOURCE KEYSTONE + AUTO BLANK (When the power is turned off, there is turned on . (220V) 3. Switch on all connected equipment. 14 DLP Personal Projector Plug the power cord into a wall socket. (110V) 2.
The Power Indicator flashes green and stays green when the power is a 90-second cooling period before the projector can be re-started.) 4. Turn the Main Power Switch on . Press and hold POWER to start the unit. OPERATION Start Up 1. Projector Remote Control POWER MENU /EXIT KEYSTONE - SOURCE KEYSTONE + AUTO BLANK (When the power is turned off, there is turned on . (220V) 3. Switch on all connected equipment. 14 DLP Personal Projector Plug the power cord into a wall socket. (110V) 2.
User Guide
Page 19
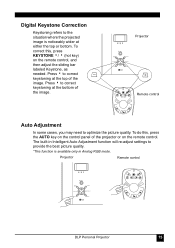
...-in Analog RGB mode. SOURCE KEYSTONE + AUTO BLANK DLP Personal Projector 15 To correct this , press the AUTO key on the control panel of the projector or on the remote control, and then adjust the sliding bar labeled Keystone, as needed. Projector POWER MENU /EXIT KEYSTONE - Projector Remote control POWER MENU /EXIT KEYSTONE - SOURCE KEYSTONE...
...-in Analog RGB mode. SOURCE KEYSTONE + AUTO BLANK DLP Personal Projector 15 To correct this , press the AUTO key on the control panel of the projector or on the remote control, and then adjust the sliding bar labeled Keystone, as needed. Projector POWER MENU /EXIT KEYSTONE - Projector Remote control POWER MENU /EXIT KEYSTONE - SOURCE KEYSTONE...
User Guide
Page 20
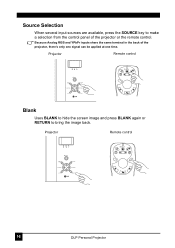
... to hide the screen image and press BLANK again or RETURN to make a selection from the control panel of the projector, there's only one signal can be applied at one time. Projector Remote control POWER MENU /EXIT KEYSTONE - Because Analog RGB and YPbPr inputs share the same terminal in the back of...
... to hide the screen image and press BLANK again or RETURN to make a selection from the control panel of the projector, there's only one signal can be applied at one time. Projector Remote control POWER MENU /EXIT KEYSTONE - Because Analog RGB and YPbPr inputs share the same terminal in the back of...

User Guide
Page 21
... panel: 1. Press v (DOWN) to the previous menu. H Position V Position More Options Sub Page: Brightness Contrast Color Tint Sharpness System DLP Personal Projector 17 Press EXIT to return to select items in the sub-menu. 4. Menu System To use the MENU / EXIT button on the remote control: 1. OSD ...
... panel: 1. Press v (DOWN) to the previous menu. H Position V Position More Options Sub Page: Brightness Contrast Color Tint Sharpness System DLP Personal Projector 17 Press EXIT to return to select items in the sub-menu. 4. Menu System To use the MENU / EXIT button on the remote control: 1. OSD ...
User Guide
Page 22
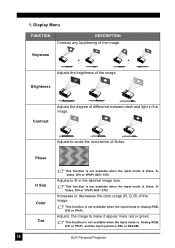
... or YPbPr 480i / 576i. Adjusts the brightness of the image. This function is not available when the input mode is PAL or SECAM. 18 DLP Personal Projector Adjusts the image to avoid the occurrence of the image. Adjusts to make it appear more red or green. Increases or decreases the color range...
... or YPbPr 480i / 576i. Adjusts the brightness of the image. This function is not available when the input mode is PAL or SECAM. 18 DLP Personal Projector Adjusts the image to avoid the occurrence of the image. Adjusts to make it appear more red or green. Increases or decreases the color range...


