Service Manual
Page 8
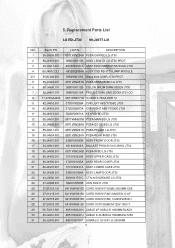
...-F(MI*3)6A250V S-AF 27 27.02718.201 6410VWH015E CORD H05VV-F(MI) 10A250V2500U 28 27.04318.031 6410VWH015F CORD VCTF3G(MI)7A125V 1800 T- 29 50.73213.501 6851V00021N CABLE 4P USB A-B 1800MM BLACK 30 50.J2401.001 6851V00021U CABLE D-SUB/RCA 1800MM/SL705X 31 50.J2403.501 6851V00021P SIGNAL/C 15/15P (-9) 2500MM 8 Replacement Parts List LG RD-JT30 99.J4977.L31 NO.
...-F(MI*3)6A250V S-AF 27 27.02718.201 6410VWH015E CORD H05VV-F(MI) 10A250V2500U 28 27.04318.031 6410VWH015F CORD VCTF3G(MI)7A125V 1800 T- 29 50.73213.501 6851V00021N CABLE 4P USB A-B 1800MM BLACK 30 50.J2401.001 6851V00021U CABLE D-SUB/RCA 1800MM/SL705X 31 50.J2403.501 6851V00021P SIGNAL/C 15/15P (-9) 2500MM 8 Replacement Parts List LG RD-JT30 99.J4977.L31 NO.

Service Manual
Page 18
... is the rotational action. Enter factory mode. Follow the PbPr offset adjustment flow chart: 18 Offset adjustment: Black coordinate spec: Osram lamp Oshio lamp x0 0.281 0.01 0.313 0.01 y0 0.311 0.01 0.329 0.01 The variance of pattern generator : Timing : 480P(H:31.54 KHz,V:60.08 Hz) pattern : black Light on projector Set user OSD values to default. Connect power, YPbPr Video into projector. Set Factory values to default. 4.HDTV Color Adjustment Procedure...
... is the rotational action. Enter factory mode. Follow the PbPr offset adjustment flow chart: 18 Offset adjustment: Black coordinate spec: Osram lamp Oshio lamp x0 0.281 0.01 0.313 0.01 y0 0.311 0.01 0.329 0.01 The variance of pattern generator : Timing : 480P(H:31.54 KHz,V:60.08 Hz) pattern : black Light on projector Set user OSD values to default. Connect power, YPbPr Video into projector. Set Factory values to default. 4.HDTV Color Adjustment Procedure...
Service Manual
Page 23
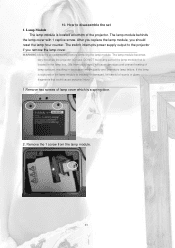
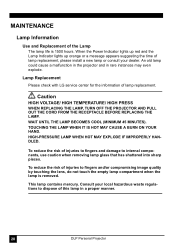
After you replace the lamp module, you remove the lamp cover. WARNING Allow the projector to disassemble the set 1. The lamp module becomes very hot when the projector is in decreased image quality and premature lamp failure. The switch interrupts power supply output to the projector if you should reset the lamp hour counter. If the lamp is ruptured or the lamp module is cracked or damaged, be careful of quartz or glass fragments...
After you replace the lamp module, you remove the lamp cover. WARNING Allow the projector to disassemble the set 1. The lamp module becomes very hot when the projector is in decreased image quality and premature lamp failure. The switch interrupts power supply output to the projector if you should reset the lamp hour counter. If the lamp is ruptured or the lamp module is cracked or damaged, be careful of quartz or glass fragments...

Service Manual
Page 32
... screen is no picture? 1) Check for the proper input source. 2) Ensure all cables are connected properly. 3) Adjust the brightness and contrast. 3. Why the remote control doesn't work? 1) Replace the batteries with new one. 2) Make sure there is within the adjustment range of the projector or the remote control unit to get better picture quality. 2) Adjust the focus. 3) Reposition the unit to improve its projection angle. 4) Ensure the distance between the remote control and the projector...
... screen is no picture? 1) Check for the proper input source. 2) Ensure all cables are connected properly. 3) Adjust the brightness and contrast. 3. Why the remote control doesn't work? 1) Replace the batteries with new one. 2) Make sure there is within the adjustment range of the projector or the remote control unit to get better picture quality. 2) Adjust the focus. 3) Reposition the unit to improve its projection angle. 4) Ensure the distance between the remote control and the projector...

Service Manual
Page 33
... Trouble Shooting Guide 1.Check EE setting / Follow up EE alignment procedure 2.Check fold mirror position / re-align fold mirror to be closer to design position. 3.Check Rod lens at datum surface / put rod lens at right datum surface 4.Check Green color / If too green and over spec., change color drum 5.Change lamp 1.Check fold mirror position / re-align fold mirror to be closer to design position 2.Check lamp / Re-assembly lamp 1.Check projection lens clean...
... Trouble Shooting Guide 1.Check EE setting / Follow up EE alignment procedure 2.Check fold mirror position / re-align fold mirror to be closer to design position. 3.Check Rod lens at datum surface / put rod lens at right datum surface 4.Check Green color / If too green and over spec., change color drum 5.Change lamp 1.Check fold mirror position / re-align fold mirror to be closer to design position 2.Check lamp / Re-assembly lamp 1.Check projection lens clean...

Service Manual
Page 34
... U107 voltage source L110(5V), L111(3.3V),VSTBY(U107-59) 3.chk Y101 output frequency(20.25MHz) 4.chk U107 output signals to save OSD setting Yes Yes Yes No Yes Keypad m alfunction No No Image crossover distortion or contour Yes 1.chk voltage input from RN101~RN104 (video input) 34 JT31 Electrical Debug Guide System no work No No data to DDP1000...
... U107 voltage source L110(5V), L111(3.3V),VSTBY(U107-59) 3.chk Y101 output frequency(20.25MHz) 4.chk U107 output signals to save OSD setting Yes Yes Yes No Yes Keypad m alfunction No No Image crossover distortion or contour Yes 1.chk voltage input from RN101~RN104 (video input) 34 JT31 Electrical Debug Guide System no work No No data to DDP1000...

Service Manual
Page 42
...hours. 5.5) Data Reset: Reset all data. 5.6) Version: software version. 42 4) Optic layer (Fig-5): (Fig-5) Optic layer 4.1) Test Pattern: system auto produce pattern for engineer test. 4.2) Spoke light: unit display full white. 4.3) Curtain Red: unit display full color red. 4.4) Curtain Green: unit display full color green. 4.5) Curtain Blue: unit display full color blue. 5) Lamp layer (Fig-6): (Fig-6) Lamp layer 5.1 )Interpolation: De-interlace Mode 5.2) Filter: system auto select Filter. 5.3) Lamp Hour: value to tell you lamp usage hours. 5.4) Usage Hour: value to default include factory...
...hours. 5.5) Data Reset: Reset all data. 5.6) Version: software version. 42 4) Optic layer (Fig-5): (Fig-5) Optic layer 4.1) Test Pattern: system auto produce pattern for engineer test. 4.2) Spoke light: unit display full white. 4.3) Curtain Red: unit display full color red. 4.4) Curtain Green: unit display full color green. 4.5) Curtain Blue: unit display full color blue. 5) Lamp layer (Fig-6): (Fig-6) Lamp layer 5.1 )Interpolation: De-interlace Mode 5.2) Filter: system auto select Filter. 5.3) Lamp Hour: value to tell you lamp usage hours. 5.4) Usage Hour: value to default include factory...
Service Manual
Page 92
..., according to MRS KEYSTONE : V Keystone correction Screen LOGO : displays the LG logo image for blanking the screen when system starts 1.2 System Control Functions 1.2.1 POWER CONTROL POWER ON FAN ON LAMP ON LG Logo ON Auto Image POWER OFF LAMP OFF FAN OFF MAIN POWER OFF 1.2.2 LED's color Definition 3 colors LED (Red/Green/Orange) State LEDs Display Description Operatio Status n LED LED Stand-by Orange : Orange Toggle : Red : Red Toggle : Green : OFF state : Ready (Power Blinks Operation LED For 30 seconds On) Normal Normal State Lamp On Check whether the Lamp is lit or...
..., according to MRS KEYSTONE : V Keystone correction Screen LOGO : displays the LG logo image for blanking the screen when system starts 1.2 System Control Functions 1.2.1 POWER CONTROL POWER ON FAN ON LAMP ON LG Logo ON Auto Image POWER OFF LAMP OFF FAN OFF MAIN POWER OFF 1.2.2 LED's color Definition 3 colors LED (Red/Green/Orange) State LEDs Display Description Operatio Status n LED LED Stand-by Orange : Orange Toggle : Red : Red Toggle : Green : OFF state : Ready (Power Blinks Operation LED For 30 seconds On) Normal Normal State Lamp On Check whether the Lamp is lit or...

Service Manual
Page 101
... Be set in the smaller modes than XGA (1204X768) Original : real size Position sub menu OSD Display Time : Until being cleared. 2.3.3.2 POSITION Menu selected by pressing Volume (+) key or pushing JOYSTICK right on the position of POSITION Menu be able to enter the lower level of menu by pressing Volume (+) key or pushing JOYSTICK right 27 case : AV ( VIDEO / S-VIDEO ) / HD VIDEO menu Range...
... Be set in the smaller modes than XGA (1204X768) Original : real size Position sub menu OSD Display Time : Until being cleared. 2.3.3.2 POSITION Menu selected by pressing Volume (+) key or pushing JOYSTICK right on the position of POSITION Menu be able to enter the lower level of menu by pressing Volume (+) key or pushing JOYSTICK right 27 case : AV ( VIDEO / S-VIDEO ) / HD VIDEO menu Range...

Service Manual
Page 145
...-100) Procedure: (a). The variance of pattern generator : Timing : 480P(H:31.54 KHz,V:60.08 Hz) pattern : black 5. Set user OSD values to default. 9. Set Factory values to default. 7. Connect power, YPbPr Video into projector. 4. Light on projector 6. Offset adjustment: 1. Black coordinate spec: Osram lamp Oshio lamp x0 0.281 0.01 0.313 0.01 y0 0.311 0.01 0.329 0.01 2. Change Timing and pattern of color coordinate via Pb offset and Pr offset: x y Pb...
...-100) Procedure: (a). The variance of pattern generator : Timing : 480P(H:31.54 KHz,V:60.08 Hz) pattern : black 5. Set user OSD values to default. 9. Set Factory values to default. 7. Connect power, YPbPr Video into projector. 4. Light on projector 6. Offset adjustment: 1. Black coordinate spec: Osram lamp Oshio lamp x0 0.281 0.01 0.313 0.01 y0 0.311 0.01 0.329 0.01 2. Change Timing and pattern of color coordinate via Pb offset and Pr offset: x y Pb...

Service Manual
Page 152
... GHS1(R171), GVS1(R170), GCLK(R173) 5.chk U3 2soldering 6.change U32 1.chk video input connector J12 and J102 2.chk U107 voltage source L110(5V), L111(3.3V),VSTBY(U107-59) 3.chk Y101 output frequency(20.25MHz) 4.chk U107 output signals to save OSD setting Yes Yes Yes No Yes Keypad malfunction No 1.chk voltage... inside or bad soldering 5.chk Reset IC (U40) 6. JT31 Electrical Debug Guide System no work No No data to DDP1000 No No im age No No image when graphics is the current input No Yes Yes Yes Yes No im age when video is the current input No Unable to download No Unable to U109 (Y0~...
... GHS1(R171), GVS1(R170), GCLK(R173) 5.chk U3 2soldering 6.change U32 1.chk video input connector J12 and J102 2.chk U107 voltage source L110(5V), L111(3.3V),VSTBY(U107-59) 3.chk Y101 output frequency(20.25MHz) 4.chk U107 output signals to save OSD setting Yes Yes Yes No Yes Keypad malfunction No 1.chk voltage... inside or bad soldering 5.chk Reset IC (U40) 6. JT31 Electrical Debug Guide System no work No No data to DDP1000 No No im age No No image when graphics is the current input No Yes Yes Yes Yes No im age when video is the current input No Unable to download No Unable to U109 (Y0~...

User Guide
Page 3
... 3 Projector Description 4 Projector 4 External Control Panel 5 Adjuster 6 Projector Features 6 Remote Control Description 7 Installing or Replacing Batteries 9 Installation 10 Display Size 10 Connecting to Various Equipment 11 Operation 12 Start Up 12 Digital Keystone Correction 13 Auto Adjustment 13 Source Selection 14 Menu System 14 1. VIDEO Menu 15 2. SPECIAL Menu 17 4. POSITION Menu 16 3. Table of the Lamp 20 Lamp Replacement 20 Operative Information 21 Troubleshooting 22 Common Problems & Solutions 22 Status Messages 22 DLP Personal Projector iii...
... 3 Projector Description 4 Projector 4 External Control Panel 5 Adjuster 6 Projector Features 6 Remote Control Description 7 Installing or Replacing Batteries 9 Installation 10 Display Size 10 Connecting to Various Equipment 11 Operation 12 Start Up 12 Digital Keystone Correction 13 Auto Adjustment 13 Source Selection 14 Menu System 14 1. VIDEO Menu 15 2. SPECIAL Menu 17 4. POSITION Menu 16 3. Table of the Lamp 20 Lamp Replacement 20 Operative Information 21 Troubleshooting 22 Common Problems & Solutions 22 Status Messages 22 DLP Personal Projector iii...
User Guide
Page 5
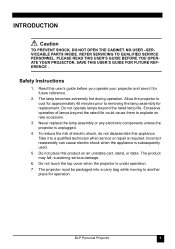
... this appliance. Do not operate lamps beyond the rated life could cause them to a qualified technician when service or repair is under operation. 7. Do not place this user's guide before you operate your projector and save it to explode on an unstable cart, stand, or table. INTRODUCTION Caution TO PREVENT SHOCK, DO NOT OPEN THE CABINET. NO USER -SERVICEABLE PARTS INSIDE. Take it for...
... this appliance. Do not operate lamps beyond the rated life could cause them to a qualified technician when service or repair is under operation. 7. Do not place this user's guide before you operate your projector and save it to explode on an unstable cart, stand, or table. INTRODUCTION Caution TO PREVENT SHOCK, DO NOT OPEN THE CABINET. NO USER -SERVICEABLE PARTS INSIDE. Take it for...
User Guide
Page 6
... energy and, if not installed and used in operating and maintaining your eyes. • In some countries, the line voltage is on , the user is connected. - Connect the equipment into an outlet on the top of + 10 volts occur. Save this user's guide: The information contained in this manual will not occur in accordance with this projector. • Do not...
... energy and, if not installed and used in operating and maintaining your eyes. • In some countries, the line voltage is on , the user is connected. - Connect the equipment into an outlet on the top of + 10 volts occur. Save this user's guide: The information contained in this manual will not occur in accordance with this projector. • Do not...

User Guide
Page 7
... shown below. Projector UGsueird'se User's Guide GSQutauidrictek Quick Start Guide PO WE R SO U RCE M ENU BLAN K M U TE LA SER 3-2 Converter Remote Control Batteries Deluxe Soft Carry Case HDTV Cable (YPBPR) S.A. & India 220V 240V 110V Power Cord VGA Cable USB Cable Optional Accessories 1. 150W lamp module 2. If any of these items are missing, please contact personnel at the place of purchase. Macintosh adapter Video Cable S-Video Cable DLP Personal Projector 3 Shipping Contents...
... shown below. Projector UGsueird'se User's Guide GSQutauidrictek Quick Start Guide PO WE R SO U RCE M ENU BLAN K M U TE LA SER 3-2 Converter Remote Control Batteries Deluxe Soft Carry Case HDTV Cable (YPBPR) S.A. & India 220V 240V 110V Power Cord VGA Cable USB Cable Optional Accessories 1. 150W lamp module 2. If any of these items are missing, please contact personnel at the place of purchase. Macintosh adapter Video Cable S-Video Cable DLP Personal Projector 3 Shipping Contents...

User Guide
Page 8
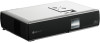
Adjuster foot Projection lens Lamp door 4 DLP Personal Projector Projector Description Projector DC 12V, 0.5A Max. power supply PC/ HD (YPBPR) connector USB MOUSE connector VIDEO connector S-VIDEO connector Ventilation grill IR remote sensor AC power cord inlet Kensington lock Projection lens adjuster External control panel (see "External Control Panel" on page 5 for more detailed information) R IR remote sensor Open here to release the front cover.
Adjuster foot Projection lens Lamp door 4 DLP Personal Projector Projector Description Projector DC 12V, 0.5A Max. power supply PC/ HD (YPBPR) connector USB MOUSE connector VIDEO connector S-VIDEO connector Ventilation grill IR remote sensor AC power cord inlet Kensington lock Projection lens adjuster External control panel (see "External Control Panel" on page 5 for more detailed information) R IR remote sensor Open here to release the front cover.
User Guide
Page 9
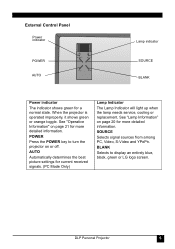
...turn the projector on or off. POWER Press the POWER key to display an entirely blue, black, green or LG logo screen. AUTO Automatically determines the best picture settings for a normal state. DLP Personal Projector 5 External Control Panel Power indicator POWER AUTO POWER SOURCE AUTO BLANK Lamp indicator SOURCE BLANK Power indicator The indicator shows green for current received signals. (PC Mode Only) Lamp Indicator The Lamp Indicator will light up when the lamp needs service, cooling or replacement. When the projector is operated improperly, it shows green or orange...
...turn the projector on or off. POWER Press the POWER key to display an entirely blue, black, green or LG logo screen. AUTO Automatically determines the best picture settings for a normal state. DLP Personal Projector 5 External Control Panel Power indicator POWER AUTO POWER SOURCE AUTO BLANK Lamp indicator SOURCE BLANK Power indicator The indicator shows green for current received signals. (PC Mode Only) Lamp Indicator The Lamp Indicator will light up when the lamp needs service, cooling or replacement. When the projector is operated improperly, it shows green or orange...

User Guide
Page 18
... several input sources are available, press the SOURCE key to select a sub-menu. POWER SOURCE AUTO BLANK POWER SOURCE MENU Menu System Press Menu for the main menu, and then press Joystick to make a selection from the control panel of the projector or the remote control. Main Menu VIDEO Contrast YPBPR Brightness Video Color S-Video Tint SubMenu Reset Contrast Brightness PC (RGB) Color R Color G Color B Reset POSITION SPECIAL TRACKING Keystone Zoom Resize Horizontal Vertical Keystone Zoom Resize Language Flip Horizontal Flip Vertical Blank Image Lamp Time Language Flip...
... several input sources are available, press the SOURCE key to select a sub-menu. POWER SOURCE AUTO BLANK POWER SOURCE MENU Menu System Press Menu for the main menu, and then press Joystick to make a selection from the control panel of the projector or the remote control. Main Menu VIDEO Contrast YPBPR Brightness Video Color S-Video Tint SubMenu Reset Contrast Brightness PC (RGB) Color R Color G Color B Reset POSITION SPECIAL TRACKING Keystone Zoom Resize Horizontal Vertical Keystone Zoom Resize Language Flip Horizontal Flip Vertical Blank Image Lamp Time Language Flip...
User Guide
Page 24
.../or compromising image quality by touching the lens, do not touch the empty lamp compartment when the lamp is 1500 hours. An old lamp could cause a malfunction in the projector and in a proper manner. 20 DLP Personal Projector WAIT UNTIL THE LAMP BECOMES COOL (MINIMUM 45 MINUTES). When the Power Indicator lights up red and the Lamp Indicator lights up orange or a message appears suggesting the time of lamp replacement, please install a new lamp or...
.../or compromising image quality by touching the lens, do not touch the empty lamp compartment when the lamp is 1500 hours. An old lamp could cause a malfunction in the projector and in a proper manner. 20 DLP Personal Projector WAIT UNTIL THE LAMP BECOMES COOL (MINIMUM 45 MINUTES). When the Power Indicator lights up red and the Lamp Indicator lights up orange or a message appears suggesting the time of lamp replacement, please install a new lamp or...
User Guide
Page 26
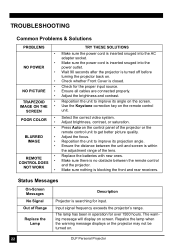
... hours. Status Messages On-Screen Messages No Signal Out of the lens. The warning message will display on the remote control SCREEN unit. IMAGE ON THE • Use the Keystone correction key on screen. Repalce the lamp when the warning message displays or the projector may not be turned on . • Check whether Front Cover is closed. REMOTE CONTROL DOES NOT WORK • • • Replace the batteries with new ones. NO PICTURE • Check for the proper input source. • Ensure all cables are connected...
... hours. Status Messages On-Screen Messages No Signal Out of the lens. The warning message will display on the remote control SCREEN unit. IMAGE ON THE • Use the Keystone correction key on screen. Repalce the lamp when the warning message displays or the projector may not be turned on . • Check whether Front Cover is closed. REMOTE CONTROL DOES NOT WORK • • • Replace the batteries with new ones. NO PICTURE • Check for the proper input source. • Ensure all cables are connected...


