
User Guide
Page 3
... to product and damage the display. As long as the main disconnection device. To Avoid Personal Injury : Do not place the display on the product screen. Some internal parts carry hazardous voltages. In the presence of thunder and lightning, never touch the power cord and signal cable because it from a power...
... to product and damage the display. As long as the main disconnection device. To Avoid Personal Injury : Do not place the display on the product screen. Some internal parts carry hazardous voltages. In the presence of thunder and lightning, never touch the power cord and signal cable because it from a power...

User Guide
Page 4
...fixed-resolution LCD panel. Therefore, NEVER: Block the bottom ventilation slots by the warranty on this will have no impact or effect on the screen for your finger for repair. Do not rub or strike the Active Matrix LCD with both hands to damage. Leaving a fixed image on ... long time may scratch, mar, or damage the Active Matrix LCD permanently. Some dot defects may appear on the product. If possible, use a screen saver on the screen. However, this may cause some scaled or processed images may appear as near a bathtub, washbowl, kitchen sink, laundry tub, in . Do not ...
...fixed-resolution LCD panel. Therefore, NEVER: Block the bottom ventilation slots by the warranty on this will have no impact or effect on the screen for your finger for repair. Do not rub or strike the Active Matrix LCD with both hands to damage. Leaving a fixed image on ... long time may scratch, mar, or damage the Active Matrix LCD permanently. Some dot defects may appear on the product. If possible, use a screen saver on the screen. However, this may cause some scaled or processed images may appear as near a bathtub, washbowl, kitchen sink, laundry tub, in . Do not ...

User Guide
Page 5
... not use chemicals such as benzene, paint thinners or alcohol) Spray water onto a soft cloth 2 to 4 times, and use an aerosol directly on the display screen because over-spraying may cause staining. On Repacking Do not throw away the carton and packing materials. wipe in which to transport the unit. Disposal...
... not use chemicals such as benzene, paint thinners or alcohol) Spray water onto a soft cloth 2 to 4 times, and use an aerosol directly on the display screen because over-spraying may cause staining. On Repacking Do not throw away the carton and packing materials. wipe in which to transport the unit. Disposal...

User Guide
Page 8
...(s) in between the head of the monitor should not exceed 5 degrees. A6 Positioning your finger(s). Ergonomic It is turned off. Adjust the position of the screen, do not put your finger. Connecting the Display 5. Good Position Bad Position Before setting up the monitor, ensure that the power to maintain an ergonomic...
...(s) in between the head of the monitor should not exceed 5 degrees. A6 Positioning your finger(s). Ergonomic It is turned off. Adjust the position of the screen, do not put your finger. Connecting the Display 5. Good Position Bad Position Before setting up the monitor, ensure that the power to maintain an ergonomic...

User Guide
Page 9
... executed automatically. A7 When you encounter problems such as shown. 1. your display may differ from the view as blurry screen, blurred letters, screen flicker or tilted screen while using the device or after changing screen resolution, press the AUTO/SET function button to a 15 pin 2 row connector. 2. When monitor power is a simplified representation of...
... executed automatically. A7 When you encounter problems such as shown. 1. your display may differ from the view as blurry screen, blurred letters, screen flicker or tilted screen while using the device or after changing screen resolution, press the AUTO/SET function button to a 15 pin 2 row connector. 2. When monitor power is a simplified representation of...

User Guide
Page 10
... the front switch panel to improve resolution. 2. When you use a PS/2-type keyboard/mouse. Connect the cable as blurry screen, blurred letters, screen flicker or titled screen while using the device or after changing screen resolution, press the AUTO/SET function button to turn off the computer and product. Applications that require other than...
... the front switch panel to improve resolution. 2. When you use a PS/2-type keyboard/mouse. Connect the cable as blurry screen, blurred letters, screen flicker or titled screen while using the device or after changing screen resolution, press the AUTO/SET function button to turn off the computer and product. Applications that require other than...
User Guide
Page 12
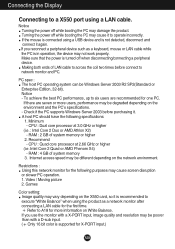
... before purchasing it again. Internet access speed may be poorer than with a D-sub input. ( Only 16 bit color is in operation, the device may cause screen disruption or slower PC operation. 1. If the mouse is connected using a LAN cable. Games Color setting: Image quality may damage the product. If you reconnect...
... before purchasing it again. Internet access speed may be poorer than with a D-sub input. ( Only 16 bit color is in operation, the device may cause screen disruption or slower PC operation. 1. If the mouse is connected using a LAN cable. Games Color setting: Image quality may damage the product. If you reconnect...

User Guide
Page 13
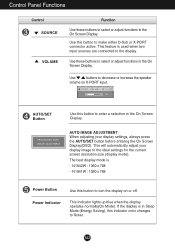
... MENU Button Use this button to switch the sound on or off. OSD LOCKED/UNLOCKED This function allows you to enter or exit the On Screen Display. or • D-sub : This menu is available, use this button to lock the current control settings, so that they cannot be inadvertently changed. Press...
... MENU Button Use this button to switch the sound on or off. OSD LOCKED/UNLOCKED This function allows you to enter or exit the On Screen Display. or • D-sub : This menu is available, use this button to lock the current control settings, so that they cannot be inadvertently changed. Press...
User Guide
Page 14
...on or off. Use buttons to select or adjust functions in the On Screen Display. N1941W : 1360 x 768 Power Button Power Indicator Use this indicator color changes to enter a selection in the On Screen Display. This will automatically adjust your display settings, always press the AUTO.../SET button before entering the On Screen Display(OSD). Use this button to flicker....
...on or off. Use buttons to select or adjust functions in the On Screen Display. N1941W : 1360 x 768 Power Button Power Indicator Use this indicator color changes to enter a selection in the On Screen Display. This will automatically adjust your display settings, always press the AUTO.../SET button before entering the On Screen Display(OSD). Use this button to flicker....

User Guide
Page 15
... (OSD) Control Adjustment Screen Adjustment Making adjustments to the image size, position and operating parameters of the OSD appears. NOTE Allow the display to select another function. To make ... becomes highlighted, press the AUTO/SET Button. The following section is given below to familiarize you with the On Screen Display Control system. When the icon you can make adjustments in the On Screen Display, follow these steps: MENU AUTO/SET MENU Press the MENU Button, then the main menu of the...
... (OSD) Control Adjustment Screen Adjustment Making adjustments to the image size, position and operating parameters of the OSD appears. NOTE Allow the display to select another function. To make ... becomes highlighted, press the AUTO/SET Button. The following section is given below to familiarize you with the On Screen Display Control system. When the icon you can make adjustments in the On Screen Display, follow these steps: MENU AUTO/SET MENU Press the MENU Button, then the main menu of the...
User Guide
Page 16
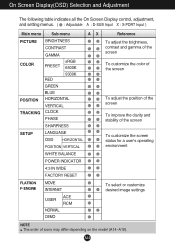
...(OSD) Selection and Adjustment The following table indicates all the On Screen Display control, adjustment, and setting menus. ( : Adjustable A : D-SUB Input X : X-PORT Input ) Main menu Sub-menu A X PICTURE BRIGHTNESS CONTRAST COLOR GAMMA PRESET RED sRGB 6500K ...ACE RCM NORMAL DEMO Reference To adjust the brightness, contrast and gamma of the screen To customize the color of the screen To adjust the position of the screen To improve the clarity and stability of the screen To customize the screen status for a user's operating environment To select or customize desired image settings ...
...(OSD) Selection and Adjustment The following table indicates all the On Screen Display control, adjustment, and setting menus. ( : Adjustable A : D-SUB Input X : X-PORT Input ) Main menu Sub-menu A X PICTURE BRIGHTNESS CONTRAST COLOR GAMMA PRESET RED sRGB 6500K ...ACE RCM NORMAL DEMO Reference To adjust the brightness, contrast and gamma of the screen To customize the color of the screen To adjust the position of the screen To improve the clarity and stability of the screen To customize the screen status for a user's operating environment To select or customize desired image settings ...

User Guide
Page 17
Press the MENU Button, then the main menu of selecting and adjusting an item using the OSD system. A15 Listed below are the icons, icon names, and icon descriptions of the all items shown on the monitor may differ from the manual. Main Menu MENU : Exit : Adjust (Decrease/Increase) SET Me: EnnuteNr ame : Select another sub-menu : Restart to the procedure of the OSD appears. On Screen Display(OSD) Selection and Adjustment You were introduced to select sub-menu Menu Name Button Tip Icons Sub-menus NOTE OSD (On Screen Display) menu languages on the Menu.
Press the MENU Button, then the main menu of selecting and adjusting an item using the OSD system. A15 Listed below are the icons, icon names, and icon descriptions of the all items shown on the monitor may differ from the manual. Main Menu MENU : Exit : Adjust (Decrease/Increase) SET Me: EnnuteNr ame : Select another sub-menu : Restart to the procedure of the OSD appears. On Screen Display(OSD) Selection and Adjustment You were introduced to select sub-menu Menu Name Button Tip Icons Sub-menus NOTE OSD (On Screen Display) menu languages on the Menu.

User Guide
Page 18
... display whitish images and low gamma values display high contrast images. CONTRAST To adjust the contrast of the screen. On Screen Display(OSD) Selection and Adjustment Main menu PICTURE PICTURE Sub menu Description BRIGHTNESS To adjust the brightness of the... screen. GAMMA MENU : Exit : Decrease : Increase SET : Select another sub-menu Select the screen color. • sRGB: Set the screen color to fit the SRGB standard color specification. • 6500K: Slightly reddish white....
... display whitish images and low gamma values display high contrast images. CONTRAST To adjust the contrast of the screen. On Screen Display(OSD) Selection and Adjustment Main menu PICTURE PICTURE Sub menu Description BRIGHTNESS To adjust the brightness of the... screen. GAMMA MENU : Exit : Decrease : Increase SET : Select another sub-menu Select the screen color. • sRGB: Set the screen color to fit the SRGB standard color specification. • 6500K: Slightly reddish white....

User Guide
Page 19
... : Decrease : Increase SET : Select another sub-menu PHASE To adjust the focus of the screen. The horizontal screen size will also change. This item allows you to remove any vertical bars or stripes visible on the screen background. On Screen Display(OSD) Selection and Adjustment Main menu Sub menu Description POSITION POSITION HORIZONTAL To...
... : Decrease : Increase SET : Select another sub-menu PHASE To adjust the focus of the screen. The horizontal screen size will also change. This item allows you to remove any vertical bars or stripes visible on the screen background. On Screen Display(OSD) Selection and Adjustment Main menu Sub menu Description POSITION POSITION HORIZONTAL To...

User Guide
Page 20
... be turned on. WHITE BALANCE If the output of the video card is adjusted to fit into 4:3. If you set the power indicator on the screen. If you set OFF, it will automatically be enabled only when the input signal is a D-sub or X-PORT input signal. WIDE 4:3 • ...WIDE : Switch to full screen mode according to reset immediately. If this function to video signal distortion. Using this function to ON or OFF. FACTORY RESET Restore all factory default...
... be turned on. WHITE BALANCE If the output of the video card is adjusted to fit into 4:3. If you set the power indicator on the screen. If you set OFF, it will automatically be enabled only when the input signal is a D-sub or X-PORT input signal. WIDE 4:3 • ...WIDE : Switch to full screen mode according to reset immediately. If this function to video signal distortion. Using this function to ON or OFF. FACTORY RESET Restore all factory default...

User Guide
Page 21
... features become enabled for advertising to the environment USER (ambient illumination, image types etc). It's setting is same with Movie mode and screen is just for X-PORT input. On Screen Display(OSD) Selection and Adjustment Main menu Sub menu Description MOVIE This feature lets you easily select the best desired INTERNET image...
... features become enabled for advertising to the environment USER (ambient illumination, image types etc). It's setting is same with Movie mode and screen is just for X-PORT input. On Screen Display(OSD) Selection and Adjustment Main menu Sub menu Description MOVIE This feature lets you easily select the best desired INTERNET image...
User Guide
Page 22
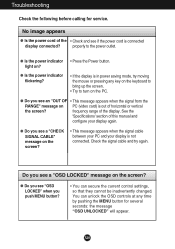
... for several seconds: the message "OSD UNLOCKED" will appear. frequency range of horizontal or vertical the screen? See the 'Specifications' section of the • Check and see a "CHECK SIGNAL CABLE" message on the screen? • This message appears when the signal cable between your PC and your display is connected display...; Do you push MENU button? • You can unlock the OSD controls at any key on the keyboard to bring up the screen. • Try to the power outlet. ● Is the power indicator light on PC (video card) is out of the display. No image appears ●...
... for several seconds: the message "OSD UNLOCKED" will appear. frequency range of horizontal or vertical the screen? See the 'Specifications' section of the • Check and see a "CHECK SIGNAL CABLE" message on the screen? • This message appears when the signal cable between your PC and your display is connected display...; Do you push MENU button? • You can unlock the OSD controls at any key on the keyboard to bring up the screen. • Try to the power outlet. ● Is the power indicator light on PC (video card) is out of the display. No image appears ●...
User Guide
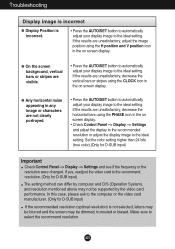
Page 23
... setting. If the results are unsatisfactory, decrease the horizontal bars using the H position and V position icon in the on screen display. ● On the screen background, vertical bars or stripes are visible. • Press the AUTO/SET button to automatically adjust your display image to... image to the ideal setting. Troubleshooting Display image is incorrect ● Display Position is not selected, letters may be blurred and the screen may not be supported by computer and O/S (Operation System), and resolution mentioned above may be dimmed, truncated or biased. If the results...
... setting. If the results are unsatisfactory, decrease the horizontal bars using the H position and V position icon in the on screen display. ● On the screen background, vertical bars or stripes are visible. • Press the AUTO/SET button to automatically adjust your display image to... image to the ideal setting. Troubleshooting Display image is incorrect ● Display Position is not selected, letters may be blurred and the screen may not be supported by computer and O/S (Operation System), and resolution mentioned above may be dimmed, truncated or biased. If the results...

User Guide
Page 24
...is properly connected and use a screwdriver to fasten if necessary. • Make sure the video card is set to normal mode. Check if the screen is properly inserted in the slot. • Set the color setting higher than 24 bits (true color) at Control Panel - A22 Check if the... screen is set to interlace mode and if yes, change it to normal mode. ● The screen blinks. • Check if the screen is performed on black/white pattern. - Settings. (X-PORT support only 16bits color) - "White ...
...is properly connected and use a screwdriver to fasten if necessary. • Make sure the video card is set to normal mode. Check if the screen is properly inserted in the slot. • Set the color setting higher than 24 bits (true color) at Control Panel - A22 Check if the... screen is set to interlace mode and if yes, change it to normal mode. ● The screen blinks. • Check if the screen is performed on black/white pattern. - Settings. (X-PORT support only 16bits color) - "White ...


