
Owner's Manual
Page 3
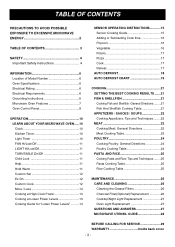
...Location of Model Number 6 Oven Specifications 6 Electrical Rating 6 Electrical Requirements 6 Grounding Instructions 6 Microwave Oven Features 7 Oven Control Panel 8 OPERATION 10 LEARN ABOUT YOUR MICROWAVE OVEN......10 Clock 10 Kitchen Timer 10 Light Timer 10 FAN Hi/Low/Off 11 LIGHT Hi/Low/Off 11 TURNTABLE On/Off 11 Child Lock 11 Help 11 Hold Warm 11 Custom Set 12 Ez On 12 Custom Cook 12 More / Less 13 Cooking at High Cook Power 13 Cooking at Lower Power Levels 13 Cooking Guide for "Lower Power Levels" ..........14 SENSOR OPERATING INSTRUCTIONS 15 Sensor Cooking Guide...
...Location of Model Number 6 Oven Specifications 6 Electrical Rating 6 Electrical Requirements 6 Grounding Instructions 6 Microwave Oven Features 7 Oven Control Panel 8 OPERATION 10 LEARN ABOUT YOUR MICROWAVE OVEN......10 Clock 10 Kitchen Timer 10 Light Timer 10 FAN Hi/Low/Off 11 LIGHT Hi/Low/Off 11 TURNTABLE On/Off 11 Child Lock 11 Help 11 Hold Warm 11 Custom Set 12 Ez On 12 Custom Cook 12 More / Less 13 Cooking at High Cook Power 13 Cooking at Lower Power Levels 13 Cooking Guide for "Lower Power Levels" ..........14 SENSOR OPERATING INSTRUCTIONS 15 Sensor Cooking Guide...

Owner's Manual
Page 4
... for household use only. • Do not allow grease to accumulate on page 2. • When cleaning the door and the surfaces that touch the door, use only mild, non-abrasive soaps or detergents and a sponge or soft cloth. • If your oven is open. • When food flames under the hood, turn on page 6. - The oven has several built-in safety switches to make sure the power...
... for household use only. • Do not allow grease to accumulate on page 2. • When cleaning the door and the surfaces that touch the door, use only mild, non-abrasive soaps or detergents and a sponge or soft cloth. • If your oven is open. • When food flames under the hood, turn on page 6. - The oven has several built-in safety switches to make sure the power...

Owner's Manual
Page 5
... food in accordance with narrow necks. - Do not heat the following : • Reorient the receiving antenna of the following items in the microwave oven: whole eggs in your microwave oven. - Put the package on the oven floor or turntable. Carefully read and follow the instructions for examination, repair, or adjustment. • Liquids, such as syrup bottles. - Stir the liquid both before removing...
... food in accordance with narrow necks. - Do not heat the following : • Reorient the receiving antenna of the following items in the microwave oven: whole eggs in your microwave oven. - Put the package on the oven floor or turntable. Carefully read and follow the instructions for examination, repair, or adjustment. • Liquids, such as syrup bottles. - Stir the liquid both before removing...
Owner's Manual
Page 6
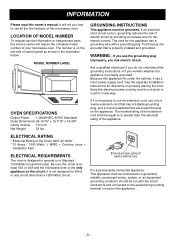
... an escape wire for directions on the appliance. Put the plug into an outlet that will accept the plug on properly placing the cord. If an electrical short circuit occurs, grounding reduces the risk of the Oven:120V AC 60Hz * 13 Amps / 1500 Watts ( MWO + Cooktop Lamp + Ventilation Fan) ELECTRICAL REQUIREMENTS The oven is properly installed and grounded. WARNING - Because this microwave oven. OVEN SPECIFICATIONS Output Power 1,000W (IEC...
... an escape wire for directions on the appliance. Put the plug into an outlet that will accept the plug on properly placing the cord. If an electrical short circuit occurs, grounding reduces the risk of the Oven:120V AC 60Hz * 13 Amps / 1500 Watts ( MWO + Cooktop Lamp + Ventilation Fan) ELECTRICAL REQUIREMENTS The oven is properly installed and grounded. WARNING - Because this microwave oven. OVEN SPECIFICATIONS Output Power 1,000W (IEC...
Owner's Manual
Page 9
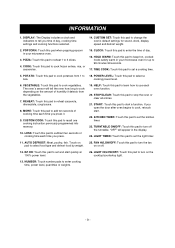
... cooking time, power level, quantities or weights. -9- FAN HI/LOW/OFF: Touch this pad when popping popcorn in your microwave oven for sound, clock, display speed and defrost weight. 2. POPCORN: Touch this pad to subtract ten seconds of cooking time each time you press it detects from 1 to turn off . 12. HOLD WARM: Touch this pad to keep hot, cooked foods safety warm in the display. 24. CUSTOM COOK: Touch this pad to recall one cooking instruction previously programmed into memory. 10. cooking power level. 6. COOK: Touch...
... cooking time, power level, quantities or weights. -9- FAN HI/LOW/OFF: Touch this pad when popping popcorn in your microwave oven for sound, clock, display speed and defrost weight. 2. POPCORN: Touch this pad to subtract ten seconds of cooking time each time you press it detects from 1 to turn off . 12. HOLD WARM: Touch this pad to keep hot, cooked foods safety warm in the display. 24. CUSTOM COOK: Touch this pad to recall one cooking instruction previously programmed into memory. 10. cooking power level. 6. COOK: Touch...

Owner's Manual
Page 10
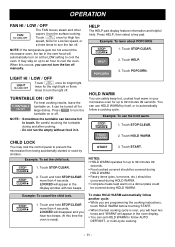
... information before use your microwave oven. LIGHT TIMER You can use . The light comes on at any time you want the LIGHT to operate your microwave oven as a timer. Enter the time by using the number key pad. 1. Touch START. NOTE: To reset that time to turn on and off the LIGHT, repeat steps 2 to turn on and off automatically at the same time every day until reset. Touch STOP/CLEAR. Enter the time you want . Touch KITCHEN TIMER. 3. Touch CLOCK. (Press once...
... information before use your microwave oven. LIGHT TIMER You can use . The light comes on at any time you want the LIGHT to operate your microwave oven as a timer. Enter the time by using the number key pad. 1. Touch START. NOTE: To reset that time to turn on and off the LIGHT, repeat steps 2 to turn on and off automatically at the same time every day until reset. Touch STOP/CLEAR. Enter the time you want . Touch KITCHEN TIMER. 3. Touch CLOCK. (Press once...
Owner's Manual
Page 11
... programming the cooking instructions, touch HOLD WARM before touching START. • When the last cooking cycle is ready. Touch STOP/CLEAR. 2. Touch HELP. 3. Be careful touching the turntable during HOLD WARM. Touch STOP/CLEAR. 2. Touch STOP/CLEAR. 2. It can safely keep hot, cooked food warm in it. Touch once for High fan speed, twice for large dishes. It may lock the control panel to prevent the microwave from the surface cooking. LIGHT HI / LOW / OFF Touch once for bright light...
... programming the cooking instructions, touch HOLD WARM before touching START. • When the last cooking cycle is ready. Touch STOP/CLEAR. 2. Touch HELP. 3. Be careful touching the turntable during HOLD WARM. Touch STOP/CLEAR. 2. Touch STOP/CLEAR. 2. It can safely keep hot, cooked food warm in it. Touch once for High fan speed, twice for large dishes. It may lock the control panel to prevent the microwave from the surface cooking. LIGHT HI / LOW / OFF Touch once for bright light...
Owner's Manual
Page 12
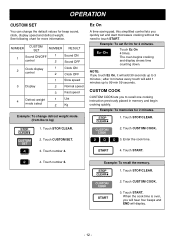
...Enter the cook time. 3. Touch STOP/CLEAR. 2. Touch STOP/CLEAR. 1. Touch START. 4. Touch START. Example: To set and start microwave cooking without the need to recall one cooking instruction previously placed in memory and begin cooking quickly. The oven begins cooking and display shows time counting down. NOTE: If you to touch START. NUMBER CUSTOM SET NUMBER RESULT 1 Sound ON/OFF control 1 2 Sound ON Sound OFF 2 Clock display control 1 Clock ON 2 Clock OFF 1 Slow speed 3 Display 2 Normal speed 3 Fast speed 4 Defrost weight mode select...
...Enter the cook time. 3. Touch STOP/CLEAR. 2. Touch STOP/CLEAR. 1. Touch START. 4. Touch START. Example: To set and start microwave cooking without the need to recall one cooking instruction previously placed in memory and begin cooking quickly. The oven begins cooking and display shows time counting down. NOTE: If you to touch START. NUMBER CUSTOM SET NUMBER RESULT 1 Sound ON/OFF control 1 2 Sound ON Sound OFF 2 Clock display control 1 Clock ON 2 Clock OFF 1 Slow speed 3 Display 2 Normal speed 3 Fast speed 4 Defrost weight mode select...

Owner's Manual
Page 15
... open the door or touch the "STOP/CLEAR" key during the initial sensing period. Glass Tray and outside of the cooking container and the inside of moisture turing into steam can mislead the sensor. 4. They can prevent steam from the food, it will show the remaining heating time. Do not open the door to stir, turn or rearrange the food. - 15 - At this time you to overcook. 3. Always use...
... open the door or touch the "STOP/CLEAR" key during the initial sensing period. Glass Tray and outside of the cooking container and the inside of moisture turing into steam can mislead the sensor. 4. They can prevent steam from the food, it will show the remaining heating time. Do not open the door to stir, turn or rearrange the food. - 15 - At this time you to overcook. 3. Always use...
Owner's Manual
Page 16
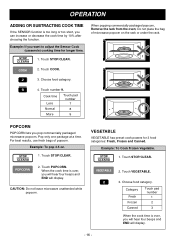
Touch STOP/CLEAR. Touch POPCORN. Choose food category. 4. Touch STOP/CLEAR. 2. CAUTION: Do not leave microwave unattended while popcorn. Choose food category. Touch STOP/CLEAR. 2. When popping commercially packaged popcorn, Remove the rack from the oven; Touch COOK. 3. Pop only one package at a time. Example: To Cook Frozen Vegetable. 1. Category Fresh Frozen Canned Touch pad number 1 2 3 When the cook time is over , you will hear four beeps and END will display. - 16 - Touch number 9. Example: To pop 3.5 oz. 1. When...
Touch STOP/CLEAR. Touch POPCORN. Choose food category. 4. Touch STOP/CLEAR. 2. CAUTION: Do not leave microwave unattended while popcorn. Choose food category. Touch STOP/CLEAR. 2. When popping commercially packaged popcorn, Remove the rack from the oven; Touch COOK. 3. Pop only one package at a time. Example: To Cook Frozen Vegetable. 1. Category Fresh Frozen Canned Touch pad number 1 2 3 When the cook time is over , you will hear four beeps and END will display. - 16 - Touch number 9. Example: To pop 3.5 oz. 1. When...

Owner's Manual
Page 17
... you reheat one or several potatoes without selecting cooking times and power levels. Touch STOP/CLEAR. 2. Example: To reheat Casserole. 1. REHEAT REHEAT lets you heat foods without needing to program times and Cook Powers. Touch POTATO. Touch STOP/CLEAR. 2. When the cook time is over , you will hear four beeps and END will display. Choose food category. Category Casserole Dinner Plate Soup/Sauce Touch pad number 1 2 3 When the cook time is over , you will hear four...
... you reheat one or several potatoes without selecting cooking times and power levels. Touch STOP/CLEAR. 2. Example: To reheat Casserole. 1. REHEAT REHEAT lets you heat foods without needing to program times and Cook Powers. Touch POTATO. Touch STOP/CLEAR. 2. When the cook time is over , you will hear four beeps and END will display. Choose food category. Category Casserole Dinner Plate Soup/Sauce Touch pad number 1 2 3 When the cook time is over , you will hear four...

Owner's Manual
Page 18
... freezer for a shorter defrosting time) to prevent cooking the food. • If the food is the best way to 20 minutes, enter a lower food weight. • The shape of aluminum foil to decimals. 2. The Auto Defrost Sequence Table below , always program a lower food weight (for up to defrost frozen foods. Weight conversion chart You are fractions of 0°F (taken directly from a "true" freezer). Enter the weight. 5. Touch START. 6. Half Pound...
... freezer for a shorter defrosting time) to prevent cooking the food. • If the food is the best way to 20 minutes, enter a lower food weight. • The shape of aluminum foil to decimals. 2. The Auto Defrost Sequence Table below , always program a lower food weight (for up to defrost frozen foods. Weight conversion chart You are fractions of 0°F (taken directly from a "true" freezer). Enter the weight. 5. Touch START. 6. Half Pound...
Owner's Manual
Page 19
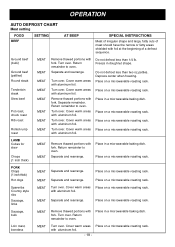
... on a microwavable roasting rack. MEAT Separate and rearrange. Place on a microwavable roasting rack. Turn over . Return remainder to oven. Turn over . Place on a microwavable roasting rack. Sausage, bulk MEAT Remove thawed portions with fork. Place in a microwavable baking dish. Loin roast, boneless MEAT Turn over . OPERATION AUTO DEFROST CHART Meat setting FOOD BEEF SETTING AT BEEP SPECIAL INSTRUCTIONS Meat of irregular shape and large, fatty cuts of a defrost sequence. Turn over . Cover warm areas...
... on a microwavable roasting rack. MEAT Separate and rearrange. Place on a microwavable roasting rack. Turn over . Return remainder to oven. Turn over . Place on a microwavable roasting rack. Sausage, bulk MEAT Remove thawed portions with fork. Place in a microwavable baking dish. Loin roast, boneless MEAT Turn over . OPERATION AUTO DEFROST CHART Meat setting FOOD BEEF SETTING AT BEEP SPECIAL INSTRUCTIONS Meat of irregular shape and large, fatty cuts of a defrost sequence. Turn over . Cover warm areas...
Owner's Manual
Page 21
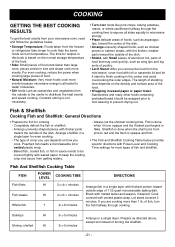
... you remove the food from the microwave, cover food with thicker parts toward outside edge of 11/2 quart microwavable baking dish. Shellfish is done when the shell turns from pink to cook than 1 lb. Fish And Shellfish Cooking Table FISH POWER LEVEL COOKING TIME DIRECTIONS Fish fillets Fish steaks Whole fish HI 31/2-41/2 minutes Arrange fish in a single layer with Power Level and Cooking Time settings for recipes in this book is...
... you remove the food from the microwave, cover food with thicker parts toward outside edge of 11/2 quart microwavable baking dish. Shellfish is done when the shell turns from pink to cook than 1 lb. Fish And Shellfish Cooking Table FISH POWER LEVEL COOKING TIME DIRECTIONS Fish fillets Fish steaks Whole fish HI 31/2-41/2 minutes Arrange fish in a single layer with Power Level and Cooking Time settings for recipes in this book is...
Owner's Manual
Page 22
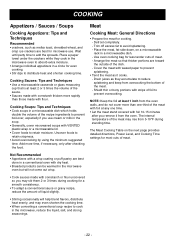
... thin or bony portions with VENTED plastic wrap or a microwavable lid. • Cover foods to distribute heat and shorten cooking time. COOKING Appetizers / Sauces / Soups Cooking Appetizers: Tips and Techniques Recommended • crackers, such as it from the oven. Place the meat, fat side down, on the next page provides detailed directions, Power Level, and Cooking Time settings for even cooking. • Stir dips to retain moisture...
... thin or bony portions with VENTED plastic wrap or a microwavable lid. • Cover foods to distribute heat and shorten cooking time. COOKING Appetizers / Sauces / Soups Cooking Appetizers: Tips and Techniques Recommended • crackers, such as it from the oven. Place the meat, fat side down, on the next page provides detailed directions, Power Level, and Cooking Time settings for even cooking. • Stir dips to retain moisture...
Owner's Manual
Page 24
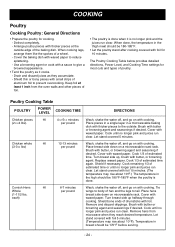
... run clear. The Poultry Cooking Table below provides detailed directions, Power Level, and Cooking Time settings for cooking. - Arrange poultry pieces with thicker pieces to tail. Let stand covered 5 minutes. When cooking legs, arrange them like the spokes of estimated time. Cover with foil. Cook 1/3 of estimated time again. Tie wings to body of hen and the legs to the outside edge of the baking dish...
... run clear. The Poultry Cooking Table below provides detailed directions, Power Level, and Cooking Time settings for cooking. - Arrange poultry pieces with thicker pieces to tail. Let stand covered 5 minutes. When cooking legs, arrange them like the spokes of estimated time. Cover with foil. Cook 1/3 of estimated time again. Tie wings to body of hen and the legs to the outside edge of the baking dish...

Owner's Manual
Page 26
... GREASE FILTERS The grease filters should rest at the main power supply and set the clock. 6. Do not use rough powder or pads. MAINTENANCE CARE AND CLEANING For best performance and safety, keep the inner door panel and the oven front frame free of the vent cover into place. Remove the two vent grille mounting screws. (2 middle screws) 2. The aluminum will drop out. 3. To order a new charcoal filter, contact the Service Center. 1. Open the door. 4. Slide a new charcoal filter...
... GREASE FILTERS The grease filters should rest at the main power supply and set the clock. 6. Do not use rough powder or pads. MAINTENANCE CARE AND CLEANING For best performance and safety, keep the inner door panel and the oven front frame free of the vent cover into place. Remove the two vent grille mounting screws. (2 middle screws) 2. The aluminum will drop out. 3. To order a new charcoal filter, contact the Service Center. 1. Open the door. 4. Slide a new charcoal filter...
Owner's Manual
Page 27
... the vent cover into place. Replace bulb with 30 watt appliance bulb. 4. Q. Remove the bulb cover mounting screws. Replace bulb cover, and mount screw. 5. Use the "listening test" by stopping the oven as soon as the popping slows to remove. Do not pop popcorn in two levels at the main power supply. 2. Replace the bulb holder. 7. Push the bottom until it will conduct the heat to absorb microwave energy). Only use either metal or aluminum pans in poor cooking...
... the vent cover into place. Replace bulb with 30 watt appliance bulb. 4. Q. Remove the bulb cover mounting screws. Replace bulb cover, and mount screw. 5. Use the "listening test" by stopping the oven as soon as the popping slows to remove. Do not pop popcorn in two levels at the main power supply. 2. Replace the bulb holder. 7. Push the bottom until it will conduct the heat to absorb microwave energy). Only use either metal or aluminum pans in poor cooking...
Owner's Manual
Page 29
... all directions (amount, time, & power levels) were correctly followed. • be sure microwave oven is on a separate circuit. • be sure oven wasn't operated when empty. • make sure metal rack (if used) is properly installed on the oven operates: • check for a blown circuit fuse or a tripped main circuit breaker. • check if oven is fully inserted into receptacle. • check that timer wasn't started instead of this manual as...
... all directions (amount, time, & power levels) were correctly followed. • be sure microwave oven is on a separate circuit. • be sure oven wasn't operated when empty. • make sure metal rack (if used) is properly installed on the oven operates: • check for a blown circuit fuse or a tripped main circuit breaker. • check if oven is fully inserted into receptacle. • check that timer wasn't started instead of this manual as...
Owner's Manual
Page 30
..., and/or install the product, instruct, or replace house fuses or correct wiring, or correction of the product. To Obtain Nearest Authorized Service Center or Sales Dealer, or to Obtain Product, Customer, or Service Assistance Call 1-800-243-0000 (Phone answered 24 hours - 365 days a year) and choose the appropriate prompt from misuse, abuse, operation outside environmental specifications or contrary...
..., and/or install the product, instruct, or replace house fuses or correct wiring, or correction of the product. To Obtain Nearest Authorized Service Center or Sales Dealer, or to Obtain Product, Customer, or Service Assistance Call 1-800-243-0000 (Phone answered 24 hours - 365 days a year) and choose the appropriate prompt from misuse, abuse, operation outside environmental specifications or contrary...


