
Owner's Manual
Page 3
...Location of Model Number 6 Oven Specifications 6 Electrical Rating 6 Electrical Requirements 6 Grounding Instructions 6 Microwave Oven Features 7 Oven Control Panel 8 OPERATION 10 LEARN ABOUT YOUR MICROWAVE OVEN......10 Clock 10 Kitchen Timer 10 Light Timer 10 FAN Hi/Low/Off 11 LIGHT Hi/Low/Off 11 TURNTABLE On/Off 11 Child Lock 11 Help 11 Hold Warm 11 Custom Set 12 Ez On 12 Custom Cook 12 More / Less 13 Cooking at High Cook Power 13 Cooking at Lower Power Levels 13 Cooking Guide for "Lower Power Levels" ..........14 SENSOR OPERATING INSTRUCTIONS 15 Sensor Cooking Guide...
...Location of Model Number 6 Oven Specifications 6 Electrical Rating 6 Electrical Requirements 6 Grounding Instructions 6 Microwave Oven Features 7 Oven Control Panel 8 OPERATION 10 LEARN ABOUT YOUR MICROWAVE OVEN......10 Clock 10 Kitchen Timer 10 Light Timer 10 FAN Hi/Low/Off 11 LIGHT Hi/Low/Off 11 TURNTABLE On/Off 11 Child Lock 11 Help 11 Hold Warm 11 Custom Set 12 Ez On 12 Custom Cook 12 More / Less 13 Cooking at High Cook Power 13 Cooking at Lower Power Levels 13 Cooking Guide for "Lower Power Levels" ..........14 SENSOR OPERATING INSTRUCTIONS 15 Sensor Cooking Guide...

Owner's Manual
Page 4
... use this appliance outdoors. Turn the oven off the power at the fuse or circuit breaker panel. • Use care when cleaning the vent hood filters. Connect it may damage the filters. • Do not tamper with the built-in a wet basement, near water - Do not immerse the electrical cord or plug in the oven. - It is made for example, near a kitchen sink, in safety switches on . - See the electrical GROUNDING INSTRUCTIONS...
... use this appliance outdoors. Turn the oven off the power at the fuse or circuit breaker panel. • Use care when cleaning the vent hood filters. Connect it may damage the filters. • Do not tamper with the built-in a wet basement, near water - Do not immerse the electrical cord or plug in the oven. - It is made for example, near a kitchen sink, in safety switches on . - See the electrical GROUNDING INSTRUCTIONS...

Owner's Manual
Page 5
... the user to touch the oven floor. Stir the liquid both before removing the container. - Do not use a browning dish incorrectly, you use straight-sided containers with the provided installation instructions. • This appliance should be overheated beyond the boiling point without food in a particular installation. It is encouraged to try to part 18 of table or counter. • Preserve the oven floor: - Uneven heating...
... the user to touch the oven floor. Stir the liquid both before removing the container. - Do not use a browning dish incorrectly, you use straight-sided containers with the provided installation instructions. • This appliance should be overheated beyond the boiling point without food in a particular installation. It is encouraged to try to part 18 of table or counter. • Preserve the oven floor: - Uneven heating...
Owner's Manual
Page 6
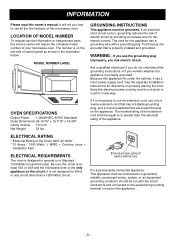
... circuit other than the electrical rating of control panel as shown in any way. INFORMATION Please read this appliance fits under the cabinet, it is properly installed and grounded. Keep the electrical power cord dry and do not understand the grounding instructions or if you risk electric shock. ELECTRICAL RATING * Electrical Rating of the Oven:120V AC 60Hz * 13 Amps / 1500 Watts ( MWO + Cooktop Lamp + Ventilation Fan) ELECTRICAL REQUIREMENTS The oven...
... circuit other than the electrical rating of control panel as shown in any way. INFORMATION Please read this appliance fits under the cabinet, it is properly installed and grounded. Keep the electrical power cord dry and do not understand the grounding instructions or if you risk electric shock. ELECTRICAL RATING * Electrical Rating of the Oven:120V AC 60Hz * 13 Amps / 1500 Watts ( MWO + Cooktop Lamp + Ventilation Fan) ELECTRICAL REQUIREMENTS The oven...
Owner's Manual
Page 9
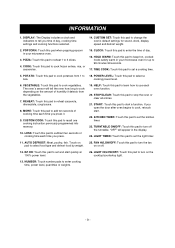
... . 9. cooking power level. 6. STOP/CLEAR: Touch this pad when popping popcorn in your microwave oven for sound, clock, display speed and defrost weight. 2. POPCORN: Touch this pad to keep hot, cooked foods safety warm in the display. 24. CLOCK: Touch this pad to stop the oven or clear all entries. 21. REHEAT: Touch this pad to cook potatoes from the vegetables. 7. MORE: Touch this pad to set the kitchen timer. 23. AUTO DEFROST: Meat, poultry, fish. NUMBER: Touch number pads to select food type and defrost food...
... . 9. cooking power level. 6. STOP/CLEAR: Touch this pad when popping popcorn in your microwave oven for sound, clock, display speed and defrost weight. 2. POPCORN: Touch this pad to keep hot, cooked foods safety warm in the display. 24. CLOCK: Touch this pad to stop the oven or clear all entries. 21. REHEAT: Touch this pad to cook potatoes from the vegetables. 7. MORE: Touch this pad to set the kitchen timer. 23. AUTO DEFROST: Meat, poultry, fish. NUMBER: Touch number pads to select food type and defrost food...

Owner's Manual
Page 10
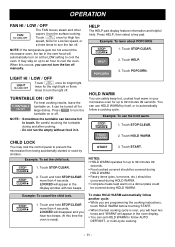
... seven beeps and END will display. 4. The light comes on and off 7:00 AM. 2. Touch CLOCK. (Press once for AM, twice for PM.) 5. OPERATION LEARN ABOUT YOUR MICROWAVE OVEN This section discusses the concepts behind microwave cooking and introduces you to the basics you need to know to operate your microwave oven as a timer. Touch STOP/CLEAR. Enter the time you want . Touch STOP/CLEAR. Touch STOP/CLEAR. 2. Example: To set the LIGHT to turn...
... seven beeps and END will display. 4. The light comes on and off 7:00 AM. 2. Touch CLOCK. (Press once for AM, twice for PM.) 5. OPERATION LEARN ABOUT YOUR MICROWAVE OVEN This section discusses the concepts behind microwave cooking and introduces you to the basics you need to know to operate your microwave oven as a timer. Touch STOP/CLEAR. Enter the time you want . Touch STOP/CLEAR. Touch STOP/CLEAR. 2. Example: To set the LIGHT to turn...
Owner's Manual
Page 11
... food in the display window with two beeps. Example: To learn about POPCORN. 1. NOTE: • Sometimes the turntable can safely keep hot, cooked food warm in the vent hood will appear in it. Touch and hold STOP/CLEAR more than 4 seconds. LOCKED will automatically turn the turntable on a dinner plate could be turned off . OPERATION FAN HI / LOW / OFF The FAN moves steam and other vapors from being accidentally started or used...
... food in the display window with two beeps. Example: To learn about POPCORN. 1. NOTE: • Sometimes the turntable can safely keep hot, cooked food warm in the vent hood will appear in it. Touch and hold STOP/CLEAR more than 4 seconds. LOCKED will automatically turn the turntable on a dinner plate could be turned off . OPERATION FAN HI / LOW / OFF The FAN moves steam and other vapors from being accidentally started or used...
Owner's Manual
Page 12
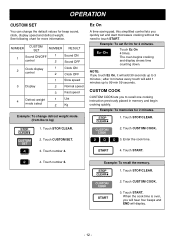
... 2 minutes. Touch STOP/CLEAR. 2. Touch CUSTOM SET. 3. after 3 minutes every touch will display. - 12 - Enter the cook time. 3. Touch STOP/CLEAR. 2. OPERATION CUSTOM SET You can change defrost weight mode. (from lbs to kg) Ez On A time-saving pad, this simplified control lets you touch Ez On, it will add 30 seconds up to touch START. NOTE: If you quickly set Ez On for beep sound, clock, display speed and defrost weight. Touch START. 4. Example: To set and start microwave cooking without the need to 99...
... 2 minutes. Touch STOP/CLEAR. 2. Touch CUSTOM SET. 3. after 3 minutes every touch will display. - 12 - Enter the cook time. 3. Touch STOP/CLEAR. 2. OPERATION CUSTOM SET You can change defrost weight mode. (from lbs to kg) Ez On A time-saving pad, this simplified control lets you touch Ez On, it will add 30 seconds up to touch START. NOTE: If you quickly set Ez On for beep sound, clock, display speed and defrost weight. Touch START. 4. Example: To set and start microwave cooking without the need to 99...

Owner's Manual
Page 15
... with lids or vented plastic wrap. 2. Match the amount of the size of moisture turing into steam can mislead the sensor. 4. When sensing time is over, the oven beeps twice and the remaining cooking time will show the remaining heating time. The display will appear in the oven. For best results by Sensor, following these recommendation. 1. They can open the door or touch the "STOP/CLEAR" key...
... with lids or vented plastic wrap. 2. Match the amount of the size of moisture turing into steam can mislead the sensor. 4. When sensing time is over, the oven beeps twice and the remaining cooking time will show the remaining heating time. The display will appear in the oven. For best results by Sensor, following these recommendation. 1. They can open the door or touch the "STOP/CLEAR" key...
Owner's Manual
Page 16
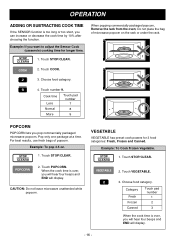
... four beeps and END will display. CAUTION: Do not leave microwave unattended while popcorn. Category Fresh Frozen Canned Touch pad number 1 2 3 When the cook time is over , you will hear four beeps and END will display. - 16 - Example: If you pop commercially packaged microwave popcorn. Touch VEGETABLE. 3. Touch COOK. 3. Touch STOP/CLEAR. 2. Choose food category. 4. VEGETABLE VEGETABLE has preset cook powers for longer time. 1. When popping commercially packaged popcorn, Remove the rack from the oven; Touch number 9.
... four beeps and END will display. CAUTION: Do not leave microwave unattended while popcorn. Category Fresh Frozen Canned Touch pad number 1 2 3 When the cook time is over , you will hear four beeps and END will display. - 16 - Example: If you pop commercially packaged microwave popcorn. Touch VEGETABLE. 3. Touch COOK. 3. Touch STOP/CLEAR. 2. Choose food category. 4. VEGETABLE VEGETABLE has preset cook powers for longer time. 1. When popping commercially packaged popcorn, Remove the rack from the oven; Touch number 9.

Owner's Manual
Page 17
Touch STOP/CLEAR. 2. Sensor Cook has preset Cook Power for 3 categories: Casserole, Dinner Plate and Soup/Sauce. Example: To cook Rice. 1. Touch REHEAT. - 17 - 3. Category Casserole Dinner Plate Soup/Sauce Touch pad number 1 2 3 When the cook time is over , you will hear four beeps and END will display. When the cook time is over , you will hear four beeps and END will display. COOK Using COOK lets you heat common microwaveprepared foods without needing to program times and Cook Powers. REHEAT...
Touch STOP/CLEAR. 2. Sensor Cook has preset Cook Power for 3 categories: Casserole, Dinner Plate and Soup/Sauce. Example: To cook Rice. 1. Touch REHEAT. - 17 - 3. Category Casserole Dinner Plate Soup/Sauce Touch pad number 1 2 3 When the cook time is over , you will hear four beeps and END will display. When the cook time is over , you will hear four beeps and END will display. COOK Using COOK lets you heat common microwaveprepared foods without needing to program times and Cook Powers. REHEAT...

Owner's Manual
Page 18
.... • For better results, a preset standing time is included in a refrigerator-freezer that are probably used to be entered is the net weight in AUTO DEFROST, you must not touch the side of the package alters the defrosting time. OPERATION AUTO DEFROST Your microwave oven is over, you will hear four beeps and END will display. Open door, turn over food. Separated pieces defrost more quickly than a deep block. • Separate...
.... • For better results, a preset standing time is included in a refrigerator-freezer that are probably used to be entered is the net weight in AUTO DEFROST, you must not touch the side of the package alters the defrosting time. OPERATION AUTO DEFROST Your microwave oven is over, you will hear four beeps and END will display. Open door, turn over food. Separated pieces defrost more quickly than a deep block. • Separate...
Owner's Manual
Page 19
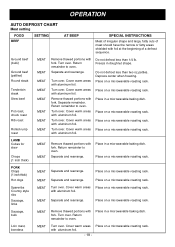
... to oven. Cover warm areas Place on a microwavable roasting rack. Turn over. Return remainder to oven. Separate remainder. Separate and rearrange. PORK Chops (1 inch thick) Hot dogs MEAT Separate and rearrange. Cover warm areas with foil at the beginning of meat should have the narrow or fatty areas shielded with aluminum foil. OPERATION AUTO DEFROST CHART Meat setting FOOD BEEF SETTING AT BEEP SPECIAL INSTRUCTIONS Meat...
... to oven. Cover warm areas Place on a microwavable roasting rack. Turn over. Return remainder to oven. Separate remainder. Separate and rearrange. PORK Chops (1 inch thick) Hot dogs MEAT Separate and rearrange. Cover warm areas with foil at the beginning of meat should have the narrow or fatty areas shielded with aluminum foil. OPERATION AUTO DEFROST CHART Meat setting FOOD BEEF SETTING AT BEEP SPECIAL INSTRUCTIONS Meat...
Owner's Manual
Page 21
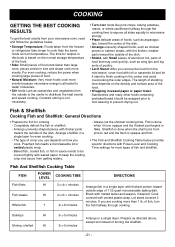
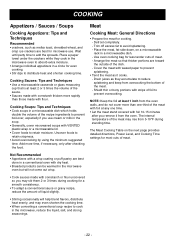
... from your microwave oven, read and follow the guidelines below provides specific directions with Power Level and Cooking Time settings for even cooking. - The time for cooking. - For even cooking, reduce the power when cooking large pieces of food. • Natural Moisture: Very moist foods cook more than large ones, pieces similar in waxed paper or paper towel: Sandwiches and many other foods containing prebaked bread should be covered lightly with...
... from your microwave oven, read and follow the guidelines below provides specific directions with Power Level and Cooking Time settings for even cooking. - The time for cooking. - For even cooking, reduce the power when cooking large pieces of food. • Natural Moisture: Very moist foods cook more than large ones, pieces similar in waxed paper or paper towel: Sandwiches and many other foods containing prebaked bread should be covered lightly with...
Owner's Manual
Page 22
... from the oven walls, and do not cover more than those made with flour. Defrost completely. - Use oven cooking bag for a smooth consistency. • To adapt a conventional sauce or gravy recipe, reduce the amount of meat. Cover the meat with waxed paper to distribute heat and shorten cooking time. Shield thin or bony portions with VENTED plastic wrap or a microwavable lid. • Cover foods to...
... from the oven walls, and do not cover more than those made with flour. Defrost completely. - Use oven cooking bag for a smooth consistency. • To adapt a conventional sauce or gravy recipe, reduce the amount of meat. Cover the meat with waxed paper to distribute heat and shorten cooking time. Shield thin or bony portions with VENTED plastic wrap or a microwavable lid. • Cover foods to...
Owner's Manual
Page 24
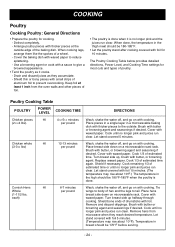
... is done. Keep foil at the outside . Shield bone ends of estimated time again. Brush with waxed paper. COOKING Poultry Cooking Poultry: General Directions • Prepare the poultry for 10 minutes. Cook 1/3 of drumsticks with foil 5 minutes. (Temperature may rise about 10°F). The Poultry Cooking Table below provides detailed directions, Power Level, and Cooking Time settings for most cuts and types of the baking dish...
... is done. Keep foil at the outside . Shield bone ends of estimated time again. Brush with waxed paper. COOKING Poultry Cooking Poultry: General Directions • Prepare the poultry for 10 minutes. Cook 1/3 of drumsticks with foil 5 minutes. (Temperature may rise about 10°F). The Poultry Cooking Table below provides detailed directions, Power Level, and Cooking Time settings for most cuts and types of the baking dish...

Owner's Manual
Page 26
... not operate the hood without the filters in hot water and a mild detergent. Soak grease filters in place. The aluminum will drop out. 3. Replace the mounting screws. Use a chrome cleaner and polish on at the main power supply and set the clock. 6. METAL RACK Wash the metal rack with a wet paper towel, especially after cooking chicken or bacon. Open the door. 4. Do not use abrasive scrubbers or cleaners to clean rack...
... not operate the hood without the filters in hot water and a mild detergent. Soak grease filters in place. The aluminum will drop out. 3. Replace the mounting screws. Use a chrome cleaner and polish on at the main power supply and set the clock. 6. METAL RACK Wash the metal rack with a wet paper towel, especially after cooking chicken or bacon. Open the door. 4. Do not use abrasive scrubbers or cleaners to clean rack...
Owner's Manual
Page 27
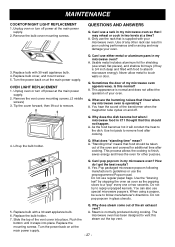
... for other rack can also use regular paper bags. This appearance is operating? A. What does "standing time" mean? This process allows the cooking to the dish. Q. Remove the vent cover mounting screws. (2 middle screws) 3. Q. As the food becomes hot it snaps into place. Steam is 3/4 inch deep and filled with a 30 watt appliance bulb. 6. MAINTENANCE COOKTOP/NIGHT LIGHT REPLACEMENT 1, Unplug oven or turn off power at the main power supply. Turn the power back...
... for other rack can also use regular paper bags. This appearance is operating? A. What does "standing time" mean? This process allows the cooking to the dish. Q. Remove the vent cover mounting screws. (2 middle screws) 3. Q. As the food becomes hot it snaps into place. Steam is 3/4 inch deep and filled with a 30 watt appliance bulb. 6. MAINTENANCE COOKTOP/NIGHT LIGHT REPLACEMENT 1, Unplug oven or turn off power at the main power supply. Turn the power back...
Owner's Manual
Page 29
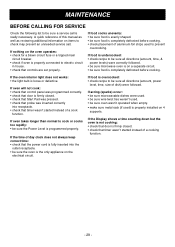
... a cooking function. - 29 - If the oven interior light does not works: • the light bulb is the only appliance on the oven operates: • check for a blown circuit fuse or a tripped main circuit breaker. • check if oven is programmed properly. MAINTENANCE BEFORE CALLING FOR SERVICE Check the following list to be sure a service call . If arcing (sparks) occur: • be sure microwavable dishes were used. • be sure wire...
... a cooking function. - 29 - If the oven interior light does not works: • the light bulb is the only appliance on the oven operates: • check for a blown circuit fuse or a tripped main circuit breaker. • check if oven is programmed properly. MAINTENANCE BEFORE CALLING FOR SERVICE Check the following list to be sure a service call . If arcing (sparks) occur: • be sure microwavable dishes were used. • be sure wire...
Owner's Manual
Page 30
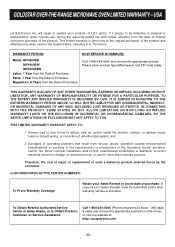
.../or install the product, instruct, or replace house fuses or correct wiring, or correction of the product. and 2. or visit our website at the time warranty service is good only to the requirements or precautions in the United States, including U.S. Please have product type (Microwave) and ZIP code ready. THIS LIMITED WARRANTY DOES NOT APPLY TO: 1. Therefore, the cost of repair or replacement...
.../or install the product, instruct, or replace house fuses or correct wiring, or correction of the product. and 2. or visit our website at the time warranty service is good only to the requirements or precautions in the United States, including U.S. Please have product type (Microwave) and ZIP code ready. THIS LIMITED WARRANTY DOES NOT APPLY TO: 1. Therefore, the cost of repair or replacement...


