

Owner's Manual
Page 3
...6 Location of Model Number 6 Oven Specifications 6 Electrical Rating 6 Electrical Requirements 6 Grounding Instructions 6 Microwave Oven Features 7 Oven Control Panel 8 OPERATION 10 LEARN ABOUT YOUR MICROWAVE OVEN......10 CLOCK 10 Kitchen Timer 10 FAN Hi/Lo/Off 10 LIGHT Hi/Lo/Off 10 Child Lock 10 Custom Set 11 Ez On 11 Time Cook 11 Time Defrost 11 Beverage 12 Frozen Entree 12 Pizza 12 Cooking at High Cook Power 12 Cooking at Lower Power Levels 12 Cooking Guide for "Lower Power Levels" ..........13 Popcorn 14 Potato 14 Auto Cook 15 Cooking Guide for "Auto Cook 15 Auto...
...6 Location of Model Number 6 Oven Specifications 6 Electrical Rating 6 Electrical Requirements 6 Grounding Instructions 6 Microwave Oven Features 7 Oven Control Panel 8 OPERATION 10 LEARN ABOUT YOUR MICROWAVE OVEN......10 CLOCK 10 Kitchen Timer 10 FAN Hi/Lo/Off 10 LIGHT Hi/Lo/Off 10 Child Lock 10 Custom Set 11 Ez On 11 Time Cook 11 Time Defrost 11 Beverage 12 Frozen Entree 12 Pizza 12 Cooking at High Cook Power 12 Cooking at Lower Power Levels 12 Cooking Guide for "Lower Power Levels" ..........13 Popcorn 14 Potato 14 Auto Cook 15 Cooking Guide for "Auto Cook 15 Auto...

Owner's Manual
Page 4
... oven has several built-in safety switches to inspect purchased items for example, near a swimming pool, or similar location. • Do not use . • Clean the ventilating hood frequently. for wire twist-ties and remove them before using it only to accumulate on page 2. • When cleaning the door and the surfaces that touch the door, use . • Do not store this appliance. Disconnect the power cord...
... oven has several built-in safety switches to inspect purchased items for example, near a swimming pool, or similar location. • Do not use . • Clean the ventilating hood frequently. for wire twist-ties and remove them before using it only to accumulate on page 2. • When cleaning the door and the surfaces that touch the door, use . • Do not store this appliance. Disconnect the power cord...

Owner's Manual
Page 5
... that interference will not occur in a residential installation. However, there is in your microwave oven. - Put the package on the oven floor or turntable. Stir the liquid both before removing the container. - Do not cook anything directly on a microwavable dish. - Contact the nearest authorized service facility for the browning dish. Do not heat the oven floor excessively. - Do not allow the container...
... that interference will not occur in a residential installation. However, there is in your microwave oven. - Put the package on the oven floor or turntable. Stir the liquid both before removing the container. - Do not cook anything directly on a microwavable dish. - Contact the nearest authorized service facility for the browning dish. Do not heat the oven floor excessively. - Do not allow the container...

Owner's Manual
Page 6
... the left side of control panel as shown in any circuit other than the electrical rating of your microwave oven. LOCATION OF MODEL NUMBER To request service information or replacement parts, the service center will accept the plug on a Standard 120V/60Hz household outlet. The number is necessary to use an extension cord, use For a permanently connected appliance: This appliance must be equal to operate on the appliance. Because...
... the left side of control panel as shown in any circuit other than the electrical rating of your microwave oven. LOCATION OF MODEL NUMBER To request service information or replacement parts, the service center will accept the plug on a Standard 120V/60Hz household outlet. The number is necessary to use an extension cord, use For a permanently connected appliance: This appliance must be equal to operate on the appliance. Because...
Owner's Manual
Page 7
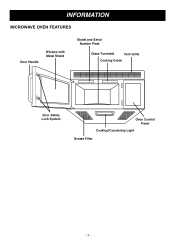
INFORMATION MICROWAVE OVEN FEATURES Door Handle Window with Metal Shield Model and Serial Number Plate Glass Turntable Vent Grille Cooking Guide Door Safety Lock System Oven Control Panel Cooktop/Countertop Light Grease Filter -7-
INFORMATION MICROWAVE OVEN FEATURES Door Handle Window with Metal Shield Model and Serial Number Plate Glass Turntable Vent Grille Cooking Guide Door Safety Lock System Oven Control Panel Cooktop/Countertop Light Grease Filter -7-

Owner's Manual
Page 9
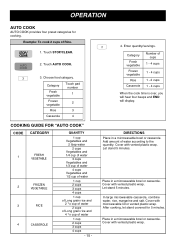
.... KITCHEN TIMER: Touch this pad to 3 slices. 6. NUMBER: Touch number pads to cook frozen entrees by weight. 7. DEFROST: Meat, poultry, fish. AUTO REHEAT: Touch this pad to change the oven's default settings for sound, clock, display speed, defrost weight, and demo mode operations. 15. CUSTOM SET: Touch this pad when popping popcorn in your microwave oven. 3. POPCORN: Touch this pad to set and start a function. STOP/CLEAR: Touch this pad to stop the oven or clear all entries. 20. START: Touch this pad to start quickly at 100% power level. 21. FAN...
.... KITCHEN TIMER: Touch this pad to 3 slices. 6. NUMBER: Touch number pads to cook frozen entrees by weight. 7. DEFROST: Meat, poultry, fish. AUTO REHEAT: Touch this pad to change the oven's default settings for sound, clock, display speed, defrost weight, and demo mode operations. 15. CUSTOM SET: Touch this pad when popping popcorn in your microwave oven. 3. POPCORN: Touch this pad to set and start a function. STOP/CLEAR: Touch this pad to stop the oven or clear all entries. 20. START: Touch this pad to start quickly at 100% power level. 21. FAN...

Owner's Manual
Page 10
.... Use the Timer for Low fan speed, or a three times to turn the fan off manually. 4. Touch START. LOCKED will appear in the vent hood will automatically turn the light off . At this information before use your microwave oven. Touch STOP/CLEAR. 2. Touch CLOCK. 3. Touch KITCHEN TIMER. 3. Touch and hold START more than 4 seconds. Please read this time the oven is over, you need to know to operate your microwave oven as a timer. It may lock the control panel to prevent the microwave from the surface cooking. KITCHEN TIMER You...
.... Use the Timer for Low fan speed, or a three times to turn the fan off manually. 4. Touch START. LOCKED will appear in the vent hood will automatically turn the light off . At this information before use your microwave oven. Touch STOP/CLEAR. 2. Touch CLOCK. 3. Touch KITCHEN TIMER. 3. Touch and hold START more than 4 seconds. Please read this time the oven is over, you need to know to operate your microwave oven as a timer. It may lock the control panel to prevent the microwave from the surface cooking. KITCHEN TIMER You...

Owner's Manual
Page 11
... Sound ON Sound OFF 2 Clock display control 1 Clock ON 2 Clock OFF 1 Slow speed 3 Display 2 Normal speed 3 Fast speed 4 Defrost weight mode select 1 Lbs 2 Kg 5 Demo mode select 1 Demo ON 2 Demo OFF Example: To change the default values for 2 minutes. 1. NOTE: It will display. - 11 - Touch number 4. 4. Enter the defrosting time you want . 3. See following chart for 2 minutes. Touch TIME DEFROST pad. 2. Touch START pad. (Defrost starts) When the defrost time is over, you quickly set and start microwave cooking without the need to defrost. The oven...
... Sound ON Sound OFF 2 Clock display control 1 Clock ON 2 Clock OFF 1 Slow speed 3 Display 2 Normal speed 3 Fast speed 4 Defrost weight mode select 1 Lbs 2 Kg 5 Demo mode select 1 Demo ON 2 Demo OFF Example: To change the default values for 2 minutes. 1. NOTE: It will display. - 11 - Touch number 4. 4. Enter the defrosting time you want . 3. See following chart for 2 minutes. Touch TIME DEFROST pad. 2. Touch START pad. (Defrost starts) When the defrost time is over, you quickly set and start microwave cooking without the need to defrost. The oven...

Owner's Manual
Page 12
... hear four beeps and END will display. Enter the power level. 5. Touch START. A slice is over , you will hear four beeps and END will display. - 12 - Touch STOP/CLEAR. 2. When the cook time is based on an 8 ounce cup. • Beverage heated with the beverage feature may be very hot. • Remove the container with care. • Beverage may be very hot, remove from oven with foods that need slower cooking, such...
... hear four beeps and END will display. Enter the power level. 5. Touch START. A slice is over , you will hear four beeps and END will display. - 12 - Touch STOP/CLEAR. 2. When the cook time is based on an 8 ounce cup. • Beverage heated with the beverage feature may be very hot. • Remove the container with care. • Beverage may be very hot, remove from oven with foods that need slower cooking, such...

Owner's Manual
Page 14
... chart: Bag Size-ounces 1.75 3.0 3.5 Touch NUMBER 1 2 3 POTATO The POTATO pad lets you will hear four beeps and END will display. Touch number 2. Touch STOP/CLEAR. Touch number 2. Touch POTATO. 3. Example: To pop a 3.0 oz. Touch POPCORN. 3. When the cook time is over , you pop 1.75, 3.0, and 3.5 ounce bags of commercially packaged microwave popcorn. Example: To cook 2 Potatoes. 1. Pop only one package at a time. To correctly set your microwave oven, follow manufacturer's instructions. You can...
... chart: Bag Size-ounces 1.75 3.0 3.5 Touch NUMBER 1 2 3 POTATO The POTATO pad lets you will hear four beeps and END will display. Touch number 2. Touch STOP/CLEAR. Touch number 2. Touch POTATO. 3. Example: To pop a 3.0 oz. Touch POPCORN. 3. When the cook time is over , you pop 1.75, 3.0, and 3.5 ounce bags of commercially packaged microwave popcorn. Example: To cook 2 Potatoes. 1. Pop only one package at a time. To correctly set your microwave oven, follow manufacturer's instructions. You can...
Owner's Manual
Page 15
..., combine water, rice, margarine and salt. Example: To cook 2 cups of cups 1 - 4 cups 1 - 4 cups 1 - 2 cups 1 - 4 cups When the cook time is over, you will hear four beeps and END will display. Cover with vented plastic wrap. Add amount of water 1 cup 2 cups 3 cups 4 cups - 15 - 4. Cover with microwavable lid or vented plastic wrap. After cooking, let stand covered for cooking. Touch STOP/CLEAR. 2. Let stand 5 minutes. DIRECTIONS...
..., combine water, rice, margarine and salt. Example: To cook 2 cups of cups 1 - 4 cups 1 - 4 cups 1 - 2 cups 1 - 4 cups When the cook time is over, you will hear four beeps and END will display. Cover with vented plastic wrap. Add amount of water 1 cup 2 cups 3 cups 4 cups - 15 - 4. Cover with microwavable lid or vented plastic wrap. After cooking, let stand covered for cooking. Touch STOP/CLEAR. 2. Let stand 5 minutes. DIRECTIONS...

Owner's Manual
Page 17
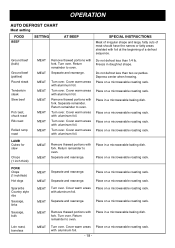
... you touch the START pad. The Auto Defrost Sequence Table below , always program a lower food weight (for a shorter defrosting time) to prevent cooking the food. • If the food is in pounds and tenths of pounds (the weight of the food minus the container). • Only use AUTO DEFROST for up to 20 minutes, enter a lower food weight. • The shape of the oven. Touch STOP/CLEAR. 2. When you do not open the door and turn food...
... you touch the START pad. The Auto Defrost Sequence Table below , always program a lower food weight (for a shorter defrosting time) to prevent cooking the food. • If the food is in pounds and tenths of pounds (the weight of the food minus the container). • Only use AUTO DEFROST for up to 20 minutes, enter a lower food weight. • The shape of the oven. Touch STOP/CLEAR. 2. When you do not open the door and turn food...
Owner's Manual
Page 18
... a microwavable roasting rack. Turn over . Return remainder to oven. Turn over . Place on a microwavable roasting rack. Place on a microwavable roasting rack. Cover warm areas with fork. OPERATION AUTO DEFROST CHART Meat setting FOOD BEEF SETTING AT BEEP SPECIAL INSTRUCTIONS Meat of irregular shape and large, fatty cuts of meat should have the narrow or fatty areas shielded with aluminum foil. Turn over . Separate and rearrange. Turn over . PORK Chops (1 inch thick) Hot...
... a microwavable roasting rack. Turn over . Return remainder to oven. Turn over . Place on a microwavable roasting rack. Place on a microwavable roasting rack. Cover warm areas with fork. OPERATION AUTO DEFROST CHART Meat setting FOOD BEEF SETTING AT BEEP SPECIAL INSTRUCTIONS Meat of irregular shape and large, fatty cuts of meat should have the narrow or fatty areas shielded with aluminum foil. Turn over . Separate and rearrange. Turn over . PORK Chops (1 inch thick) Hot...
Owner's Manual
Page 20
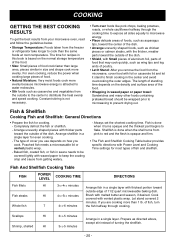
... foods containing prebaked bread should be covered lightly with Power Level and Cooking Time settings for cooking. - Always set the shortest cooking time. HI 41/2-51/2 minutes Brush with thickest portion toward the outside of cover you use depends on how you are cooking more than large ones, pieces similar in a single layer with melted butter and season, if desired. If you cook. Fish And Shellfish Cooking Table FISH POWER LEVEL COOKING TIME DIRECTIONS...
... foods containing prebaked bread should be covered lightly with Power Level and Cooking Time settings for cooking. - Always set the shortest cooking time. HI 41/2-51/2 minutes Brush with thickest portion toward the outside of cover you use depends on how you are cooking more than large ones, pieces similar in a single layer with melted butter and season, if desired. If you cook. Fish And Shellfish Cooking Table FISH POWER LEVEL COOKING TIME DIRECTIONS...
Owner's Manual
Page 21
... from the oven walls, and do not cover more than those made with waxed paper to prevent splattering. • Tend the meat as it from 5-10°F during cooking for most cuts of the dish. - Cooking Sauces: Tips and Techniques • Use a microwavable casserole or glass measuring cup that thicker portions are toward the outside of meat. Defrost completely. - Use oven cooking bag for...
... from the oven walls, and do not cover more than those made with waxed paper to prevent splattering. • Tend the meat as it from 5-10°F during cooking for most cuts of the dish. - Cooking Sauces: Tips and Techniques • Use a microwavable casserole or glass measuring cup that thicker portions are toward the outside of meat. Defrost completely. - Use oven cooking bag for...

Owner's Manual
Page 23
.... - 23 - The Poultry Cooking Table below provides detailed directions, Power Level, and Cooking Time settings for cooking. - Brush with a sauce to give a browned appearance. • Tend the poultry as they reach desired temperature. Use a browning agent or cook with butter or browning agent and seasonings if desired. Let stand covered 5 minutes. Let stand covered with thicker pieces to the outside edge of aluminum foil...
.... - 23 - The Poultry Cooking Table below provides detailed directions, Power Level, and Cooking Time settings for cooking. - Brush with a sauce to give a browned appearance. • Tend the poultry as they reach desired temperature. Use a browning agent or cook with butter or browning agent and seasonings if desired. Let stand covered 5 minutes. Let stand covered with thicker pieces to the outside edge of aluminum foil...

Owner's Manual
Page 25
... into place. MAINTENANCE CARE AND CLEANING For best performance and safety, keep the inner door panel and the oven front frame free of the vent cover into place and close the door. Clean your oven is vented inside, the charcoal filter should be cleaned. CLEANING THE GREASE FILTERS The grease filters should rest at the angle shown and set the clock. - 25 - To remove grease filters, slide each filter to dry. Remove the two vent grille mounting screws. (2 middle screws) 2. Rinse well and...
... into place. MAINTENANCE CARE AND CLEANING For best performance and safety, keep the inner door panel and the oven front frame free of the vent cover into place and close the door. Clean your oven is vented inside, the charcoal filter should be cleaned. CLEANING THE GREASE FILTERS The grease filters should rest at the angle shown and set the clock. - 25 - To remove grease filters, slide each filter to dry. Remove the two vent grille mounting screws. (2 middle screws) 2. Rinse well and...

Owner's Manual
Page 26
... use the preprogrammed Popcorn pad. Use of your microwave oven. Q. Replace bulb with 30 watt appliance bulb. 4. Pop packaged microwave popcorn following manufacturer's guidelines or use the rack that food should not happen. Unplug oven or turn off . Q. Why does the dish become hot when I get the best results? Use hot pads to touch walls or door. Use the "listening test" by stopping the oven as soon as the popping slows to the dish. Replace the mounting screws...
... use the preprogrammed Popcorn pad. Use of your microwave oven. Q. Replace bulb with 30 watt appliance bulb. 4. Pop packaged microwave popcorn following manufacturer's guidelines or use the rack that food should not happen. Unplug oven or turn off . Q. Why does the dish become hot when I get the best results? Use hot pads to touch walls or door. Use the "listening test" by stopping the oven as soon as the popping slows to the dish. Replace the mounting screws...

Owner's Manual
Page 28
..., power level, time, size of this manual as well as reviewing additional information on 4 supports. If food cooks unevenly: • be sure food is evenly shaped. • be sure food is firmly closed . • check that timer wasn't started instead of aluminum foil strips used to check may prevent an unneeded service call is the only appliance on the electrical circuit. If oven will not cook: • check that control panel...
..., power level, time, size of this manual as well as reviewing additional information on 4 supports. If food cooks unevenly: • be sure food is evenly shaped. • be sure food is firmly closed . • check that timer wasn't started instead of aluminum foil strips used to check may prevent an unneeded service call is the only appliance on the electrical circuit. If oven will not cook: • check that control panel...

Owner's Manual
Page 29
GOLDSTAR OVER-THE-RANGE MICROWAVE OVEN LIMITED WARRANTY - Call 1-800-243-0000 and choose the appropriate prompt. Service trips to your Sales Receipt to deliver, pick up, and/or install the product, instruct, or replace house fuses or correct wiring, or correction of Purchase. Territories. WARRANTY PERIOD: HOW SERVICE IS HANDLED: Model: MV1501W MV1501B MV1501BQ Labor: 1 Year from the Date of unauthorized repairs; CUSTOMER INTER-ACTIVE...
GOLDSTAR OVER-THE-RANGE MICROWAVE OVEN LIMITED WARRANTY - Call 1-800-243-0000 and choose the appropriate prompt. Service trips to your Sales Receipt to deliver, pick up, and/or install the product, instruct, or replace house fuses or correct wiring, or correction of Purchase. Territories. WARRANTY PERIOD: HOW SERVICE IS HANDLED: Model: MV1501W MV1501B MV1501BQ Labor: 1 Year from the Date of unauthorized repairs; CUSTOMER INTER-ACTIVE...


