

Owners Manual
Page 5
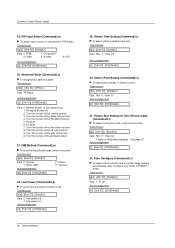
Contents Warnings 2 Safety Instructions 3~4 Introduction Controls and Connection Options 7 Remote Control Key Functions 8 Installation Installation Instruction 9~10 External Equipment Connections 11~14 VCR Setup 11 Cable TV Setup 11 External A/V ...Screen Position 21 Manual Configure 21 Screen Adjustments 22 Initializing 22 Selecting Wide VGA/XGA mode 22 Luminance Noise Reduction 22 PIP (Picture-in remote control. Select viewing source for available connection and operational setup options.) 1. Additional features Setup See Contents above. After reading this manual, keep...
Contents Warnings 2 Safety Instructions 3~4 Introduction Controls and Connection Options 7 Remote Control Key Functions 8 Installation Installation Instruction 9~10 External Equipment Connections 11~14 VCR Setup 11 Cable TV Setup 11 External A/V ...Screen Position 21 Manual Configure 21 Screen Adjustments 22 Initializing 22 Selecting Wide VGA/XGA mode 22 Luminance Noise Reduction 22 PIP (Picture-in remote control. Select viewing source for available connection and operational setup options.) 1. Additional features Setup See Contents above. After reading this manual, keep...
Owners Manual
Page 7
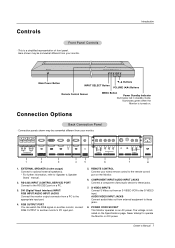
... from a PC to the appropriate input port. 4. Main Power Button INPUT SELECT Button E, D Buttons VOLUME (F,G) Buttons Remote Control Sensor MENU Button Power Standby Indicator Illuminates red in standby mode, Illuminates green when the Monitor is turned on another ... CORD SOCKET This Monitor operates on a PC. 3. Introduction ON/OFF INPUT SELECT MENU VOL. RS-232C INPUT (CONTROL/SERVICE) PORT Connect to the remote control port on the Specifications page. DVI (Digital Visual Interface) INPUT/ RGB INPUT/AUDIO INPUT JACKS Connect the monitor output connector from your monitor. (...
... from a PC to the appropriate input port. 4. Main Power Button INPUT SELECT Button E, D Buttons VOLUME (F,G) Buttons Remote Control Sensor MENU Button Power Standby Indicator Illuminates red in standby mode, Illuminates green when the Monitor is turned on another ... CORD SOCKET This Monitor operates on a PC. 3. Introduction ON/OFF INPUT SELECT MENU VOL. RS-232C INPUT (CONTROL/SERVICE) PORT Connect to the remote control port on the Specifications page. DVI (Digital Visual Interface) INPUT/ RGB INPUT/AUDIO INPUT JACKS Connect the monitor output connector from your monitor. (...
Owners Manual
Page 8
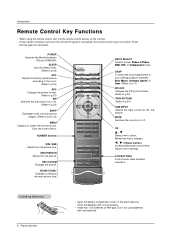
... Key Functions - Press the key again as if the remote IR signal is interrupted, the remote control may not function. SIZE Adjusts the sub picture size. ZOOM-/ZOOM+ Enlarges or reduces the main picture size. ZOOM + INPUT SELECT Selects source: Video, S-.... POWER Switches the Monitor between ON and STANDBY. NUMBER buttons WIN. SPLIT ZOOM Enlarges the picture. Memorizes menu changes. When using the remote control, aim it at the remote control sensor on the back side and insert the batteries with new batteries. MUTE Switches the sound on or off . (Refer to p.23...
... Key Functions - Press the key again as if the remote IR signal is interrupted, the remote control may not function. SIZE Adjusts the sub picture size. ZOOM-/ZOOM+ Enlarges or reduces the main picture size. ZOOM + INPUT SELECT Selects source: Video, S-.... POWER Switches the Monitor between ON and STANDBY. NUMBER buttons WIN. SPLIT ZOOM Enlarges the picture. Memorizes menu changes. When using the remote control, aim it at the remote control sensor on the back side and insert the batteries with new batteries. MUTE Switches the sound on or off . (Refer to p.23...

Owners Manual
Page 9
... be installed in various ways such as on a wall, or on each side and 2" from your plasma display. ZOOM + Owner's Manual Batteries BNC-RCA Adapter Remote Control D-sub 15 pin Cable Power Cord DVI-D Cable Installation Instructions • The Monitor can be mounted horizontally or vertically. Do not try to ground...
... be installed in various ways such as on a wall, or on each side and 2" from your plasma display. ZOOM + Owner's Manual Batteries BNC-RCA Adapter Remote Control D-sub 15 pin Cable Power Cord DVI-D Cable Installation Instructions • The Monitor can be mounted horizontally or vertically. Do not try to ground...

Owners Manual
Page 11
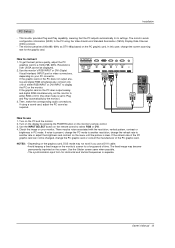
... the plasma display. If the 4:3 picture format is connected to the S-VIDEO input on the monitor. Use the INPUT SELECT button on the remote control to the monitor input jacks, as shown in the figure. Select your local cable TV service provider(s). How to the monitor's VIDEO INPUT... RF Cable Cable Box Owner's Manual 11 When connecting the monitor to the monitor's VIDEO INPUT. 2. Use the INPUT SELECT button on the remote control to select Video. (If connected to the VIDEO input on the monitor. (Note that S-Video offers higher quality). Typically a frozen still...
... the plasma display. If the 4:3 picture format is connected to the S-VIDEO input on the monitor. Use the INPUT SELECT button on the remote control to the monitor input jacks, as shown in the figure. Select your local cable TV service provider(s). How to the monitor's VIDEO INPUT... RF Cable Cable Box Owner's Manual 11 When connecting the monitor to the monitor's VIDEO INPUT. 2. Use the INPUT SELECT button on the remote control to select Video. (If connected to the VIDEO input on the monitor. (Note that S-Video offers higher quality). Typically a frozen still...

Owners Manual
Page 12
...AUDIO L Y PB PR AUDIO INPUT COMPONENT INPUT R AUDIO L (MONO) S-VIDEO VIDEO INPUT AUDIO INPUT Camcorder How to use 1. Turn on the remote control to the AUDIO INPUT jacks on the monitor, as shown below. When connecting the monitor to the monitor's VIDEO INPUT. 2. Use the INPUT SELECT...HDCP (High-bandwidth Digital Contents Protection) protocol for video connections, depending on the digital set -top box.) 2. Use INPUT SELECT on the remote control to select Component. (If connected to the AUDIO INPUT jacks on the monitor, as shown in the figure. 2. To watch digitally ...
...AUDIO L Y PB PR AUDIO INPUT COMPONENT INPUT R AUDIO L (MONO) S-VIDEO VIDEO INPUT AUDIO INPUT Camcorder How to use 1. Turn on the remote control to the AUDIO INPUT jacks on the monitor, as shown below. When connecting the monitor to the monitor's VIDEO INPUT. 2. Use the INPUT SELECT...HDCP (High-bandwidth Digital Contents Protection) protocol for video connections, depending on the digital set -top box.) 2. Use INPUT SELECT on the remote control to select Component. (If connected to the AUDIO INPUT jacks on the monitor, as shown in the figure. 2. To watch digitally ...
Owners Manual
Page 13
..., adjust the PC sound as DTV 480p based on the screen. Then, make the corresponding audio connections. Check the image on the monitor's remote control. 3. Owner's Manual 13 Use the monitor's RGB INPUT or DVI (Digital Visual Interface) INPUT port for the graphic card. If using... perceives 640x480, 60Hz as required. ( )R( ) ( )L ( ) EXTERNAL SPEAKER RS-232C INPUT (CONTROL/SERVICE) DVI INPUT RGB INPUT AUDIO INPUT RGB OUTPUT REMOTE CONTROL How to another resolution, change the PC graphic card or consult the manufacturer of either RGB or DVI; (the other mode is clear. If...
..., adjust the PC sound as DTV 480p based on the screen. Then, make the corresponding audio connections. Check the image on the monitor's remote control. 3. Owner's Manual 13 Use the monitor's RGB INPUT or DVI (Digital Visual Interface) INPUT port for the graphic card. If using... perceives 640x480, 60Hz as required. ( )R( ) ( )L ( ) EXTERNAL SPEAKER RS-232C INPUT (CONTROL/SERVICE) DVI INPUT RGB INPUT AUDIO INPUT RGB OUTPUT REMOTE CONTROL How to another resolution, change the PC graphic card or consult the manufacturer of either RGB or DVI; (the other mode is clear. If...

Owners Manual
Page 15
... select the SPECIAL menu. 2. Owner's Manual 15 Press the INPUT SELECT button on the Monitor or press the POWER, INPUT SELECT button on the remote control and then the Monitor will be shown on . First select your desired language. Connect power cord correctly. 2. If the Monitor was turned off... with the remote control and then the ON/OFF button on the Monitor • Press the ON/OFF button on the Monitor and then press the INPUT SELECT...
... select the SPECIAL menu. 2. Owner's Manual 15 Press the INPUT SELECT button on the Monitor or press the POWER, INPUT SELECT button on the remote control and then the Monitor will be shown on . First select your desired language. Connect power cord correctly. 2. If the Monitor was turned off... with the remote control and then the ON/OFF button on the Monitor • Press the ON/OFF button on the Monitor and then press the INPUT SELECT...

Owners Manual
Page 19
... may be used to turn the monitor on the Monitor's screen for a long period of time. 1. Avoid allowing a fixed image to clear entirely with the remote control. - set to select the SPECIAL menu. 2. To return to select Low power. 3. Press the MENU button and then use D / E button to normal... viewing, press the any button on the screen for Vertical Viewing (MU-50PZ44M/44V/90M/90V series models only) 1. VIDEO Language AUDIO Key lock ISM Method TIME Low power G On Set ID. VIDEO AUDIO Language Key lock...
... may be used to turn the monitor on the Monitor's screen for a long period of time. 1. Avoid allowing a fixed image to clear entirely with the remote control. - set to select the SPECIAL menu. 2. To return to select Low power. 3. Press the MENU button and then use D / E button to normal... viewing, press the any button on the screen for Vertical Viewing (MU-50PZ44M/44V/90M/90V series models only) 1. VIDEO Language AUDIO Key lock ISM Method TIME Low power G On Set ID. VIDEO AUDIO Language Key lock...

Owners Manual
Page 25
... - RS-232C connection cables are not supplied with the Monitor. ( )R( ) ( )L ( ) EXTERNAL SPEAKER RS-232C INPUT (CONTROL/SERVICE) DVI INPUT RGB INPUT AUDIO INPUT RGB OUTPUT REMOTE CONTROL R AUDIO L Y PB PR AUDIO INPUT COMPONENT INPUT R AUDIO L (MONO) S-VIDEO VIDEO INPUT AUDIO INPUT AC INPUT Type of the control device to the RS...
... - RS-232C connection cables are not supplied with the Monitor. ( )R( ) ( )L ( ) EXTERNAL SPEAKER RS-232C INPUT (CONTROL/SERVICE) DVI INPUT RGB INPUT AUDIO INPUT RGB OUTPUT REMOTE CONTROL R AUDIO L Y PB PR AUDIO INPUT COMPONENT INPUT R AUDIO L (MONO) S-VIDEO VIDEO INPUT AUDIO INPUT AC INPUT Type of the control device to the RS...

Owners Manual
Page 26
... this function to read mode, it returns the data of the PC computer. Data 1: Illegal Code 2: Not supported function 3: Wait more time Screen Mute k 05. Remote Control Lock Mode k 14. Transmit 'FF' data to specify a monitor ID number. - Balance k 21. Press the G button and then use D / E button to 'Real Data Mapping...
... this function to read mode, it returns the data of the PC computer. Data 1: Illegal Code 2: Not supported function 3: Wait more time Screen Mute k 05. Remote Control Lock Mode k 14. Transmit 'FF' data to specify a monitor ID number. - Balance k 21. Press the G button and then use D / E button to 'Real Data Mapping...

Owners Manual
Page 27
...Component 2 : Video 3 : S-video 4 : DVI Acknowledgement [b][ ][Set ID][ ][OK][Data][x] 04. Volume Mute (Command2:e) G To control volume mute on remote control. Acknowledgement [f][ ][Set ID][ ][OK][Data][x] 03. External Control Device Setup 01. Volume Control (Command2:f) G To adjust volume. You can also adjust volume... . Power (Command2:a) G To control Power On/Off of the Monitor. Screen Mute (Command2:d) G To select screen mute on the Monitor's remote control. Transmission [k][d][ ][Set ID][ ][Data][Cr] Data 0 : Screen mute off (Picture on) 1 : Screen mute on (Picture off ...
...Component 2 : Video 3 : S-video 4 : DVI Acknowledgement [b][ ][Set ID][ ][OK][Data][x] 04. Volume Mute (Command2:e) G To control volume mute on remote control. Acknowledgement [f][ ][Set ID][ ][OK][Data][x] 03. External Control Device Setup 01. Volume Control (Command2:f) G To adjust volume. You can also adjust volume... . Power (Command2:a) G To control Power On/Off of the Monitor. Screen Mute (Command2:d) G To select screen mute on the Monitor's remote control. Transmission [k][d][ ][Set ID][ ][Data][Cr] Data 0 : Screen mute off (Picture on) 1 : Screen mute on (Picture off ...
Owners Manual
Page 28
...off 1: Lock on Acknowledgement [m][ ][Set ID][ ][OK][Data][x] • If you're not using the PIP or TWIN PICTURE button on the remote control. You can also adjust brightness in the Twin menu. Acknowledgement [h][ ][Set ID][ ][OK][Data][x] 09. Color (Command2:i) G To adjust ...Set ID][ ][Data][Cr] Data Red : 0 ~ Green : 64 • Refer to 'Real data mapping 1'. See page 27. When main power is on /off , remote control lock is released. 14. Transmission [k][o][ ][Set ID][ ][Data][Cr] Data 0: 4:3 1: 16:9 Acknowledgement [o][ ][Set ID][ ][OK][Data][x] 16. Acknowledgement [i][ ][Set ...
...off 1: Lock on Acknowledgement [m][ ][Set ID][ ][OK][Data][x] • If you're not using the PIP or TWIN PICTURE button on the remote control. You can also adjust brightness in the Twin menu. Acknowledgement [h][ ][Set ID][ ][OK][Data][x] 09. Color (Command2:i) G To adjust ...Set ID][ ][Data][Cr] Data Red : 0 ~ Green : 64 • Refer to 'Real data mapping 1'. See page 27. When main power is on /off , remote control lock is released. 14. Transmission [k][o][ ][Set ID][ ][Data][Cr] Data 0: 4:3 1: 16:9 Acknowledgement [o][ ][Set ID][ ][OK][Data][x] 16. Acknowledgement [i][ ][Set ...

Owners Manual
Page 29
... 3' as shown below . Transmission [k][q][ ][Set ID][ ][Data][Cr] Data 0: Right down on screen 1: Left down on screen 2: Left up on screen 3: Right up on the remote control or in color temperature. Treble (Command2:r) G To adjust treble.
... 3' as shown below . Transmission [k][q][ ][Set ID][ ][Data][Cr] Data 0: Right down on screen 1: Left down on screen 2: Left up on screen 3: Right up on the remote control or in color temperature. Treble (Command2:r) G To adjust treble.
Owners Manual
Page 30
...][Cr] Data FF:Read Acknowledgement [z][ ][Set ID][ ][OK][Data][x] Data 0: Normal (Power on and signal exist) 1: No signal (Power on) 2: Turn the monitor off by remote control 3: Turn the monitor off by sleep time function 4: Turn the monitor off by RS-232C function 5: 5V down 6: AC down 7: Turn the monitor off...
...][Cr] Data FF:Read Acknowledgement [z][ ][Set ID][ ][OK][Data][x] Data 0: Normal (Power on and signal exist) 1: No signal (Power on) 2: Turn the monitor off by remote control 3: Turn the monitor off by sleep time function 4: Turn the monitor off by RS-232C function 5: 5V down 6: AC down 7: Turn the monitor off...

Owners Manual
Page 31
Remote Control IR Code G Output waveform Single pulse, modulated with 37.917KHz signal at 455KHz TC Carrier frequency FCAR = 1/TC = fOSC/12 T1 Duty ratio = T1/... • Bit "1" 1.12 ms G Frame interval : Tf The waveform is transmitted as long as a key is depressed. IR Code How to Connect G Connect your wired remote control to the Remote Control port on the Monitor. Tf Tf 0.56 ms 2.24 ms IR Code Tf=108ms @455KHz Owner's Manual 31
Remote Control IR Code G Output waveform Single pulse, modulated with 37.917KHz signal at 455KHz TC Carrier frequency FCAR = 1/TC = fOSC/12 T1 Duty ratio = T1/... • Bit "1" 1.12 ms G Frame interval : Tf The waveform is transmitted as long as a key is depressed. IR Code How to Connect G Connect your wired remote control to the Remote Control port on the Monitor. Tf Tf 0.56 ms 2.24 ms IR Code Tf=108ms @455KHz Owner's Manual 31
Owners Manual
Page 33
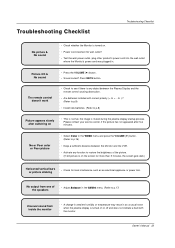
...Manual 33 No output from inside the monitor • A change in ambient humidity or temperature may result in . Picture OK & No sound The remote control doesn't work • Press the VOLUME (G) button. • Sound muted? No or Poor color or Poor picture • Select Color...Refer to p.16) • Keep a sufficient distance between the Monitor and the VCR. • Activate any object between the Plasma Display and the remote control causing obstruction. • Are batteries installed with the monitor. Press MUTE button. • Check to see if there is any function to p.17...
...Manual 33 No output from inside the monitor • A change in ambient humidity or temperature may result in . Picture OK & No sound The remote control doesn't work • Press the VOLUME (G) button. • Sound muted? No or Poor color or Poor picture • Select Color...Refer to p.16) • Keep a sufficient distance between the Monitor and the VCR. • Activate any object between the Plasma Display and the remote control causing obstruction. • Are batteries installed with the monitor. Press MUTE button. • Check to see if there is any function to p.17...


