

Owners Manual
Page 5
...Method .... 19 Low power 19 Menu Rotation For Vertical Viewing ......... 20 Screen Menu Options Auto Adjustment 21 Setting Picture Format 21 Picture Size Zoom 21 Adjusting Horizonta_Nert[ca] Position ........ 22 Manual Configure 22 Screen Adjustments 22 Initializing 22 Luminance Noise... Reduction 23 Selecting Wide VGA mode 23 Split Zoom 23 PiP (Picture tn Picture) Feature Watching PiP 24 Swapping PIP 24 Moving PIP 24 Selecting a Input Signa_ Source for PiP ....... 24 ...
...Method .... 19 Low power 19 Menu Rotation For Vertical Viewing ......... 20 Screen Menu Options Auto Adjustment 21 Setting Picture Format 21 Picture Size Zoom 21 Adjusting Horizonta_Nert[ca] Position ........ 22 Manual Configure 22 Screen Adjustments 22 Initializing 22 Luminance Noise... Reduction 23 Selecting Wide VGA mode 23 Split Zoom 23 PiP (Picture tn Picture) Feature Watching PiP 24 Swapping PIP 24 Moving PIP 24 Selecting a Input Signa_ Source for PiP ....... 24 ...
Owners Manual
Page 8
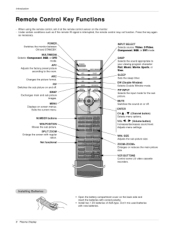
.... SWAP MENU PIP INP_ OH_ MU"f_ NUMBER buttons Moves the sub picture_ SPLIT ZOOM Enlarge the screen with regular ration. DW (Double Window) Selects Double Window mode PIP INPUT Selects the input mode for the sub picture MUTE Switches the sound on screen menus. oN%:::, Se,eo,s:..=..o.oOo.,,".\ ... may not function as necessary. DASP Selects the sound appropriate to the room. Press the key again POWER. SWAP fJ Exchanges main and sub picture images MENU Displays on or off . Not functional INPUT SELECT Selects source: Video, S-Video, // Component, R_, or D_ mode. Introduction ...
.... SWAP MENU PIP INP_ OH_ MU"f_ NUMBER buttons Moves the sub picture_ SPLIT ZOOM Enlarge the screen with regular ration. DW (Double Window) Selects Double Window mode PIP INPUT Selects the input mode for the sub picture MUTE Switches the sound on screen menus. oN%:::, Se,eo,s:..=..o.oOo.,,".\ ... may not function as necessary. DASP Selects the sound appropriate to the room. Press the key again POWER. SWAP fJ Exchanges main and sub picture images MENU Displays on or off . Not functional INPUT SELECT Selects source: Video, S-Video, // Component, R_, or D_ mode. Introduction ...
Owners Manual
Page 11
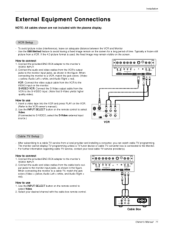
...cables from the VCR to the VIDEO input on the screem How to the monitor input jacks, as shown in the figure. If the 4:3 picture format is connected to sefect Video. 2, Select your Iocai cable TV service provider(s). the fixed image may remain visible on the monitor S-VIDEO...cable TV service, contact your desired channel with the plasma display. Installation - Connect the provided BNC°RCA adapter to connect 1. To avoid picture noise (interference), leave an adequate distance between the VCR and Monitor Use the ISM Method feature to avoid having a fixed image remain on ...
...cables from the VCR to the VIDEO input on the screem How to the monitor input jacks, as shown in the figure. If the 4:3 picture format is connected to sefect Video. 2, Select your Iocai cable TV service provider(s). the fixed image may remain visible on the monitor S-VIDEO...cable TV service, contact your desired channel with the plasma display. Installation - Connect the provided BNC°RCA adapter to connect 1. To avoid picture noise (interference), leave an adequate distance between the VCR and Monitor Use the ISM Method feature to avoid having a fixed image remain on ...
Owners Manual
Page 12
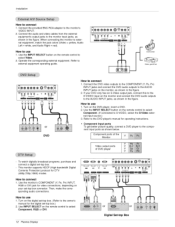
... = yellow, Audio Left = white, and Audio Right = red). Turn on the remote control to external equipment operating guide. Component Input po_s exter- To get better picture quality, connect a DVD player to connect 1. How to use 1, Turn on the digital set -top box connector. Connect the DVD video outpu_ to the COMPONENT...
... = yellow, Audio Left = white, and Audio Right = red). Turn on the remote control to external equipment operating guide. Component Input po_s exter- To get better picture quality, connect a DVD player to connect 1. How to use 1, Turn on the digital set -top box connector. Connect the DVD video outpu_ to the COMPONENT...
Owners Manual
Page 13
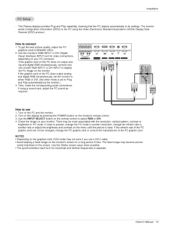
... or DVl; (the other mode is present, change the PC mode to another rate or adjust the brightness and contrast on the menu until the picture as required, Now to another resolution, change the PC graphic card or consult the manufacturer of the PC graphic card, NOTES * Depending on the graphics..., make the corresponding audie connections. If using the Video Electronics Standard Association (VESA) Display Data Channel (DDC) protocol, How to connect 1, To get the best picture quality, adjust the PC graphics card to select RGB or DVI. 4. There may become perma- Owner_ Manual 13
... or DVl; (the other mode is present, change the PC mode to another rate or adjust the brightness and contrast on the menu until the picture as required, Now to another resolution, change the PC graphic card or consult the manufacturer of the PC graphic card, NOTES * Depending on the graphics..., make the corresponding audie connections. If using the Video Electronics Standard Association (VESA) Display Data Channel (DDC) protocol, How to connect 1, To get the best picture quality, adjust the PC graphics card to select RGB or DVI. 4. There may become perma- Owner_ Manual 13
Owners Manual
Page 16
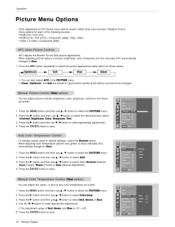
...the MENU button and then use A/'9' bu_on to select the PICTU_ menu. 2, Press the I_ button and then use A V button to select the desired picture option (Contrast, Brightness, Color, Sharpness, Tint). 3_ Press the _ button and then use 4 ,,'J_ button to User, 1. When adjusting color temperature .../ V button to select either Normal Cool (Preset), Warm (Preset) or User (Manual Adjustment}, 4. t6 Plasma Display Readjust Picture = APC adjusts the Monitor for the best picture appearance. - Press the MENU button and then use A/V button to select the _CTURE 2, Press the t_ button and then use...
...the MENU button and then use A/'9' bu_on to select the PICTU_ menu. 2, Press the I_ button and then use A V button to select the desired picture option (Contrast, Brightness, Color, Sharpness, Tint). 3_ Press the _ button and then use 4 ,,'J_ button to User, 1. When adjusting color temperature .../ V button to select either Normal Cool (Preset), Warm (Preset) or User (Manual Adjustment}, 4. t6 Plasma Display Readjust Picture = APC adjusts the Monitor for the best picture appearance. - Press the MENU button and then use A/V button to select the _CTURE 2, Press the t_ button and then use...

Owners Manual
Page 19
... be set to setect On orOff 4. Press the I_ button and then use A/'V button to even if you select On, the screen darken& 4. A frozen still picture from the screen Note: An excessive permanent image may help prevent ghost images However, it can only be used with White Wash. Press the MENU...
... be set to setect On orOff 4. Press the I_ button and then use A/'V button to even if you select On, the screen darken& 4. A frozen still picture from the screen Note: An excessive permanent image may help prevent ghost images However, it can only be used with White Wash. Press the MENU...
Owners Manual
Page 21
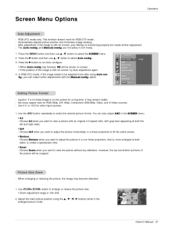
... when you can also adjust ARC in the SCHEN menu. ,4:,3 - with an original 4:3 aspect ratio, with the Manual conflg, option, - the picture will be shown on the screen for RGB-DTV mode. Set: every' aspect ratio for other input sources, 1. You can make further adjustments with ...and S-Video sources. Operation RGB (PC) mode only; This function doesn't work for a long time, it may become distorted. 1. Automatically adjusts picture position and minimizes image shaking. Press the MENU button and then use A / V button to select Auto coz_g.. & Press the i_ button to view...
... when you can also adjust ARC in the SCHEN menu. ,4:,3 - with an original 4:3 aspect ratio, with the Manual conflg, option, - the picture will be shown on the screen for RGB-DTV mode. Set: every' aspect ratio for other input sources, 1. You can make further adjustments with ...and S-Video sources. Operation RGB (PC) mode only; This function doesn't work for a long time, it may become distorted. 1. Automatically adjusts picture position and minimizes image shaking. Press the MENU button and then use A / V button to select Auto coz_g.. & Press the i_ button to view...
Owners Manual
Page 22
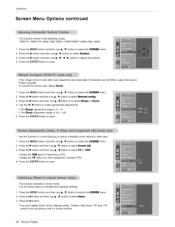
... 3 Press the I_ button and then use A / V button to select the SCREW menu. 2. Position_ Split zoom, PIP size, PIP position and sub picture size for other equipment, (Except 4 Press the ENTER button to save. Press the ENTER button to save . = Use this function to correct jittering or... image still isn't clear after auto adjustment Phase manually To correct the screen size, adjust Clock, and especially if characters are still jittery, adjust the picture 1. Press the I_ button and then use & iV button to select TV or VCR. • Select the _ option if watching a VCR, • Select ...
... 3 Press the I_ button and then use A / V button to select the SCREW menu. 2. Position_ Split zoom, PIP size, PIP position and sub picture size for other equipment, (Except 4 Press the ENTER button to save. Press the ENTER button to save . = Use this function to correct jittering or... image still isn't clear after auto adjustment Phase manually To correct the screen size, adjust Clock, and especially if characters are still jittery, adjust the picture 1. Press the I_ button and then use & iV button to select TV or VCR. • Select the _ option if watching a VCR, • Select ...

Owners Manual
Page 23
..., 2 Press the i_ button and then use ,6, / 'IF button to select the desired VGA resolution. 4_ Press the ENTER button to save, Enlarges the picture in correct proportions. - to the section you wish to enlarge, you can be used for aH input sources. Press the SPLIT ZOOM button repeatedly to...2-Split Zoom mode, you can be viewed without using the,& iV/_11/1_ button. Press the ENTER button to save menu, Operation o To see a normal picture, match the resolution of RGB mode and selection of choosing 5, _on 5 is enlarged to select On or Off. 4. Owner_ Manual 23 Split Zoom can move...
..., 2 Press the i_ button and then use ,6, / 'IF button to select the desired VGA resolution. 4_ Press the ENTER button to save, Enlarges the picture in correct proportions. - to the section you wish to enlarge, you can be used for aH input sources. Press the SPLIT ZOOM button repeatedly to...2-Split Zoom mode, you can be viewed without using the,& iV/_11/1_ button. Press the ENTER button to save menu, Operation o To see a normal picture, match the resolution of RGB mode and selection of choosing 5, _on 5 is enlarged to select On or Off. 4. Owner_ Manual 23 Split Zoom can move...

Owners Manual
Page 24
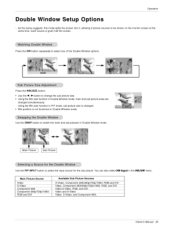
...to exchange the main and sub pic tu res. [ Main Picture ] Sub Picture ] Press the WIN.POSITION button Press the A/V _41/1_ button repeatedly until desired The sub picture moves up/downAeft/fight. One source will be large, and ...can atso adjust the PiP features in the PIP/DW menu. To watch 4:3 or 16:9 aspect ratio for the sub picture Main Picture Source Available Sub Picture Sources ....V. !de S 9 O_7 ....S..z.'_!d_£ .../.1..0..8..0..i.,.....R..G...B..,....a..n..d.....D..V] Component 480i V!de%S:V!deo_ RGB,_aad _DV!... e ......V..!.d..e..o.....a..n..d S:ffid...
...to exchange the main and sub pic tu res. [ Main Picture ] Sub Picture ] Press the WIN.POSITION button Press the A/V _41/1_ button repeatedly until desired The sub picture moves up/downAeft/fight. One source will be large, and ...can atso adjust the PiP features in the PIP/DW menu. To watch 4:3 or 16:9 aspect ratio for the sub picture Main Picture Source Available Sub Picture Sources ....V. !de S 9 O_7 ....S..z.'_!d_£ .../.1..0..8..0..i.,.....R..G...B..,....a..n..d.....D..V] Component 480i V!de%S:V!deo_ RGB,_aad _DV!... e ......V..!.d..e..o.....a..n..d S:ffid...
Owners Manual
Page 25
... function in Double Window mode. Press the WIN.SIZE button. • Use the 4/1_ button to select one of the Double Window options. Main Picture Sub Picture Use the PIP INPUT butt:on the monitor screen at the same time. Each source is not functional in the PIP/DW menu Main... Picture Source Video S-Video Cgm_p£ne_nt 480 i RGB and DVl Available Sub Picture Sources S-Video, Component 480i/480p/720p/1080i, Video,SoVideo, RGB and DVi Video and S-Video Video, S-Video, and...
... function in Double Window mode. Press the WIN.SIZE button. • Use the 4/1_ button to select one of the Double Window options. Main Picture Sub Picture Use the PIP INPUT butt:on the monitor screen at the same time. Each source is not functional in the PIP/DW menu Main... Picture Source Video S-Video Cgm_p£ne_nt 480 i RGB and DVl Available Sub Picture Sources S-Video, Component 480i/480p/720p/1080i, Video,SoVideo, RGB and DVi Video and S-Video Video, S-Video, and...

Owners Manual
Page 28
... Acknowledgement [[a][ ][Set ID][ ][OK][Data][x] I 1 ' Power On I * In a like manner, if other functions transmit 'FF' data based on (Picture off (Volume on the Monitor's remote control. Max:64 • Refer to 'Real data mapping 1' as shown below . Screen Mute (Command2:d) I_ To ... 0 : Screen mute off . Volume Control (Command2:f) I_ To adjust volume. You can also adjust volume with the volume buttons on /off (Picture on) 1 : Screen mute on this format, Acknowledgement data feedback presents status about each function. 02. Transmission [[k][g][ ][Set ID][ ][Data][Cr]...
... Acknowledgement [[a][ ][Set ID][ ][OK][Data][x] I 1 ' Power On I * In a like manner, if other functions transmit 'FF' data based on (Picture off (Volume on the Monitor's remote control. Max:64 • Refer to 'Real data mapping 1' as shown below . Screen Mute (Command2:d) I_ To ... 0 : Screen mute off . Volume Control (Command2:f) I_ To adjust volume. You can also adjust volume with the volume buttons on /off (Picture on) 1 : Screen mute on this format, Acknowledgement data feedback presents status about each function. 02. Transmission [[k][g][ ][Set ID][ ][Data][Cr]...
Owners Manual
Page 29
...][Uata][x] J External Control Device Setup 13. Transmission [[k][p][ ][Set IU][ ][Uata][Cr] J Data Min: 21 - You can also adjust color in the Picture menu. Transmission [[k][k][ ][Set IU][ ][Uata][Cr] J Data Min: 0 - Transmission [[k][I][ ][Set ID][ ][gata][Cr] Data 0: OSD off 1: PIP...][Cr] J Data Red : 0- Sharpness (Command2:k) I_ To adjust the screen sharpness. PIP / DW (Command2:n) I_ To control the PIP (Picture In picture)/DW (Double Window). Transmission [[k][o][ ][Set ID][ ][Data][Cr] Data 0:4:3 J 1' 16:9 Acknowledgement [[o][ ][Set IU][ ][OK][Uata][x] J ...
...][Uata][x] J External Control Device Setup 13. Transmission [[k][p][ ][Set IU][ ][Uata][Cr] J Data Min: 21 - You can also adjust color in the Picture menu. Transmission [[k][k][ ][Set IU][ ][Uata][Cr] J Data Min: 0 - Transmission [[k][I][ ][Set ID][ ][gata][Cr] Data 0: OSD off 1: PIP...][Cr] J Data Red : 0- Sharpness (Command2:k) I_ To adjust the screen sharpness. PIP / DW (Command2:n) I_ To control the PIP (Picture In picture)/DW (Double Window). Transmission [[k][o][ ][Set ID][ ][Data][Cr] Data 0:4:3 J 1' 16:9 Acknowledgement [[o][ ][Set IU][ ][OK][Uata][x] J ...

Owners Manual
Page 30
... ][Set ID][ ][Data][Cr] J Data Min: 0- You can also adjust bass in the PIP/DW menu. You can also adjust the sub picture position using WIN.POSITION on screen Acknowledqement [[q][ ][Set ID][ ][OK][Data][x] J 18. Max: 64 • Refer to 'Real data mapping 3' ...:-20 5 :-19 A :-18 5F: -1 64:0 69:+1 C3:+19 C8:+20 Color Temperature (Command2:u) I_ To adjust color temperature, You can also adjust balance in the Picture menu, Transmission I[k][u][ ][Set ID][ ][Data][Cr] Data 0: Normal 1: Cool I 2: Warm 3: User Acknowledgement I[u][ ][Set ID][ ][OK][Data][x] I Data Min: 0-- ...
... ][Set ID][ ][Data][Cr] J Data Min: 0- You can also adjust bass in the PIP/DW menu. You can also adjust the sub picture position using WIN.POSITION on screen Acknowledqement [[q][ ][Set ID][ ][OK][Data][x] J 18. Max: 64 • Refer to 'Real data mapping 3' ...:-20 5 :-19 A :-18 5F: -1 64:0 69:+1 C3:+19 C8:+20 Color Temperature (Command2:u) I_ To adjust color temperature, You can also adjust balance in the Picture menu, Transmission I[k][u][ ][Set ID][ ][Data][Cr] Data 0: Normal 1: Cool I 2: Warm 3: User Acknowledgement I[u][ ][Set ID][ ][OK][Data][x] I Data Min: 0-- ...
Owners Manual
Page 31
... To recognize an abnormal state. Transmission t[J][t][ ][Set IU][ ][Uata][Cr] J Data Min: 0 _ Max: 64 • Refer to 'Real data mapping 1'. Picture Size Setting for sub picture in orbiter function. It works only in Double Window mode. Acknowledqement t[t][ ][Set IU][ ][OK][Data][x] J 32. See page 28. Transmission [[k][y][ ][Set IU][ ...OK][Data][x] 30. Transmission [[j][s][ ][Set ID][ ][Data][Cr] J Data Min:0-Max:9 Acknowledgement t[s][ ][Set ID][ ][OK][Data][x] 31. Auto Configure (Command2:u) I_ To adjust picture position and minimize image shaking automatically.
... To recognize an abnormal state. Transmission t[J][t][ ][Set IU][ ][Uata][Cr] J Data Min: 0 _ Max: 64 • Refer to 'Real data mapping 1'. Picture Size Setting for sub picture in orbiter function. It works only in Double Window mode. Acknowledqement t[t][ ][Set IU][ ][OK][Data][x] J 32. See page 28. Transmission [[k][y][ ][Set IU][ ...OK][Data][x] 30. Transmission [[j][s][ ][Set ID][ ][Data][Cr] J Data Min:0-Max:9 Acknowledgement t[s][ ][Set ID][ ][OK][Data][x] 31. Auto Configure (Command2:u) I_ To adjust picture position and minimize image shaking automatically.

Owners Manual
Page 34
... switching on ° This is norma{ as the image is muted during the startup pr_ess of the moniton Please contact your service centre, if the picture has not appeared after five minutes, J II • SelecCtolor in the PIC_ menu and press the VOLUME (1_) button " (Refer to p16) &#...8226; Keep a sufficient distance between the Monitor and the VCR. • Activate any function to restore the brightness of the picture. (if still picture is turned on the screen for local interference such as an electrical appliance or power tool_ 1 No OUtpUt fr°m°ne of t_...
... switching on ° This is norma{ as the image is muted during the startup pr_ess of the moniton Please contact your service centre, if the picture has not appeared after five minutes, J II • SelecCtolor in the PIC_ menu and press the VOLUME (1_) button " (Refer to p16) &#...8226; Keep a sufficient distance between the Monitor and the VCR. • Activate any function to restore the brightness of the picture. (if still picture is turned on the screen for local interference such as an electrical appliance or power tool_ 1 No OUtpUt fr°m°ne of t_...


