

Owners Manual
Page 2
... help Any changes or modifications not expressly approved by the party responsible for comp{[ance could void the user's authority to operate this product in a residential installation. The responsible party for a C_ass B digital device, pursuant to radio or television reception, which the receiver is connected. The lightning flash with the limits for this equipment does cause harmful interference to Part...
... help Any changes or modifications not expressly approved by the party responsible for comp{[ance could void the user's authority to operate this product in a residential installation. The responsible party for a C_ass B digital device, pursuant to radio or television reception, which the receiver is connected. The lightning flash with the limits for this equipment does cause harmful interference to Part...

Owners Manual
Page 5
...Manua/ 5 VCR Setup Cable TV Setup External A]V Source Setup DVD Setup D'D,/Setup PC Setup 9-10 11_-14 11 11 12 12 12 13~I4 Turning on the Monitor 15 Menu Language Selection 15 Picture Menu Options APC (Auto Picture Control 16 Manual Picture Control t6 Auto Cotor Temperature Control 16 Manual Color Temperature Control .......... 16 Sound Menu Options DASP (Digital Auto Sound Processing) ....... Contents Warnings 2 Safety Instructions 3~4 Introduction Controls and Connection Options 7 Remote Control Key Functions 8 Installation Installation...
...Manua/ 5 VCR Setup Cable TV Setup External A]V Source Setup DVD Setup D'D,/Setup PC Setup 9-10 11_-14 11 11 12 12 12 13~I4 Turning on the Monitor 15 Menu Language Selection 15 Picture Menu Options APC (Auto Picture Control 16 Manual Picture Control t6 Auto Cotor Temperature Control 16 Manual Color Temperature Control .......... 16 Sound Menu Options DASP (Digital Auto Sound Processing) ....... Contents Warnings 2 Safety Instructions 3~4 Introduction Controls and Connection Options 7 Remote Control Key Functions 8 Installation Installation...

Owners Manual
Page 6
... you can use it easy to install your PC and video images simultaneously_ games, and internet browsing.. TO REDUCE THE RISK OF FIRE AND ELECTRIC SHOCK, DO NOT EXPOSE THIS PRODUCT TO RAiN OR MOISTURE. 6 P_sma D_p_y Wade Screen The screen of the Plasma Display is not suffF cient cause for the PDP to view your plasma display in a theater. Several minute colored dots...
... you can use it easy to install your PC and video images simultaneously_ games, and internet browsing.. TO REDUCE THE RISK OF FIRE AND ELECTRIC SHOCK, DO NOT EXPOSE THIS PRODUCT TO RAiN OR MOISTURE. 6 P_sma D_p_y Wade Screen The screen of the Plasma Display is not suffF cient cause for the PDP to view your plasma display in a theater. Several minute colored dots...

Owners Manual
Page 7
...another monitor, connect RGB OUTPUT to operate the Monitor on Connection - Introduction Main Power Button INPUT SELECT Button V, & Buttons VOLUME (4,1_) Buttons Remote Control Sensor MENU Button Power Standby Indicator Illuminates red in standby mode, Illuminates green when the Monitor is indicated on a PC, 3_ DVI (Digital Visual Interface) INPUT/ RGB INPUT/AUDIO iNPUT JACKS Connect the monitor output connector of front panel. EXPANDED INPUT 6. Owner_ Manual 7 Here shown may be somewhat different from external equipment to the RS_232C port on the Specifications...
...another monitor, connect RGB OUTPUT to operate the Monitor on Connection - Introduction Main Power Button INPUT SELECT Button V, & Buttons VOLUME (4,1_) Buttons Remote Control Sensor MENU Button Power Standby Indicator Illuminates red in standby mode, Illuminates green when the Monitor is indicated on a PC, 3_ DVI (Digital Visual Interface) INPUT/ RGB INPUT/AUDIO iNPUT JACKS Connect the monitor output connector of front panel. EXPANDED INPUT 6. Owner_ Manual 7 Here shown may be somewhat different from external equipment to the RS_232C port on the Specifications...
Owners Manual
Page 8
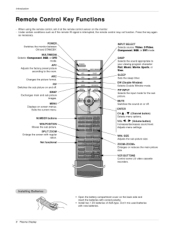
... menu. SLEEP Sets the sleep timer. oN%:::, Se,eo,s:..=..o.oOo.,,".\ mode_ "-...,.\ APC ._... _ Adjusts the factory preset picture --'_"__.... PiP Switches the sub picture on or off . Changes the picture format. SWAP MENU PIP INP_ OH_ MU"f_ NUMBER buttons Moves the sub picture_ SPLIT ZOOM Enlarge the screen with regular ration. DW (Double Window) Selects Double Window mode PIP INPUT Selects the input mode for the sub picture MUTE Switches the sound on and off ENTER OH _ t _ (Channel button) Selects menu...
... menu. SLEEP Sets the sleep timer. oN%:::, Se,eo,s:..=..o.oOo.,,".\ mode_ "-...,.\ APC ._... _ Adjusts the factory preset picture --'_"__.... PiP Switches the sub picture on or off . Changes the picture format. SWAP MENU PIP INP_ OH_ MU"f_ NUMBER buttons Moves the sub picture_ SPLIT ZOOM Enlarge the screen with regular ration. DW (Double Window) Selects Double Window mode PIP INPUT Selects the input mode for the sub picture MUTE Switches the sound on and off ENTER OH _ t _ (Channel button) Selects menu...

Owners Manual
Page 9
... you purchased the product, Owner's Manual Batteries BNC-RCA Adapter Remote Control D-sub 15 pin Cable Power Cord DVI-D Cable I nst a !Ia t io n * The Monitor can be mounted horizontally or vertically. The speakers depicted are not )ossible, have a qualified electrician install a separate circuit breaker, Do not t_ to ground the unit by connecting it to be installed in the optional Wall Mounting Bracket Installation and Setup Guide, Owner_ Manual 9 If an accessory...
... you purchased the product, Owner's Manual Batteries BNC-RCA Adapter Remote Control D-sub 15 pin Cable Power Cord DVI-D Cable I nst a !Ia t io n * The Monitor can be mounted horizontally or vertically. The speakers depicted are not )ossible, have a qualified electrician install a separate circuit breaker, Do not t_ to ground the unit by connecting it to be installed in the optional Wall Mounting Bracket Installation and Setup Guide, Owner_ Manual 9 If an accessory...
Owners Manual
Page 10
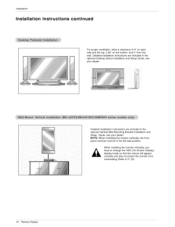
... installing the monitor vertically; When installing the monitor vertically, you have to change the OSD (On Screen Display) display mode so that the menus will appear correctly and also to protect the monitor from the wall. the front panel controls must be in the optional Vertical Wall Mounting Bracket Installation and Setup Guide, see your dealer. Detailed installation instrucLions are included in the optional Desktop Stand Installation and Setup Guide, see your dealer, , .... ,, ' :: Detailed installation instructions...
... installing the monitor vertically; When installing the monitor vertically, you have to change the OSD (On Screen Display) display mode so that the menus will appear correctly and also to protect the monitor from the wall. the front panel controls must be in the optional Vertical Wall Mounting Bracket Installation and Setup Guide, see your dealer. Detailed installation instrucLions are included in the optional Desktop Stand Installation and Setup Guide, see your dealer, , .... ,, ' :: Detailed installation instructions...
Owners Manual
Page 11
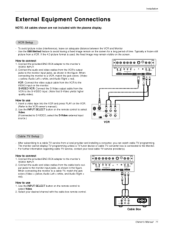
... cable box remote control Cable Box Owner_ Manual 11 To avoid picture noise (interference), leave an adequate distance between the VCR and Monitor Use the ISM Method feature to avoid having a fixed image remain on the remote control to select Video. (If connected to S-VIDEO, select the S-Video external input source) VCR After subscribing to a cable TV service from the cable box's out= put jacks to the monitoCs VIDEO INPUT. 2 Connect the audio and video cables from a local provider and installing a converter, you can watch cable TV programming...
... cable box remote control Cable Box Owner_ Manual 11 To avoid picture noise (interference), leave an adequate distance between the VCR and Monitor Use the ISM Method feature to avoid having a fixed image remain on the remote control to select Video. (If connected to S-VIDEO, select the S-Video external input source) VCR After subscribing to a cable TV service from the cable box's out= put jacks to the monitoCs VIDEO INPUT. 2 Connect the audio and video cables from a local provider and installing a converter, you can watch cable TV programming...
Owners Manual
Page 12
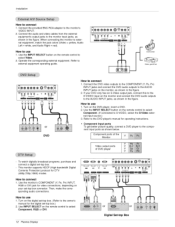
... Audio Right = red). Operate the corresponding external equipment. Connect the DVD video outpu_ to the COMPONENT (Y, PB, PR) INPUT jacks and connect the DVD audio outputs to the AUDIO INPUT jacks on the remote control to the owner's manual for operating instructions. - Use the INPUT SELECT button on your DVD only has an S*Video output jack, connect this to the SW)DEO input on the monitor and connect the DVD audio outputs to the AUDIO INPUT jacks, as shown in the figure, How to use 1, Turn on the digital set -top box connector. Refer to the monitor's VIDEO INPUT. 2. Connect...
... Audio Right = red). Operate the corresponding external equipment. Connect the DVD video outpu_ to the COMPONENT (Y, PB, PR) INPUT jacks and connect the DVD audio outputs to the AUDIO INPUT jacks on the remote control to the owner's manual for operating instructions. - Use the INPUT SELECT button on your DVD only has an S*Video output jack, connect this to the SW)DEO input on the monitor and connect the DVD audio outputs to the AUDIO INPUT jacks, as shown in the figure, How to use 1, Turn on the digital set -top box connector. Refer to the monitor's VIDEO INPUT. 2. Connect...
Owners Manual
Page 13
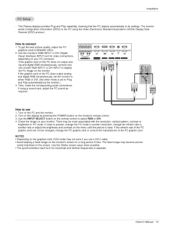
... or DVI. 4. Use the INPUT SELECT button on the PC does not output analog and digital RGB simultaneously; may not work if yeu use 1_ Turn on the PC and the monitor. 2 Turn on the display by the monitor.) 3. Owner_ Manual 13 Installation - This Plasma display provides Plug and Play capability, meaning that the PC adjusts automatically to Plug and Play autematicatly by pressing the POWER button on the monitoCs remote control, 3. If noise is present, change the PC mode...
... or DVI. 4. Use the INPUT SELECT button on the PC does not output analog and digital RGB simultaneously; may not work if yeu use 1_ Turn on the PC and the monitor. 2 Turn on the display by the monitor.) 3. Owner_ Manual 13 Installation - This Plasma display provides Plug and Play capability, meaning that the PC adjusts automatically to Plug and Play autematicatly by pressing the POWER button on the monitoCs remote control, 3. If noise is present, change the PC mode...

Owners Manual
Page 15
... Monitor is switched to standby mode, Press the INPUT SELECT button on the Monitor or press the POWER, INPUT SELECT, MULTIMEDIA button on the remote control to save. n i I0 Operation Turning on the Monitor. If the Monitor was turned off with the (D ON/OFF button on the Monitor • Press the _ ON/OFF button on the Monitor to turn the Monitor on . Owner_ Manual 15 Or, on the remote control, press POWER, INPUT SELECT, or MULTIMEDIA to turn the Monitor on . 2. Connect power cord correctly...
... Monitor is switched to standby mode, Press the INPUT SELECT button on the Monitor or press the POWER, INPUT SELECT, MULTIMEDIA button on the remote control to save. n i I0 Operation Turning on the Monitor. If the Monitor was turned off with the (D ON/OFF button on the Monitor • Press the _ ON/OFF button on the Monitor to turn the Monitor on . Owner_ Manual 15 Or, on the remote control, press POWER, INPUT SELECT, or MULTIMEDIA to turn the Monitor on . 2. Connect power cord correctly...
Owners Manual
Page 16
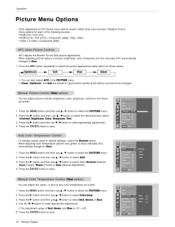
...) / Component • Video/S-Video/Component (480i) options doesn't effect sources. (480p, 720p, 1080i) other input sources. t6 Plasma Display You can adjust picture contrast, brightness, coior, sharpness, and tint to User, 1. To initialize vatues (reset to save. Press the ENTER button to default settings), seiect the Normal option. When adjusting picture options (contrast, brightness, color, sharpness changes to make appropriate adjustments_ 4. Press the I_ button and then use & iV button to...
...) / Component • Video/S-Video/Component (480i) options doesn't effect sources. (480p, 720p, 1080i) other input sources. t6 Plasma Display You can adjust picture contrast, brightness, coior, sharpness, and tint to User, 1. To initialize vatues (reset to save. Press the ENTER button to default settings), seiect the Normal option. When adjusting picture options (contrast, brightness, color, sharpness changes to make appropriate adjustments_ 4. Press the I_ button and then use & iV button to...

Owners Manual
Page 18
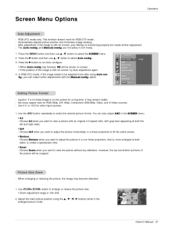
... the number of minutes selected. 3. Note that this setting is cleared when the monitor is no input signai, the Monitor will turn off with the O ON/OFF button on the monitor, reset the clock. 1. The timer begins to save , menu - Press the _" button and then use A / V button to select _ or _, 4. Off-Timer function overrides OmTimer function if they are set 7. sound level Press the I_ button and then use A / V button to set the...
... the number of minutes selected. 3. Note that this setting is cleared when the monitor is no input signai, the Monitor will turn off with the O ON/OFF button on the monitor, reset the clock. 1. The timer begins to save , menu - Press the _" button and then use A / V button to select _ or _, 4. Off-Timer function overrides OmTimer function if they are set 7. sound level Press the I_ button and then use A / V button to set the...

Owners Manual
Page 19
... Manual 19 Press the ENTER button to save. • With the KEY LOCK ON, the display _ Key lock' appears on the screen if any button on the front panel is best not to allow any button. • Orbiter Orbiter may be impossible to ciear entirely with the remote control This feature can be set to select Key_k 3. The monitor can only be used to save , Low power...
... Manual 19 Press the ENTER button to save. • With the KEY LOCK ON, the display _ Key lock' appears on the screen if any button on the front panel is best not to allow any button. • Orbiter Orbiter may be impossible to ciear entirely with the remote control This feature can be set to select Key_k 3. The monitor can only be used to save , Low power...
Owners Manual
Page 21
... 480p, Component 4801/480p, Video, and S-Video sources. In RGB (PC) mode, if the image needs to enlarge or reduce the picture size. * Zoom adjustment range is still not correct, try Auto adjustment again. 4. Choose 4,3 when you can also adjust ARC in DVI mode. Set: every' aspect ratio for a long time, it may become distorted. 1. Caution: If a 4:3 fixed image is functioning The Auto conflg, and Manual co_ig, are not active in the SCHEN menu...
... 480p, Component 4801/480p, Video, and S-Video sources. In RGB (PC) mode, if the image needs to enlarge or reduce the picture size. * Zoom adjustment range is still not correct, try Auto adjustment again. 4. Choose 4,3 when you can also adjust ARC in DVI mode. Set: every' aspect ratio for a long time, it may become distorted. 1. Caution: If a 4:3 fixed image is functioning The Auto conflg, and Manual co_ig, are not active in the SCHEN menu...
Owners Manual
Page 27
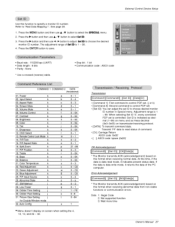
... Use this function to specify a monitor ID number, Refer to choose the desired monitor ID number. Orbiter Pixet Setting j 31 P_ure Size Setting j for Double Window mode 32, Auto Config j q 0~1 r 1 ~ FE s 0~9 t 0 ~64 u 1 • Menu doesn't display on this format when receiving normal data. Volume Control k c 0~ 3 k d 0~ 1 k e 0~ 1 k f 0- 64 07 Contrast k 08 Bnghtness k 09. Remote C_ro_ Lock Mode k 14. Orbiter Time Setting j 30. The adjustment range of the PC computer, Error Acknowledgement _Command2][ ][Set...
... Use this function to specify a monitor ID number, Refer to choose the desired monitor ID number. Orbiter Pixet Setting j 31 P_ure Size Setting j for Double Window mode 32, Auto Config j q 0~1 r 1 ~ FE s 0~9 t 0 ~64 u 1 • Menu doesn't display on this format when receiving normal data. Volume Control k c 0~ 3 k d 0~ 1 k e 0~ 1 k f 0- 64 07 Contrast k 08 Bnghtness k 09. Remote C_ro_ Lock Mode k 14. Orbiter Time Setting j 30. The adjustment range of the PC computer, Error Acknowledgement _Command2][ ][Set...

Owners Manual
Page 28
... screen format using the INPUT SELECT button on remote control or in the Picture menu. Transmission [[k][f][ ][Set ID][ ][Data][Cr] J Data Min:0- You can also adjust mute using the PC, D-IV 720p/1080i. 04. Input Select (Command2:b) (Main Picture Input) I_ To select input source for the Monitor. Transmission l[k][b][ ][Set ID][ ][Data][Cr] Data 0 :RGB 1 :Component 2 : Video I 3 :S-Video 4 :DVl Acknowledgement lib][][Set ID][ ][OK][Data][x] I I_ To show Power On/Off. Aspect Ratio (Command2:c) (Main picture format) I_ To adjust the screen format...
... screen format using the INPUT SELECT button on remote control or in the Picture menu. Transmission [[k][f][ ][Set ID][ ][Data][Cr] J Data Min:0- You can also adjust mute using the PC, D-IV 720p/1080i. 04. Input Select (Command2:b) (Main Picture Input) I_ To select input source for the Monitor. Transmission l[k][b][ ][Set ID][ ][Data][Cr] Data 0 :RGB 1 :Component 2 : Video I 3 :S-Video 4 :DVl Acknowledgement lib][][Set ID][ ][OK][Data][x] I I_ To show Power On/Off. Aspect Ratio (Command2:c) (Main picture format) I_ To adjust the screen format...
Owners Manual
Page 29
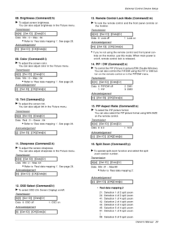
... zoom Owner's Manual 29 Remote Control Lock Mode (Command2:m) I_ To lock the remote control and the front panel controls on the monitor, use this mode. Acknowledcfement I [j] [ ][Set IU][ ][OK][Uata][x] ] 11. Acknowledgement I [h][ ][Set ID][ ][OK][Data][x] J 09. You can also control the PIP/DW using the remote control and front panel controls on the monitor. See page 28. Max:99 • Refer to 'Real data mapping 1'. 08. You can also adjust color in the Picture menu. [[k][h][ ][Set...
... zoom Owner's Manual 29 Remote Control Lock Mode (Command2:m) I_ To lock the remote control and the front panel controls on the monitor, use this mode. Acknowledcfement I [j] [ ][Set IU][ ][OK][Uata][x] ] 11. Acknowledgement I [h][ ][Set ID][ ][OK][Data][x] J 09. You can also control the PIP/DW using the remote control and front panel controls on the monitor. See page 28. Max:99 • Refer to 'Real data mapping 1'. 08. You can also adjust color in the Picture menu. [[k][h][ ][Set...

Owners Manual
Page 30
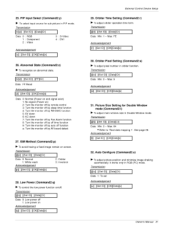
... on screen 3: Right up on the remote control or in the Sound menu. You can also adjust bass in the PIP/DW menu. Balance (Command2:t) I_ To adjust balance. Red Adjustment (Command2:v) I_ To adjust red in the Sound menu, Transmission [[k][t][ ][Set ID][ ][Data][Cr] I 30 Plasma Display 21. Acknowledgement [[v][ ][Set ID][ ][OK][Data][x] J 23. Transmission [[k][r][ ][Set ID][ ][Data][Cr] I 20. You can also adjust treble in the Picture menu, Transmission I[k][u][ ][Set ID...
... on screen 3: Right up on the remote control or in the Sound menu. You can also adjust bass in the PIP/DW menu. Balance (Command2:t) I_ To adjust balance. Red Adjustment (Command2:v) I_ To adjust red in the Sound menu, Transmission [[k][t][ ][Set ID][ ][Data][Cr] I 30 Plasma Display 21. Acknowledgement [[v][ ][Set ID][ ][OK][Data][x] J 23. Transmission [[k][r][ ][Set ID][ ][Data][Cr] I 20. You can also adjust treble in the Picture menu, Transmission I[k][u][ ][Set ID...
Owners Manual
Page 31
...] Owner's Manual 31 PIP Input Select (Command2:y) I_ To select input source for Double Window mode (Command2:t) I_ To adjust main window size in PIP mode. Transmission [[k][z][ ][Set IU][ ][FF][Cr] ] Data FF:Read Acknowledaement ][z][ ][Set ID][ ][OK][Data][x] 1 Data 0: Normal (Power on and signal exist) 1: No signal (Power on Acknowledqement [[q][ ][Set IU][ ][OK][Data][x] J External Control Device Setup 29. 25. ISM Method (Command2:p) I_ To avoid having a fixed image remain on screen...
...] Owner's Manual 31 PIP Input Select (Command2:y) I_ To select input source for Double Window mode (Command2:t) I_ To adjust main window size in PIP mode. Transmission [[k][z][ ][Set IU][ ][FF][Cr] ] Data FF:Read Acknowledaement ][z][ ][Set ID][ ][OK][Data][x] 1 Data 0: Normal (Power on and signal exist) 1: No signal (Power on Acknowledqement [[q][ ][Set IU][ ][OK][Data][x] J External Control Device Setup 29. 25. ISM Method (Command2:p) I_ To avoid having a fixed image remain on screen...

